Android 進階17:Fragment FragmentManager FragmentTransaction 深入理解
日常開發中我們經常使用 Fragment 管理佈局,使用起來非常方便,但是在簡單的 API 背後隱藏了什麼操作,很多人恐怕不瞭解。
如果你回答不出這些問題,那這篇文章可能就對你有些幫助:
- Fragment FragmentManager FragmentTransaction 的關係和作用
- Fragment 如何實現佈局的新增替換
- 巢狀 Fragment 的原理
讀完本文你將瞭解:
注意,這裡分析的是
support-fragment-25.3.1-source.jar" 的support.v4.app.Fragment及相關類。
Fragment 的使用
Fragment 的使用大家應該都熟悉,這裡舉個例子,要實現這樣的類似餓了麼點餐效果:
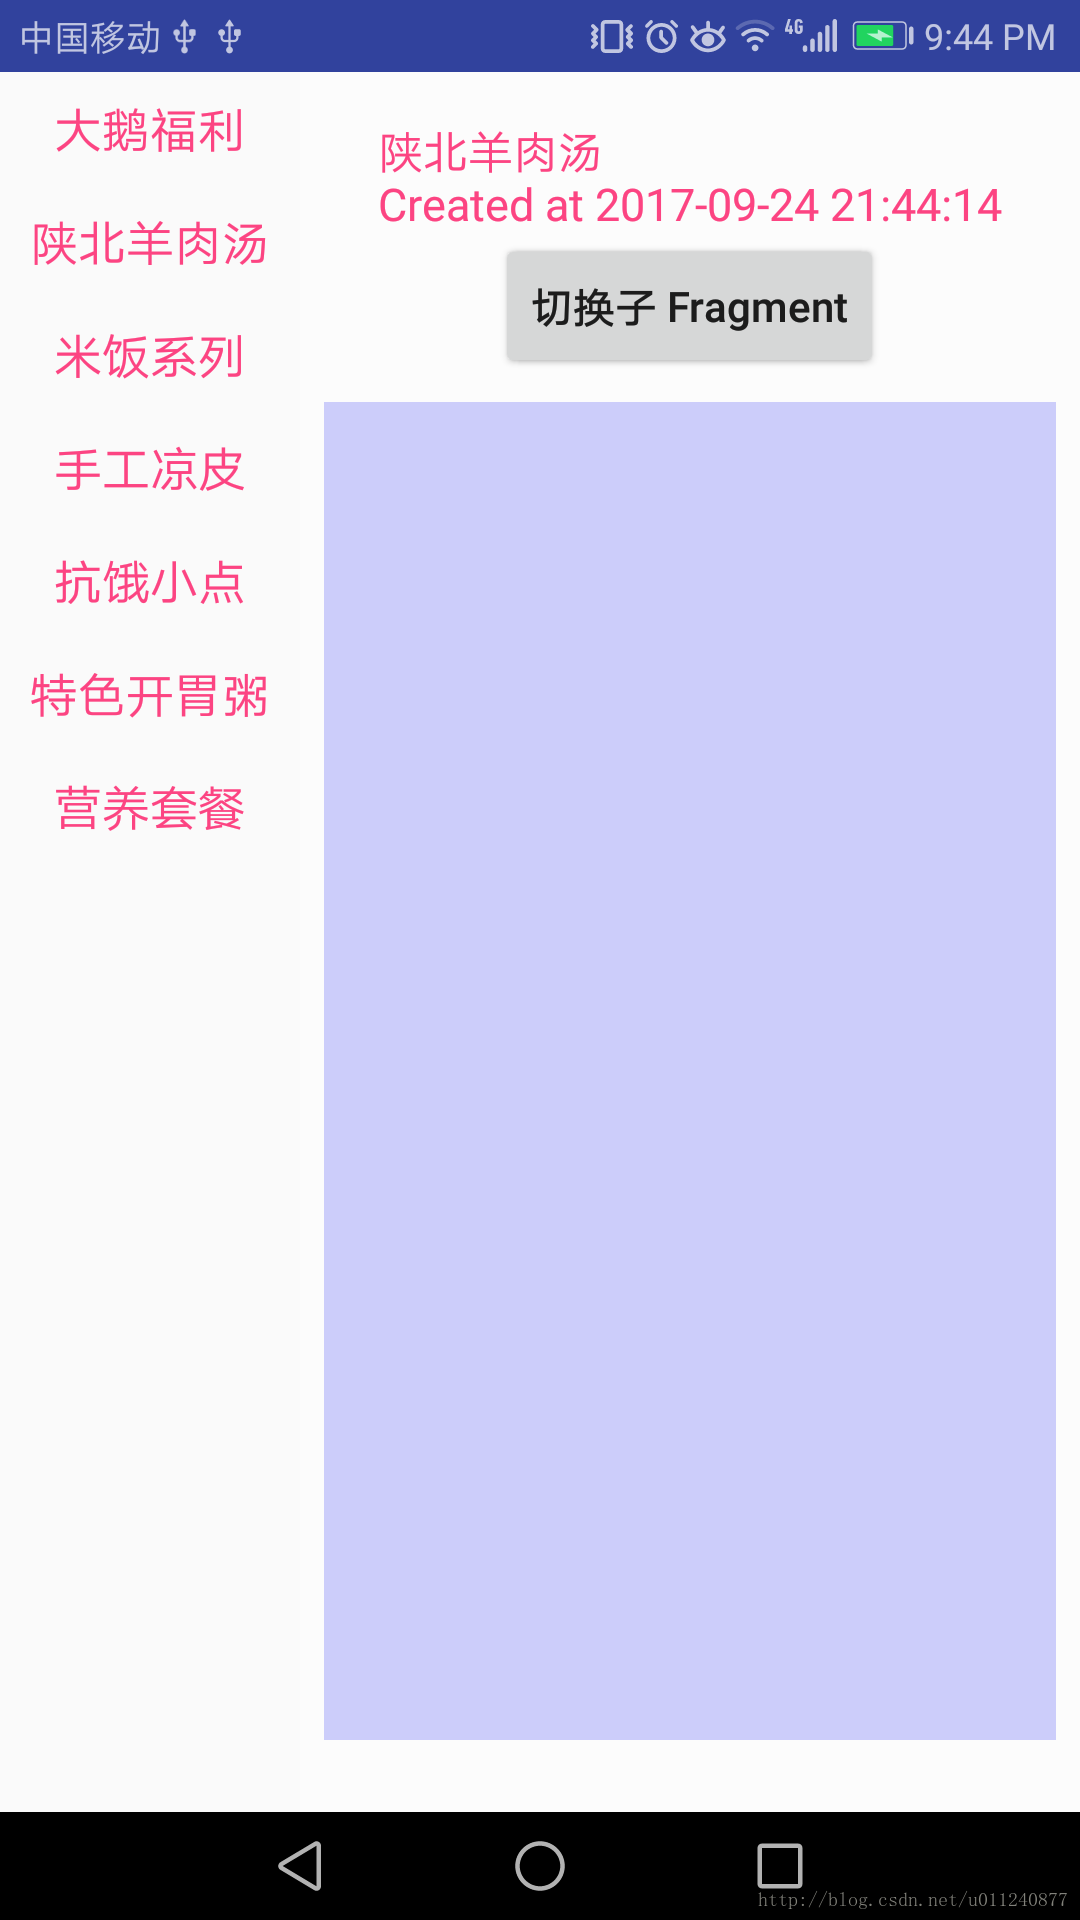
介面醜了點,但意思是差不多的哈,,左邊一個列表,點選後切換右邊的佈局。我們就可以使用 Fragment 來實現。
實現也很簡單,建立一個的佈局,然後在 Activity 裡點選時替換 Fragment。
mFragmentManager = getSupportFragmentManager();
mFragmentManager.beginTransaction()
    .replace(R.id.fl_content, fragment)
    .commitAllowingStateLoss();
程式碼很簡單,核心就三步:
- 建立 Fragment
- 獲取 FragmentManager
- 呼叫事務,新增、替換
我們一步步來了解這背後的故事。
Fragment 大家應該比較熟悉,放到最後。
先來看看 FragmentManager。
FragmentManager
public abstract class FragmentManager {...}FragmentManager 是一個抽象類,定義了一些和 Fragment 相關的操作和內部類/介面。
定義的操作
FragmentManager 中定義的方法如下:
//開啟一系列對 Fragments 的操作
public abstract FragmentTransaction beginTransaction();

//FragmentTransaction.commit() 是非同步執行的,如果你想立即執行,可以呼叫這個方法
public abstract boolean executePendingTransactions();

//根據 ID 找到從 XML 解析出來的或者事務中新增的 Fragment
//首先會找新增到 FragmentManager 中的,找不到就去回退棧裡找
public abstract Fragment findFragmentById(@IdRes int id);

//跟上面的類似,不同的是使用 tag 進行查詢
public abstract Fragment findFragmentByTag(String tag);

//彈出回退棧中棧頂的 Fragment,非同步執行的
public abstract void popBackStack();

//立即彈出回退棧中棧頂的,直接執行哦
public abstract boolean popBackStackImmediate();

//返回棧頂符合名稱的,如果傳入的 name 不為空,在棧中間找到了 Fragment,那將彈出這個 Fragment 上面的所有 Fragment
//有點類似啟動模式的 singleTask 的感覺
//如果傳入的 name 為 null,那就和 popBackStack() 一樣了
//非同步執行
public abstract void popBackStack(String name, int flags);

//同步版的上面
public abstract boolean popBackStackImmediate(String name, int flags);

//和使用 name 查詢、彈出一樣
//不同的是這裡的 id 是 FragmentTransaction.commit() 返回的 id
public abstract void popBackStack(int id, int flags);
//你懂得
public abstract boolean popBackStackImmediate(int id, int flags);

//獲取回退棧中的元素個數
public abstract int getBackStackEntryCount();
//根據索引獲取回退棧中的某個元素
public abstract BackStackEntry getBackStackEntryAt(int index);

//新增或者移除一個監聽器
public abstract void addOnBackStackChangedListener(OnBackStackChangedListener listener);
public abstract void removeOnBackStackChangedListener(OnBackStackChangedListener listener);

//還定義了將一個 Fragment 例項作為引數傳遞
public abstract void putFragment(Bundle bundle, String key, Fragment fragment);
public abstract Fragment getFragment(Bundle bundle, String key);

//獲取 manager 中所有新增進來的 Fragment
public abstract List<Fragment> getFragments();
可以看到,定義的方法有很多是非同步執行的,後面看看它究竟是如何實現的非同步。
內部類/介面:
- BackStackEntry:Fragment 後退棧中的一個元素
- onBackStackChangedListener:後退棧變動監聽器
- FragmentLifecycleCallbacks: FragmentManager 中的 Fragment 生命週期監聽
//後退棧中的一個元素
public interface BackStackEntry {
    //棧中該元素的唯一標識
    public int getId();

    //獲取 FragmentTransaction#addToBackStack(String) 設定的名稱
    public String getName();

    @StringRes
    public int getBreadCrumbTitleRes();
    @StringRes
    public int getBreadCrumbShortTitleRes();
    public CharSequence getBreadCrumbTitle();
    public CharSequence getBreadCrumbShortTitle();
}
可以看到 BackStackEntry 的介面比較簡單,關鍵資訊就是 ID 和 Name。
//在 Fragment 回退棧中有變化時回撥
public interface OnBackStackChangedListener {
    public void onBackStackChanged();
}
//FragmentManager 中的 Fragment 生命週期監聽
public abstract static class FragmentLifecycleCallbacks {
public void onFragmentPreAttached(FragmentManager fm, Fragment f, Context context) {}
public void onFragmentAttached(FragmentManager fm, Fragment f, Context context) {}
public void onFragmentCreated(FragmentManager fm, Fragment f, Bundle savedInstanceState) {}
public void onFragmentActivityCreated(FragmentManager fm, Fragment f,
Bundle savedInstanceState) {}
public void onFragmentViewCreated(FragmentManager fm, Fragment f, View v,
Bundle savedInstanceState) {}
public void onFragmentStarted(FragmentManager fm, Fragment f) {}
public void onFragmentResumed(FragmentManager fm, Fragment f) {}
public void onFragmentPaused(FragmentManager fm, Fragment f) {}
public void onFragmentStopped(FragmentManager fm, Fragment f) {}
public void onFragmentSaveInstanceState(FragmentManager fm, Fragment f, Bundle outState) {}
public void onFragmentViewDestroyed(FragmentManager fm, Fragment f) {}
public void onFragmentDestroyed(FragmentManager fm, Fragment f) {}
public void onFragmentDetached(FragmentManager fm, Fragment f) {}
}
}熟悉 Fragment 生命週期的同學一定覺得很面熟,這個介面就是為我們提供一個 FragmentManager 所有 Fragment 生命週期變化的回撥。
小結:
可以看到,FragmentManager 是一個抽象類,它定義了對一個 Activity/Fragment 中 新增進來的 Fragment 列表、Fragment 回退棧的操作、管理。
實現類 FragmentManagerImpl
FragmentManager 定義的任務是由 FragmentManagerImpl 實現的。
主要成員:
final class FragmentManagerImpl extends FragmentManager implements LayoutInflaterFactory {

    ArrayList<OpGenerator> mPendingActions;
    Runnable[] mTmpActions;
    boolean mExecutingActions;

    ArrayList<Fragment> mActive;
    ArrayList<Fragment> mAdded;
    ArrayList<Integer> mAvailIndices;
    ArrayList<BackStackRecord> mBackStack;
    ArrayList<Fragment> mCreatedMenus;

// Must be accessed while locked.
    ArrayList<BackStackRecord> mBackStackIndices;
    ArrayList<Integer> mAvailBackStackIndices;

    ArrayList<OnBackStackChangedListener> mBackStackChangeListeners;
    private CopyOnWriteArrayList<Pair<FragmentLifecycleCallbacks, Boolean>> mLifecycleCallbacks;
//...
}可以看到,FragmentManagerImpl 中定義了 新增的、活躍的。以及回退棧的列表,這和 FragmentManager 的要求一致。
int mCurState = Fragment.INITIALIZING;
FragmentHostCallback mHost;
FragmentContainer mContainer;
Fragment mParent;

static Field sAnimationListenerField = null;

boolean mNeedMenuInvalidate;
boolean mStateSaved;
boolean mDestroyed;
String mNoTransactionsBecause;
boolean mHavePendingDeferredStart;
接著還有當前的狀態,當前 Fragment 的起始 mParent,以及 FragmentManager 的 mHost 和 mContainer。
FragmentContainer 就是一個介面,定義了關於佈局的兩個方法:
public abstract class FragmentContainer {
    @Nullable
    public abstract View onFindViewById(@IdRes int id);
    public abstract boolean onHasView();
}
而 FragmentHostCallback 就複雜一點了,它提供了 Fragment 需要的資訊,也定義了 Fragment 宿主應該做的操作:
public abstract class FragmentHostCallback<E> extends FragmentContainer {
    private final Activity mActivity;
    final Context mContext;
    private final Handler mHandler;
    final int mWindowAnimations;
    final FragmentManagerImpl mFragmentManager = new FragmentManagerImpl();
    //...
}
我們知道,一般來說 Fragment 的宿主就兩種:
- Activity
- Fragment
比如 FragmentActivity 的內部類 HostCallbacks 就實現了這個抽象類:
class HostCallbacks extends FragmentHostCallback<FragmentActivity> {
    public HostCallbacks() {
        super(FragmentActivity.this /*fragmentActivity*/);
    }
    //...

    @Override
    public LayoutInflater onGetLayoutInflater() {
        return FragmentActivity.this.getLayoutInflater().cloneInContext(FragmentActivity.this);
    }

    @Override
    public FragmentActivity onGetHost() {
        return FragmentActivity.this;
    }

    @Override
    public void onStartActivityFromFragment(Fragment fragment, Intent intent, int requestCode) {
        FragmentActivity.this.startActivityFromFragment(fragment, intent, requestCode);
    }

    @Override
    public void onStartActivityFromFragment(
            Fragment fragment, Intent intent, int requestCode, @Nullable Bundle options) {
        FragmentActivity.this.startActivityFromFragment(fragment, intent, requestCode, options);
    }

    @Override
    public void onRequestPermissionsFromFragment(@NonNull Fragment fragment,
            @NonNull String[] permissions, int requestCode) {
        FragmentActivity.this.requestPermissionsFromFragment(fragment, permissions,
                requestCode);
    }

    @Override
    public boolean onShouldShowRequestPermissionRationale(@NonNull String permission) {
        return ActivityCompat.shouldShowRequestPermissionRationale(
                FragmentActivity.this, permission);
    }

    @Override
    public boolean onHasWindowAnimations() {
        return getWindow() != null;
    }

    @Override
    public void onAttachFragment(Fragment fragment) {
        FragmentActivity.this.onAttachFragment(fragment);
    }

    @Nullable
    @Override
    public View onFindViewById(int id) {
        return FragmentActivity.this.findViewById(id);
    }

    @Override
    public boolean onHasView() {
        final Window w = getWindow();
        return (w != null && w.peekDecorView() != null);
    }
}
我們再看看他對 FragmentManager 定義的關鍵方法是如何實現的。
@Override
public FragmentTransaction beginTransaction() {
    return new BackStackRecord(this);
}
beginTransaction() 返回一個新的 BackStackRecord ,我們後面介紹。
前面提到了,popBackStack() 是一個非同步操作,它是如何實現非同步的呢?
@Override
public void popBackStack() {
    enqueueAction(new PopBackStackState(null, -1, 0), false);
}
public void enqueueAction(OpGenerator action, boolean allowStateLoss) {
    if (!allowStateLoss) {
        checkStateLoss();
    }
    synchronized (this) {
        if (mDestroyed || mHost == null) {
            throw new IllegalStateException("Activity has been destroyed");
        }
        if (mPendingActions == null) {
            mPendingActions = new ArrayList<>();
        }
        mPendingActions.add(action);
        scheduleCommit();
    }
}
private void scheduleCommit() {
    synchronized (this) {
        boolean postponeReady =
                mPostponedTransactions != null && !mPostponedTransactions.isEmpty();
        boolean pendingReady = mPendingActions != null && mPendingActions.size() == 1;
        if (postponeReady || pendingReady) {
            mHost.getHandler().removeCallbacks(mExecCommit);
            mHost.getHandler().post(mExecCommit);
        }
    }
}
可以看到,呼叫到最後,是呼叫宿主中的 Handler 來傳送任務的,so easy 嘛。其他的非同步執行也是類似,就不贅述了。
後退棧相關方法:
ArrayList<BackStackRecord> mBackStack;
@Override
public int getBackStackEntryCount() {
    return mBackStack != null ? mBackStack.size() : 0;
}

@Override
public BackStackEntry getBackStackEntryAt(int index) {
    return mBackStack.get(index);
}
可以看到,開始事務和後退棧,返回/操作的都是 BackStackRecord,我們來了解了解它是何方神聖。
事務
BackStackRecord 繼承了 FragmentTransaction:
final class BackStackRecord extends FragmentTransaction implements
        FragmentManager.BackStackEntry, FragmentManagerImpl.OpGenerator {...}
先來看看 FragmentTransaction。
FragmentTransaction
FragmentTransaction 定義了一系列對 Fragment 的操作方法:
//它會呼叫 add(int, Fragment, String),其中第一個引數傳的是 0
public abstract FragmentTransaction add(Fragment fragment, String tag);

//它會呼叫 add(int, Fragment, String),其中第三個引數是 null
public abstract FragmentTransaction add(@IdRes int containerViewId, Fragment fragment);

//新增一個 Fragment 給 Activity 的最終實現
//第一個參數列示 Fragment 要放置的佈局 id
//第二個參數列示要新增的 Fragment,【注意】一個 Fragment 只能新增一次
//第三個引數選填,可以給 Fragment 設定一個 tag,後續可以使用這個 tag 查詢它
public abstract FragmentTransaction add(@IdRes int containerViewId, Fragment fragment,
        @Nullable String tag);

//呼叫 replace(int, Fragment, String),第三個引數傳的是 null
public abstract FragmentTransaction replace(@IdRes int containerViewId, Fragment fragment);

//替換宿主中一個已經存在的 fragment
//這一個方法等價於先呼叫 remove(), 再呼叫 add()
public abstract FragmentTransaction replace(@IdRes int containerViewId, Fragment fragment,
        @Nullable String tag);

//移除一個已經存在的 fragment
//如果之前新增到宿主上,那它的佈局也會被移除
public abstract FragmentTransaction remove(Fragment fragment);

//隱藏一個已存的 fragment
//其實就是將新增到宿主上的佈局隱藏
public abstract FragmentTransaction hide(Fragment fragment);

//顯示前面隱藏的 fragment,這隻適用於之前新增到宿主上的 fragment
public abstract FragmentTransaction show(Fragment fragment);

//將指定的 fragment 將佈局上解除
//當呼叫這個方法時,fragment 的佈局已經銷燬了
public abstract FragmentTransaction detach(Fragment fragment);

//當前面解除一個 fragment 的佈局繫結後,呼叫這個方法可以重新繫結
//這將導致該 fragment 的佈局重建,然後新增、展示到介面上
public abstract FragmentTransaction attach(Fragment fragment);
對 fragment 的操作基本就這幾步,我們知道,要完成對 fragment 的操作,最後還需要提交一下:
mFragmentManager.beginTransaction()
        .replace(R.id.fl_child, getChildFragment())
//        .commit()
        .commitAllowingStateLoss();
事務的四種提交方式
事務最終的提交方法有四種:
commit()commitAllowingStateLoss()commitNow()commitNowAllowingStateLoss()
它們之間的特點及區別如下:
public abstract int commit();commit() 在主執行緒中非同步執行,其實也是 Handler 丟擲任務,等待主執行緒排程執行。
注意:
commit()需要在宿主 Activity 儲存狀態之前呼叫,否則會報錯。
這是因為如果 Activity 出現異常需要恢復狀態,在儲存狀態之後的commit()將會丟失,這和呼叫的初衷不符,所以會報錯。
public abstract int commitAllowingStateLoss();commitAllowingStateLoss() 也是非同步執行,但它的不同之處在於,允許在 Activity 儲存狀態之後呼叫,也就是說它遇到狀態丟失不會報錯。
因此我們一般在介面狀態出錯是可以接受的情況下使用它。
public abstract void commitNow();commitNow() 是同步執行的,立即提交任務。
前面提到 FragmentManager.executePendingTransactions() 也可以實現立即提交事務。但我們一般建議使用 commitNow(), 因為另外那位是一下子執行所有待執行的任務,可能會把當前所有的事務都一下子執行了,這有可能有副作用。
此外,這個方法提交的事務可能不會被新增到 FragmentManger 的後退棧,因為你這樣直接提交,有可能影響其他非同步執行任務在棧中的順序。
和 commit() 一樣,commitNow() 也必須在 Activity 儲存狀態前呼叫,否則會拋異常。
public abstract void commitNowAllowingStateLoss();同步執行的 commitAllowingStateLoss()。
OK,瞭解了 FragmentTransaction 定義的操作,去看看我們真正關心的、 beginTransaction() 中返回的 BackStackRecord:
@Override
public FragmentTransaction beginTransaction() {
    return new BackStackRecord(this);
}
事務真正實現/回退棧 BackStackRecord
BackStackRecord 既是對 Fragment 進行操作的事務的真正實現,也是 FragmentManager 中的回退棧的實現:
final class BackStackRecord extends FragmentTransaction implements
        FragmentManager.BackStackEntry, FragmentManagerImpl.OpGenerator {...}
它的關鍵成員:
final FragmentManagerImpl mManager;

//Op 可選的狀態值
static final int OP_NULL = 0;
static final int OP_ADD = 1;
static final int OP_REPLACE = 2;
static final int OP_REMOVE = 3;
static final int OP_HIDE = 4;
static final int OP_SHOW = 5;
static final int OP_DETACH = 6;
static final int OP_ATTACH = 7;

ArrayList<Op> mOps = new ArrayList<>();
static final class Op {
    int cmd;    //狀態
    Fragment fragment;
    int enterAnim;
    int exitAnim;
    int popEnterAnim;
    int popExitAnim;
}

int mIndex = -1;    //棧中最後一個元素的索引
可以看到 Op 就是新增了狀態和動畫資訊的 Fragment, mOps 就是棧中所有的 Fragment。
事務定義的方法它是如何實現的呢。
先看新增一個 Fragment 到佈局 add() 的實現:
@Override
public FragmentTransaction add(int containerViewId, Fragment fragment) {
    doAddOp(containerViewId, fragment, null, OP_ADD);
    return this;
}

@Override
public FragmentTransaction add(int containerViewId, Fragment fragment, String tag) {
    doAddOp(containerViewId, fragment, tag, OP_ADD);
    return this;
}
private void doAddOp(int containerViewId, Fragment fragment, String tag, int opcmd) {
    final Class fragmentClass = fragment.getClass();
    final int modifiers = fragmentClass.getModifiers();
    if (fragmentClass.isAnonymousClass() || !Modifier.isPublic(modifiers)
            || (fragmentClass.isMemberClass() && !Modifier.isStatic(modifiers))) {
        throw new IllegalStateException("Fragment " + fragmentClass.getCanonicalName()
                + " must be a public static class to be  properly recreated from"
                + " instance state.");
    }

    //1.修改新增的 fragmentManager 為當前棧的 manager
    fragment.mFragmentManager = mManager;

    if (tag != null) {
        if (fragment.mTag != null && !tag.equals(fragment.mTag)) {
            throw new IllegalStateException("Can't change tag of fragment "
                    + fragment + ": was " + fragment.mTag
                    + " now " + tag);
        }
        fragment.mTag = tag;
    }

    if (containerViewId != 0) {
        if (containerViewId == View.NO_ID) {
            throw new IllegalArgumentException("Can't add fragment "
                    + fragment + " with tag " + tag + " to container view with no id");
        }
        if (fragment.mFragmentId != 0 && fragment.mFragmentId != containerViewId) {
            throw new IllegalStateException("Can't change container ID of fragment "
                    + fragment + ": was " + fragment.mFragmentId
                    + " now " + containerViewId);
        }
        //2.設定宿主 ID 為佈局 ID
        fragment.mContainerId = fragment.mFragmentId = containerViewId;
    }

    //3.構造 Op
    Op op = new Op();
    op.cmd = opcmd;    //狀態
    op.fragment = fragment;
    //4.新增到陣列列表中
    addOp(op);
}
void addOp(Op op) {
    mOps.add(op);
    op.enterAnim = mEnterAnim;
    op.exitAnim = mExitAnim;
    op.popEnterAnim = mPopEnterAnim;
    op.popExitAnim = mPopExitAnim;
}
可以看到新增一個 Fragment 到佈局很簡單,概況一下就是:
修改 fragmentManager 和 ID,構造成 Op,設定狀態資訊,然後新增到列表裡。
新增完了看看替換 replace 的實現:
@Override
public FragmentTransaction replace(int containerViewId, Fragment fragment) {
    return replace(containerViewId, fragment, null);
}

@Override
public FragmentTransaction replace(int containerViewId, Fragment fragment, String tag) {
    if (containerViewId == 0) {
        throw new IllegalArgumentException("Must use non-zero containerViewId");
    }

    doAddOp(containerViewId, fragment, tag, OP_REPLACE);
    return this;
}
太可怕了,也是呼叫上面剛提到的 doAddOp(),不同之處在於第四個引數為 OP_REPLACE,看來之前小看了這個狀態值!
再看其他方法的實現就很簡單了,無非就是構造一個 Op,設定對應的狀態值。
@Override
public FragmentTransaction remove(Fragment fragment) {
    Op op = new Op();
    op.cmd = OP_REMOVE;
    op.fragment = fragment;
    addOp(op);

    return this;
}

@Override
public FragmentTransaction hide(Fragment fragment) {
    Op op = new Op();
    op.cmd = OP_HIDE;
    op.fragment = fragment;
    addOp(op);

    return this;
}

@Override
public FragmentTransaction show(Fragment fragment) {
    Op op = new Op();
    op.cmd = OP_SHOW;
    op.fragment = fragment;
    addOp(op);

    return this;
}
那這些狀態值的不同是什麼時候起作用的呢?
別忘了我們操作 Fragment 還有最後一步,提交。
看看這兩個是怎麼實現的:
@Override
public int commit() {
    return commitInternal(false);
}

@Override
public int commitAllowingStateLoss() {
    return commitInternal(true);
}
int commitInternal(boolean allowStateLoss) {
    if (mCommitted) throw new IllegalStateException("commit already called");
    //...
    mCommitted = true;
    if (mAddToBackStack) {
        mIndex = mManager.allocBackStackIndex(this);    //更新 index 資訊
    } else {
        mIndex = -1;
    }
    mManager.enqueueAction(this, allowStateLoss);    //非同步任務入隊
    return mIndex;
}
public void enqueueAction(OpGenerator action, boolean allowStateLoss) {
    if (!allowStateLoss) {
        checkStateLoss();
    }
    synchronized (this) {
        if (mDestroyed || mHost == null) {
            throw new IllegalStateException("Activity has been destroyed");
        }
        if (mPendingActions == null) {
            mPendingActions = new ArrayList<>();
        }
        mPendingActions.add(action);
        scheduleCommit();    //傳送任務
    }
}
private void scheduleCommit() {
    synchronized (this) {
        boolean postponeReady =
                mPostponedTransactions != null && !mPostponedTransactions.isEmpty();
        boolean pendingReady = mPendingActions != null && mPendingActions.size() == 1;
        if (postponeReady || pendingReady) {
            mHost.getHandler().removeCallbacks(mExecCommit);
            mHost.getHandler().post(mExecCommit);
        }
    }
}前面已經介紹過了,FragmentManager.enqueueAction() 最終是使用 Handler 實現的非同步執行。
現在的問題是執行的任務是啥?
答案就是 Handler 傳送的任務 mExecCommit:
Runnable mExecCommit = new Runnable() {
    @Override
    public void run() {
        execPendingActions();
    }
};
/**
 * Only call from main thread!
 * 更新 UI 嘛,肯定得在主執行緒
 */
public boolean execPendingActions() {
    ensureExecReady(true);

    boolean didSomething = false;
    while (generateOpsForPendingActions(mTmpRecords, mTmpIsPop)) {
        mExecutingActions = true;
        try {
            optimizeAndExecuteOps(mTmpRecords, mTmpIsPop);    //這裡是入口
        } finally {
            cleanupExec();
        }
        didSomething = true;
    }

    doPendingDeferredStart();

    return didSomething;
}
private void optimizeAndExecuteOps(ArrayList<BackStackRecord> records,
        ArrayList<Boolean> isRecordPop) {
    if (records == null || records.isEmpty()) {
        return;
    }

    if (isRecordPop == null || records.size() != isRecordPop.size()) {
        throw new IllegalStateException("Internal error with the back stack records");
    }

    // Force start of any postponed transactions that interact with scheduled transactions:
    executePostponedTransaction(records, isRecordPop);

    final int numRecords = records.size();
    int startIndex = 0;
    for (int recordNum = 0; recordNum < numRecords; recordNum++) {
        final boolean canOptimize = records.get(recordNum).mAllowOptimization;
        if (!canOptimize) {
            // execute all previous transactions
            if (startIndex != recordNum) {
                //這裡將 Ops 過濾一遍
                executeOpsTogether(records, isRecordPop, startIndex, recordNum);
            }
            // execute all unoptimized pop operations together or one add operation
              //...
    }
    if (startIndex != numRecords) {
        executeOpsTogether(records, isRecordPop, startIndex, numRecords);
    }
}
private void executeOpsTogether(ArrayList<BackStackRecord> records,
        ArrayList<Boolean> isRecordPop, int startIndex, int endIndex) {
    final boolean allowOptimization = records.get(startIndex).mAllowOptimization;
    boolean addToBackStack = false;
    if (mTmpAddedFragments == null) {
        mTmpAddedFragments = new ArrayList<>();
    } else {
        mTmpAddedFragments.clear();
    }
    if (mAdded != null) {
        mTmpAddedFragments.addAll(mAdded);
    }
    for (int recordNum = startIndex; recordNum < endIndex; recordNum++) {
        final BackStackRecord record = records.get(recordNum);
        final boolean isPop = isRecordPop.get(recordNum);
        if (!isPop) {
            record.expandReplaceOps(mTmpAddedFragments);    //修改狀態
        } else {
            record.trackAddedFragmentsInPop(mTmpAddedFragments);
        }
        addToBackStack = addToBackStack || record.mAddToBackStack;
    }
    mTmpAddedFragments.clear();

    if (!allowOptimization) {
        FragmentTransition.startTransitions(this, records, isRecordPop, startIndex, endIndex,
                false);
    }
    //真正處理的入口
    executeOps(records, isRecordPop, startIndex, endIndex);

    int postponeIndex = endIndex;
    if (allowOptimization) {
        ArraySet<Fragment> addedFragments = new ArraySet<>();
        addAddedFragments(addedFragments);
        postponeIndex = postponePostponableTransactions(records, isRecordPop,
                startIndex, endIndex, addedFragments);
        makeRemovedFragmentsInvisible(addedFragments);    //名字就能看出來作用
    }

    if (postponeIndex != startIndex && allowOptimization) {
        // need to run something now
        FragmentTransition.startTransitions(this, records, isRecordPop, startIndex,
                postponeIndex, true);
        moveToState(mCurState, true);
    }
    //...
}
//修改 Ops 狀態,這一步還沒有真正處理狀態
expandReplaceOps(ArrayList<Fragment> added) {
    for (int opNum = 0; opNum < mOps.size(); opNum++) {
        final Op op = mOps.get(opNum);
        switch (op.cmd) {
            case OP_ADD:
            case OP_ATTACH:
                added.add(op.fragment);
                break;
            case OP_REMOVE:
            case OP_DETACH:
                added.remove(op.fragment);
                break;
            case OP_REPLACE: {
                Fragment f = op.fragment;
                int containerId = f.mContainerId;
                boolean alreadyAdded = false;
                for (int i = added.size() - 1; i >= 0; i--) {
                    Fragment old = added.get(i);
                    if (old.mContainerId == containerId) {
                        if (old == f) {
                            alreadyAdded = true;
                        } else {
                            Op removeOp = new Op();
                            removeOp.cmd = OP_REMOVE;    //可以看到,替換也是透過刪除實現的
                            removeOp.fragment = old;
                            removeOp.enterAnim = op.enterAnim;
                            removeOp.popEnterAnim = op.popEnterAnim;
                            removeOp.exitAnim = op.exitAnim;
                            removeOp.popExitAnim = op.popExitAnim;
                            mOps.add(opNum, removeOp);
                            added.remove(old);
                            opNum++;
                        }
                    }
                }
                if (alreadyAdded) {
                    mOps.remove(opNum);
                    opNum--;
                } else {
                    op.cmd = OP_ADD;
                    added.add(f);
                }
            }
            break;
        }
    }
}
//設定將要被移除的 Fragment 為不可見的最終實現
private void makeRemovedFragmentsInvisible(ArraySet<Fragment> fragments) {
    final int numAdded = fragments.size();
    for (int i = 0; i < numAdded; i++) {
        final Fragment fragment = fragments.valueAt(i);
        if (!fragment.mAdded) {
            final View view = fragment.getView();    //獲取 Fragment 的佈局,設定狀態
            if (Build.VERSION.SDK_INT < Build.VERSION_CODES.HONEYCOMB) {
                fragment.getView().setVisibility(View.INVISIBLE);
            } else {        //高版本設定透明度
                fragment.mPostponedAlpha = view.getAlpha();
                view.setAlpha(0f);
            }
        }
    }
}
程式碼多了一點,但我們終於找到了最終的實現:Handler 非同步發到主線,排程執行後,聚合、修改 Ops 的狀態,然後遍歷、修改 Fragment 棧中的 View 的狀態。
真正處理的部分
前面主要是對 Fragment 的包裝類 Ops 進行一些狀態修改,真正根據 Ops 狀態進行操作在這個部分:
/**
 * Executes the operations contained within this transaction. The Fragment states will only
 * be modified if optimizations are not allowed.
 */
void executeOps() {
    final int numOps = mOps.size();
    for (int opNum = 0; opNum < numOps; opNum++) {
        final Op op = mOps.get(opNum);
        final Fragment f = op.fragment;
        f.setNextTransition(mTransition, mTransitionStyle);
        switch (op.cmd) {
            case OP_ADD:
                f.setNextAnim(op.enterAnim);
                mManager.addFragment(f, false);
                break;
            case OP_REMOVE:
                f.setNextAnim(op.exitAnim);
                mManager.removeFragment(f);
                break;
            case OP_HIDE:
                f.setNextAnim(op.exitAnim);
                mManager.hideFragment(f);
                break;
            case OP_SHOW:
                f.setNextAnim(op.enterAnim);
                mManager.showFragment(f);
                break;
            case OP_DETACH:
                f.setNextAnim(op.exitAnim);
                mManager.detachFragment(f);
                break;
            case OP_ATTACH:
                f.setNextAnim(op.enterAnim);
                mManager.attachFragment(f);
                break;
            default:
                throw new IllegalArgumentException("Unknown cmd: " + op.cmd);
        }
        if (!mAllowOptimization && op.cmd != OP_ADD) {
            mManager.moveFragmentToExpectedState(f);
        }
    }
    if (!mAllowOptimization) {
        // Added fragments are added at the end to comply with prior behavior.
        mManager.moveToState(mManager.mCurState, true);
    }
}
FragmentManager 對這些方法的實現也很簡單,修改 Fragment 的狀態值,比如 remove(Fragment):
public void removeFragment(Fragment fragment) {
    if (DEBUG) Log.v(TAG, "remove: " + fragment + " nesting=" + fragment.mBackStackNesting);
    final boolean inactive = !fragment.isInBackStack();
    if (!fragment.mDetached || inactive) {
        if (mAdded != null) {
            mAdded.remove(fragment);
        }
        if (fragment.mHasMenu && fragment.mMenuVisible) {
            mNeedMenuInvalidate = true;
        }
        fragment.mAdded = false;    //設定屬性值
        fragment.mRemoving = true;
    }
}
最終會呼叫 moveToState(),我們直接來看它的實現:
void moveToState(Fragment f, int newState, int transit, int transitionStyle,
boolean keepActive) {
//還沒有新增的 Fragment 處於 onCreate() 狀態
if ((!f.mAdded || f.mDetached) && newState > Fragment.CREATED) {
newState = Fragment.CREATED;
}
if (f.mRemoving && newState > f.mState) {
// While removing a fragment, we can't change it to a higher state.
newState = f.mState;
}
//推遲啟動的設定為 stop
if (f.mDeferStart && f.mState < Fragment.STARTED && newState > Fragment.STOPPED) {
newState = Fragment.STOPPED;
}
if (f.mState < newState) {
// For fragments that are created from a layout, when restoring from
// state we don't want to allow them to be created until they are
// being reloaded from the layout.
if (f.mFromLayout && !f.mInLayout) {
return;
}
if (f.getAnimatingAway() != null) {
// The fragment is currently being animated... but! Now we
// want to move our state back up. Give up on waiting for the
// animation, move to whatever the final state should be once
// the animation is done, and then we can proceed from there.
f.setAnimatingAway(null);
//如果當前 Fragment 正有動畫,直接修改為最終狀態
moveToState(f, f.getStateAfterAnimating(), 0, 0, true);
}
switch (f.mState) {
case Fragment.INITIALIZING:
if (DEBUG) Log.v(TAG, "moveto CREATED: " + f);
if (f.mSavedFragmentState != null) {
f.mSavedFragmentState.setClassLoader(mHost.getContext().getClassLoader());
f.mSavedViewState = f.mSavedFragmentState.getSparseParcelableArray(
FragmentManagerImpl.VIEW_STATE_TAG);
f.mTarget = getFragment(f.mSavedFragmentState,
FragmentManagerImpl.TARGET_STATE_TAG);
if (f.mTarget != null) {
f.mTargetRequestCode = f.mSavedFragmentState.getInt(
FragmentManagerImpl.TARGET_REQUEST_CODE_STATE_TAG, 0);
}
f.mUserVisibleHint = f.mSavedFragmentState.getBoolean(
FragmentManagerImpl.USER_VISIBLE_HINT_TAG, true);
if (!f.mUserVisibleHint) {
f.mDeferStart = true;
if (newState > Fragment.STOPPED) {
newState = Fragment.STOPPED;
}
}
}
f.mHost = mHost;
f.mParentFragment = mParent;
f.mFragmentManager = mParent != null
? mParent.mChildFragmentManager : mHost.getFragmentManagerImpl();
dispatchOnFragmentPreAttached(f, mHost.getContext(), false);
f.mCalled = false;
f.onAttach(mHost.getContext()); //呼叫 Fragment 生命週期方法
if (!f.mCalled) {
throw new SuperNotCalledException("Fragment " + f
+ " did not call through to super.onAttach()");
}
if (f.mParentFragment == null) {
mHost.onAttachFragment(f);
} else {
f.mParentFragment.onAttachFragment(f);
}
dispatchOnFragmentAttached(f, mHost.getContext(), false);
if (!f.mRetaining) {
f.performCreate(f.mSavedFragmentState); //呼叫 Fragment 生命週期方法
dispatchOnFragmentCreated(f, f.mSavedFragmentState, false);
} else {
f.restoreChildFragmentState(f.mSavedFragmentState);
f.mState = Fragment.CREATED;
}
f.mRetaining = false;
if (f.mFromLayout) { //從佈局解析來的
// For fragments that are part of the content view
// layout, we need to instantiate the view immediately
// and the inflater will take care of adding it.
f.mView = f.performCreateView(f.getLayoutInflater( //呼叫 Fragment 生命週期方法
f.mSavedFragmentState), null, f.mSavedFragmentState);
if (f.mView != null) {
f.mInnerView = f.mView;
if (Build.VERSION.SDK_INT >= 11) {
ViewCompat.setSaveFromParentEnabled(f.mView, false);
} else {
f.mView = NoSaveStateFrameLayout.wrap(f.mView);
}
if (f.mHidden) f.mView.setVisibility(View.GONE);
f.onViewCreated(f.mView, f.mSavedFragmentState); //呼叫 Fragment 生命週期方法
dispatchOnFragmentViewCreated(f, f.mView, f.mSavedFragmentState, false);
} else {
f.mInnerView = null;
}
}
case Fragment.CREATED:
if (newState > Fragment.CREATED) {
if (DEBUG) Log.v(TAG, "moveto ACTIVITY_CREATED: " + f);
if (!f.mFromLayout) {
ViewGroup container = null;
if (f.mContainerId != 0) {
if (f.mContainerId == View.NO_ID) {
throwException(new IllegalArgumentException(
"Cannot create fragment "
+ f
+ " for a container view with no id"));
}
container = (ViewGroup) mContainer.onFindViewById(f.mContainerId);
if (container == null && !f.mRestored) {
String resName;
try {
resName = f.getResources().getResourceName(f.mContainerId);
} catch (NotFoundException e) {
resName = "unknown";
}
throwException(new IllegalArgumentException(
"No view found for id 0x"
+ Integer.toHexString(f.mContainerId) + " ("
+ resName
+ ") for fragment " + f));
}
}
f.mContainer = container;
f.mView = f.performCreateView(f.getLayoutInflater( //呼叫 Fragment 生命週期方法
f.mSavedFragmentState), container, f.mSavedFragmentState);
if (f.mView != null) {
f.mInnerView = f.mView;
if (Build.VERSION.SDK_INT >= 11) {
ViewCompat.setSaveFromParentEnabled(f.mView, false);
} else {
f.mView = NoSaveStateFrameLayout.wrap(f.mView);
}
if (container != null) {
container.addView(f.mView); //將 Fragment 的佈局新增到父佈局中
}
if (f.mHidden) {
f.mView.setVisibility(View.GONE);
}
f.onViewCreated(f.mView, f.mSavedFragmentState);//呼叫 Fragment 生命週期方法
dispatchOnFragmentViewCreated(f, f.mView, f.mSavedFragmentState,
false);
// Only animate the view if it is visible. This is done after
// dispatchOnFragmentViewCreated in case visibility is changed
f.mIsNewlyAdded = (f.mView.getVisibility() == View.VISIBLE)
&& f.mContainer != null;
} else {
f.mInnerView = null;
}
}
f.performActivityCreated(f.mSavedFragmentState); //呼叫 Fragment 生命週期方法
dispatchOnFragmentActivityCreated(f, f.mSavedFragmentState, false);
if (f.mView != null) {
f.restoreViewState(f.mSavedFragmentState);
}
f.mSavedFragmentState = null;
}
case Fragment.ACTIVITY_CREATED:
if (newState > Fragment.ACTIVITY_CREATED) {
f.mState = Fragment.STOPPED;
}
case Fragment.STOPPED:
if (newState > Fragment.STOPPED) {
if (DEBUG) Log.v(TAG, "moveto STARTED: " + f);
f.performStart();
dispatchOnFragmentStarted(f, false);
}
case Fragment.STARTED:
if (newState > Fragment.STARTED) {
if (DEBUG) Log.v(TAG, "moveto RESUMED: " + f);
f.performResume();
dispatchOnFragmentResumed(f, false);
f.mSavedFragmentState = null;
f.mSavedViewState = null;
}
}
} else if (f.mState > newState) {
switch (f.mState) {
case Fragment.RESUMED:
if (newState < Fragment.RESUMED) {
if (DEBUG) Log.v(TAG, "movefrom RESUMED: " + f);
f.performPause();
dispatchOnFragmentPaused(f, false);
}
case Fragment.STARTED:
if (newState < Fragment.STARTED) {
if (DEBUG) Log.v(TAG, "movefrom STARTED: " + f);
f.performStop();
dispatchOnFragmentStopped(f, false);
}
case Fragment.STOPPED:
if (newState < Fragment.STOPPED) {
if (DEBUG) Log.v(TAG, "movefrom STOPPED: " + f);
f.performReallyStop();
}
case Fragment.ACTIVITY_CREATED:
if (newState < Fragment.ACTIVITY_CREATED) {
if (DEBUG) Log.v(TAG, "movefrom ACTIVITY_CREATED: " + f);
if (f.mView != null) {
// Need to save the current view state if not
// done already.
if (mHost.onShouldSaveFragmentState(f) && f.mSavedViewState == null) {
saveFragmentViewState(f);
}
}
f.performDestroyView();
dispatchOnFragmentViewDestroyed(f, false);
if (f.mView != null && f.mContainer != null) {
Animation anim = null;
if (mCurState > Fragment.INITIALIZING && !mDestroyed
&& f.mView.getVisibility() == View.VISIBLE
&& f.mPostponedAlpha >= 0) {
anim = loadAnimation(f, transit, false,
transitionStyle);
}
f.mPostponedAlpha = 0;
if (anim != null) {
final Fragment fragment = f;
f.setAnimatingAway(f.mView);
f.setStateAfterAnimating(newState);
final View viewToAnimate = f.mView;
anim.setAnimationListener(new AnimateOnHWLayerIfNeededListener(
viewToAnimate, anim) {
@Override
public void onAnimationEnd(Animation animation) {
super.onAnimationEnd(animation);
if (fragment.getAnimatingAway() != null) {
fragment.setAnimatingAway(null);
moveToState(fragment, fragment.getStateAfterAnimating(),
0, 0, false);
}
}
});
f.mView.startAnimation(anim);
}
f.mContainer.removeView(f.mView);
}
f.mContainer = null;
f.mView = null;
f.mInnerView = null;
}
case Fragment.CREATED:
if (newState < Fragment.CREATED) {
if (mDestroyed) {
if (f.getAnimatingAway() != null) {
// The fragment's containing activity is
// being destroyed, but this fragment is
// currently animating away. Stop the
// animation right now -- it is not needed,
// and we can't wait any more on destroying
// the fragment.
View v = f.getAnimatingAway();
f.setAnimatingAway(null);
v.clearAnimation();
}
}
if (f.getAnimatingAway() != null) {
// We are waiting for the fragment's view to finish
// animating away. Just make a note of the state
// the fragment now should move to once the animation
// is done.
f.setStateAfterAnimating(newState);
newState = Fragment.CREATED;
} else {
if (DEBUG) Log.v(TAG, "movefrom CREATED: " + f);
if (!f.mRetaining) {
f.performDestroy();
dispatchOnFragmentDestroyed(f, false);
} else {
f.mState = Fragment.INITIALIZING;
}
f.performDetach();
dispatchOnFragmentDetached(f, false);
if (!keepActive) {
if (!f.mRetaining) {
makeInactive(f);
} else {
f.mHost = null;
f.mParentFragment = null;
f.mFragmentManager = null;
}
}
}
}
}
}
if (f.mState != newState) {
Log.w(TAG, "moveToState: Fragment state for " + f + " not updated inline; "
+ "expected state " + newState + " found " + f.mState);
f.mState = newState;
}
}程式碼很長,但做的事情很簡單:
- 根據狀態呼叫對應的生命週期方法
- 如果是新建立的,就把佈局新增到 ViewGroup 中
Fragment 是什麼
Fragment 是什麼,從官網、別人部落格上看到的都是他人之言,我們還是得去看原始碼才能得到答案。
public class Fragment implements ComponentCallbacks, OnCreateContextMenuListener {...}可以看到,Fragment 沒有繼承任何類,只是實現了這兩個介面,第二個不太重要,第一個是在記憶體不足時可以收到回撥。
沒有什麼特別資訊,我們還是去看看它的主要成員。
Fragment 的主要成員
static final int INITIALIZING = 0;     // Not yet created.
static final int CREATED = 1;          // Created.
static final int ACTIVITY_CREATED = 2; // The activity has finished its creation.
static final int STOPPED = 3;          // Fully created, not started.
static final int STARTED = 4;          // Created and started, not resumed.
static final int RESUMED = 5;          // Created started and resumed.

//當前 Fragment 的狀態值
int mState = INITIALIZING;
//...
// True if the fragment is in the list of added fragments.
boolean mAdded;

// If set this fragment is being removed from its activity.
boolean mRemoving;

// Set to true if this fragment was instantiated from a layout file.
boolean mFromLayout;

// Set to true when the view has actually been inflated in its layout.
boolean mInLayout;

// True if this fragment has been restored from previously saved state.
boolean mRestored;

// Number of active back stack entries this fragment is in.
int mBackStackNesting;

// Set to true when the app has requested that this fragment be hidden
// from the user.
boolean mHidden;

// Set to true when the app has requested that this fragment be deactivated.
boolean mDetached;

// If set this fragment would like its instance retained across
// configuration changes.
boolean mRetainInstance;

// If set this fragment is being retained across the current config change.
boolean mRetaining;

// If set this fragment has menu items to contribute.
boolean mHasMenu;

// Set to true to allow the fragment's menu to be shown.
boolean mMenuVisible = true;

// Used to verify that subclasses call through to super class.
boolean mCalled;
一堆標誌位和狀態值。然後就是關鍵的成員了:
// The fragment manager we are associated with.  Set as soon as the
// fragment is used in a transaction; cleared after it has been removed
// from all transactions.
FragmentManagerImpl mFragmentManager;

//Fragmemt 繫結的物件,一半就是 Activity 和 Fragment
FragmentHostCallback mHost;
//管理子 Fragment
FragmentManagerImpl mChildFragmentManager;

// For use when restoring fragment state and descendant fragments are retained.
// This state is set by FragmentState.instantiate and cleared in onCreate.
FragmentManagerNonConfig mChildNonConfig;
//如果這個 Fragment 繫結的是另一個 Fragment,就需要設定這個值
Fragment mParentFragment;
//容器 Fragment 的ID
int mFragmentId;
//容器 View 的ID
int mContainerId;

//父佈局
ViewGroup mContainer;

//當前 Fragment 的佈局
View mView;

//真正儲存狀態的內部佈局
View mInnerView;
看到這裡,結合前面的,我們就清晰了一個 Fragment 的建立、新增過程:
在 onCreateView() 中返回一個 佈局,然後在 FragmentManager 中拿到這個佈局,新增到要繫結容器(Activity/Fragment)的 ViewGroup 中,然後設定相應的狀態值。
生命週期方法
Fragment 的生命週期大家都清楚,官方提供了一張很清晰的圖:
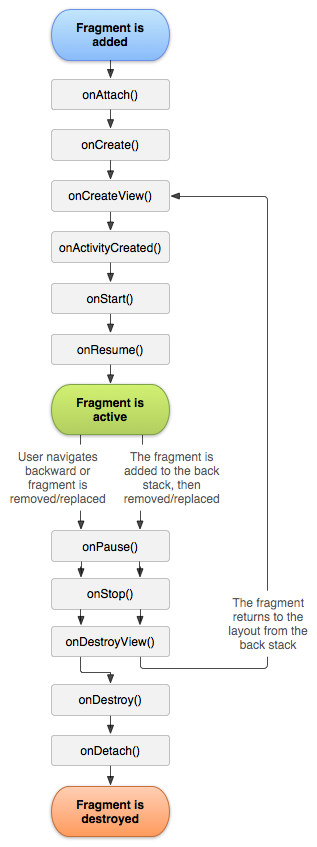
總共 11 個方法,這裡我們看一下各個方法的具體原始碼。
1. onAttach(Context)
@CallSuper
public void onAttach(Context context) {
    mCalled = true;
    final Activity hostActivity = mHost == null ? null : mHost.getActivity();
    if (hostActivity != null) {
        mCalled = false;
        onAttach(hostActivity);
    }
}

@Deprecated
@CallSuper
public void onAttach(Activity activity) {
    mCalled = true;
}
onAttach() 是一個 Fragment 和它的 Context 關聯時第一個呼叫的方法,這裡我們可以獲得對應的 Context 或者 Activity,可以看到這裡拿到的 Activity 是 mHost.getActivity(),後面我們介紹 FragmentManager 時介紹這個方法。
2. onCreate(Bundle)
public void onCreate(@Nullable Bundle savedInstanceState) {
    mCalled = true;
    restoreChildFragmentState(savedInstanceState);
    if (mChildFragmentManager != null
            && !mChildFragmentManager.isStateAtLeast(Fragment.CREATED)) {
        mChildFragmentManager.dispatchCreate();
    }
}
void restoreChildFragmentState(@Nullable Bundle savedInstanceState) {
    if (savedInstanceState != null) {
        Parcelable p = savedInstanceState.getParcelable(
                FragmentActivity.FRAGMENTS_TAG);
        if (p != null) {
            if (mChildFragmentManager == null) {
                instantiateChildFragmentManager();
            }
            mChildFragmentManager.restoreAllState(p, mChildNonConfig);
            mChildNonConfig = null;
            mChildFragmentManager.dispatchCreate();
        }
    }
}
onCreate() 在 onAttach() 後呼叫,用於做一些初始化操作。
需要注意的是,Fragment 的 onCreate() 呼叫時關聯的 Activity 可能還沒建立好,所以這裡不要有依賴外部 Activity 佈局的操作。如果有依賴 Activity 的操作,可以放在 onActivityCreate() 中。
從上面的程式碼還可以看到,如果是從舊狀態中恢復,會執行子 Fragment 狀態的恢復,此外還在 onCreate() 中呼叫了子 Fragment 管理者的建立。
3. onCreateView(LayoutInflater, ViewGroup, Bundle)
@Nullable
public View onCreateView(LayoutInflater inflater, @Nullable ViewGroup container,
        @Nullable Bundle savedInstanceState) {
    return null;
}
在 onCreate() 後就會執行 onCreatView(),這個方法返回一個 View,預設返回為 null。
當我們需要在 Fragment 中顯示佈局時,需要重寫這個方法,返回要顯示的佈局。
後面佈局銷燬時就會呼叫 onDestroyView()。
3.1. onViewCreated
public void onViewCreated(View view, @Nullable Bundle savedInstanceState) {
}
onViewCreate() 不是生命週期中的方法,但是卻很有用。
它會在 onCreateView() 返回後立即執行,引數中的 view 就是之前建立的 View,因此我們可以在 onViewCreate() 中進行佈局的初始化,比如這樣:
@Override
public void onViewCreated(final View view, @Nullable final Bundle savedInstanceState) {
    if (view == null) {
        return;
    }
    mTextView = (TextView) view.findViewById(R.id.tv_content);
    mBtnSwitchChild = (Button) view.findViewById(R.id.btn_switch_child);

    Bundle arguments = getArguments();
    if (arguments != null && mTextView != null && !TextUtils.isEmpty(arguments.getString(KEY_TITLE))) {
        mTextView.setText(arguments.getString(KEY_TITLE));
    }
    mBtnSwitchChild.setOnClickListener(new View.OnClickListener() {
        @Override
        public void onClick(final View v) {
            //...
    });
}
4. onActivityCreated(Bundle)
@CallSuper
public void onActivityCreated(@Nullable Bundle savedInstanceState) {
    mCalled = true;
}
onActivityCreated() 會在 Fragment 關聯的 Activity 建立好、Fragment 的佈局結構初始化完成後呼叫。
可以在這個方法裡做些和佈局、狀態恢復有關的操作。
4.1 onViewStateRestored(Bundle)
@CallSuper
public void onViewStateRestored(@Nullable Bundle savedInstanceState) {
    mCalled = true;
}
onViewStateRestored() 方法會在 onActivityCreated() 結束後呼叫,用於一個 Fragment 在從舊的狀態恢復時,獲取狀態 saveInstanceState 恢復狀態,比如恢復一個 check box 的狀態。
經過這四步,Fragment 建立完成,同步於 Activity 的建立過程。
5. onStart()
@CallSuper
public void onStart() {
    mCalled = true;

    if (!mLoadersStarted) {
        mLoadersStarted = true;
        if (!mCheckedForLoaderManager) {
            mCheckedForLoaderManager = true;
            mLoaderManager = mHost.getLoaderManager(mWho, mLoadersStarted, false);
        }
        if (mLoaderManager != null) {
            mLoaderManager.doStart();
        }
    }
}
onStart() 當 Fragment 可見時呼叫,同步於 Activity 的 onStart()。
6. onResume()
@CallSuper
public void onResume() {
    mCalled = true;
}
onResume() 當 Fragment 可見並且可以與使用者互動時呼叫。
它和 Activity 的 onResume() 同步。
7. onPause()
@CallSuper
public void onPause() {
    mCalled = true;
}
onPause() 當 Fragment 不再可見時呼叫。
也和 Activity 的 onPause() 同步。
8. onStop()
@CallSuper
public void onStop() {
    mCalled = true;
}
onStop() 當 Fragment 不再啟動時呼叫,和 Activity.onStop() 一致。
9. onDestroyView()
@CallSuper
public void onDestroyView() {
    mCalled = true;
}
當 onCreateView() 返回的佈局(不論是不是 null)從 Fragment 中解除繫結時呼叫 onDestroyView() 。
下次 Fragment 展示時,會重新建立佈局。
10. onDestroy()
@CallSuper
public void onDestroy() {
    mCalled = true;
    //Log.v("foo", "onDestroy: mCheckedForLoaderManager=" + mCheckedForLoaderManager
    //        + " mLoaderManager=" + mLoaderManager);
    if (!mCheckedForLoaderManager) {
        mCheckedForLoaderManager = true;
        mLoaderManager = mHost.getLoaderManager(mWho, mLoadersStarted, false);
    }
    if (mLoaderManager != null) {
        mLoaderManager.doDestroy();
    }
}
當 Fragment 不再使用時會呼叫 onDestroy(),它是一個 Fragment 生命週期的倒數第二步。
可以看到這裡,呼叫了 mLoaderManager.doDestroy(),後面介紹它。
11. onDetach()
@CallSuper
public void onDetach() {
    mCalled = true;
}
Fragment 生命週期的最後一個方法,當 Fragment 不再和一個 Activity 繫結時呼叫。
Fragment 的 onDestroyView(), onDestroy(), onDetach() 三個對應 Activity 的 onDestroyed() 方法。
總結
OK,看完這篇文章,相信對開頭提出的問題你已經有了答案,這裡再總結一下。
Fragment、FragmentManager、FragmentTransaction 關係
- Fragment
- 其實是對 View 的封裝,它持有 view, containerView, fragmentManager, childFragmentManager 等資訊
- FragmentManager
- 是一個抽象類,它定義了對一個 Activity/Fragment 中 新增進來的 Fragment 列表、Fragment 回退棧的操作、管理方法
- 還定義了獲取事務物件的方法
- 具體實現在 FragmentImpl 中
- FragmentTransaction
- 定義了對 Fragment 新增、替換、隱藏等操作,還有四種提交方法
- 具體實現是在 BackStackRecord 中
Fragment 如何實現佈局的新增替換
透過獲得當前 Activity/Fragment 的 FragmentManager/ChildFragmentManager,進而拿到事務的實現類 BackStackRecord,它將目標 Fragment 構造成 Ops(包裝Fragment 和狀態資訊),然後提交給 FragmentManager 處理。
如果是非同步提交,就透過 Handler 傳送 Runnable 任務,FragmentManager 拿到任務後,先處理 Ops 狀態,然後呼叫 moveToState() 方法根據狀態呼叫 Fragment 對應的生命週期方法,從而達到 Fragment 的新增、佈局的替換隱藏等。
下面這張圖從下往上看就是一個 Fragment 建立經歷的方法:

巢狀 Fragment 的原理
也比較簡單,Fragment 內部有一個 childFragmentManager,透過它管理子 Fragment。
在新增子 Fragment 時,把子 Fragment 的佈局 add 到父 Fragment 即可。
相關文章
- Fragment中的那些坑——Android進階2021-09-09FragmentAndroid
- 理解 Android Fragment2016-09-13AndroidFragment
- Android FragmentManager使用2019-04-26AndroidFragment
- Dart 進階 | 深入理解 Function & Closure2020-05-06DartFunction
- Android Fragment生命週期深入探究2015-01-19AndroidFragment
- Android中使用FragmentManager管理fragments2015-03-07AndroidFragment
- 大型Java進階專題(十一) 深入理解JVM (下)2020-08-08JavaJVM
- python進階(17)協程2021-04-25Python
- JavaScript 進階之深入理解資料雙向繫結2017-08-04JavaScript
- 深入理解Android2011-09-01Android
- Android高階進階之路【五】深入剖析Android系統Binder通訊機制2021-11-10Android
- 深入理解javascript原型和閉包(17)——補this2014-09-27JavaScript原型
- 深入理解 Java17 新特性:Sealed Classes2024-07-24Java
- 深入理解 React 高階元件2018-11-29React元件
- 深入理解React 高階元件2017-10-21React元件
- android基礎學習-android篇day17-Android Fragment(碎片)基本使用2018-09-23AndroidFragment
- Flutter進階:深入探究 TextField2019-01-26Flutter
- 漸進深入理解Nginx2019-09-21Nginx
- Android_Fragment_Fragment詳解2014-06-21AndroidFragment
- 深入理解資料結構--二叉樹(進階篇1)2021-09-14資料結構二叉樹
- 深入理解javascript系列(十六):深入高階函式2018-06-19JavaScript函式
- android 訊息傳遞機制進階EventBus的深入探究2019-03-04Android
- 深入淺出理解 React高階元件2018-11-15React元件
- [譯] 深入理解 React 高階元件2018-11-03React元件
- python進階(17)偏函式partial2021-04-29Python函式
- 【C進階】17、++和--操作符分析2021-10-27
- 前端進階-深入瞭解物件2018-11-13前端物件
- 深入理解javascript函式進階系列第四篇——惰性函式2017-12-12JavaScript函式
- Android藍芽那點事——深入瞭解Android藍芽Bluetooth《進階篇》2017-08-18Android藍芽
- Android進階:七、Retrofit2.0原理解析之最簡流程2019-04-27Android
- Android的進階學習(五)--Messenger的使用和理解2015-12-08AndroidMessenger
- FragmentTransaction使用全解2017-03-03Fragment
- FragmentTransaction的replace方法2016-12-03Fragment
- Android之Fragment2018-07-25AndroidFragment
- 前端進階系列(第2期):深入理解JavaScript資料型別轉換2019-01-28前端JavaScript資料型別
- android viewpager使用Fragment懶載入,滑到當前fragment才進行資料載入2017-06-26AndroidViewpagerFragment
- Android進階:七、Retrofit2.0原理解析之最簡流程【上】2019-04-08Android
- Android 深入理解 Notification 機制2019-02-15Android