Volley 原始碼分析
Volley概述
Volley是Google 2013年I/O大會推出的針對Android的HTTP網路請求框架,讓網路請求更簡單,更快。
今天我們來點乾貨 分析下Volley原始碼 不介紹Volley基本用法 概念等等
因為 張鴻洋 郭霖 等大神
部落格都寫的很清晰了 非常通俗易懂 贊!
IDE AndroidStudio 直接在AS上分析就行
開始分析
1.快取檔案與網路
我們一個 mRequestQueue 是透過 newRequestQueue拿到的 所以我們直接點進去 
他裡面呼叫的是這個方法 直接點 
點選進去 我們看到了這樣一個方法
 private static final String DEFAULT_CACHE_DIR = "volley";

    /**
     * Creates a default instance of the worker pool and calls {@link RequestQueue#start()} on it.
     *
     * @param context A {@link Context} to use for creating the cache dir.
     * @param stack An {@link HttpStack} to use for the network, or null for default.
     * @return A started {@link RequestQueue} instance.
     */
    public static RequestQueue newRequestQueue(Context context, HttpStack stack) {
        File cacheDir = new File(context.getCacheDir(), DEFAULT_CACHE_DIR);

        String userAgent = "volley/0";
        try {
            String packageName = context.getPackageName();
            PackageInfo info = context.getPackageManager().getPackageInfo(packageName, 0);
            userAgent = packageName + "/" + info.versionCode;
        } catch (NameNotFoundException e) {
        }

        if (stack == null) {
            if (Build.VERSION.SDK_INT >= 9) {
                stack = new HurlStack();
            } else {
                // Prior to Gingerbread, HttpUrlConnection was unreliable.
                // See: http://android-developers.blogspot.com/2011/09/androids-http-clients.html
                stack = new HttpClientStack(AndroidHttpClient.newInstance(userAgent));
            }
        }

        Network network = new BasicNetwork(stack);

        RequestQueue queue = new RequestQueue(new DiskBasedCache(cacheDir), network);
        queue.start();

        return queue;
    }
不要慌 我們一行一行分析 看看這個方法到底做了些什麼 從第一行開始
Volley 預設的快取地址是從這裡設定的
File cacheDir = new File(context.getCacheDir(), DEFAULT_CACHE_DIR);首先我們先來看 這個區域性變數的名字 cacheDir 快取的的資料夾
getCacheDir 指向於 data/data/包名/cache/ 加DEFAULT_CACHE_DIR ==volley
這裡就得到了Volley的快取地址為 data/data/包名/cache/volley
Volley官方文件說明 Volley 易於定製 擴充套件性強 所以說我們可以隨便改原始碼
我們拿到了快取資料夾 在來看他用在哪裡了
RequestQueue queue = new RequestQueue(new DiskBasedCache(cacheDir), network);透過程式碼我們看到他傳給了 DiskBasedCache
每一個響應有一個快取檔案 而這些都是由DiskBasedCache 來提供支援
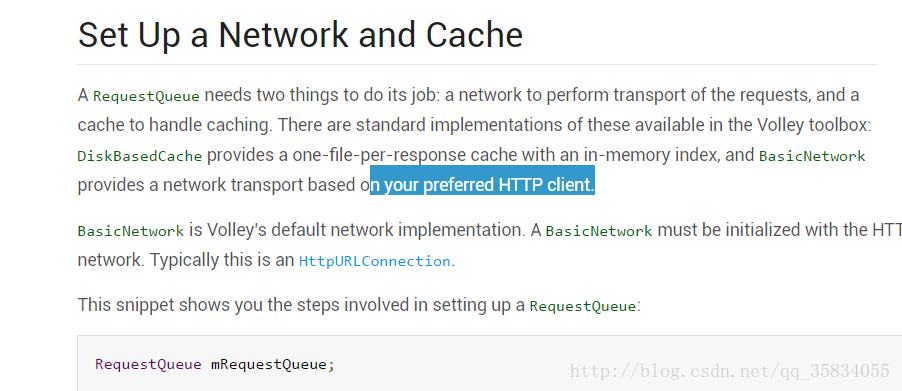
官方文件說明 你的RequestQueue 需要兩個東西去維持他的工作 快取與網路
現在我們拿到了快取
網路
Network network = new BasicNetwork(stack);由BasicNetwork 來提供網路的傳輸
BasicNetwork 可以根據你喜歡的http client 來選擇
官方說明
   if (stack == null) {
            if (Build.VERSION.SDK_INT >= 9) {
                stack = new HurlStack();
            } else {
                // Prior to Gingerbread, HttpUrlConnection was unreliable.
                // See: http://android-developers.blogspot.com/2011/09/androids-http-clients.html
                stack = new HttpClientStack(AndroidHttpClient.newInstance(userAgent));
            }
        }

        Network network = new BasicNetwork(stack);
接著繼續看stack Volley內部做了個判斷 如果你的當前SDK版本大於9(2.3.3)則使用 HurlStack HttpURLConnection
如果小於2.3 則使用 HttpClientStack
原始碼中有個連結是 谷歌開發人員的一個部落格 介紹了利弊 
大概意思就是說在2.3以前用HttpClient最好 因為BUG少
2.3之後的HttpURLConnection 是最好的選擇 其簡單的API和程式碼量很少使其非常適合Android 透明的壓縮和快取快取減少網路使用,提高速度並節省電池
HttpClient都被google廢棄了 在6.0 SDK中直接拿掉了
接著又回到上頭 我們說過可以自定義Stack 選擇自己喜歡的http 但其實這個引數 一般都為空 …
倒序回到呼叫 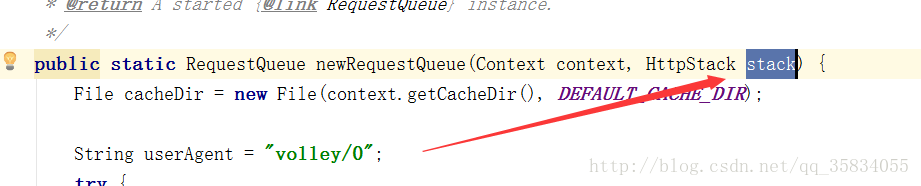
Stack 預設為null 
我們傳的是單引數的方法 傳到原始碼就是一個上下文 所以說還是會走系統預設 透過SDK自行選擇
mRequestQueue = Volley.newRequestQueue(this);
我們的volley 是透過一個 queue.start()方法開啟的 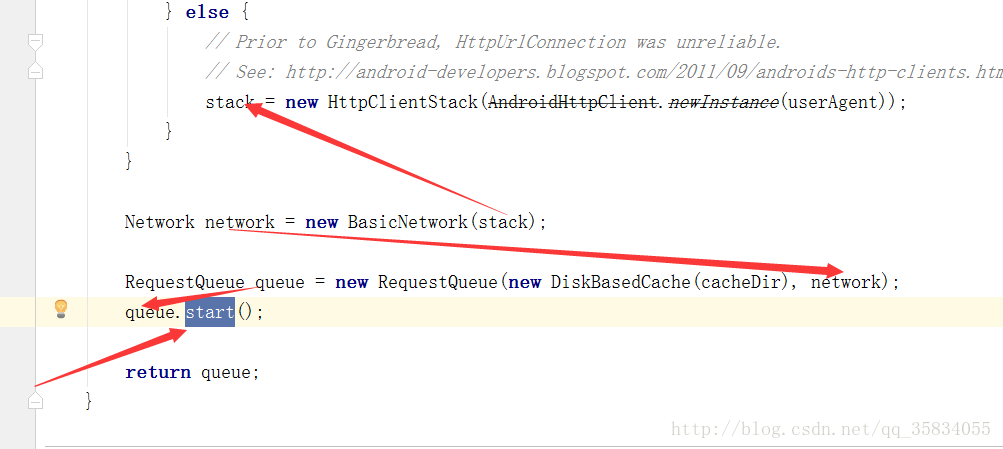
開啟
點進start 我們看到了這些程式碼
/**
     * Starts the dispatchers in this queue.
     */
    public void start() {
        stop();  // Make sure any currently running dispatchers are stopped.
        // Create the cache dispatcher and start it.
        mCacheDispatcher = new CacheDispatcher(mCacheQueue, mNetworkQueue, mCache, mDelivery);
        mCacheDispatcher.start();

        // Create network dispatchers (and corresponding threads) up to the pool size.
        for (int i = 0; i < mDispatchers.length; i++) {
            NetworkDispatcher networkDispatcher = new NetworkDispatcher(mNetworkQueue, mNetwork,
                    mCache, mDelivery);
            mDispatchers[i] = networkDispatcher;
            networkDispatcher.start();
        }
    }
我們看到了 在start前他先進行了stop 其實這是一種很好的程式碼實現方式
避免你這個應用被start兩次
接著建立快取排程程式並啟動它。
為什麼這麼說 new CacheDispatcher 快取執行緒 我們點進去看下
 mCacheDispatcher = new CacheDispatcher(mCacheQueue, mNetworkQueue, mCache, mDelivery);
        mCacheDispatcher.start();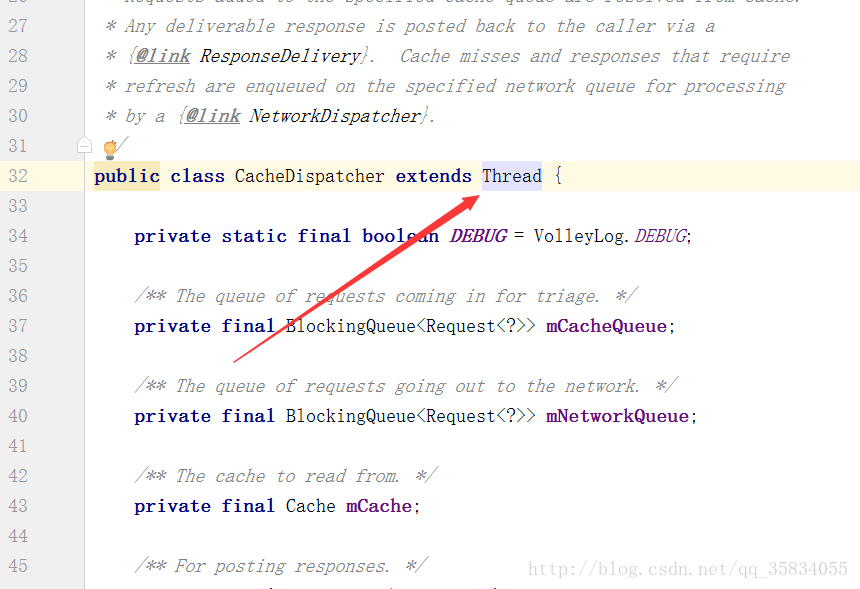
接著下面的程式碼 建立了一池子的網路執行緒
// Create network dispatchers (and corresponding threads) up to the pool size.
for (int i = 0; i < mDispatchers.length; i++) {
NetworkDispatcher networkDispatcher = new NetworkDispatcher(mNetworkQueue, mNetwork,
mCache, mDelivery);
mDispatchers[i] = networkDispatcher;
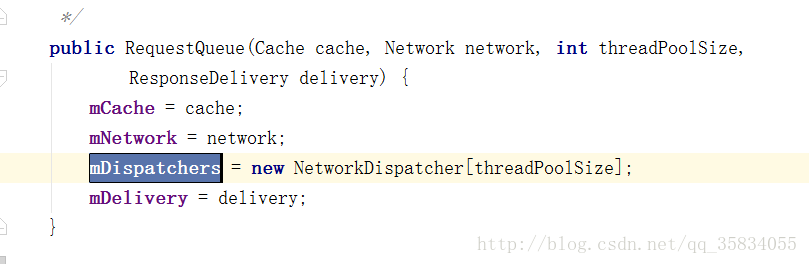
networkDispatcher.start();
}我們來找一找 for迴圈的length值為多少吧 點選mDispatchers
Shift+F 全域性查詢 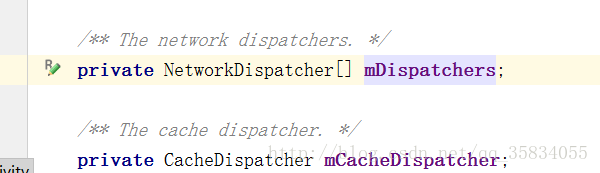
來到了這裡 threadPoolSize 是透過構造方法傳過來的
Alt+F7 檢視RequestQueue在哪裡被呼叫了
到了這 在快捷鍵 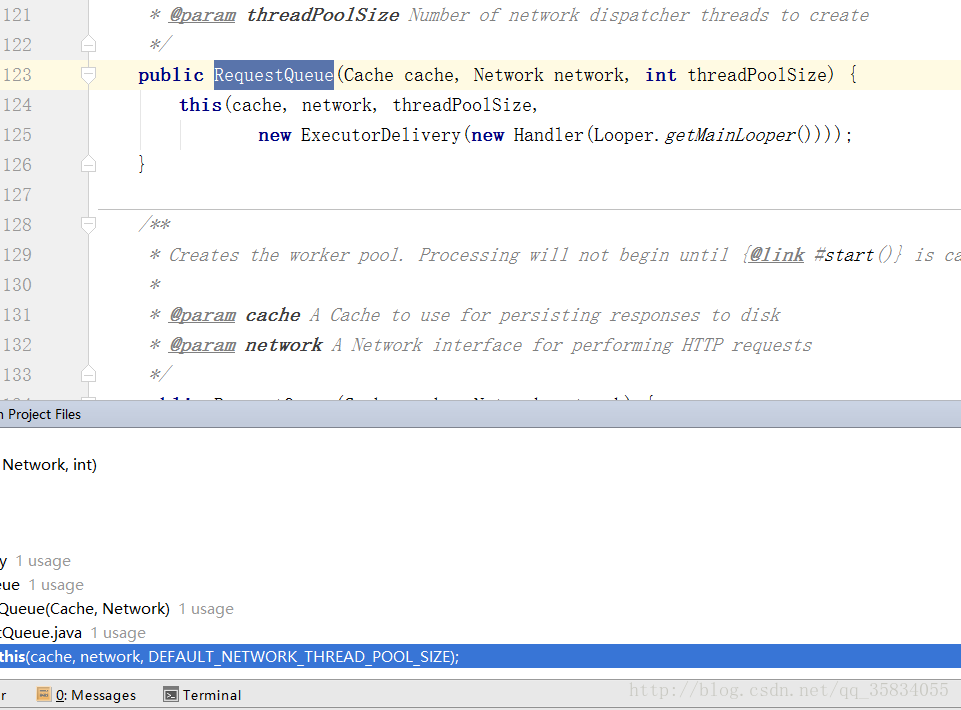
找到了呼叫地址 雙擊點進去 
上面可能有點花眼 重點記住快捷鍵的使用
也就是說當queue.start() 開啟的時候我們 建立了一個快取執行緒 並建立了
4個網路執行緒 並且分別把它們給開啟
12.30了 睡覺了 寫部落格真費時間…. 好在是週末
我們接著回到快取執行緒 CacheDispatcher繼承於 Thread 肯定會執行run方法 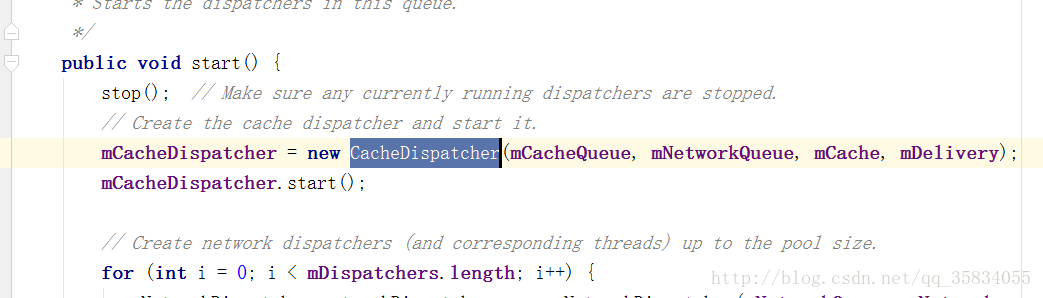
我們來看看 快取執行緒的run方法都幹了些什麼
 @Override
    public void run() {
        if (DEBUG) VolleyLog.v("start new dispatcher");
        Process.setThreadPriority(Process.THREAD_PRIORITY_BACKGROUND);

        // Make a blocking call to initialize the cache.
        mCache.initialize();

        while (true) {
            try {
                // Get a request from the cache triage queue, blocking until
                // at least one is available.
                final Request<?> request = mCacheQueue.take();
                request.addMarker("cache-queue-take");

                // If the request has been canceled, don't bother dispatching it.
                if (request.isCanceled()) {
                    request.finish("cache-discard-canceled");
                    continue;
                }

                // Attempt to retrieve this item from cache.
                Cache.Entry entry = mCache.get(request.getCacheKey());
                if (entry == null) {
                    request.addMarker("cache-miss");
                    // Cache miss; send off to the network dispatcher.
                    mNetworkQueue.put(request);
                    continue;
                }

                // If it is completely expired, just send it to the network.
                if (entry.isExpired()) {
                    request.addMarker("cache-hit-expired");
                    request.setCacheEntry(entry);
                    mNetworkQueue.put(request);
                    continue;
                }

                // We have a cache hit; parse its data for delivery back to the request.
                request.addMarker("cache-hit");
                Response<?> response = request.parseNetworkResponse(
                        new NetworkResponse(entry.data, entry.responseHeaders));
                request.addMarker("cache-hit-parsed");

                if (!entry.refreshNeeded()) {
                    // Completely unexpired cache hit. Just deliver the response.
                    mDelivery.postResponse(request, response);
                } else {
                    // Soft-expired cache hit. We can deliver the cached response,
                    // but we need to also send the request to the network for
                    // refreshing.
                    request.addMarker("cache-hit-refresh-needed");
                    request.setCacheEntry(entry);

                    // Mark the response as intermediate.
                    response.intermediate = true;

                    // Post the intermediate response back to the user and have
                    // the delivery then forward the request along to the network.
                    mDelivery.postResponse(request, response, new Runnable() {
                        @Override
                        public void run() {
                            try {
                                mNetworkQueue.put(request);
                            } catch (InterruptedException e) {
                                // Not much we can do about this.
                            }
                        }
                    });
                }

            } catch (InterruptedException e) {
                // We may have been interrupted because it was time to quit.
                if (mQuit) {
                    return;
                }
                continue;
            }
        }
    }
我們看到 他維護了一個while true 的死迴圈
 // Get a request from the cache triage queue, blocking until
                // at least one is available.
                final Request<?> request = mCacheQueue.take();
                request.addMarker("cache-queue-take");
從mCacheQueue 中拿到request
他這個死迴圈不是一直執行的而是一個阻塞式執行take()
如果有我就取 沒有就等著
  // If the request has been canceled, don't bother dispatching it.
                if (request.isCanceled()) {
                    request.finish("cache-discard-canceled");
                    continue;
                }
他拿到了request 做了一個判斷你的request是不是被人給取消掉了 如果取消掉了就不做任何操作 如果沒有接著往下走
 // Attempt to retrieve this item from cache.
      Cache.Entry entry = mCache.get(request.getCacheKey());
                if (entry == null) {
                    request.addMarker("cache-miss");
                    // Cache miss; send off to the network dispatcher.
                    mNetworkQueue.put(request);
                    continue;
                }
透過 request.getCacheKey() 嘗試從快取的集合中拿到他快取的資料
getCacheKey getUrl 透過這個url伺服器地址為一個key 進行判斷
/**
     * Returns the cache key for this request.  By default, this is the URL.
     */
    public String getCacheKey() {
        return getUrl();
    }
如果沒有request快取資料 就把這個request新增到網路佇列裡
mNetworkQueue.put(request);如果有快取資料則不會走之前的if判斷 就走到了這裡
  // If it is completely expired, just send it to the network.
                if (entry.isExpired()) {
                    request.addMarker("cache-hit-expired");
                    request.setCacheEntry(entry);
                    mNetworkQueue.put(request);
                    continue;
                }
entry.isExpired() 判斷你快取資料是否過期了 如果過期
接這把你新增到網路對列裡 mNetworkQueue.put(request); 等待網路請求
如果有快取並且沒有過期就接著往下走
   Response<?> response = request.parseNetworkResponse(
                        new NetworkResponse(entry.data, entry.responseHeaders));
解析與響應 他把你快取的資料存進去 並最終拿到了response 想要的資料
Volley可以把原生的響應資料 entry.data 解析成你想要的資料 也就是io流帶過來的二進位制
接著繼續走到了這句
mDelivery.postResponse(request, response);把request響應的資料分發到主執行緒 這就是快取大概流程
接著我們看網路執行緒的run方法 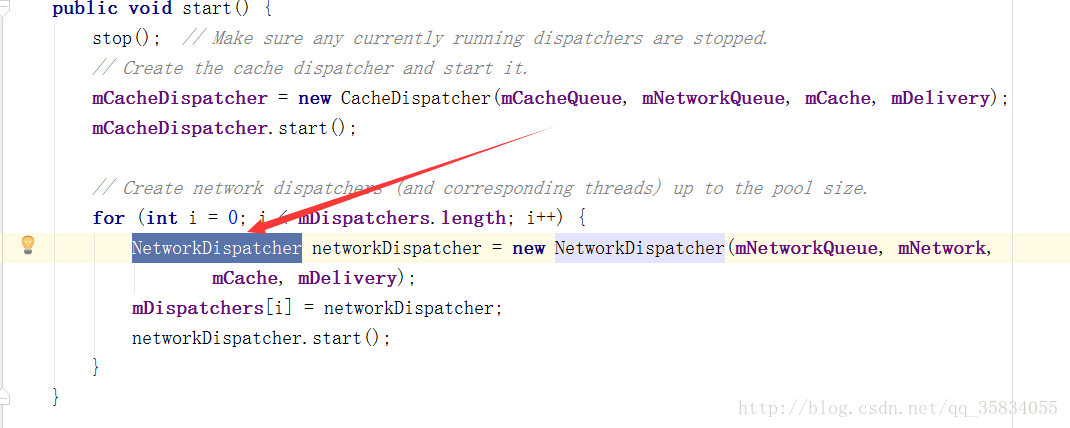
網路執行緒的run方法
 @Override
    public void run() {
        Process.setThreadPriority(Process.THREAD_PRIORITY_BACKGROUND);
        while (true) {
            long startTimeMs = SystemClock.elapsedRealtime();
            Request<?> request;
            try {
                // Take a request from the queue.
                request = mQueue.take();
            } catch (InterruptedException e) {
                // We may have been interrupted because it was time to quit.
                if (mQuit) {
                    return;
                }
                continue;
            }

            try {
                request.addMarker("network-queue-take");

                // If the request was cancelled already, do not perform the
                // network request.
                if (request.isCanceled()) {
                    request.finish("network-discard-cancelled");
                    continue;
                }

                addTrafficStatsTag(request);

                // Perform the network request.
                NetworkResponse networkResponse = mNetwork.performRequest(request);
                request.addMarker("network-http-complete");

                // If the server returned 304 AND we delivered a response already,
                // we're done -- don't deliver a second identical response.
                if (networkResponse.notModified && request.hasHadResponseDelivered()) {
                    request.finish("not-modified");
                    continue;
                }

                // Parse the response here on the worker thread.
                Response<?> response = request.parseNetworkResponse(networkResponse);
                request.addMarker("network-parse-complete");

                // Write to cache if applicable.
                // TODO: Only update cache metadata instead of entire record for 304s.
                if (request.shouldCache() && response.cacheEntry != null) {
                    mCache.put(request.getCacheKey(), response.cacheEntry);
                    request.addMarker("network-cache-written");
                }

                // Post the response back.
                request.markDelivered();
                mDelivery.postResponse(request, response);
            } catch (VolleyError volleyError) {
                volleyError.setNetworkTimeMs(SystemClock.elapsedRealtime() - startTimeMs);
                parseAndDeliverNetworkError(request, volleyError);
            } catch (Exception e) {
                VolleyLog.e(e, "Unhandled exception %s", e.toString());
                VolleyError volleyError = new VolleyError(e);
                volleyError.setNetworkTimeMs(SystemClock.elapsedRealtime() - startTimeMs);
                mDelivery.postError(request, volleyError);
            }
        }
    }
首先看到的依舊是一個 阻塞 死迴圈 依舊是從一個mQueue取request
 // Take a request from the queue.
                request = mQueue.take();
也做了一個判斷 取消了不做任何操作
 if (request.isCanceled()) {
                    request.finish("network-discard-cancelled");
                    continue;
                }
沒取消就走到了這裡 去執行一個網路請求 拿到了networkResponse
  // Perform the network request.
                NetworkResponse networkResponse = mNetwork.performRequest(request);
                request.addMarker("network-http-complete");
如果沒有304異常就把networkResponse 解析成了一個response
  // Parse the response here on the worker thread.
                Response<?> response = request.parseNetworkResponse(networkResponse);
                request.addMarker("network-parse-complete");
接著走到了一個判斷
 // Write to cache if applicable.
                // TODO: Only update cache metadata instead of entire record for 304s.
                if (request.shouldCache() && response.cacheEntry != null) {
                    mCache.put(request.getCacheKey(), response.cacheEntry);
                    request.addMarker("network-cache-written");
                }
如果我的請求是被需要快取的request.shouldCache() 那就寫快取
mCache.put(request.getCacheKey(), response.cacheEntry);
寫完了快取就走到了這裡 分發到主執行緒
mDelivery.postResponse(request, response);我們來看看postResponse怎麼傳送到主執行緒的把 
我們來到了這裡 正常的執行緒池execute 裡面應該是開執行緒 處理事件 Volley重寫了這個方法 直接分發到主執行緒
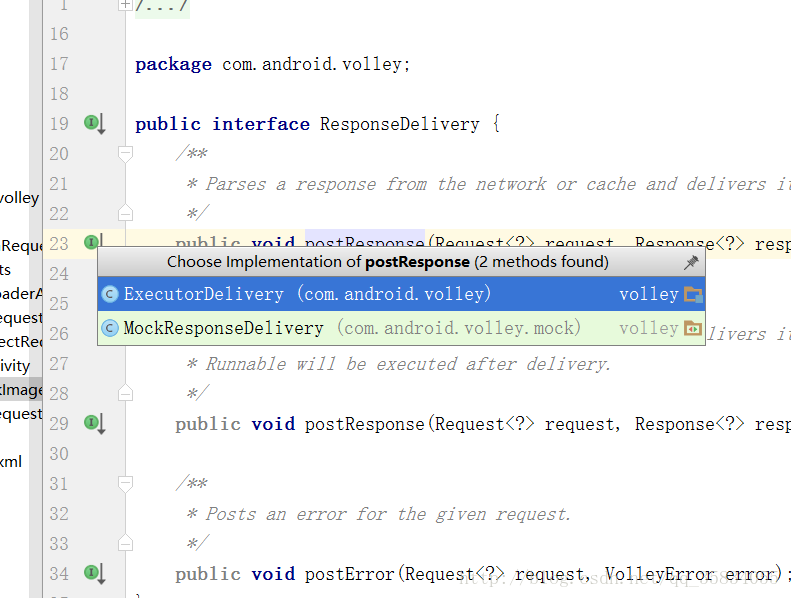
因此,我們的Response響應最終會在主執行緒被呼叫方接收並進行處理。
總結圖片

Volley只是個框架從原始碼就能看到 最底層的操作還是由 HttpClient HttpURLConnection 來實現的 其實選擇網路可以改成okhttp 可自行改造 自由度非常高
最後我感覺我寫的挺清晰了 有什麼不對的地方 希望留言 我會進行修改 詳細到寫的我快吐血了….
相關文章
- Volley原始碼分析(二)2017-08-22原始碼
- Android Volley原始碼分析2015-08-26Android原始碼
- Architecture(2)Volley原始碼分析2019-03-04原始碼
- Volley 原始碼探索2018-11-06原始碼
- Android Volley的優缺點及原始碼分析2017-05-10Android原始碼
- Volley原始碼分析【面向介面程式設計的典範】2016-06-03原始碼程式設計
- 2017-10-9(Volley使用範例原始碼分析)2017-12-13原始碼
- 遲到的Volley原始碼解析2017-04-28原始碼
- Android Volley框架原始碼解析2018-01-08Android框架原始碼
- Google Volley框架原始碼走讀2015-06-11Go框架原始碼
- Volley 原始碼解析之圖片請求2018-12-29原始碼
- Volley 原始碼解析之快取機制2019-01-06原始碼快取
- Volley 原始碼解析之網路請求2018-12-21原始碼
- Android 開源專案原始碼解析 -->Volley 原始碼解析(十五)2016-09-27Android原始碼
- Android Volley 原始碼解析(二),探究快取機制2018-02-12Android原始碼快取
- Retrofit原始碼分析三 原始碼分析2018-05-17原始碼
- 集合原始碼分析[2]-AbstractList 原始碼分析2019-04-11原始碼
- 集合原始碼分析[1]-Collection 原始碼分析2019-03-23原始碼
- 集合原始碼分析[3]-ArrayList 原始碼分析2019-04-12原始碼
- Guava 原始碼分析之 EventBus 原始碼分析2018-08-01Guava原始碼
- Android網路程式設計(四)從原始碼解析Volley2016-07-31Android程式設計原始碼
- Android 原始碼分析之 AsyncTask 原始碼分析2019-03-04Android原始碼
- 【JDK原始碼分析系列】ArrayBlockingQueue原始碼分析2020-09-27JDK原始碼BloC
- 以太坊原始碼分析(36)ethdb原始碼分析2018-05-14原始碼
- 以太坊原始碼分析(38)event原始碼分析2018-05-14原始碼
- 以太坊原始碼分析(41)hashimoto原始碼分析2018-05-14原始碼
- 以太坊原始碼分析(43)node原始碼分析2018-05-14原始碼
- 以太坊原始碼分析(52)trie原始碼分析2018-05-14原始碼
- Android Volley 原始碼解析(三),圖片載入的實現2018-02-24Android原始碼
- 深度 Mybatis 3 原始碼分析(一)SqlSessionFactoryBuilder原始碼分析2019-06-06MyBatis原始碼SQLSessionUI
- 以太坊原始碼分析(51)rpc原始碼分析2018-05-14原始碼RPC
- 【Android原始碼】Fragment 原始碼分析2017-12-23Android原始碼Fragment
- 【Android原始碼】Intent 原始碼分析2017-12-23Android原始碼Intent
- Android Volley 原始碼解析(一),網路請求的執行流程2018-02-11Android原始碼
- k8s client-go原始碼分析 informer原始碼分析(6)-Indexer原始碼分析2022-06-19K8SclientGo原始碼ORMIndex
- k8s client-go原始碼分析 informer原始碼分析(4)-DeltaFIFO原始碼分析2022-05-22K8SclientGo原始碼ORM
- 以太坊原始碼分析(20)core-bloombits原始碼分析2018-05-14原始碼OOM
- 以太坊原始碼分析(24)core-state原始碼分析2018-05-14原始碼