如何藉助 HealthKit 打造一款健身應用?
【編者按】本文作者為 Matthew Maher,文章手把手地介紹瞭如何藉助 HealthKit 建立簡單的健身應用,包含諸多程式碼例項。本文系國內 ITOM 管理平臺 OneAPM 編譯呈現。
根據新聞報導,健康與健美在今時今日的重要程度比已往任何時候都高。說起來有點可笑,似乎就在幾天之前,筆者就見到過類似的新聞。或許,這是當人逐漸變老之後揮之不去的感覺吧——渴望保持健康以及健美的感覺。不管怎麼說,健康與健美是一個重要話題。技術的進步,尤其是移動應用與硬體世界的不斷提高,正為這個似乎日益成長的話題帶來全新的契機。
HealthKit 是蘋果公司推出的一款移動應用平臺,旨在為重要、可追蹤的健康資料與注重健康、熱衷鍛鍊的科技消費者搭起橋樑。這很酷。使用者可以輕鬆地追蹤一段時間內可測量的健身與健康資料。除了瞭解自身的健康資料,看到圖表中喜人的增長曲線也的確鼓舞人心。
正如人們想象的那樣,在管理健康資訊時安全是非常重要的考慮因素。HealthKit 直截了當地將所有 HealthKit 資訊的絕對控制權置於使用者的手中。使用者可以授權或拒絕任何應用對其健康資料發出的讀取請求。
作為開發者,我們需要徵求許可才能從/向 HealthKit 讀取/寫入資料。實際上,我們需要明確地宣告打算讀取或改變的資料。此外,任何使用 HealthKit 的應用都必須包含隱私政策,這樣一來,使用者才能對其資訊的處理感到更加放心。
關於 OneHourWalker
在本文中,我們將打造一個有趣的小應用,它會從 HealthKit 讀取資料,也會向其寫入新資料。來見一見 OneHourWalker 吧。

OneHourWalker 是一款追蹤使用者在一個小時內行走或跑步之距離的健身應用。使用者可以將距離與 HealthKit 分享,之後就能在健康應用中讀取之。我知道,一個小時聽起來有點過於樂觀了(至少筆者本人可能無法堅持下去)。因此,使用者也可以提早中止計數,並分享距離。
額,到目前為止,似乎 OneHourWalker 只會向 HealthKit 寫入資料。我們需要讀取什麼資料呢?
好問題!在步行鍛鍊時,我喜歡選擇鄉間或林間小路。常常,我會遇到樹枝低垂的區域。而我是一條身高 193cm 的漢子,這真的讓我很苦惱。解決辦法是:從 HealthKit 讀取使用者的身高資料,將之列印為應用的一個標籤。這個標籤可以作為對使用者的善意提醒,這樣,他們就能避免在步行時被樹枝打到。
首先,點此下載 OneHourWalker 的初始專案。先試著跑起來,找找應用執行的感覺。計數器與地點追蹤功能已經在執行了,所以我們只需專注於 HealthKit 實現。注意,當到達 60 分鐘時間點時,計算器與追蹤都會停止。
啟用 HealthKit
首先,在我們的應用中啟用 HealthKit。在專案導航中,點選 OneHourWalker,之後點選 Targets 下面的 OneHourWalker,之後選擇螢幕頂部的 Capabilities 選項。
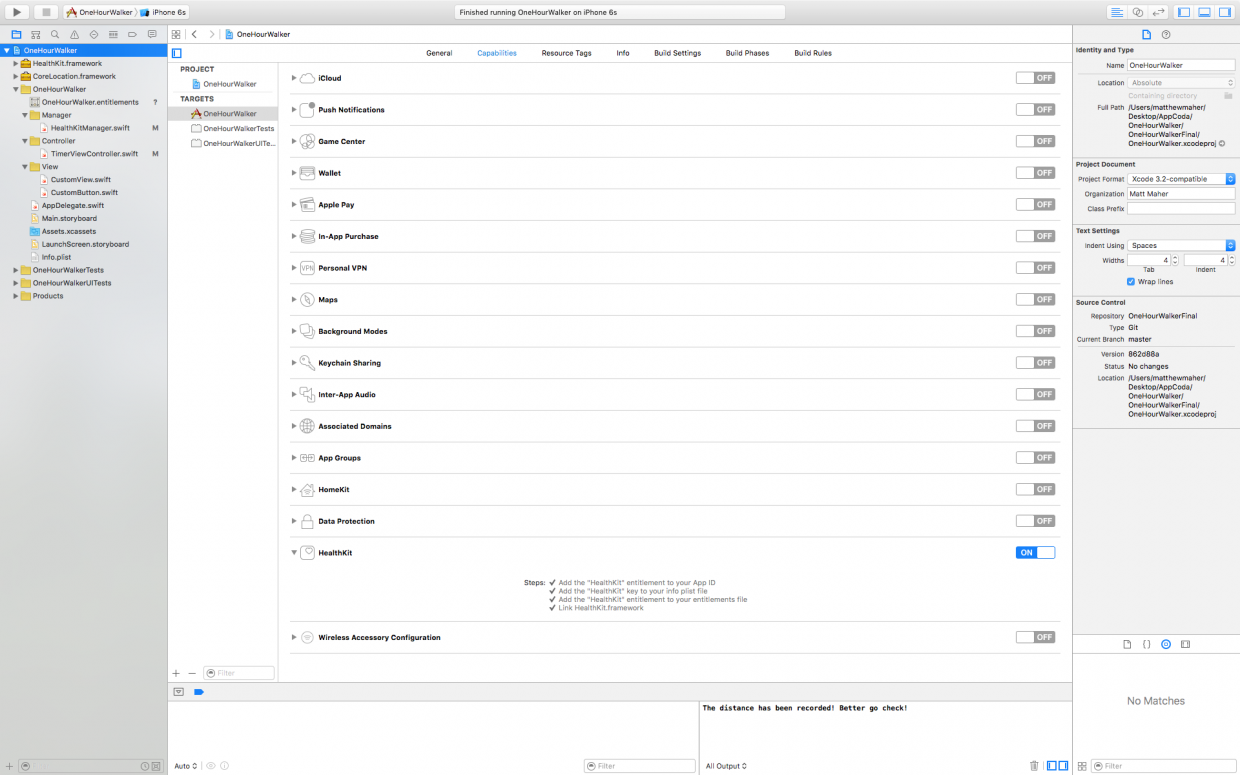
檢視 Capabilities 列表的底部,啟用 HealthKit。這一簡單的操作會將 HealthKit 許可權新增到 App ID,將 HealthKit 鍵新增到 info plist 檔案,將 HealthKit 許可權新增到授權檔案,並且與 HealthKit.framework 相連線。就是這麼簡單。
開始程式設計
接下來,跳轉到 TimerViewController.swift,開始將 HealthKit 引入 OneHourWalker。首先,建立一個 HealthKitManager 例項。
import UIKit
import CoreLocation
import HealthKit

class TimerViewController: UIViewController, CLLocationManagerDelegate {

    @IBOutlet weak var timerLabel: UILabel!
    @IBOutlet weak var milesLabel: UILabel!
    @IBOutlet weak var heightLabel: UILabel!

    var zeroTime = NSTimeInterval()
    var timer : NSTimer = NSTimer()

    let locationManager = CLLocationManager()
    var startLocation: CLLocation!
    var lastLocation: CLLocation!
    var distanceTraveled = 0.0

    let healthManager:HealthKitManager = HealthKitManager()
所有 HealthKit 工作都會在 HealthKitManager.swift 中進行。它會包含重要的方法,我們很快就會談到。
正如在前文介紹部分所述,我們需要取得使用者的許可,才能讀取並修改他們的健康資料。在 viewDidLoad()中,我們就得這麼做。
    override func viewDidLoad() {
       super.viewDidLoad()

   locationManager.requestWhenInUseAuthorization()

    if CLLocationManager.locationServicesEnabled(){
        locationManager.delegate = self
        locationManager.desiredAccuracy = kCLLocationAccuracyBest
    } else {
        print("Need to Enable Location")
    }

    // We cannot access the user's HealthKit data without specific permission.
    getHealthKitPermission()
}
getHealthKitPermission() 方法會呼叫 manager 的 authorizeHealthKit()方法。如果一切順利,我們便能呼叫setHeight()方法。不過,我們很快會在後文中談到此方法。
func getHealthKitPermission() {

    // Seek authorization in HealthKitManager.swift.
    healthManager.authorizeHealthKit { (authorized,  error) -> Void in                        if authorized {

            // Get and set the user's height.
            self.setHeight()
        } else {
                   if error != nil {
                        print(error)
            }
            print("Permission denied.")
        }
    }
}
在 HealthKitManager.swift 中,我們會建立 authorizeHealthKit() 方法。然而,除此之外,我們需要建立 HealthKit 儲存,用於連線應用與 HealthKit 的資料。
let healthKitStore: HKHealthStore = HKHealthStore()

func authorizeHealthKit(completion: ((success: Bool, error: NSError!) -> Void)!) {

    // State the health data type(s) we want to read from HealthKit.
    let healthDataToRead = Set(arrayLiteral: HKObjectType.quantityTypeForIdentifier(HKQuantityTypeIdentifierHeight)!)

    // State the health data type(s) we want to write from HealthKit.
    let healthDataToWrite = Set(arrayLiteral: HKObjectType.quantityTypeForIdentifier(HKQuantityTypeIdentifierDistanceWalkingRunning)!)

    // Just in case OneHourWalker makes its way to an iPad...
    if !HKHealthStore.isHealthDataAvailable() {
        print("Can't access HealthKit.")
    }

    // Request authorization to read and/or write the specific data.
    healthKitStore.requestAuthorizationToShareTypes(healthDataToWrite, readTypes: healthDataToRead) { (success, error) -> Void in
    if( completion != nil ) {
            completion(success:success, error:error)
        }
    }
}
在請求獲取使用者健康資料的授權時,我們需要明確指定打算讀取以及修改的資訊。對本例而言,我們需要讀取使用者的身高,從而幫助他們躲避有危險的低垂枝丫。我們希望 HealthKit 能提供一個可以轉化為可理解的身高的 HKObject 量。此外,我們還要獲得修改 HKObject 量的許可,以記錄使用者的行走及跑步距離。
在處理好 OneHourWalker 與 iPad 通訊的可能性後,我們做出官方請求。
在 HealthKitManager.swift 中,建立從 HealthKit 讀取使用者身高資料的 getHeight() 方法。
func getHeight(sampleType: HKSampleType , completion: ((HKSample!, NSError!) -> Void)!) {

    // Predicate for the height query
    let distantPastHeight = NSDate.distantPast() as NSDate
    let currentDate = NSDate()
    let lastHeightPredicate = HKQuery.predicateForSamplesWithStartDate(distantPastHeight, endDate: currentDate, options: .None)

    // Get the single most recent height
    let sortDescriptor = NSSortDescriptor(key: HKSampleSortIdentifierStartDate, ascending: false)

    // Query HealthKit for the last Height entry.
    let heightQuery = HKSampleQuery(sampleType: sampleType, predicate: lastHeightPredicate, limit: 1, sortDescriptors: [sortDescriptor]) { (sampleQuery, results, error ) -> Void in

    if let queryError = error {
                completion(nil, queryError)
                return
            }

            // Set the first HKQuantitySample in results as the most recent height.                let lastHeight = results!.first

            if completion != nil {
                completion(lastHeight, nil)
            }
    }

    // Time to execute the query.
    self.healthKitStore.executeQuery(heightQuery)
}
查詢身高資料的第一步是建立一個斷言以定義時間引數。我們是在請求一段時間內的所有身高資料——與當前日期相距甚遠的一個過去的日期。顯然,這會返回一個陣列。然而,我們只想要最近期的身高,因此,我們請求資料時可以讓最新的資料排在陣列的最前頭。
在構建這一查詢時,我們會把陣列的長度限制為1。在考慮好出現錯誤的可能性後,我們會將結果中的首個也即唯一一個陣列專案分配給 lastHeight。接下來,完善 getHeight() 方法。最後,針對使用者的健康資料執行查詢。
回到 TimerViewController.swift,在 app 真正投入使用之前,假設使用者授權了適當的許可,則 setHeight() 方法會被 getHealthKitPermission() 呼叫。
var height: HKQuantitySample?
首先,我們需要為 HKQuantitySample 例項宣告一個身高變數。
func setHeight() {
     // Create the HKSample for Height.
     let heightSample = HKSampleType.quantityTypeForIdentifier(HKQuantityTypeIdentifierHeight)

     // Call HealthKitManager's getSample() method to get the user's height.
     self.healthManager.getHeight(heightSample!, completion: { (userHeight, error) -> Void in

     if( error != nil ) {
            print("Error: \(error.localizedDescription)")
            return
        }

        var heightString = ""

        self.height = userHeight as? HKQuantitySample

        // The height is formatted to the user's locale.
        if let meters = self.height?.quantity.doubleValueForUnit(HKUnit.meterUnit()) {
            let formatHeight = NSLengthFormatter()
            formatHeight.forPersonHeightUse = true
            heightString = formatHeight.stringFromMeters(meters)
        }

        // Set the label to reflect the user's height.
        dispatch_async(dispatch_get_main_queue(), { () -> Void in                                self.heightLabel.text = heightString
        })
    })

}
在 share() 方法之上,我們會建立 setHeight() 方法。我們請求的身高資料樣本以 HKQuantity 返回,識別符號 HKQuantityTypeIdentifierHeight 知道這一物件。
接下來,呼叫在 manager 中建立的 getHeight() 方法。有了身高樣本,我們還需要將之翻譯為恰當的字串以展示在標籤中。與往常一樣,考慮所有可能的錯誤情況是很重要的。
到此,使用者就可以開啟 app,檢視他們的身高(如果他的健康應用中記錄著身高資料),開啟計時器,追蹤他跑步或行走的距離了。接下來,我們要處理將距離資料寫入健康應用的過程,這樣,使用者才能在同一個應用中儲存其所有的健身資料。
在使用者結束外出鍛鍊之後,不管有沒有到60分鐘,他可能會使用 Share(分享)按鈕將其辛苦賺得的運動距離傳送到健康應用。所以,在 share() 方法中,我們需要呼叫 HealthKitManager.swift 的 saveDistance() 方法來實現這一過程。在這個方法中,我們會傳送運動距離以及取得該距離的日期。這樣,使用者便能在第二天爭取更好的成績。
@IBAction func share(sender: AnyObject) {
      healthManager.saveDistance(distanceTraveled, date: NSDate())
}
接下來,回到 manager,我們要在此處建立 saveDistance() 方法。首先,我們要讓 HealthKit 知道我們打算寫入一個代表步行及跑步距離的量。之後,將度量單位設定為英里,並賦值官方的樣本量。HealthKit 的 saveObject() 方法會將此資料寫入使用者的健康資料。
func saveDistance(distanceRecorded: Double, date: NSDate ) {

    // Set the quantity type to the running/walking distance.
    let distanceType = HKQuantityType.quantityTypeForIdentifier(HKQuantityTypeIdentifierDistanceWalkingRunning)

    // Set the unit of measurement to miles.
    let distanceQuantity = HKQuantity(unit: HKUnit.mileUnit(), doubleValue: distanceRecorded)

    // Set the official Quantity Sample.
    let distance = HKQuantitySample(type: distanceType!, quantity: distanceQuantity, startDate: date, endDate: date)

    // Save the distance quantity sample to the HealthKit Store.
    healthKitStore.saveObject(distance, withCompletion: { (success, error) -> Void in
    if( error != nil ) {
          print(error)
        } else {
          print("The distance has been recorded! Better go check!")
        }
    })
}
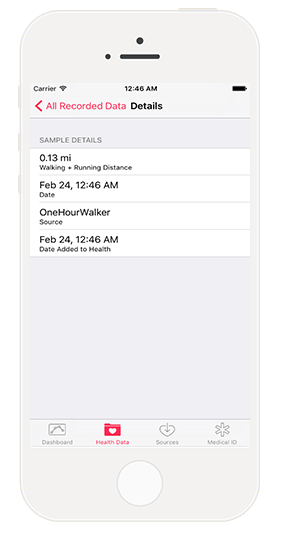
跳轉到健康應用,所記錄的資料會出現在 Walking + Running Distance(行走+跑步距離)一行(如果已經啟用)。此外,依照下面的路徑,我們可以看到詳細的樣本資料:Health Data tab(健康資料選項卡) > Fitness(健身) > Walking + Running Distance(行走+跑步距離) > Show All Data(顯示所有資料)。我們的資料就在此列表中。輕擊一個單元,我們的圖示(目前還未設定)就會與距離一同出現。再次點選此單元,就能看到完整的細節資料。
藉助 OneHourWalker,我們便能為全世界 iOS 使用者的身體健康貢獻一份力量。然而,這只是一個開始。在使用 HealthKit 讀取並修改健康資料的道路上,還有非常多的可能性。
當然,對使用者而言,擁有這些可追蹤資料的好處很多。人們可以輕鬆地按照日期、星期進行比較,從而激勵自己朝著目標努力。不過,真正的偉大之處在於,開發者可以提供全新的,富有創造力的有趣方法來獲取資料。
歡迎大家對 HealthKit 應用進行測試。點選此處檢視 OneHourWalker 的最終版本。
本文系 OneAPM 工程師編譯整理。OneAPM Mobile Insight 以真實使用者體驗為度量標準進行 Crash 分析,監控網路請求及網路錯誤,提升使用者留存。訪問 OneAPM 官方網站感受更多應用效能優化體驗,想閱讀更多技術文章,請訪問 OneAPM 官方技術部落格。
本文轉自 OneAPM 官方部落格
原文地址:http://www.appcoda.com/healthkit-introduction/
相關文章
- 如何藉助 NoSQL 提高 JPA 應用效能SQL
- HealthKit開發教程之HealthKit的輔助資料
- 藉助 HTTP/2 打造更迅捷的 Web 體驗HTTPWeb
- 藉助Unity AR Foundation構建跨平臺AR應用Unity
- 藉助 Material You 動態配色豐富您的應用
- 藉助 AOP 為 Java Web 應用記錄效能資料JavaWeb
- 譯文|藉助 Pulsar Functions 遷移到無服務應用程式Function
- 藉助雲託管低成本部署企業微信應用
- 爆款遊戲如何藉助 RocketMQ Serverless,打造流暢體驗並節省 98% 成本?遊戲MQServer
- 如何打造 “好用” 的應用?
- 藉助應用的最新創新“升級”您的遊戲業務遊戲
- 打造一款可靠的WAF(Web應用防火牆)Web防火牆
- SpringBoot應用篇之藉助Redis實現排行榜功能Spring BootRedis
- LVS高階應用-藉助防火牆標記分類報文防火牆
- Android應用前後臺切換監聽,藉助ActivityLifecycleCallbacks實現Android
- 智者當借力而行, 藉助Autodesk應用程式商店實現名利雙收
- 企業如何藉助SEO優化線上聲譽?優化
- 藉助免費OA系統,打造統一移動辦公系統
- 如何快速開發一款應用
- 印度藉助企業力量應對網路攻擊
- 藉助babel理解jsxBabelJS
- 藉助 Project Zero 在 Web 2.0 領域建立 RESTful IBM Lotus Domino 應用程式ProjectWebRESTIBM
- 如何藉助CRM銷售管理系統提升業績?
- 如何藉助GitHub搭建屬於自己的maven倉庫GithubMaven
- 如何藉助python第三方庫存取不同應用程式的使用者名稱、密碼Python密碼
- LinkedIn如何打造成功應用?
- 打造數字化服務能力,中國聯通如何藉助雲原生技術實現增長突圍?
- 如何快速開發一款應用程式?
- 如何打造一款三消類遊戲遊戲
- 藉助dockerSwarm搭建叢集部署DockerSwarm
- 藉助node,搭建vue環境Vue
- 藉助 VMware 虛擬化 OracleOracle
- 如何在CentOS/RHEL 7上藉助ssm管理LVM卷?CentOSSSMLVM
- 如何藉助 Django 來編寫一個 Python Web APIDjangoPythonWebAPI
- 食品企業如何藉助SAP實現高效智慧化管理
- 如何藉助分散式儲存 JuiceFS 加速 AI 模型訓練分散式UIAI模型
- 金融行業如何藉助AI重新定義投資的疆界行業AI
- 論壇藉助:最佳化sql,null值如何走索引SQLNull索引