OpenStack中ipv6的設計與使用的一些理論分析(未測試)( by quqi99 )
版權宣告:可以任意轉載,轉載時請務必以超連結形式標明文章原始出處和作者資訊及本版權宣告
( http://blog.csdn.net/quqi99 )
refer, Linux 用作 IPv6 閘道器 http://bigeagle.me/2011/11/linux_as_ipv6_gateway/
https://etherpad.openstack.org/IPV6-Support
l3-agent don't support ipv6IPv4 address exhaustion, especially in Asia Pacific region.
- support assignment of only IPv6 address to VM.
- Configuration flag to select IPv4 mode or IPv6 mode or dual stack mode.
- Each VIF of VM is assigned both IPv6 global unicast address
- Pass-through IPv6 packets on L3-agent node.
- Firewall rule management for IPv6 traffic
- Support DNSv6
- Support IPv6 connections to all API layers.
- NTP poisoning
IPv6 evolution History
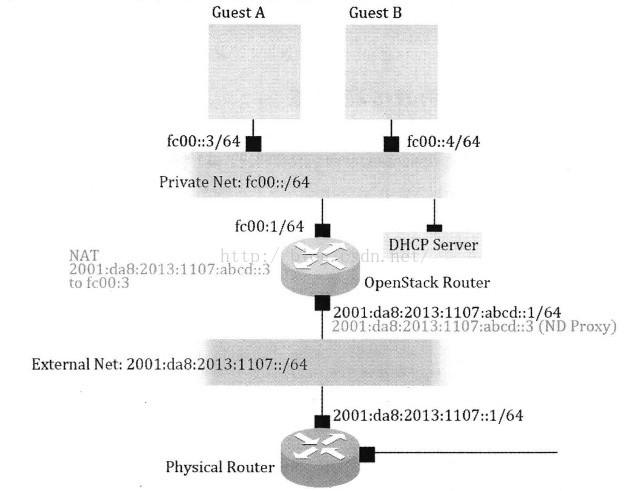
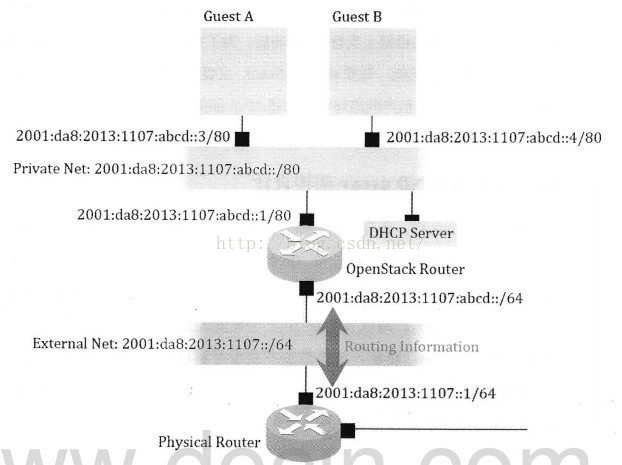
下面三張圖依次顯示了實現IPv6的三種模型:
1, NAT66, 即仿造現有的OpenStack IPv4實現中的NAT方式
2, ND proxy方式,本文將要敘述的
3, 路由方式,採用動態路由協議交換路由

ipv6 process
eg:
WAN: br-ex (GW: 2001:2:3:4500::1/56, IP: 2001:2:3:45ff:ff:ff:ff:ff/128 )
LAN: br-int
VM1: 2001:2:3:4501::/64, 2001:2:3:4501:221:70ff:fec0:ef3f
VM2: 2001:2:3:4502::/64
br-ex: 2001:2:3:45ff:ff:ff:ff:ff/128
in physical router:
ip-6 route add 2001:2:3:4500::/56 via 2001:2:3:4500::1
in l3-agent
ip -6 route add default 2001:2:3:4500::0/56 dev qg-interface ( for every tenant router)
ip -6 route add 2001:2:3:4501::/64 dev gw-tenant1
ip -6 route add 2001:2:3:4502::/64 dev gw-tenant2
ip -6 neigh add proxy 2001:2:3:4501:221:70ff:fec0:ef3f/64 dev gw-tenant1
ip -6 neigh add proxy 2001:2:3:4501::1 dev qg-interface
ip -6 neigh add proxy 2001:2:3:4502::1 dev qg-interface
--------- physical router 2001:2:3:4500::1/56 -------------
. ----------. 2001:2:3:4500::2/56 .---------------.
sixxs | br-ex (qg-interface)
|
*----------*
| br-eth1 |veth______________veth| br-int |
| |eth0 | |
*----------* *---------------*
gw-tenant1 | | gw-tenant2
| |
2001:2:3:4501::/64 | | 2001:2:3:4502::/64
| |
tap1 | | tap2
[VM1] [VM2]
VM1: 2001:2:3:4501:221:70ff:fec0:ef3f/64
1) open ipv6 function and install radvd in the l3-agent node to allocate the ipv6 address for VM.
( dhcp-range=tag:br0,::1,::FFFF,constructor:br0, ra-names, 12h
enable-ra )
cat /etc/radvd.conf
interface gw-tenant1 {AdvSendAdvert on;
AdvManagedFlag off;
AdvOtherConfigFlag off; # tell client vm if use DHCPv6 to allocate ip.
Prefix 2001:2:3:4501::/64{ # broadcast ipv6 prefix.
AdvOnLink on;
AdvAutonomous on;
AdvRouterAddr off;
};
};
interface gw-tenant2 {
AdvSendAdvert on;
AdvManagedFlag off;
AdvOtherConfigFlag off; # tell client vm if use DHCPv6 to allocate ip.
Prefix 2001:2:3:4502::/64{ # broadcast ipv6 prefix.
AdvOnLink on;
AdvAutonomous on;
AdvRouterAddr off;
};
};
if useing DHCPv6 to allocate ip, dhcp6s only provide ip, not provide prefix, so it needs to collaborate with radvd:
cat /etc/dhcp6s.conf
interface br-lan {
address-pool pool1 86400;
};
pool pool1 {
range 2001:2:3:4500:aaaa::1 to 2001:2:3:4500:aaaa::ffff ;
}
注意:dnsmasq也是可以代替radvd的,如使用配置(http://www.thekelleys.org.uk/dnsmasq/docs/dnsmasq-man.html):
dnsmasqenable-ra, 告訴dnsmasq使用ipv6字首
dhcp-range,
ra-only, dnsmasq發RA廣播,但不使用DHCPv6
slaac, dnsmasq發RA廣播,並設定A-bit這樣客戶端能生成SLAAC地址
ra-stateless, dnsmasq發RA廣播,並設定O-bit與A-bit這樣客戶端生成SLAAC地址並使用DHCP檢索其他資訊
ND協議包中有三個位(Auto, Managed, Other):
- M bit (Managed Address Configuration), M bit 如果是 1,表示 Clients 要另外再去跟 DHCPv6 要 IPv6 Prefix
- O bit (Other Configuration), O bit 如果是 1,表示 Clients 要去跟 DHCPv6 要 DNS 等等資訊.
這樣:
- slaas, Stateless autoconfiguration, A=1, M=0, O=0, 主機將只得到 Router 給的 Prefix,無法取得 DNS 等資訊,其他必須自己填寫.
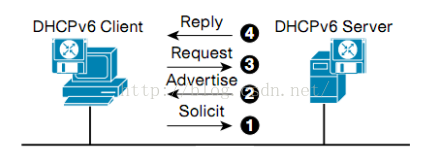
- dhcpv6-stateful, A=0, M=1, O=1, 所有資訊(IPv6 prefix, DNS等)都通過DHCPv6獲得類似於 IPv4 的 DHCP ,客戶端主要使用 UDP port 546 而伺服器端使用 UDP port 547
- dhcpv6-stateless,A=1, M=0, O=1, 除了使用 RA 裡面的 Prefix,其他如 DNS 等等資訊會由 DHCPv6 取得. 如下圖所示:

- ipv6_ra_mode: 置位slaas, dhcpv6-stateful, dhcpv6-stateless後即使用Neutron radvd, 不置位使用外部路由器
- ipv6_address_mode: 置位slaas, dhcpv6-stateful, dhcpv6-stateless決定上述ND協議包中的三個位.
neutron subnet-create --name public-subnet --allocation-pool start=172.16.12.5,end=172.16.12.254 public 172.16.12.0/24
neutron subnet-create --ip-version=6 --name=public-v6-subnet --allocation-pool start=2001:db8:cafe:d::5,end=2001:db8:cafe:d:ffff:ffff:ffff:fffe --disable-dhcp public 2001:db8:cafe:d::/64
neutron net-create private
neutron subnet-create --ip-version=6 --name=private_v6_subnet --ipv6-address-mode=slaac --ipv6-ra-mode=slaac private 2001:db8:cafe::/64
neutron net-create private-dhcpv6
neutron subnet-create --ip-version=6 --name=private_dhcpv6_subnet --ipv6-address-mode=dhcpv6-stateful --ipv6-ra-mode=dhcpv6-stateful private-dhcpv6 2001:db8:cafe:1::/64 --dns-nameserver 2001:db8:cafe:a::e
neutron net-create private-dhcpv6-stateless
neutron subnet-create --ip-version=6 --name=private_dhcpv6_stateless_subnet --ipv6-address-mode=dhcpv6-stateless --ipv6-ra-mode=dhcpv6-stateless private-dhcpv6-stateless 2001:db8:cafe:2::/64 --dns-nameserver 2001:db8:cafe:a::e
neutron router-create router
neutron router-gateway-set router public
neutron router-interface-add router private_v4_subnet
neutron router-interface-add router private_v6_subnet
2) configure router for VM
sysctl -w net.ipv6.conf.all.forwarding=1
ip -6 addr add 2001:2:3:4501:221:70ff:fec0:ef3f/64 dev tap1
ip -6 addr add 2001:2:3:45ff:ff:ff:ff:ff/128 dev qg-interface
ip -6 route add default 2001:2:3:4500::1/56 dev qg-interface
ip address add 2001:2:3:4501::1 dev gw-tenant1
ip address add 2001:2:3:4502::1 dev gw-tenant2
ip -6 route add 2001:2:3:4501::/64 dev gw-tenant1
ip -6 route add 2001:2:3:4502::/64 dev gw-tenant2
ip -6 route list
3) install NDP protocal in the l3-agent node to tell it's address space to upstream network
sysctl -w net.ipv6.conf.all.proxy_ndp=1
ip -6 neigh add proxy 2001:2:3:4501:221:70ff:fec0:ef3f/64 dev gw-tenant1
# is prepared for the hardware router in the front of br-ex
ip -6 neigh add proxy 2001:2:3:4501::1 dev br-ex
ip -6 neigh add proxy 2001:2:3:4502::1 dev br-ex
if no haredware router, we can continue to demo this env user radvd.
ifconfig eth0 promisc
how to test,
1) curl --verbose -6http://localhost
2) tcpdump -ni <interface> ip6
noteson openstack ipv6 support (untested)
1, ipv6 support is not activated in /etc/nova/nova.conf, --use_ipv6=True
2, fixed ip,
nova-manage network create--label=myown \
--vlan=2511 \
--fixed_range_v4=10.145.230.0/24\
--fixed_range_v6=2a01:4f8:161:5304::0/64 \
--gateway_v6=fe80::1 \
--num_networks=1
3, floating ip,
nova-manage floating create --pool=v6pool --ip_range=2a01:4f8:161:5304::10--interface=eth0
cat /etc/dhcp6s.conf
interface br-lan {
address-pool pool1 86400;
};
pool pool1 {
range 2001:2:3:4500:aaaa::1 to 2001:2:3:4500:aaaa::ffff ;
}
2) configure router for VM
上面配置了預設路由後,內部網路就可以訪問外部網路了,但外網無法得知內網的路由。由於沒向ISP申請單獨的IPv6塊,這裡不可能在外網上新增路由,但是:
1,內網與外網同屬同一個子網,不可以配置路由向外網廣播路由資訊包,這樣會造成路由混亂。但可以通過proxy_ndp讓外網的ndp請求穿過閘道器。
2,內網與外網不屬於同一個子網的話,可以配置路由向外網廣播路由資訊包,這樣就不需要配置proxy_ndp了
注: 路由器是按最大字元長度匹配演算法來匹配路由的, 所以字首相同, 子網長度不同的子網算不同的網段. 所以對於不同子網, 加了路由之後, 下面的就不需要再加ndp_proxy了.
外面發給虛機(2001:2:3:4501:221:70ff:fec0:ef3f/64)的包, 由於前56位是可以路由的,所以先發給br-ex(2001:2:3:4500::2/56),然後br-ex介面所在路由器上沒有2001:2:3:4501:221::0/64的轉發表,所以它認為該目的IP為
2001:2:3:4500::0/56網路下的主機,直接向2001:2:3:4500::2/56網路組播NS包,ND proxy發現該包是通向自己內部的主機,於是對該NS進行代理 ,將其轉發到內部網路2001:2:3:4501:221::0/64中的主機,這樣ND proxy就可以獲得目的主機的MAC,本地路由器就可以獲得ND proxy的MAC,因此,資料包就可以傳送到內網虛擬機器。
sysctl -w net.ipv6.conf.all.forwarding=1
ip -6 addr add 2001:2:3:4501:221:70ff:fec0:ef3f/64 dev tap1ip -6 addr add 2001:2:3:45ff:ff:ff:ff:ff/128 dev qg-interface
ip -6 route add default 2001:2:3:4500::1/56 dev qg-interface
ip address add 2001:2:3:4501::1 dev gw-tenant1
ip address add 2001:2:3:4502::1 dev gw-tenant2
ip -6 route add 2001:2:3:4501::/64 dev gw-tenant1
ip -6 route add 2001:2:3:4502::/64 dev gw-tenant2
ip -6 route list
3) install NDP protocal in the l3-agent node to tell it's address space to upstream network
sysctl -w net.ipv6.conf.all.proxy_ndp=1
ip -6 neigh add proxy 2001:2:3:4501:221:70ff:fec0:ef3f/64 dev gw-tenant1
ip -6 neigh add proxy 2001:2:3:4501::1 dev qg-interface
ip -6 neigh add proxy 2001:2:3:4502::1 dev qg-interface
ifconfig eth0 promisc
how to test,
1) curl --verbose -6http://localhost
2) tcpdump -ni <interface> ip6
noteson openstack ipv6 support (untested)
1, ipv6 support is not activated in /etc/nova/nova.conf, --use_ipv6=True
2, fixed ip,
nova-manage network create--label=myown \
--vlan=2511 \
--fixed_range_v4=10.145.230.0/24\
--fixed_range_v6=2a01:4f8:161:5304::0/64 \
--gateway_v6=fe80::1 \
--num_networks=1
3, floating ip,
nova-managefloating create --pool=v6pool --ip_range=2a01:4f8:161:5304::10--interface=eth0
Devstack整合
1, 測試環境準備
因為家中是移動寬頻,沒有公網IP,所以網上的一些ipv6 6to4 tunnel是用不了的。為此將openwrt中的WAN6口刪除,然後點選"Network -> Interfaces"選單配置IPv6 ULA-Prefix=2001:2:3:4500::/56(它會修改配置/etc/config/radvd),並在WAN口中配置IPv6 Setting(Router Advertisement-Service=server mode, DHCPv6-Service
=server mode, NDP-Proxy=disabled [5], DHCPv6-Mode=stateless+stateful)。
這樣家中的電腦會獲取到類似2001:2:3:4500:c12c:6b76:fa2e:74ee/64的IPv6地址, 同時openwrt的br-lan口會有閘道器地址2001:2:3:4500::1/60
vi /etc/network/interfaces
allow-ovs br-phy
iface br-phy inet dhcp
ovs_type OVSBridge
ovs_ports eth0
2, devstack配置
#IPv6 tenant network
IP_VERSION=6
IPV6_RA_MODE=slaac
IPV6_ADDRESS_MODE=slaac
FIXED_RANGE_V6=2001:2:3:4500::/64
IPV6_PRIVATE_NETWORK_GATEWAY=2001:2:3:4500::1
HOST_IPV6=2001:2:3:4500:fa32:e4ff:febe:87cd
#IPv6 management network
SERVICE_IP_VERSION=6
SERVICE_HOST=[$HOST_IPV6]
MYSQL_HOST=$HOST_IPV6
3, 環境變數
export OS_USERNAME=admin
export OS_PASSWORD=password
export OS_TENANT_NAME=demo
export OS_AUTH_URL=http://[2001:2:3:4500:fa32:e4ff:febe:87cd]/v2.0
export OS_AUTH_STRATEGY=keystone
4, 問題, memcached中報錯:ValueError: Unable to parse connection string: [2001:2:3:4500:fa32:e4ff:febe:87cd]:11211
diff --git a/lib/keystone b/lib/keystone
index 5695004..55b581f 100644
--- a/lib/keystone
+++ b/lib/keystone
@@ -490,7 +490,7 @@ function configure_auth_token_middleware {
iniset $conf_file $section auth_uri $KEYSTONE_SERVICE_URI
iniset $conf_file $section cafile $SSL_BUNDLE_FILE
iniset $conf_file $section signing_dir $signing_dir
- iniset $conf_file $section memcached_servers $SERVICE_HOST:11211
+ iniset $conf_file $section memcached_servers inet6:${SERVICE_HOST}:11211
}
BGP+IPv6
#Create two pools default-pool-ip6(2001:db8:1234::/48) and public-pool(2001:db8:4321:42::/64).
neutron address-scope-create --shared address-scope-ip6 6
neutron subnetpool-create --address-scope address-scope-ip6 --shared --pool-prefix 2001:db8:1234::/48 --default-prefixlen 64 --max-prefixlen 64 --is-default true default-pool-ip6
neutron subnetpool-create --address-scope address-scope-ip6 --pool-prefix 2001:db8:4321:42::/64 --default-prefixlen 64 public-pool
#Create our public network and the IPv6 subnet on the two pools:
neutron net-create --provider:network_type flat --provider:physical_network external --router:external=True public
neutron subnet-create --name public-ip6 --ip_version 6 --subnetpool public-pool public
neutron net-create pronet
neutron subnet-create --name subnet6 --ip_version 6 --use-default-subnetpool --ipv6-address-mode slaac --ipv6-ra-mode slaac pronet
#Create router and VM
neutron router-create router1
neutron router-interface-add <router1 pronet_subnet_id>
neutron router-gateway-set router1 public
nova boot --flavor 1 --image cirros vm1
1, neutron.conf
service_plugins = bgp, router
2, BGP setup
neutron bgp-speaker-create --ip-version 6 --local-as 65001 --advertise-floating-ip-host-routes false bgp1
neutron bgp-speaker-network-add bgp1 public
neutron bgp-peer-create --peer-ip 2001:db8:4321:e0::1 --remote-as 65001 bgp-peer1
neutron bgp-speaker-peer-add bgp1 bgp-peer1
3, BGP agent
sudo apt install neutron-bgp-dragent python-ryu
neutron bgp-dragent-speaker-add <bgp-agent-id> bgp1
vi /etc/neutron/bgp_dragent.ini
[BGP]
# BGP speaker driver class to be instantiated. (string value)
bgp_speaker_driver = neutron.services.bgp.driver.ryu.driver.RyuBgpDriver
# 32-bit BGP identifier, typically an IPv4 address owned by the system running
# the BGP DrAgent. (string value)
bgp_router_id = 10.11.12.13
4, 驗證, bird配置檔案如下:
protocol bgp {
local as 65001;
neighbor 2001:db8:4321:e0::42 as 65001;
}
bird> show proto bgp1
name proto table state since info
bgp1 BGP master up 12:06:50 Established
bird> show route 2001:db8:1234:1::/64
2001:db8:1234:1::/64 via 2001:db8:4321:2::5 on ens3 [bgp1 12:06:50 from 2001:db8:4321:e0::42] * (100/0) [i]
router01:~$ ping6 -c3 2001:db8:1234:1:f816:3eff:fecd:6bf4
PING 2001:db8:1234:1:f816:3eff:fecd:6bf4(2001:db8:1234:1:f816:3eff:fecd:6bf4) 56 data bytes
64 bytes from 2001:db8:1234:1:f816:3eff:fecd:6bf4: icmp_seq=1 ttl=63 time=1.80 ms
Reference
http://blog.sina.com.cn/s/blog_4afa958f0101cm5z.html
http://www.docin.com/p-1014142107.html
http://blogs.rdoproject.org/7199/journey-of-ipv6-in-openstack
https://cloudbau.github.io/openstack/neutron/networking/2016/05/17/neutron-ipv6.html
相關文章
- 【討論】論 cursor 在測試中的使用
- 測試理論
- 測試中,介面測試的必要性與介面測試的基礎用例設計
- 為了未來的使用測試
- 遊戲設計與理論化研究(2)——黑箱方法論的運用遊戲設計
- 軟體測試理論(1)基礎理論
- 演算法設計與分析---論序演算法
- 正交分析法設計理論及實踐
- 08-01 Jmeter 核心原理與效能測試理論JMeter
- 銀行軟體測試:基於網際網路金融平臺的測試框架設計與分析框架
- 淺談Hbase與中間的一些設計策略
- 測試流程和理論--測試流程體系
- 百度評論中臺的設計與探索
- 關於ASM的一些理論ASM
- java系統可靠性測試設計與用例分析Java
- 分享一個提升測試內部測試理論基礎的小方法
- 軟體測試理論(2)自動化測試
- 軟體測試基礎理論
- 1.測試理論知識
- Handler的一點理論分析
- 一些實用的職場理論
- 打破虛擬與現實邊界的遊戲設計理論框架遊戲設計框架
- 菜鳥小白的測試基礎理論總結(一)
- OPF理論在回合RPG中的分析和應用
- 程式設計師與測試員的立場對立程式設計師
- APP測試設計測試用例的要點APP
- 電腦科學和Python程式設計導論(六) 測試與除錯Python程式設計除錯
- 統計學理論—方差分析
- Norns.Urd 中的一些設計
- 2024最新軟體測試【測試理論+ 介面測試】面試題(內附答案)面試題
- 基於 BDD 理論的 Nebula 整合測試框架重構(下篇)框架
- 基於 BDD 理論的 Nebula 整合測試框架重構(上篇)框架
- OpenStack平臺的使用
- 多測師肖sir_測試理論之測試思維(1)
- 2024最新軟體測試【測試理論+ 抓包與網路協議】面試題(內附答案)協議面試題
- 效能測試之測試分析與調優
- 基於TRIZ理論的筷子儲存盒設計
- hashmap的一些效能測試HashMap
- 『居善地』介面測試 — 7、介面自動化測試框架的設計與實現框架