List在各種手機應用中都有體現,是安卓UI設計的必修課。
本文將介紹在開發中如何利用ListView和GridView設計自定義列表。
下面分別是用ListView和GridView做的效果:
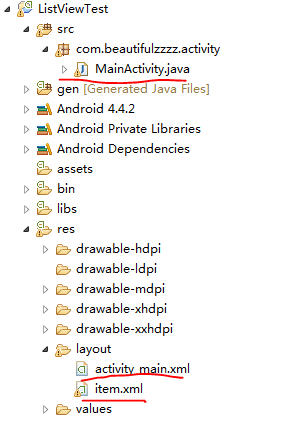
上面兩個看似相差很大,但是其程式碼非常類似,主要有:


① 在頁面中嵌入ListView或GridView:
ListView的activity_main.xml
 1 <RelativeLayout xmlns:android="http://schemas.android.com/apk/res/android"
 2     xmlns:tools="http://schemas.android.com/tools"
 3     android:layout_width="match_parent"
 4     android:layout_height="match_parent"
 5     android:paddingBottom="@dimen/activity_vertical_margin"
 6     android:paddingLeft="@dimen/activity_horizontal_margin"
 7     android:paddingRight="@dimen/activity_horizontal_margin"
 8     android:paddingTop="@dimen/activity_vertical_margin"
 9     tools:context="com.beautifulzzzz.activity.MainActivity" >
10
11     <ListView
12         android:id="@+id/listView1"
13                 android:layout_width="match_parent"
14         android:layout_height="match_parent"
15         android:padding="5dp" >
16
17     </ListView>
18
19 </RelativeLayout>
GridView的activity_main.xml
 1 <RelativeLayout xmlns:android="http://schemas.android.com/apk/res/android"
 2     xmlns:tools="http://schemas.android.com/tools"
 3     android:layout_width="match_parent"
 4     android:layout_height="match_parent"
 5     android:background="@color/orange_red"
 6     android:paddingBottom="@dimen/activity_vertical_margin"
 7     android:paddingLeft="@dimen/activity_horizontal_margin"
 8     android:paddingRight="@dimen/activity_horizontal_margin"
 9     android:paddingTop="@dimen/activity_vertical_margin"
10     tools:context="com.beautifulzzzz.activity.MainActivity" >
11
12  <GridView
13         android:id="@+id/gridView1"
14         android:layout_width="match_parent"
15         android:layout_height="match_parent"
16         android:numColumns="3"
17         android:padding="5dp" >
18     </GridView>
19
20 </RelativeLayout>
② 設計每個單元樣式:
兩個工程的item.xml一樣,如果想定製不同的效果:如朋友圈列表那樣的就要精心設計這個item了(不排除有其他方法)!
該item.xml佈局顯示效果就是上面一個圖片,下面一個文字
 1 <?xml version="1.0" encoding="utf-8"?>
 2 <LinearLayout xmlns:android="http://schemas.android.com/apk/res/android"
 3     android:layout_width="match_parent"
 4     android:layout_height="match_parent"
 5     android:gravity="center"
 6     android:orientation="vertical"
 7     android:padding="22dp"
 8     android:background="@drawable/item_selector">
 9
10 <ImageView
11     android:id="@+id/image"
12     android:layout_width="match_parent"
13     android:layout_height="50dp" />
14
15 <TextView
16     android:id="@+id/text"
17     android:layout_width="wrap_content"
18     android:layout_height="wrap_content"
19     android:textColor="#ffffff"
20     android:text="文字"
21     />
22 </LinearLayout>
③ 設計Adapter和監聽事件:
兩個程式碼很相似,下面紅色的部分是將資料和item.xml中的元素繫結~class ItemClickListener implements OnItemClickListener是item點選監聽事件類,在其內部呼叫.get(key)獲得點選item中相應的元素值(是一種map的儲存方式)。
ListView的MainActivity.java
 1 public class MainActivity extends Activity {
 2
 3     private ListView lview;
 4     private List<Map<String, Object>> data_list;
 5     private SimpleAdapter sim_adapter;
 6     // ICON
 7     private int[] icon = { R.drawable.icon_01, R.drawable.icon_02,
 8             R.drawable.icon_03, R.drawable.icon_04, R.drawable.icon_05,
 9             R.drawable.icon_06, R.drawable.icon_07, R.drawable.icon_08,
10             R.drawable.icon_09, R.drawable.icon_10, R.drawable.icon_11,
11             R.drawable.icon_12, R.drawable.icon_13, R.drawable.icon_14 };
12     private String[] iconName = { "ͨ茶葉", "漢堡", "肉", "香腸", "披薩", "蝦", "水果", "魚",
13             "麵包", "蟹", "雞腿", "根莖蔬菜", "蛋糕", "酒" };
14
15     public void onCreate(Bundle savedInstanceState) {
16         super.onCreate(savedInstanceState);
17         this.requestWindowFeature(Window.FEATURE_NO_TITLE);
18         // this.getWindow().setFlags(WindowManager.LayoutParams.FLAG_FULLSCREEN,
19         // WindowManager.LayoutParams.FLAG_FULLSCREEN);
20         setContentView(R.layout.activity_main);
21
22         lview = (ListView) findViewById(R.id.listView1);
23         data_list = new ArrayList<Map<String, Object>>();
24
25         getData();
26
27         String[] from = { "image", "text" };
28         int[] to = { R.id.image, R.id.text };
29         sim_adapter = new SimpleAdapter(this, data_list, R.layout.item, from,
30                 to);
31
32         lview.setAdapter(sim_adapter);
33         lview.setOnItemClickListener(new ItemClickListener());
34     }
35
36     public List<Map<String, Object>> getData() {
37         for (int i = 0; i < icon.length; i++) {
38             Map<String, Object> map = new HashMap<String, Object>();
39             map.put("image", icon[i]);
40             map.put("text", iconName[i]);
41             data_list.add(map);
42         }
43
44         return data_list;
45     }
46
47     // 當AdapterView被單擊(觸控式螢幕或者鍵盤),則返回的Item單擊事件
48     class ItemClickListener implements OnItemClickListener {
49         public void onItemClick(AdapterView<?> arg0,// The AdapterView where the
50                                                     // click happened
51                 View arg1,// The view within the AdapterView that was clicked
52                 int arg2,// The position of the view in the adapter
53                 long arg3// The row id of the item that was clicked
54         ) {
55             // 在本例中arg2=arg3
56             HashMap<String, Object> item = (HashMap<String, Object>) arg0
57                     .getItemAtPosition(arg2);
58             // 顯示所選Item的ItemText
59             setTitle((String) item.get("text"));// the item is map,you can
60                                                 // seethe function getData,if
61                                                 // want get the value, just use
62                                                 // .get(key) to get the value
63         }
64     }
65 }
GridView的MainActivity.java
 1 public class MainActivity extends Activity {
 2
 3     private GridView gview;
 4     private List<Map<String, Object>> data_list;
 5     private SimpleAdapter sim_adapter;
 6     // ICON
 7     private int[] icon = { R.drawable.icon_01, R.drawable.icon_02,
 8             R.drawable.icon_03, R.drawable.icon_04, R.drawable.icon_05,
 9             R.drawable.icon_06, R.drawable.icon_07, R.drawable.icon_08,
10             R.drawable.icon_09, R.drawable.icon_10, R.drawable.icon_11,
11             R.drawable.icon_12, R.drawable.icon_13, R.drawable.icon_14 };
12     private String[] iconName = { "ͨ茶葉", "漢堡", "肉", "香腸", "披薩", "蝦", "水果", "魚",
13             "麵包", "蟹", "雞腿", "根莖蔬菜", "蛋糕", "酒" };
14
15     public void onCreate(Bundle savedInstanceState) {
16         super.onCreate(savedInstanceState);
17         this.requestWindowFeature(Window.FEATURE_NO_TITLE);
18         // this.getWindow().setFlags(WindowManager.LayoutParams.FLAG_FULLSCREEN,
19         // WindowManager.LayoutParams.FLAG_FULLSCREEN);
20         setContentView(R.layout.activity_main);
21
22         gview = (GridView) findViewById(R.id.gridView1);
23         data_list = new ArrayList<Map<String, Object>>();
24
25         getData();
26
27         String[] from = { "image", "text" };
28         int[] to = { R.id.image, R.id.text };
29         sim_adapter = new SimpleAdapter(this, data_list, R.layout.item, from,
30                 to);
31
32         gview.setAdapter(sim_adapter);
33         gview.setOnItemClickListener(new ItemClickListener());
34     }
35
36     public List<Map<String, Object>> getData() {
37         for (int i = 0; i < icon.length; i++) {
38             Map<String, Object> map = new HashMap<String, Object>();
39             map.put("image", icon[i]);
40             map.put("text", iconName[i]);
41             data_list.add(map);
42         }
43
44         return data_list;
45     }
46
47     // 當AdapterView被單擊(觸控式螢幕或者鍵盤),則返回的Item單擊事件
48     class ItemClickListener implements OnItemClickListener {
49         public void onItemClick(AdapterView<?> arg0,// The AdapterView where the
50                                                     // click happened
51                 View arg1,// The view within the AdapterView that was clicked
52                 int arg2,// The position of the view in the adapter
53                 long arg3// The row id of the item that was clicked
54         ) {
55             // 在本例中arg2=arg3
56             HashMap<String, Object> item = (HashMap<String, Object>) arg0
57                     .getItemAtPosition(arg2);
58             // 顯示所選Item的ItemText
59             setTitle((String) item.get("text"));// the item is map,you can
60                                                 // seethe function getData,if
61                                                 // want get the value, just use
62                                                 // .get(key) to get the value
63         }
64     }
65 }
在研究上面問題過程中記錄了幾個有用的連結:
1、安卓 GridView item均勻分佈:http://zhidao.baidu.com/link?url=XphquqnT6InmtaovIy9XqfRNEaQqzE8JCvqsVN8H46Fb_aXCALxbADzotyMCNreQDiqC6i0Is1WUI5twCQfl6V1BkvbbW1RrzZoGHOSeNoq
2、Android API 中文(15) —— GridView:http://www.cnblogs.com/over140/archive/2010/10/19/1855366.html
3、gridview中的OnItemClickListener事件觸發問題!!!
4、Android應用開發筆記(10):製作自定義背景Button按鈕、自定義形狀Button的全攻略
5、android selector(如對TextView點選樣式改變) - perfect亮:http://www.cnblogs.com/liangstudyhome/p/3695305.html
MMMMMMMMMMMMM
- 上面工程中點選item的點選效果被我重新定義過了,具體用了第5點連結中說的selector:
- 在item.xml的第8行:android:background="@drawable/item_selector"
- 在drawable資料夾內新建item_selector.xml
-
1 <?xml version="1.0" encoding="utf-8"?>
2 <selector xmlns:android="http://schemas.android.com/apk/res/android" >
3     <item android:state_pressed="true"
4         android:drawable="@color/orange_red_shen" />
5     <item android:state_focused="true"
6         android:drawable="@color/orange_red_shen" />
7     <item android:drawable="@color/orange_red" />
8 </selector>
MMMMMMMMMMMMM
上述兩個工程的原始碼:
GridView工程:http://pan.baidu.com/s/1sjQlRCp
ListView工程:http://pan.baidu.com/s/1i3zxUj7
@beautifulzzzz
2015-11-10 持續更新中~