用Python socket 實現一個簡單的http伺服器(post 與get 的區別)、CGI、WSGI、MVC
預備知識:
關於http 協議的基礎請參考這裡。
關於socket 基礎函式請參考這裡。
關於python 網路程式設計基礎請參考這裡。
一、python socket 實現的簡單http伺服器
廢話不多說,前面實現過使用linux c 或者python 充當客戶端來獲取http 響應,也利用muduo庫實現過一個簡易http伺服器,現在來實現一個python版
的簡易http伺服器,程式碼改編自 http://www.cnblogs.com/vamei/ and http://www.liaoxuefeng.com/
httpServer.py
Python Code
|
1 |
#!/usr/bin/env python |
chmod +x httpServer.py, 並執行./httpServer.py
使用瀏覽器當做客戶端訪問伺服器
在httpServer.py 所在目錄有index.html, reg.html, T-mac.jpg
1、訪問目錄: http://192.168.56.188:8000/index.html
伺服器輸出:
Connect by: ('192.168.56.1', 6274)
Request is:
GET /index.html HTTP/1.1
Host: 192.168.56.188:8000
Connection: keep-alive
Accept: text/html,application/xhtml+xml,application/xml;q=0.9,image/webp,*/*;q=0.8
User-Agent: Mozilla/5.0 (Windows NT 6.1) AppleWebKit/537.36 (KHTML, like Gecko)
Chrome/33.0.1750.146 Safari/537.36
Accept-Encoding: gzip,deflate,sdch
Accept-Language: zh-CN,zh;q=0.8,en;q=0.6,zh-TW;q=0.4
回顧程式碼可知我們給客戶端的響應是頭部+index.html, index.html如下:
HTML Code
|
1 |
<html> |
進而進一步訪問T-mac.jpg,由於我們在實現伺服器時使用短連線,即響應一次就關掉連線,所以客戶端會再發起一次連線,如下:
Connect by: ('192.168.56.1', 6275)
Request is:
GET /T-mac.jpg HTTP/1.1
Host: 192.168.56.188:8000
Connection: keep-alive
Accept: image/webp,*/*;q=0.8
User-Agent: Mozilla/5.0 (Windows NT 6.1) AppleWebKit/537.36 (KHTML, like Gecko)
Chrome/33.0.1750.146 Safari/537.36
Referer: http://192.168.56.188:8000/index.html
Accept-Encoding: gzip,deflate,sdch
Accept-Language: zh-CN,zh;q=0.8,en;q=0.6,zh-TW;q=0.4
同樣地,伺服器響應頭部+圖片的二進位制資料,如下圖所示:

當然你也可以直接訪問 http://192.168.56.188:8000/T-mac.jpg
2、訪問目錄:http://192.168.56.188:8000/reg.html
伺服器輸出:
Connect by: ('192.168.56.1', 6282)
Request is:
GET /reg.html HTTP/1.1
Host: 192.168.56.188:8000
Connection: keep-alive
Accept: text/html,application/xhtml+xml,application/xml;q=0.9,image/webp,*/*;q=0.8
User-Agent: Mozilla/5.0 (Windows NT 6.1) AppleWebKit/537.36 (KHTML, like Gecko)
Chrome/33.0.1750.146 Safari/537.36
Accept-Encoding: gzip,deflate,sdch
Accept-Language: zh-CN,zh;q=0.8,en;q=0.6,zh-TW;q=0.4
同樣地,我們把頭部+reg.html 響應過去,reg.html 是登錄檔單如下:
HTML Code
|
1 |
<!DOCTYPE HTML PUBLIC "-//W3C//DTD HTML 4.01//EN" "http://www.w3.org/TR/html4/strict.dtd"> |
我們隨便填一些資訊上去然後點選提交資料,如下圖:

此時瀏覽器會訪問 http://192.168.56.188:8000/
伺服器輸出為:
Connect by: ('192.168.56.1', 6578)
Request is:
POST / HTTP/1.1
Host: 192.168.56.188:8000
Connection: keep-alive
Content-Length: 59
Cache-Control: max-age=0
Accept: text/html,application/xhtml+xml,application/xml;q=0.9,image/webp,*/*;q=0.8
Origin: http://192.168.56.188:8000
User-Agent: Mozilla/5.0 (Windows NT 6.1) AppleWebKit/537.36 (KHTML, like Gecko)
Chrome/33.0.1750.146 Safari/537.36
Content-Type: application/x-www-form-urlencoded
Referer: http://192.168.56.188:8000/reg.html
Accept-Encoding: gzip,deflate,sdch
Accept-Language: zh-CN,zh;q=0.8,en;q=0.6,zh-TW;q=0.4
user=simba&psw=1990&repsw=1990&sex=nan&tech=java&country=cn
注意:即表單中的name=value,以&分隔。
回顧程式碼,我們只是將瀏覽器提交的資料體直接發回去,再輸出register success! 瀏覽器輸出如下圖:

如果我們把 表單中的 <form action="http://192.168.56.188:8000" method="post"> method 改成get,會是怎樣的呢?
此時瀏覽器會訪問 http://192.168.56.188:8000/?user=simba&psw=1990&repsw=1990&sex=nan&tech=java&country=cn
伺服器輸出為:
Connect by: ('192.168.56.1', 6382)
Request is:
GET /?user=simba&psw=1990&repsw=1990&sex=nan&tech=java&country=cn HTTP/1.1
Host: 192.168.56.188:8000
Connection: keep-alive
Accept: text/html,application/xhtml+xml,application/xml;q=0.9,image/webp,*/*;q=0.8
User-Agent: Mozilla/5.0 (Windows NT 6.1) AppleWebKit/537.36 (KHTML, like Gecko)
Chrome/33.0.1750.146 Safari/537.36
Referer: http://192.168.56.188:8000/reg.html
Accept-Encoding: gzip,deflate,sdch
Accept-Language: zh-CN,zh;q=0.8,en;q=0.6,zh-TW;q=0.4
因為我們應答回去的資料跟post一致,故瀏覽器看到的輸出也是一樣的。
在這裡可以總結一下post 跟 get 提交的一些區別:
get提交,提交的資訊都顯示在位址列中;對於敏感資料不安全;由於位址列儲存體積有限而不能提交大容量資料;將資訊封裝到了請求訊息的請求行中,而post 提交將資訊封裝到了請求體中。
二、CGIHTTPServer:使用靜態檔案或者CGI來回應請求

先看看什麼是CGI (Common Gateway Interface)。CGI是伺服器和應用指令碼之間的一套介面標準。它的功能是當客戶端訪問cgi指令碼檔案時讓伺服器程式執行此指令碼程式,將程式的輸出作為response傳送給客戶。總體的效果,是允許伺服器動態的生成回覆內容,而不必侷限於靜態檔案。
支援CGI的伺服器程式接收到客戶的請求,根據請求中的URL,執行對應的指令碼檔案。伺服器會將HTTP請求的資訊通過環境變數的方式傳遞給指令碼檔案,並等待指令碼的輸出。指令碼的輸出封裝成合法的HTTP回覆,傳送給客戶。CGI可以充分發揮伺服器的可程式設計性,讓伺服器變得“更聰明”。伺服器和CGI 指令碼之間的通訊要符合CGI標準。CGI的實現方式有很多,比如說使用Apache 伺服器與Perl 寫的CGI指令碼,或者Python 伺服器與shell寫的CGI 指令碼。
為了使用CGI,我們需要使用 BaseHTTPServer 包中的 HTTPServer 類來構建伺服器。
# Written by Vamei
# A messy HTTP server based on TCP socket

import BaseHTTPServer
import CGIHTTPServer

HOST = ''
PORT = 8000

# Create the server, CGIHTTPRequestHandler is pre-defined handler
server = BaseHTTPServer.HTTPServer((HOST, PORT), CGIHTTPServer.CGIHTTPRequestHandler)
# Start the server
server.serve_forever()
CGIHTTPRequestHandler 預設當前目錄下的cgi-bin和ht-bin資料夾中的檔案為CGI指令碼,而存放於其他地方的檔案被認為是靜態檔案。因此需要修改一下index.html,將其中form元素指向的action改為cgi-bin/post.py。
<head>
<title>WOW</title>
</head>
<html>
<p>Wow, Python Server</p>
<IMG src="test.jpg"/>
<form name="input" action="cgi-bin/post.py" method="post">
First name:<input type="text" name="firstname"><br>
<input type="submit" value="Submit">
</form>
</html>
建立一個cgi-bin的資料夾,並在cgi-bin中放入如下post.py檔案,也就是 CGI指令碼:
#!/usr/bin/env python
# Written by Vamei
import cgi
form = cgi.FieldStorage()

# Output to stdout, CGIHttpServer will take this as response to the client
print "Content-Type: text/html"     # HTML is following
print                               # blank line, end of headers
print "<p>Hello world!</p>"         # Start of content
print "<p>" +  repr(form['firstname']) + "</p>"
(注意:post.py 需要有可執行許可權)
第一行說明了指令碼所使用的語言,即Python。 cgi包用於提取請求中包含的表格資訊。指令碼只負責將所有的結果輸出到標準輸出(使用print)。
CGIHTTPRequestHandler 會收集這些輸出,封裝成HTTP回覆,傳送給客戶端。
對於POST 方法的請求,它的URL需要指向一個CGI指令碼(也就是在cgi-bin或者ht-bin中的檔案)。CGIHTTPRequestHandler 繼承自SimpleHTTPRequestHandler,所以也可以處理GET方法和HEAD方法的請求。此時,如果URL指向CGI指令碼時,伺服器將指令碼的執行結果傳送到客戶端;當此時URL指向靜態檔案時,伺服器將檔案的內容傳送到客戶端。更進一步,我可以讓CGI指令碼執行資料庫操作,比如將接收到的資料放入到資料庫中以及更豐富的程式操作,相關內容從略。
三、python 中的 WSGI
WSGI, Web Server Gateway Interface。WSGI 是Python 對CGI 進行的一種包裝,核心使用Python實現,具體實現通常來說也需要使用Python,目前Django 等web框架都實現了WSGI。
WSGI 介面定義非常簡單,它只要求Web 開發者實現一個函式,就可以響應HTTP請求。來看一個最簡單的Web版本的“Hello, web!”:
def application(environ, start_response):
    start_response('200 OK', [('Content-Type', 'text/html')])
    return '<h1>Hello, web!</h1>'
上面的application()函式就是符合WSGI標準的一個HTTP處理函式,它接收兩個引數:
-
environ:一個包含所有HTTP請求資訊的
dict物件; -
start_response:一個傳送HTTP響應的函式。
在application()函式中,呼叫:
start_response('200 OK', [('Content-Type', 'text/html')])
就傳送了HTTP響應的Header,注意Header只能傳送一次,也就是隻能呼叫一次start_response()函式。start_response()函式接收兩個引數,一個是HTTP響應碼,一個是一組list表示的HTTP頭部,每個Header用一個包含兩個str的tuple表示。
Python內建了一個WSGI 伺服器,這個模組叫 wsgiref,它是用純 Python 編寫的WSGI 伺服器的參考實現。所謂“參考實現”是指該實現完全符合WSGI 標準,但是不考慮任何執行效率,僅供開發和測試使用。
執行WSGI服務
我們先編寫hello.py,實現Web應用程式的WSGI 處理函式:
# hello.py

def application(environ, start_response):
    start_response('200 OK', [('Content-Type', 'text/html')])
    return '<h1>Hello, %s!</h1>' % (environ['PATH_INFO'][1:] or 'web')
然後,再編寫一個server.py,負責啟動WSGI伺服器,載入application()函式:
# server.py
# 從wsgiref模組匯入:
from wsgiref.simple_server import make_server
# 匯入我們自己編寫的application函式:
from hello import application

# 建立一個伺服器,IP地址為空,埠是8000,處理函式是application:
httpd = make_server('', 8000, application)
print "Serving HTTP on port 8000..."
# 開始監聽HTTP請求:
httpd.serve_forever()
訪問 http://localhost:8000/simba 會列印 Hello, simba!
四、MVC:Model-View-Controller

(一)中我們需要自己監聽埠,接收http 請求,解析 http 請求,傳送http 響應(包括靜態檔案和訪問 cgi),就好象實現了一個極簡版的 apache/lighttpd/nginx;
(二/三)中利用已有的 cgi/wsgi 伺服器,我們只需要實現如何響應http 請求即可。
但如上的方式需要對每一個不同的請求(引數)都實現一個函式來響應,作為真正的web 後臺實現來說肯定是不適用的,我們需要將同個目錄的請求統一處理。比如一些python web 框架如 web.py 會自己實現一個 wsgi 伺服器,並留出介面,讓開發者更好地實現 web 應用的功能,將 url 對映到各個不同的 python class,在 class 內會定義 GET/POST 方法,使用者訪問url 則由對應的 class 類來處理,如下所示。當然具體展示給使用者的html 肯定是根據得到的變數值替換而成,即模板化,不同模板有不同的語法。在Jinja2 模板中,用{{ name }}表示一個需要替換的變數;很多時候,還需要迴圈、條件判斷等指令語句,在Jinja2中用{% ... %}表示指令。
Python Code
|
1 |
urls = ( |
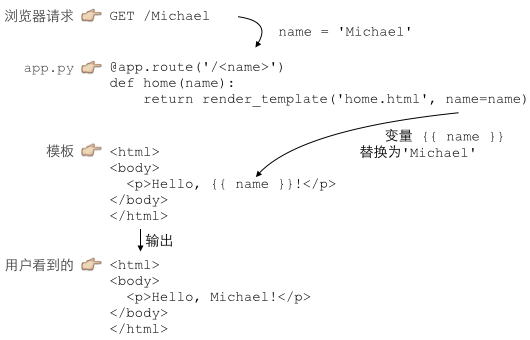
這就是傳說中的MVC:Model-View-Controller,中文名“模型-檢視-控制器”。
Python 處理URL的函式就是C:Controller,Controller 負責業務邏輯,比如檢查使用者名稱是否存在,取出使用者資訊等等;
包含變數{{ name }}的模板就是V:View,View 負責顯示邏輯,通過簡單地替換一些變數,View最終輸出的就是使用者看到的HTML。
MVC 中的Model在哪?Model是用來傳給View 的,這樣View 在替換變數的時候,就可以從Model 中取出相應的資料。
上面的例子中,Model 就是一個dict:
{ 'name': 'Michael' }
只是因為Python支援關鍵字引數,很多Web框架允許傳入關鍵字引數,然後,在框架內部組裝出一個dict作為Model。
在實際應用中往往也會把資料庫表的操作認為是Model,通過從請求獲取的資訊,進而在庫表查詢出需要替換url 的變數值。
注意:一般一個表一個Model,而且把表操作函式中的表名寫死,這樣如果表有欄位變動,只需改動此Model,而無需修改其他呼叫此表操作的地方。此外,在一個Web App 中,有多個使用者會同時訪問,假設以多執行緒模式來處理每個使用者的請求,每個執行緒在訪問資料庫時都必須建立僅屬於自身的連線,對別的執行緒不可見,否則就會造成資料庫操作混亂,此時可能需要用到 threading.local 物件。
參考:
http://www.tutorialspoint.com/cplusplus/cpp_web_programming.htm
http://www.cnblogs.com/vamei
http://www.liaoxuefeng.com/
相關文章
- HTTP中GET與POST的區別HTTP
- 淺談HTTP中Get與Post的區別HTTP
- 淺談HTTP中Get與Post的區別-javaHTTPJava
- GET 與 POST 的區別
- post與get的區別
- get與post的區別?
- http中的get和post的區別HTTP
- 用 go 實現一個簡單的 mvcGoMVC
- Http get,post,soap協議的區別HTTP協議
- GET與POST的真正區別
- 再看GET與POST的區別
- http和https的區別/get和post的區別HTTP
- HTTP中Get與Post有什麼區別?HTTP
- GET與POST區別
- socket與http的區別HTTP
- 你真的瞭解HTTP中GET與POST的區別嗎?HTTP
- http請求之get和post的區別HTTP
- HTTP協議類POST 和GET的區別HTTP協議
- php實現一個簡單的socketPHP
- get與post的請求區別
- get與post的區別總結
- 99%的人都理解錯了 HTTP 中 GET 與 POST 的區別HTTP
- 99%的人都理解錯了HTTP中GET與POST的區別HTTP
- http請求中get和post方法的區別HTTP
- HTTP協議GET和POST請求的區別HTTP協議
- 99%的人都理解錯了HTTP中GET與POST的區別 (轉)HTTP
- GET和POST的區別?
- GET和POST的區別
- GET 和 POST 的區別
- POST 和 GET 的區別
- POST與GET請求區別
- C#實現一個最簡單的HTTP伺服器C#HTTP伺服器
- orm的method屬性值post和get的區別簡單介紹ORM
- 一個用C#實現的簡單http server (轉)C#HTTPServer
- post方式get方式提交表單的主要區別
- http協議中,“get”和“post”的區別是什麼HTTP協議
- 淺談HTTP中GET和POST請求方式的區別HTTP
- post、get的區別總結