物件導向程式設計風格 VS 基於物件程式設計風格(boost::bind/function)
本文主要通過實現Thread 類來展現兩種程式設計風格的不同點。
很多人沒有區分“物件導向”和“基於物件”兩個不同的概念。物件導向的三大特點(封裝,繼承,多型)缺一不可。通常“基於物件”是使用物件,但是無法利用現有的物件模板產生新的物件型別,繼而產生新的物件,也就是說“基於物件”沒有繼承的特點。而“多型”表示為父類型別的子類物件例項,沒有了繼承的概念也就無從談論“多型”。現在的很多流行技術都是基於物件的,它們使用一些封裝好的物件,呼叫物件的方法,設定物件的屬性。但是它們無法讓程式設計師派生新物件型別。他們只能使用現有物件的方法和屬性。所以當你判斷一個新的技術是否是物件導向的時候,通常可以使用後兩個特性來加以判斷。“物件導向”和“基於物件”都實現了“封裝”的概念,但是物件導向實現了“繼承和多型”,而“基於物件”沒有實現這些。----摘自網路
一、物件導向程式設計風格
Thread 類圖:

注:下劃線表示靜態成員
Thread.h:
C++ Code
|
1
2 3 4 5 6 7 8 9 10 11 12 13 14 15 16 17 18 19 20 21 22 23 24 25 |
#ifndef _THREAD_H_
#define _THREAD_H_ #include <pthread.h> class Thread { public: Thread(); virtual ~Thread(); void Start(); void Join(); void SetAutoDelete(bool autoDelete); private: static void *ThreadRoutine(void *arg); //沒有隱含的this 指標 virtual void Run() = 0; pthread_t threadId_; bool autoDelete_; }; #endif // _THREAD_H_ |
Thread.cpp:
C++ Code
|
1
2 3 4 5 6 7 8 9 10 11 12 13 14 15 16 17 18 19 20 21 22 23 24 25 26 27 28 29 30 31 32 33 34 35 36 37 38 39 |
#include "Thread.h"
#include <iostream> using namespace std; Thread::Thread() : autoDelete_(false) { cout << "Thread ..." << endl; } Thread::~Thread() { cout << "~Thread ..." << endl; } void Thread::Start() { pthread_create(&threadId_, NULL, ThreadRoutine, this); } void Thread::Join() { pthread_join(threadId_, NULL); } void *Thread::ThreadRoutine(void *arg) { Thread *thread = static_cast<Thread *>(arg); thread->Run(); //執行緒結束,執行緒物件也得析構 if (thread->autoDelete_) delete thread; return NULL; } void Thread::SetAutoDelete(bool autoDelete) { autoDelete_ = autoDelete; } |
Thread_test.cpp:
C++ Code
|
1
2 3 4 5 6 7 8 9 10 11 12 13 14 15 16 17 18 19 20 21 22 23 24 25 26 27 28 29 30 31 32 33 34 35 36 37 38 39 40 41 42 43 44 |
#include "Thread.h"
#include <unistd.h> #include <iostream> using namespace std; class TestThread : public Thread { public: TestThread(int count) : count_(count) { cout << "TestThread ..." << endl; } ~TestThread() { cout << "~TestThread ..." << endl; } private: void Run() { while (count_--) { cout << "this is a test ..." << endl; sleep(1); } } int count_; }; int main(void) { TestThread *t2 = new TestThread(5); t2->SetAutoDelete(true); t2->Start(); t2->Join(); for (; ; ) pause(); return 0; } |
有幾個點需要注意:
1、Thread類是虛基類,TestThread類繼承來實現虛擬函式run()。
2、根據 pthread_create 的原型
int pthread_create(pthread_t *thread, const pthread_attr_t *attr,
                   void *(*start_routine) (void *), void *arg);
start_routine 引數是一般的函式指標,故不能直接將run() 作為此引數,因為run()是成員函式,隱含this指標,故實現一個靜態成員函式ThreadRoutine(), 在裡面呼叫run(),此外引數arg 我們傳遞this指標,在ThreadRoutine()內將派生類指標轉換為基類指標來呼叫run()。
3、把run()實現為private是為了不讓使用者直接呼叫,因為這樣根本就沒有產生執行緒排程。
4、注意區分執行緒與執行緒物件,設定autoDetele_ 成員也是為了當執行緒結束時能夠立刻銷燬執行緒物件。在main函式內,主執行緒pthread_join()等待執行緒結束;run()結束後會delete 掉執行緒物件,否則要一直等到main函式結束才會被自動銷燬。
二、基於物件程式設計風格
boost bind/function庫的出現,替代了stl中的mem_fun,ptr_fun ,bind1st,bin2nd等函式,這些函式參考這裡。
下面舉例boost bind/function 的使用。
C++ Code
|
1
2 3 4 5 6 7 8 9 10 11 12 13 14 15 16 17 18 19 20 21 22 23 24 25 26 27 |
#include <iostream>
#include <boost/function.hpp> #include <boost/bind.hpp> using namespace std; class Foo { public: void memberFunc(double d, int i, int j) { cout << d << endl;//列印0.5 cout << i << endl;//列印100 cout << j << endl;//列印10 } }; int main() { Foo foo; boost::function<void (int)> fp = boost::bind(&Foo::memberFunc, &foo, 0.5, _1, 10); fp(100); boost::function<void (int, int)> fp2 = boost::bind(&Foo::memberFunc, &foo, 0.5, _1, _2); fp2(100, 200); boost::function<void (int, int)> fp3 = boost::bind(&Foo::memberFunc, boost::ref(foo), 0.5, _1, _2); fp3(55, 66); return 0; } |
boost bind/function 實現轉換函式介面。
fp(100); 等價於 (&foo)->memberFunc(0.5, 100, 10); 即_1 是佔位符,如果繫結的是一般的函式,則bind 中的引數中不再需要this指標,當然一般函式也沒有類名字首。
boost::ref() 表示引用,fp3(55, 66); 相當於foo.memberFunc(0.5, 55, 66);
Thread 類圖:
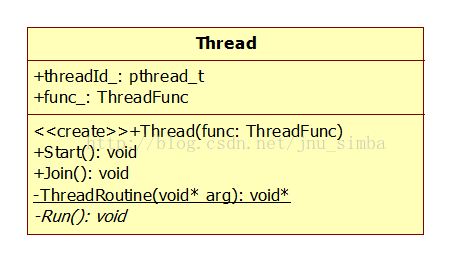
typedef boost::function<void ()> ThreadFunc;
Thread.h:
C++ Code
|
1
2 3 4 5 6 7 8 9 10 11 12 13 14 15 16 17 18 19 20 21 22 23 24 25 26 27 |
#ifndef _THREAD_H_
#define _THREAD_H_ #include <pthread.h> #include <boost/function.hpp> class Thread { public: typedef boost::function<void ()> ThreadFunc; explicit Thread(const ThreadFunc &func); void Start(); void Join(); void SetAutoDelete(bool autoDelete); private: static void *ThreadRoutine(void *arg); void Run(); ThreadFunc func_; pthread_t threadId_; bool autoDelete_; }; #endif // _THREAD_H_ |
Thread.cpp:
C++ Code
|
1
2 3 4 5 6 7 8 9 10 11 12 13 14 15 16 17 18 19 20 21 22 23 24 25 26 27 28 29 30 31 32 33 34 35 36 37 38 |
#include "Thread.h"
#include <iostream> using namespace std; Thread::Thread(const ThreadFunc &func) : func_(func), autoDelete_(false) { } void Thread::Start() { pthread_create(&threadId_, NULL, ThreadRoutine, this); } void Thread::Join() { pthread_join(threadId_, NULL); } void *Thread::ThreadRoutine(void *arg) { Thread *thread = static_cast<Thread *>(arg); thread->Run(); if (thread->autoDelete_) delete thread; return NULL; } void Thread::SetAutoDelete(bool autoDelete) { autoDelete_ = autoDelete; } void Thread::Run() { func_(); } |
Thread_test.cpp:
C++ Code
|
1
2 3 4 5 6 7 8 9 10 11 12 13 14 15 16 17 18 19 20 21 22 23 24 25 26 27 28 29 30 31 32 33 34 35 36 37 38 39 40 41 42 43 44 45 46 47 48 49 50 51 52 53 54 55 56 57 58 59 60 61 62 63 64 65 66 67 68 69 70 71 72 73 |
#include "Thread.h"
#include <boost/bind.hpp> #include <unistd.h> #include <iostream> using namespace std; class Foo { public: Foo(int count) : count_(count) { } void MemberFun() { while (count_--) { cout << "this is a test ..." << endl; sleep(1); } } void MemberFun2(int x) { while (count_--) { cout << "x=" << x << " this is a test2 ..." << endl; sleep(1); } } int count_; }; void ThreadFunc() { cout << "ThreadFunc ..." << endl; } void ThreadFunc2(int count) { while (count--) { cout << "ThreadFunc2 ..." << endl; sleep(1); } } int main(void) { Thread t1(ThreadFunc); Thread t2(boost::bind(ThreadFunc2, 3)); Foo foo(3); Thread t3(boost::bind(&Foo::MemberFun, &foo)); Foo foo2(3); Thread t4(boost::bind(&Foo::MemberFun2, &foo2, 1000)); t1.Start(); t2.Start(); t3.Start(); t4.Start(); t1.Join(); t2.Join(); t3.Join(); t4.Join(); return 0; } |
假設TcpServer是一個網路庫,如何使用它呢?那要看它是如何實現的:
C程式設計風格:註冊三個全域性函式到網路庫,網路庫函式的引數有函式指標型別,裡面通過函式指標來回撥。
物件導向風格:用一個EchoServer繼承自TcpServer(抽象類),實現三個純虛擬函式介面OnConnection, OnMessage, OnClose。通過基類指標呼叫虛擬函式實現多型。
基於物件風格:用一個EchoServer包含一個TcpServer(具體類)物件成員server,在建構函式中用boost::bind 來註冊三個成員函式,如server.SetConnectionCallback(boost::bind(&EchoServer::OnConnection, ...)); 也就是設定了server.ConnectionCallback_ 成員,通過繫結不同的函式指標,呼叫server.ConnectionCallback_()
時就實現了行為的不同。如下所示。
C++ Code
|
1
2 3 4 5 6 7 8 9 10 11 12 13 14 15 |
class EchoServer
{ public: EchoServer() { server_.SetConnectionCallback(boost::bind(&EchoServer::OnConnection, ...)); ... } void OnConnection() { .. } TcpServer server_; }; |
參考:
muduo manual.pdf
《linux 多執行緒伺服器程式設計:使用muduo c++網路庫》
相關文章
- 物件導向程式設計物件程式設計
- python物件導向程式設計基礎Python物件程式設計
- python基礎(物件導向程式設計)Python物件程式設計
- JS物件導向程式設計(一):物件JS物件程式設計
- Python 物件導向程式設計Python物件程式設計
- 十三、物件導向程式設計物件程式設計
- Python物件導向程式設計Python物件程式設計
- 程式設計思想 物件導向程式設計物件
- js物件導向程式設計JS物件程式設計
- 十六、物件導向程式設計物件程式設計
- 函數語言程式設計 vs 物件導向程式設計 vs 程式式程式設計的JS演示比較 - DEV函數程式設計物件JSdev
- 06 物件導向程式設計 (續)物件程式設計
- Python - 物件導向程式設計 - @propertyPython物件程式設計
- Python物件導向程式設計(1)Python物件程式設計
- Scala的物件導向程式設計物件程式設計
- Python - 物件導向程式設計 - super()Python物件程式設計
- JavaScript物件導向程式設計理解!JavaScript物件程式設計
- 物件導向程式設計C++物件程式設計C++
- Python OOP 物件導向程式設計PythonOOP物件程式設計
- python技能--物件導向程式設計Python物件程式設計
- javascript:物件導向的程式設計JavaScript物件程式設計
- JS物件導向的程式設計JS物件程式設計
- Javascript 物件導向程式設計(一)JavaScript物件程式設計
- Javascript 物件導向程式設計(二)JavaScript物件程式設計
- Javascript 物件導向程式設計(三)JavaScript物件程式設計
- JavaScript-設計模式-物件導向程式設計JavaScript設計模式物件程式設計
- JavaScript設計模式之物件導向程式設計JavaScript設計模式物件程式設計
- 物件導向程式設計和`GP`泛型程式設計物件程式設計泛型
- 物件導向變成 VS 函數語言程式設計物件函數程式設計
- 14 Python物件導向程式設計:反射Python物件程式設計反射
- 物件導向程式設計,不美了麼?物件程式設計
- 圖解python | 物件導向程式設計圖解Python物件程式設計
- python之物件導向程式設計(一)Python物件程式設計
- 史上最全 Python 物件導向程式設計Python物件程式設計
- 淺談PHP物件導向程式設計PHP物件程式設計
- JS物件導向程式設計(三):原型JS物件程式設計原型
- [筆記]物件導向的程式設計筆記物件程式設計
- 前端_JavaScript_物件導向程式設計前端JavaScript物件程式設計
- java-物件導向程式設計--(3)Java物件程式設計