iOS純Autolayout實現微信朋友圈和通訊錄另附App啟動頁短視訊效果
2017/8/24更新 由於10.0以上的版本對於autolayout的佈局有點變化,因此這裡做一下修復 如果按照之前的操作,約束就會嚴重衝突,雖然不會影響對應的效果,但是看起來很不爽

1.首先更新下Using UITableView+FDTemplateLayoutCell (1.6) 去年用的是1.4,作者更新到了1.6,就是修復了這個bug
2.對於約束的理解,報錯無非就是約束的衝突,一個高度的改變,導致無法撐開整個cell的佈局,因此這裡修改下優先順序,操作如下

這裡修改下對應1約束的優先順序,預設和2一樣是1000,把它改成999,也就是優先撐開內部空間的約束,再滿足底部支撐,這樣就沒有報錯了
根據個人的習慣而定,本部落格主要以Autolayout為主,早之前沒接觸的時候,已經看習慣了程式碼佈局UI,又長又臭,而且主要是寫出來不一定正確,跑起來的時候只有出一點錯誤,UI就飛了,一點都不直觀,沒錯,這也是對立的兩派,由於習慣問題,很多人不願意去接觸Autolayout,但是它的存在真的很強大,首先考慮下微信微博發動態這類佈局UI,少說要上千行程式碼吧,但是Autolayout就可以為你省去那麼多程式碼,你只要寫邏輯就可以了,這樣看上去非常清晰,之前有寫過一個Demo是簡單介紹如何用Autolayout實現高度自適應的,比較簡單,適合入門,需要的朋友可以用力戳點選開啟連結
有個朋友需要讓我寫個朋友圈的Demo給他,正好晚上回去也沒什麼事,就寫個微信Demo玩玩
啟動頁動畫

朋友圈示例


圖上的點贊之後資料來源可能有點錯亂,已經修改了
介紹下主要分析的知識點
1.微信朋友圈AutoLayout實現高度自適應
2.微信通訊路根據名字首字母分類排序
3.首次啟動用短視訊來做動畫
首先給大家介紹個小小的框架,專門用來寫設定頁面這種老變來變去cell需求的框架
最簡單的做法就是跟著demo來一遍,配置你需要的Plist檔案,把每個cell需要展示的資訊存起來

用的時候你只要在控制器根據之前plist裡面配置好的key來讀就可以了,非常容易修改配置,免得需求該來該去麻煩
- (void)settingsViewController:(IASKAppSettingsViewController*)sender tableView:(UITableView *)tableView didSelectCustomViewSpecifier:(IASKSpecifier*)specifier
{
        NSIndexPath * indexPath = [sender.settingsReader indexPathForKey:specifier.key];
        [tableView deselectRowAtIndexPath:indexPath animated:YES];

        CASE_TYPE type = [self caseIndexForKey:specifier.key];
    switch (type) {
        case FRIENTDCIRCLE:
        {
            DiscoveryViewController *discoverVC = [[DiscoveryViewController alloc] init];
            [self.navigationController pushViewController:discoverVC animated:YES];
        }
            break;
        case SHAKEANDSHAKE:

            break;
        case YAOYIYAO:

            break;
        case NEARBYPEOPLE:

            break;
        case SHOPPING:

            break;
        case GAME:

            break;

        default:
            break;
    }
}
進入正題,用Autolayout來佈局高度自適應的朋友圈,控制的還是tableview,最關鍵的還是那個cell的約束設定,直
接看約束圖

一套完整的約束必須是上下左右各邊都有約束到,上面複雜約束已經做到了上左下右都有約束,如果有一邊漏了,雖
然約束不會報錯不會警告,但是如果你不完整,你到時候根本無法計算,看下最簡單的約束示例
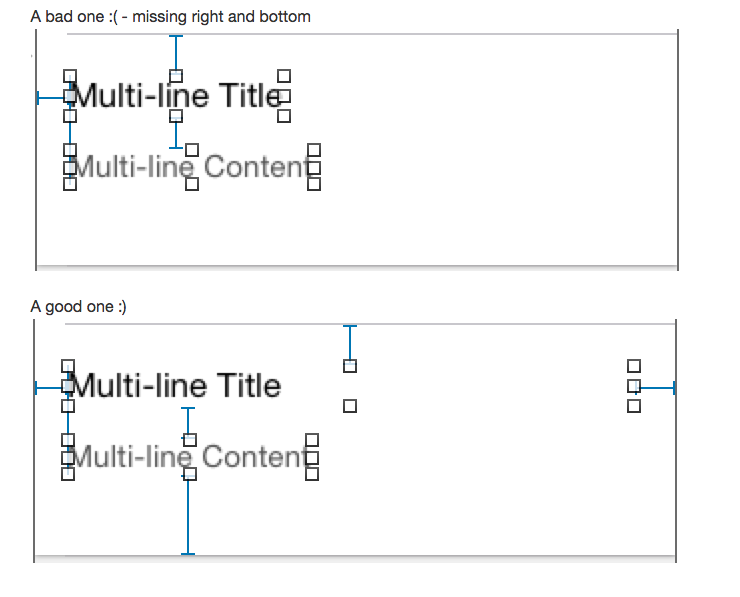
那麼問題來了,佈局完了是非常的簡單高效,這應該不難吧,覺得難的看我一開始給的連結,那個入門級別的
1.label如何實現自適應高度
2.collectionView如何根據不同圖片個數增加高度
3.評論的tableview如何動態變化
注:這裡tableview的cell裡面嵌了tableview和collectionView,那麼這兩個的代理方法就不介紹了,主要看如何動態變化,需要看的同學到時候自己下載程式碼跑起來看看就好了
關鍵程式碼如下
- (void)configCell:(MKJFriendTableViewCell *)cell indexpath:(NSIndexPath *)indexpath
{
    __weak typeof(cell)weakCell = cell;
    FriendIssueInfo *issueInfo = self.friendsDatas[indexpath.row];
    // headerImage 頭像 實現漸隱效果
    [cell.headerImageView sd_setImageWithURL:[NSURL URLWithString:issueInfo.photo] placeholderImage:nil completed:^(UIImage *image, NSError *error, SDImageCacheType cacheType, NSURL *imageURL) {

        if (image && cacheType == SDImageCacheTypeNone)
        {
            weakCell.headerImageView.alpha = 0;
            [UIView animateWithDuration:0.8 animations:^{
                weakCell.headerImageView.alpha = 1.0f;
            }];
        }
        else
        {
            weakCell.headerImageView.alpha = 1.0f;
        }
    }];

    // name 名字
    cell.nameLabel.text = issueInfo.userName;

    // description 描述 根據配置在資料來源的是否展開欄位確定行數
    cell.desLabel.text = issueInfo.message;
    cell.isExpand = issueInfo.isExpand;
    if (issueInfo.isExpand)
    {
        cell.desLabel.numberOfLines = 0;

    }
    else
    {
        cell.desLabel.numberOfLines = 3;
    }

    // 全文label 根據文字的高度是否展示全文lable  點選事件通過資料來源來互動
    CGSize rec = [issueInfo.message boundingRectWithSize:CGSizeMake(SCREEN_WIDTH - 90, CGFLOAT_MAX) options:NSStringDrawingUsesLineFragmentOrigin attributes:@{NSFontAttributeName : [UIFont boldSystemFontOfSize:14]} context:nil].size;
    if (rec.height > 55) {
        cell.showAllDetailsButton.hidden = NO;
        cell.showAllHeight.constant = 15;
    }
    else
    {
        cell.showAllHeight.constant = 0;
        cell.showAllDetailsButton.hidden = YES;
    }


    // img  九宮格圖片,用collectionView做
    cell.imageDatas = [[NSMutableArray alloc] initWithArray:issueInfo.messageSmallPics];
    cell.imageDatasBig = [[NSMutableArray alloc] initWithArray:issueInfo.messageBigPics];
    [cell.collectionView reloadData];
    // 這裡可以用lauout來獲取其高度,但是由於巢狀的關係,可能算不準,我們還是手動算好了
//    [cell.collectionView layoutIfNeeded];
//    cell.colletionViewHeight.constant = cell.collectionView.collectionViewLayout.collectionViewContentSize.height;
    CGFloat width = SCREEN_WIDTH - 90 - 20;
    // 沒圖片就高度為0 (約束是可以拖出來的哦哦)
    if ([NSArray isEmpty:issueInfo.messageSmallPics])
    {
        cell.colletionViewHeight.constant = 0;
    }
    else
    {
        if (issueInfo.messageSmallPics.count == 1)
        {
            cell.colletionViewHeight.constant = width / 1.5;
        }
        else
        {
            cell.colletionViewHeight.constant = ((issueInfo.messageSmallPics.count - 1) / 3 + 1) * (width / 3) + (issueInfo.messageSmallPics.count - 1) / 3 * 15;
        }
    }

    // timeStamp  時間
    cell.timeLabel.text = issueInfo.timeTag;

    // right action button  彈出黑色點贊或者評論的框
    cell.isShowPopView = NO;
    cell.backPopViewWidth.constant = 0;

    // right action button inline like button state   按鈕狀態也是根據資料來源配置
    if (issueInfo.hadClickLike) {
        [cell.likeButton setTitle:@"取消" forState:UIControlStateNormal];
    }
    else
    {
        [cell.likeButton setTitle:@"贊" forState:UIControlStateNormal];
    }
    cell.hadLikeActivityMessage = issueInfo.hadClickLike; // 預設都是沒有點贊

    // commentTableView  評論的taibleView
    // 這裡的思路也是可以根據contentSize獲取,但是貌似又可能算不準,我還是手動計算,思路就是
    // 最後一個cell的Y軸座標加上其高度就是算出來的高度啦
    cell.commentdatas = [[NSMutableArray alloc] initWithArray:issueInfo.commentMessages];
    [cell.commentTableView reloadData];
    CGRect recHeight = CGRectZero;
    if (![NSArray isEmpty:issueInfo.commentMessages])
    {
        recHeight = [cell.commentTableView rectForRowAtIndexPath:[NSIndexPath indexPathForRow:issueInfo.commentMessages.count - 1 inSection:0]];
    }
    cell.tableViewHeight.constant = recHeight.origin.y + recHeight.size.height;
//    NSLog(@"%@,heightTable%f",indexpath,cell.tableViewHeight.constant);
}
注:可能要備註下,這裡的collectionView和tableview的約束高度是可以拖出來重新賦值的,同學一定要記得啊,畢竟動態高度,需要根據資料來源來配置,而且這裡點贊,收起什麼的都用資料來源來配置了
OK,根據上面的完美約束以及程式碼動態算了高度(這裡內嵌的兩個tableview和collection都可以用contentsize來獲取高度哦,也可以像我這樣自己算),直接呼叫下面一句程式碼,高度自適應完美搞定!!!
- (CGFloat)tableView:(UITableView *)tableView heightForRowAtIndexPath:(NSIndexPath *)indexPath
{
    return [tableView fd_heightForCellWithIdentifier:identify cacheByIndexPath:indexPath configuration:^(MKJFriendTableViewCell *cell) {

        [self configCell:cell indexpath:indexPath];

    }];
功能點還是蠻多的
1.點贊
2.評論
3.文字展開收縮
4.圖片展示
5.樓中樓評論
6.這麼多都會涉及到複用,需要注意呀同學們,而且這是Demo,還有很多地方需要優化啊
簡單介紹一種評論的鍵盤問題,需要更多的自行拉倒最下面去下載就好了
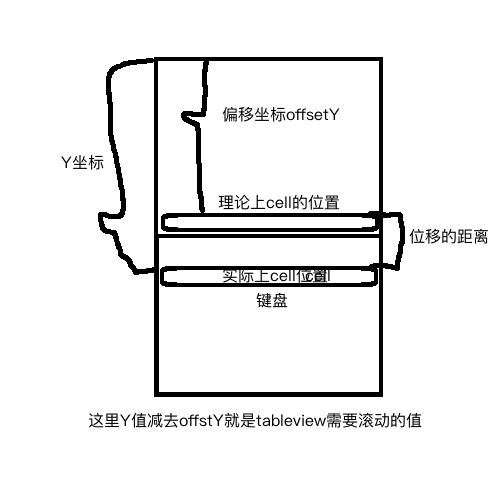
計算彈起高度看圖就可以明白了,再配合下程式碼即可
#pragma mark - 鍵盤的代理 show or hidden
- (void)keyboardWillShow:(NSNotification *)noti
{
    self.isKeyboardShowing = YES;
    NSDictionary *userInfo = noti.userInfo;
    CGFloat keyboardHeight = [[userInfo valueForKey:UIKeyboardFrameEndUserInfoKey] CGRectValue].size.height;
    CGFloat delta = 0;
    CGFloat topOffsetKeyboard = 0;
    if (self.isResponseByCell)
    { // 是通過點選cell觸發鍵盤
        topOffsetKeyboard = [UIScreen mainScreen].bounds.size.height - keyboardHeight - kChatToolBarHeight - self.selectedCellHeight - 20;

    }
    else // 點選comment觸發
    {
        topOffsetKeyboard = [UIScreen mainScreen].bounds.size.height - keyboardHeight - kChatToolBarHeight - 30;
    }
    delta = self.touch_offset_y - topOffsetKeyboard;

    CGFloat contentOffset = self.tableView.contentOffset.y; // 這個指的是頂部tableView滾動的距離
    contentOffset += delta; // delta + 下拉  -上拉
    if (contentOffset <= -64) {
        contentOffset = -64;
    }
    [self.tableView setContentOffset:CGPointMake(self.tableView.contentOffset.x, contentOffset) animated:YES];
}
其實主要還是涉及到不同子View之前的座標轉換到window上座標的轉換方式,理解不了的可以看點選開啟連結
下面分析下通訊錄裡面實現搜尋以及漢字轉換成英文首字母排序
1.搜尋控制器UISearchController點選開啟連結
self.searchResult = [[SearchResultController alloc] init];
    self.searchResult.block = ^{

        [weakSelf.searchController.searchBar resignFirstResponder];

    };
    self.searchController = [[UISearchController alloc] initWithSearchResultsController:self.searchResult];
    self.searchController.searchResultsUpdater = self;
    self.searchController.searchBar.placeholder = @"查詢聯絡人";
    self.searchController.searchBar.delegate = self;

    self.searchController.searchBar.showsCancelButton = NO;
    self.searchController.searchBar.returnKeyType = UIReturnKeySearch;
    self.searchController.searchBar.backgroundColor = RGBA(153, 153, 153, 1);
    self.searchController.searchBar.backgroundImage = [UIImage new];
    UITextField *searchBarTextField = [self.searchController.searchBar valueForKey:@"_searchField"];
    if (searchBarTextField)
    {
        [searchBarTextField setBackgroundColor:[UIColor whiteColor]];
        [searchBarTextField setBorderStyle:UITextBorderStyleRoundedRect];
        searchBarTextField.layer.cornerRadius = 5.0f;
        searchBarTextField.layer.borderColor = RGBA(204, 204, 204, 1).CGColor;
        searchBarTextField.layer.borderWidth = 0.5f;
    }
    self.tableView.tableHeaderView = self.searchController.searchBar;
2.代理實現搜尋結果顯示
// 搜尋的代理
- (void)updateSearchResultsForSearchController:(UISearchController *)searchController
{
    NSLog(@"%@",searchController.searchBar.text);
    NSString *searchString = [self.searchController.searchBar text];
    if (self.filterFirends!= nil) {
        [self.filterFirends removeAllObjects];
    }
    if ([PinyinHelper isIncludeChineseInString:searchString])
    {
        for (FriendInfo *friend in self.allFriends)
        {
            if ([friend.userName containsString:searchString])
            {
                [self.filterFirends addObject:friend];

            }
        }
    }
    else
    {
        for (FriendInfo *friend in self.allFriends)
        {
            HanyuPinyinOutputFormat *outputFormat=[[HanyuPinyinOutputFormat alloc] init];
            outputFormat.vCharType = VCharTypeWithV;
            outputFormat.caseType = CaseTypeLowercase;
            outputFormat.toneType = ToneTypeWithoutTone;
            NSString *outputPinyin=[PinyinHelper toHanyuPinyinStringWithNSString:friend.userName withHanyuPinyinOutputFormat:outputFormat withNSString:@""];

            if ([[outputPinyin uppercaseString] containsString:[searchString uppercaseString]])
            {
                [self.filterFirends addObject:friend];
            }
        }
    }
    //過濾資料
    self.searchResult.filterData = self.filterFirends;
    //重新整理表格
    [self.searchResult refreshData];

}
3.這裡載入出來的資料來源是要根據字母篩選的 A--陣列 B--陣列 ......Z--陣列,這就是基本結構
// 處理英文首字母
- (void)handleFirstLetterArray
{
    // 拿到所有的key  字母
    NSMutableDictionary *letterDict = [[NSMutableDictionary alloc] init];
    for (FriendInfo *friend in self.allFriends) {
        HanyuPinyinOutputFormat *outputFormat=[[HanyuPinyinOutputFormat alloc] init];
        outputFormat.vCharType = VCharTypeWithV;
        outputFormat.caseType = CaseTypeLowercase;
        outputFormat.toneType = ToneTypeWithoutTone;
        NSString *outputPinyin=[PinyinHelper toHanyuPinyinStringWithNSString:friend.userName withHanyuPinyinOutputFormat:outputFormat withNSString:@""];
        NSLog(@"%@",outputPinyin);
        [letterDict setObject:friend forKey:[[outputPinyin substringToIndex:1] uppercaseString]];
    }
    // 字母陣列
    self.letterArr = letterDict.allKeys;

    // 讓key進行排序  A  -  Z
    self.letterArr = [[NSMutableArray alloc] initWithArray:[self.letterArr sortedArrayUsingComparator:^NSComparisonResult(id  _Nonnull obj1, id  _Nonnull obj2) {
        // 大於上升,小於下降
        return [obj1 characterAtIndex:0] > [obj2 characterAtIndex:0];

    }]];

    // 遍歷所有的排序後的key  每個Key拿到對應的陣列進行組裝
    for (NSString *letter in self.letterArr)
    {
        NSMutableArray *nameArr = [[NSMutableArray alloc] init];
        for (FriendInfo *friend in self.allFriends) {
            HanyuPinyinOutputFormat *outputFormat=[[HanyuPinyinOutputFormat alloc] init];
            outputFormat.vCharType = VCharTypeWithV;
            outputFormat.caseType = CaseTypeUppercase;
            outputFormat.toneType = ToneTypeWithoutTone;
            NSString *outputPinyin=[PinyinHelper toHanyuPinyinStringWithNSString:friend.userName withHanyuPinyinOutputFormat:outputFormat withNSString:@""];
            if ([letter isEqualToString:[[outputPinyin substringToIndex:1] uppercaseString]])
            {
                [nameArr addObject:friend];
            }
        }
        // 根據key裝大字典
        // A -- 一批通訊人
        // B -- 一批人
        // ...
        [self.nameDict setObject:nameArr forKey:letter];
    }
}
最後介紹下用短視訊來做App首次啟動的效果(類似keep uber 百靈鳥這些啟動效果)
1.首先弄個MP4格式的本地小視訊,用一個viewcontroller來做視訊容器,用MPMoviePlayer來做視訊
self.moviePlayer = [[MPMoviePlayerController alloc] initWithContentURL:self.videoURL];
    self.moviePlayer.view.frame = CGRectMake(0, 點選開啟連結0, SCREEN_WIDTH, SCREEN_HEIGHT);
    self.moviePlayer.shouldAutoplay = YES;
    self.moviePlayer.controlStyle = MPMovieControlStyleNone;
    self.moviePlayer.repeatMode = MPMovieRepeatModeNone;
    self.moviePlayer.movieSourceType = MPMovieSourceTypeFile;

    [self.view addSubview:self.moviePlayer.view];
    [self configShimmerLabel];
    //監聽播放完成
    [[NSNotificationCenter defaultCenter]addObserver:self selector:@selector(playFinsihed) name:MPMoviePlayerPlaybackDidFinishNotification object:nil];
2.這裡視訊底部有一串閃爍的文字,這裡用的是facebook的一個動畫效果 點選開啟鏈
3.呼叫時機以及如何展示層級
- (void)jungleIfFirstLoading
{
    __weak typeof(self)weakSelf = self;
    NSInteger firstIN = [[[NSUserDefaults standardUserDefaults] valueForKey:@"FIRST_ENTER_IN"] integerValue];
    if (firstIN != 0) {
        return;
    }

    self.animationVC = [[AnimationVideoViewController alloc] init];
    self.animationVC.videoURL = [NSURL fileURLWithPath:[[NSBundle mainBundle]pathForResource:@"intro"ofType:@"mp4"]];
    self.animationVC.view.frame = CGRectMake(0, 0, SCREEN_WIDTH, SCREEN_HEIGHT);
    self.animationVC.finishBlock = ^{
        [UIView animateWithDuration:1.0 animations:^{
            weakSelf.animationVC.view.alpha = 0;
        } completion:^(BOOL finished) {
            [weakSelf.animationVC.view removeFromSuperview];
            weakSelf.animationVC = nil;
        }];

    };
    [[[UIApplication sharedApplication] keyWindow] addSubview:self.animationVC.view];
    [[[UIApplication sharedApplication] keyWindow] bringSubviewToFront:self.animationVC.view];

    [[NSUserDefaults standardUserDefaults] setValue:@(1) forKey:@"FIRST_ENTER_IN"];
    [[NSUserDefaults standardUserDefaults] synchronize];
}
這裡我們在主控制的ViewwillAppear裡面呼叫這些程式碼,通過NSUserdefault來進行判斷是否第一次進來,最後我們把裝載有視訊的控制器View增加到Window上面並且帶到最前面展示,當使用者點選螢幕或播放完進入App的時候移除
2016-11-30 21:16:58.250 MKJWechat[3372:55057] dealloc-->AnimationVideoViewController
看到有列印就已經釋放了,搞定!!!

詳細Demo:點選開啟連結
有需要改進的地方大家盡情留言,小弟下班時間抽空寫的,沒那麼完善,各位還是自行跑Demo試試吧,我會不斷完
善的,再多點時間就把即時通訊也加一下進去,自己正好也學習下
蹦了一定要給我留言哦,我好完善一下

相關文章
- 短視訊商城在ios短視訊開發上的應用效果iOS
- 如何實現 iOS 短視訊跨頁面的無痕續播?iOS
- 純前端匯出微信通訊錄到 Excel前端Excel
- 短視訊平臺搭建,實現banner自動滑動展示效果
- 短視訊app原始碼,實現原生js圖片預覽效果APP原始碼JS
- 短視訊系統,實現介面陰影效果
- appium 點選微信通訊錄APP
- 短視訊程式原始碼,PageSlider實現滑動頁面原始碼IDE
- 短視訊軟體開發,RecyclerView實現拖拽效果View
- CustomPainter——微信拍視訊按鈕效果實現AI
- Flutter 城市/通訊錄列表字母索引聯動效果實現Flutter索引
- 短視訊系統,Android 使用MotionLayout實現動畫效果Android動畫
- 短視訊軟體開發,ios啟動圖適配和啟動圖示適配iOS
- ios實現本地通訊錄點選(標識)跳轉APPiOSAPP
- 短視訊app開發之ios小視訊開發經驗共享APPiOS
- 短視訊軟體開發,動態計算在指定位置新增view,實現引導頁效果View
- 短視訊直播原始碼,拖動滑塊實現圖片驗證效果原始碼
- 直播短視訊原始碼短視訊APP短視訊帶貨系統多商戶直播原始碼APP
- IOS逆向--Tweak和app互動方案【程式通訊】iOSAPP
- iOS基於Socket.io即時通訊IM實現,WebRTC實現視訊通話iOSWeb
- 短視訊app開發,介面滑動到底的幾種實現方式APP
- 短視訊直播系統開發直播短視訊程式搭建短視訊互動直播
- 短視訊app製作,對於需要付費的內功,實現模糊遮罩效果APP遮罩
- css模擬實現手機通訊錄佈局效果CSS
- 利用SQL實現通訊錄SQL
- 呼叫通訊錄實現思路
- 微信開發之網頁中加入視訊和音訊網頁音訊
- Android端的短視訊開發,我們該如何快速實現移動端短視訊功能?Android
- 如何在微信小程式中實現音視訊通話微信小程式
- iOS - Contacts 通訊錄iOS
- 短視訊app開發,Flutter StaggeredGridView的瀑布流效果APPFlutterView
- 短視訊平臺開發,依靠DrawerLayout實現側滑選單效果
- 短視訊原始碼,在Android 中opengl es實現燈光效果原始碼Android
- 短視訊軟體開發,實現簡單的輪播圖效果
- iOS實現音訊進度條效果iOS音訊
- 用AutoLayout實現分頁滾動
- iOS 視訊新增濾鏡效果iOS
- iOS開發:音訊播放、錄音、視訊播放、拍照、視訊錄製iOS音訊