http://blog.teamtreehouse.com/android-libraries-use-every-project
A good developer knows to never reinvent the wheel (“unless you plan on learning more about wheels“). With its roots in Linux and the open source community, Android has a vibrant and strong ecosystem of open source libraries that developers can freely use in their own apps. While some are for very specific uses that you may never need, others are so helpful and, well, simply delightful that you should never start an app without them.
It may sound like a lot of work to use an open source library in a project, but with Android Studio, it’s easier than ever. Often it only takes one line of code in your app’s build.gradle file to include a library automatically. Gradle is the new build automation tool in Android Studio, and it will automatically download and include libraries if they are set up for it. It is so easy and popular that many libraries have this built in and include instructions on how to do it.
ButterKnife
On to my favorite libraries! Let’s start with a test: which of these do you like better?
protected TextView mWelcomeLabel;
protected EditText mUsernameField;
protected EditText mPasswordField;
protected Button mSubmitButton;

@Override
protected void onCreate(Bundle savedInstanceState) {
  super.onCreate(savedInstanceState);
  setContentView(R.layout.activity_main);
  mWelcomeLabel = (TextView) findViewById(R.id.welcomeLabel);
  mUsernameField = (EditText) findViewById(R.id.usernameField);
  mPasswordField = (EditText) findViewById(R.id.passwordField);
  mSubmitButton = (Button) findViewById(R.id.submitButton);
}
or
@InjectView(R.id.welcomeLabel) protected TextView mWelcomeLabel;
@InjectView(R.id.usernameField) protected EditText mUsernameField;
@InjectView(R.id.passwordField) protected EditText mPasswordField;
@InjectView(R.id.submitButton) protected Button mSubmitButton;

@Override
protected void onCreate(Bundle savedInstanceState) {
  super.onCreate(savedInstanceState);
  setContentView(R.layout.activity_my);
  ButterKnife.inject(this);
}
The latter code is more concise and understandable, don’t you think? The second block of code is using a library called ButterKnife, which uses annotations to “inject” views by creating boilerplate code for you. ButterKnife is small, simple, and lightweight, and because it makes your life as a developer easier, you should pretty much always use it. It would be great if the Android SDK itself could improve in this manner!
There are additional attributes you can use to make OnClickListeners and other common, verbose aspects of Android development easier to write and understand.
Below is all you need to include this library automatically in your Android Studio projects. Just add this one line to your app’s build.gradle file (in app/src):
compile 'com.jakewharton:butterknife:5.1.2'
You need to add it in the dependencies section, like this:
dependencies {
  compile fileTree(dir: 'libs', include: ['*.jar'])
  compile 'com.jakewharton:butterknife:5.1.2'
}
Picasso
You may not need this for every app, but if you are downloading images from the web, then you should use Picasso. There are a few popular libraries that do this kind of work, but Picasso is my favorite because it’s simple and easy and I really like how the API is written. Code should always be this intuitive and pleasurable to use!
If you have never downloaded an image from the web in Android, then perhaps you don’t know why this is so helpful. Here are the steps you need to take to download an image with only the standard Android APIs:
- Get Image URL
- Create AsyncTask to download image
- Execute AsyncTask
- Store result in Bitmap
- Set bitmap as source
- Cache image for future
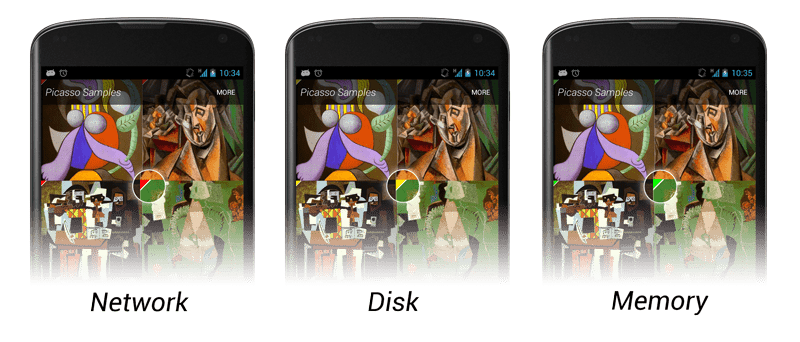
That’s a lot of work! Doesn’t it seem like you should just be able to provide the URL to an ImageView and magically have it appear? Check out the steps if you use Picasso:
- Get image URL
- Load it into an ImageView with one line:
Picasso.with(this).load(imageUrl).into(mImageView);
This last line says, “With this context, load this image URL into this ImageView.” Not only is it short and sweet, but it also takes care of those other steps mentioned above behind the scenes. It’s an asynchronous download and the image is automatically cached for future use. It also has additional features that make it helpful for debugging and other work.
Once again, adding it to your project is super easy in Android Studio. Just add this line to your dependencies section (like ButterKnife above):
compile 'com.squareup.picasso:picasso:2.3.3'
If you want to see this in action, I cover using it in Build a Self-Destructing Message App and Implementing Designs for Android.
Downloading things other than images from the web? Check out android-async-http!
Animations
The Material Design guidelines focus heavily on animation, and if you use it correctly, you can really make your app look polished and make your interactions more intuitive and enjoyable. Animations can be hard, but good libraries make them easy!
For a set of regular View animations, check out AndroidViewAnimations. I’ll let the author’s animated GIF speak for itself:
The syntax for this library is similar to what we saw for Picasso above:
YoYo.with(Techniques.Bounce)
    .duration(700)
    .playOn(findViewById(R.id.usernameField));
Including it is simple, though it does require two other projects as well:
dependencies {
  compile 'com.nineoldandroids:library:2.4.0'
  compile 'com.daimajia.easing:library:1.0.0@aar'
  compile 'com.daimajia.androidanimations:library:1.0.8@aar'
}
Another really helpful animations library is ListViewAnimations, which makes animating items in a list very easy. Check out the demo video on Google Play to see examples of everything it can do.
How to Discover Libraries
If you are new to the open source community, you may be wondering how you can find libraries like this on your own. It’s really just a mindset. Every time you go to add new code, ask, “Has somebody done this already?”
- Ask Google
- Ask GitHub
- Ask StackOverflow
- Ask a friend
Then, once you find a library that looks interesting, remember the most important two letters for researching open source libraries: vs.
Whenever I’m researching a library, I google the library’s name followed by “vs”. Then in autocomplete I see competing libraries that the one I’m researching has been compared to. That helps me evaluate similar libraries and choose the best one for me. Check out this example of ButterKnife:
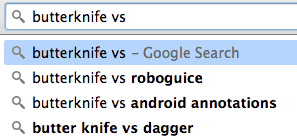
RoboGuice, AndroidAnnotations, and Dagger are all libraries that do similar injection things like we saw ButterKnife does for us.
Lastly, you can utilize social media and newsletters to keep an eye on the open source landscape. I passively monitor the following and bookmark any libraries that look useful.
- Twitter (my “Android” list)
- Google+
- androidweekly.net newsletter
- http://android-arsenal.com/
- http://www.appdevwiki.com/
Remember, one of the main goals of programming is to be efficient and complete. Learning how to use the work of others to augment your own is a valuable skill even the most seasoned professionals rely on.