前言
    NS_CLASS_AVAILABLE_IOS(2_0) @interface UITableView : UIScrollView <NSCoding>
    @available(iOS 2.0, *)       public class UITableView : UIScrollView, NSCoding
1、tableView 的建立
Objective-C
遵守 UITableViewDelegate, UITableViewDataSource 協議
資料來源 初始化
    // 宣告資料來源,必須宣告為全域性變數
    @property(nonatomic, retain)NSMutableArray *myDataArray;

    // 資料來源陣列初始化,定義一個可變陣列做為表格的資料來源
    myDataArray = [[NSMutableArray alloc] init];

    NSArray *array1 = @[@"UIWindow", @"UIApplication", @"UIView", @"UILabel",
                        @"UIProgressView", @"UIAlertView", @"UIActionSheet", @"UIPickerView"];
    NSArray *array2 = @[@"視窗", @"應用", @"檢視", @"標籤", @"進度條", @"警告框",
                        @"操作表", @"選擇框", @"風火輪", @"影象檢視", @"網頁檢視", @"滾動檢視",
                        @"多行文字檢視"];

    // 向資料來源中新增資料
    [myDataArray addObject:array1];
    [myDataArray addObject:array2];
tableView 初始化
    // 宣告表格檢視物件,頭標題和腳標題懸浮顯示,預設型別
    UITableView *myTableView = [[UITableView alloc] initWithFrame:self.view.bounds];

    // 設定 tableView 的代理
    myTableView.delegate = self;
    myTableView.dataSource = self;

    // 將 tableView 新增到視窗中
    [self.view addSubview:myTableView];
協議方法
    // 設定分段數
    - (NSInteger)numberOfSectionsInTableView:(UITableView *)tableView {

        // 資料來源陣列為多維陣列時,用陣列計算
        return myDataArray.count;
    }

    // 設定行數
    - (NSInteger)tableView:(UITableView *)tableView numberOfRowsInSection:(NSInteger)section {

        // section 段,返回每段中有多少行
        return [[myDataArray objectAtIndex:section] count];
    }

    // 設定每一行顯示的內容
    - (UITableViewCell *)tableView:(UITableView *)tableView cellForRowAtIndexPath:(NSIndexPath *)indexPath {

        // 建立標識詞,隨意設定,但不能和其它 tableView 的相同
        static NSString *indentifier = @"testIdentifier";

        // 根據標誌詞先從複用佇列裡查詢
        UITableViewCell *cell = [tableView dequeueReusableCellWithIdentifier:indentifier];

        // 複用佇列中沒有時再建立
        if (cell == nil) {

            // 建立新的 cell,預設為主標題模式
            cell = [[UITableViewCell alloc] initWithStyle:UITableViewCellStyleDefault reuseIdentifier:indentifier];
        }

        // 設定每一行顯示的文字內容
        cell.textLabel.text = [[myDataArray objectAtIndex:indexPath.section] objectAtIndex:indexPath.row];

        // indexPath.section 分段數,indexPath.row 行數,設定圖片內容,圖片在 Cell 的左端,圖片大小自動壓縮
        cell.imageView.image = [UIImage imageNamed:@"HQ_0003"];

        return cell;
    }
Swift
遵守 UITableViewDelegate, UITableViewDataSource 協議
資料來源 初始化
    // 宣告資料來源,必須宣告為全域性變數
    var myDataArray:[[String]] = Array()

    let array1:[String] = ["UIWindow", "UIApplication", "UIView", "UILabel", "UIProgressView",
                          "UIAlertView", "UIActionSheet", "UIPickerView"]
    let array2:[String] = ["視窗", "應用", "檢視", "標籤", "進度條", "警告框", "操作表", "選擇框",
                          "風火輪", "影象檢視", "網頁檢視", "滾動檢視", "多行文字檢視", "工具條"]

    // 向資料來源中新增資料
    myDataArray.append(array1)
    myDataArray.append(array2)
tableView 初始化
    // 宣告表格檢視物件,頭標題和腳標題懸浮顯示,預設型別
    let myTableView:UITableView = UITableView(frame: self.view.bounds)

    // 設定 tableView 的代理
    myTableView.delegate = self
    myTableView.dataSource = self

    // 將 tableView 新增到視窗中
    self.view.addSubview(myTableView)
協議方法
    // 設定分段數
    func numberOfSectionsInTableView(tableView: UITableView) -> Int {

        // 資料來源陣列為多維陣列時,用陣列計算
        return myDataArray.count
    }

    // 設定行數
    func tableView(tableView: UITableView, numberOfRowsInSection section: Int) -> Int {

        // section 段,返回每段中有多少行
        return myDataArray[section].count
    }

    // 設定每一行顯示的內容
    func tableView(tableView: UITableView, cellForRowAtIndexPath indexPath: NSIndexPath) -> UITableViewCell {

        // 建立標識詞,隨意設定,但不能和其它 tableView 的相同
        let indentifier = "testIdentifier"

        // 根據標誌詞先從複用佇列裡查詢
        var cell = tableView.dequeueReusableCellWithIdentifier(indentifier)

        // 複用佇列中沒有時再建立
        if cell == nil {

            // 建立新的 cell,預設為主標題模式
            cell = UITableViewCell(style: .Default, reuseIdentifier: indentifier)
        }

        // 設定每一行顯示的文字內容
        cell!.textLabel?.text = myDataArray[indexPath.section][indexPath.row]

        // indexPath.section 分段數,indexPath.row 行數,設定圖片內容,圖片在 Cell 的左端,圖片大小自動壓縮
        cell!.imageView?.image = UIImage(named: "HQ_0003")

        return cell!
    }
2、tableView 的設定
Objective-C
設定資料來源初始化方式
    // 將陣列指向新的空間,可以不提前申請空間(不初始化)
    myDataArray = @[array1, array2];

    // 將陣列裡的所有資料替換成新的,必須提前申請空間
    myDataArray.array = @[array1, array2];
設定分段的頭標題和腳標題
    // 設定分段的頭標題和腳標題的型別
    /*
        UITableViewStylePlain,     // 簡單模式,每個分段之間緊密連線,頭腳標題懸浮顯示,預設型別
        UITableViewStyleGrouped    // 分組模式,每個分段之間分開,頭腳標題跟隨移動,頭標題英文自動大寫
    */

        // 頭標題和腳標題懸浮顯示,預設型別
        UITableView *myTableView = [[UITableView alloc] init];

        UITableView *myTableView = [[UITableView alloc] initWithFrame:frame];

        // 帶顯示型別的設定
        UITableView *myTableView = [[UITableView alloc] initWithFrame:frame style:UITableViewStyleGrouped];

    // 設定分段的頭標題高度,UITableViewDelegate 協議方法
    - (CGFloat)tableView:(UITableView *)tableView heightForHeaderInSection:(NSInteger)section {

        return 40;
    }

    // 設定分段的腳標題高度,UITableViewDelegate 協議方法
    - (CGFloat)tableView:(UITableView *)tableView heightForFooterInSection:(NSInteger)section {

        return 30;
    }

    // 設定分段的頭標題內容,UITableViewDataSource 協議方法
    - (NSString *)tableView:(UITableView *)tableView titleForHeaderInSection:(NSInteger)section {

        if (0 == section) {
            return @"English Header";
        }
        else {
            return @"中文 Header";
        }
    }

    // 設定分段的腳標題內容,UITableViewDataSource 協議方法
    - (NSString *)tableView:(UITableView *)tableView titleForFooterInSection:(NSInteger)section {

        if (0 == section) {
            return @"English Footer";
        }
        else {
            return @"中文 Footer";
        }
    }

    // 分段頭標題檢視,UITableViewDelegate 協議方法,返回自定義的標題檢視
    - (UIView *)tableView:(UITableView *)tableView viewForHeaderInSection:(NSInteger)section {

        if (!section) {
            label.text = @"English Header";
        }
        else{
            label.text = @"中文 Header";
        }

        return label;
    }

    // 分段腳標題檢視,UITableViewDelegate 協議方法
    - (UIView *)tableView:(UITableView *)tableView viewForFooterInSection:(NSInteger)section {

        if (!section) {
            label.text = @"English Footer";
        }
        else{
            label.text = @"中文 Footer";
        }

        // 返回自定義的標題檢視
        return label;
   }
設定表格的表頭和表尾檢視
    // 設定表格的表頭檢視
    /*
        只有檢視的高度設定起作用
    */
    myTableView.tableHeaderView = myHeaderView;

    // 設定表格的表尾檢視
    /*
        只有檢視的高度設定起作用
    */
    myTableView.tableFooterView = myFooterView;
設定表格的背景
    // 設定表格的背景檢視
    myTableView.backgroundView = myImageView;

    // 設定表格的背景顏色
    myTableView.backgroundColor = [UIColor blueColor];
設定表格的分割線
    // 設定表格的分割線顏色
    /*
        設定為 clearColor 時即可隱藏(不顯示)所有分割線
    */
    myTableView.separatorColor = [UIColor redColor];

    // 設定表格的分割線型別
    /*
        UITableViewCellSeparatorStyleNone,         // 沒有分割線
        UITableViewCellSeparatorStyleSingleLine,   // 單線型,預設

        // 嵌刻線型,This separator style is only supported for grouped style
        UITableViewCellSeparatorStyleSingleLineEtched
    */
    myTableView.separatorStyle = UITableViewCellSeparatorStyleSingleLine;

    // 設定表格的分割線邊距
    /*
        上、左、下、右,只有左、右設定有效
        設定左邊距時會使標題相應的右移
        左邊距設定為 0 時,分割線不會緊靠左邊框
    */
    myTableView.separatorInset = UIEdgeInsetsMake(0, 10, 0, 10);

    // 清除表格多餘的分割線
    /*
        表格為 UITableViewStylePlain 型別時,若表格的內容沒有佔滿螢幕時,沒有設定內容的部分表格也會有分割線
        建立自定義的 view,將該 view 的背景顏色清空(預設為透明),並新增到表格的腳檢視上
    */
    myTableView.tableFooterView = [[UIView alloc] init];

    // 設定表格分割線左邊距為零
    [myTableView setSeparatorInset:UIEdgeInsetsZero];
    [myTableView setLayoutMargins:UIEdgeInsetsZero];

    - (void)tableView:(UITableView *)tableView willDisplayCell:(UITableViewCell *)cell forRowAtIndexPath:(NSIndexPath *)indexPath{
        // UITableViewDelegate 協議方法

        [cell setSeparatorInset:UIEdgeInsetsZero];
        [cell setLayoutMargins:UIEdgeInsetsZero];
    }

    // 自定義表格分割線
    /*
        系統分割線的左邊無法緊靠表格左邊框,隱藏系統分割線,自定義檢視,新增到 Cell 的下邊實現
        同時可以清除表格在 UITableViewStylePlain 型別時的多餘分割線
    */

    myTableView.separatorStyle = UITableViewCellSeparatorStyleNone;

    if (cell == nil) {

        // 建立新的 cell
        cell = [[UITableViewCell alloc] initWithStyle:UITableViewCellStyleDefault reuseIdentifier:indentifier];

        // 新增自定義分割線檢視
        CGRect frame = CGRectMake(0, cell.contentView.bounds.size.height, self.view.bounds.size.width, 1);
        UIView *mySeparatorView = [[UIView alloc] initWithFrame:frame];
        mySeparatorView.backgroundColor = [[UIColor lightGrayColor] colorWithAlphaComponent:0.5];
        [cell.contentView addSubview:mySeparatorView];
    }
設定表格的行高
    // 屬性設定
    /*
        設定全部行的高度,預設為 44
    */
    myTableView.rowHeight = 60;

    // 協議方法設定
    /*
        可單獨設定每一行的高度,預設為 44
    */
    - (CGFloat)tableView:(UITableView *)tableView heightForRowAtIndexPath:(NSIndexPath *)indexPath {

        return 60;
    }

    // 設定估計行高
    /*
        設定全部行的高度
    */
    self.tableView.estimatedRowHeight = 80;

    // 協議方法設定估計行高
    /*
        可單獨設定每一行的估計行高
    */
    - (CGFloat)tableView:(UITableView *)tableView estimatedHeightForRowAtIndexPath:(NSIndexPath *)indexPath {

        return 80;
    }

    // 設定自動計算行高
    self.tableView.rowHeight = UITableViewAutomaticDimension;
設定表格的編輯開關狀態
    // 開啟表格的編輯模式
    /*
        default is NO. setting is not animated
    */
    myTableView.editing = YES;

    // 翻轉表格的編輯模式
    myTableView.editing = !myTableView.editing;

    // 翻轉表格的編輯模式
    [myTableView setEditing:!myTableView.editing animated:YES];
設定表格選擇狀態
    // 設定表格普通模式下是否允許單選
    /*
        default is YES. Controls whether rows can be selected when not in editing mode
    */
    myTableView.allowsSelection = YES;

    // 設定表格在編輯模式下是否允許單選
    /*
        default is NO. Controls whether rows can be selected when in editing mode
    */
    myTableView.allowsSelectionDuringEditing = YES;

    // 設定表格普通模式下是否允許多選
    /*
        default is NO. Controls whether multiple rows can be selected simultaneously
    */
    myTableView.allowsMultipleSelection = YES;

    // 設定表格在編輯模式下是否允許多選
    /*
        default is NO. Controls whether multiple rows can be selected simultaneously in editing mode
    */
    myTableView.allowsMultipleSelectionDuringEditing = YES;

    // 取消表格選擇
    /*
        在表格選中協議方法中設定,表格點選變色後恢復原來顏色,設定後無法實現表格多選
    */
    [tableView deselectRowAtIndexPath:indexPath animated:YES];
過載表格檢視
    // 過載表格檢視
    /*
        重走所有的表格檢視方法,重新整理所有的表格
    */
    [tableView reloadData];

    // 過載某一分段
    [tableView reloadSections:[NSIndexSet indexSetWithIndex:indexPath.section]
             withRowAnimation:UITableViewRowAnimationAutomatic];
    // 過載某一個行
    [tableView reloadRowsAtIndexPaths:[NSArray arrayWithObject:indexPath]
                     withRowAnimation:UITableViewRowAnimationAutomatic];

    // 刪除一個 cell
    /*
        只重新整理刪除的 cell
    */
    [tableView deleteRowsAtIndexPaths:[NSArray arrayWithObject:indexPath]
                     withRowAnimation:UITableViewRowAnimationAutomatic];

    // 插入一個 cell
    /*
        只重新整理插入的 cell
    */
    [tableView insertRowsAtIndexPaths:[NSArray arrayWithObject:indexPath]
                     withRowAnimation:UITableViewRowAnimationAutomatic];
Swift
設定分段的頭標題和腳標題
    // 設定分段的頭標題和腳標題的型別
    /*
        case Plain       // 簡單模式,每個分段之間緊密連線,頭腳標題懸浮顯示,預設型別
        case Grouped     // 分組模式,每個分段之間分開,頭腳標題跟隨移動,頭標題英文自動大寫
    */

        // 頭標題和腳標題懸浮顯示,預設型別
        let myTableView:UITableView = UITableView()

        let myTableView:UITableView = UITableView(frame: frame)

        // 帶顯示型別的設定
        let myTableView:UITableView = UITableView(frame: frame, style: .Grouped)

    // 設定分段的頭標題高度,UITableViewDelegate 協議方法
    func tableView(tableView: UITableView, heightForHeaderInSection section: Int) -> CGFloat {

        return  40
    }

    // 設定分段的腳標題高度,UITableViewDelegate 協議方法
    func tableView(tableView: UITableView, heightForFooterInSection section: Int) -> CGFloat {

        return 30
    }

    // 設定分段的頭標題內容,UITableViewDataSource 協議方法
    func tableView(tableView: UITableView, titleForHeaderInSection section: Int) -> String? {

        if 0 == section {
            return "English Header"
        }
        else {
            return "中文 Header"
        }
    }

    // 設定分段的腳標題內容,UITableViewDataSource 協議方法
    func tableView(tableView: UITableView, titleForFooterInSection section: Int) -> String? {

        if 0 == section {
            return "English Footer"
        }
        else {
            return "中文 Footer"
        }
    }

    // 分段頭標題檢視,UITableViewDelegate 協議方法,返回自定義的標題檢視
    func tableView(tableView: UITableView, viewForHeaderInSection section: Int) -> UIView? {

        if 0 == section {
            label.text = "English Header"
        }
        else {
            label.text = "中文 Header"
        }

        return label
    }

    // 分段腳標題檢視,UITableViewDelegate 協議方法,返回自定義的標題檢視
    func tableView(tableView: UITableView, viewForFooterInSection section: Int) -> UIView? {

        if 0 == section {
            label.text = "English Footer"
        }
        else {
            label.text = "中文 Footer"
        }

        return label
    }
設定表格的表頭和表尾檢視
    // 設定表格的表頭檢視
    /*
        只有檢視的高度設定起作用
    */
    myTableView.tableHeaderView = myHeaderView

    // 設定表格的表尾檢視
    /*
        只有檢視的高度設定起作用
    */
    myTableView.tableFooterView = myFooterView
設定表格的背景
    // 設定表格的背景檢視
    myTableView.backgroundView = myImageView

    // 設定表格的背景顏色
    myTableView.backgroundColor = UIColor.blueColor()
設定表格的分割線
    // 設定表格的分割線顏色
    /*
        設定為 clearColor 時即可隱藏(不顯示)所有分割線
    */
    myTableView.separatorColor = UIColor.redColor()

    // 設定表格分割線的型別
    /*
        case None                // 沒有分割線
        case SingleLine          // 單線型,預設
        case SingleLineEtched    // 嵌刻線型,This separator style is only supported for grouped style
    */
    myTableView.separatorStyle = .SingleLine

    // 設定表格的分割線邊距
    /*
        上、左、下、右,只有左、右設定有效
        設定左邊距時會使標題相應的右移
        左邊距設定為 0 時,分割線不會緊靠左邊框
    */
    myTableView.separatorInset = UIEdgeInsetsMake(0, 10, 0, 10)

    // 清除表格多餘的分割線
    /*
        表格為 Plain 型別時,若表格的內容沒有佔滿螢幕時,沒有設定內容的部分表格也會有分割線
        建立自定義的 view,將該 view 的背景顏色清空(預設為透明),並新增到表格的腳檢視上
    */
    myTableView.tableFooterView = UIView()

    // 自定義表格分割線
    /*
        系統分割線的左邊無法緊靠表格左邊框,隱藏系統分割線,自定義檢視,新增到 Cell 的下邊實現
        同時可以清除表格在 Plain 型別時的多餘分割線
    */

    myTableView.separatorStyle = .None

    if cell == nil {

        // 建立新的 cell
        cell = UITableViewCell(style: .Default, reuseIdentifier: indentifier)

        // 新增自定義分割線檢視
        let frame:CGRect = CGRectMake(0, cell!.contentView.bounds.size.height, self.view.bounds.size.width, 1)
        let mySeparatorView:UIView = UIView(frame: frame)
        mySeparatorView.backgroundColor = UIColor.lightGrayColor().colorWithAlphaComponent(0.5)
        cell!.contentView.addSubview(mySeparatorView)
    }
設定表格的行高
    // 屬性設定
    /*
        設定全部行的高度,預設為 44
    */
    myTableView.rowHeight = 60

    // 協議方法設定
    /*
        可單獨設定每一行的高度,預設為 44
    */
    func tableView(tableView: UITableView, heightForRowAtIndexPath indexPath: NSIndexPath) -> CGFloat {

        return 60
    }

    // 設定估計行高
    /*
        設定全部行的高度
    */
    self.tableView.estimatedRowHeight = 80

    // 協議方法設定估計行高
    /*
        可單獨設定每一行的估計行高
    */
    func tableView(tableView: UITableView, estimatedHeightForRowAtIndexPath indexPath: NSIndexPath) -> CGFloat {

        return 80
    }

    // 設定自動計算行高
    self.tableView.rowHeight = UITableViewAutomaticDimension
設定表格的編輯開關狀態
    // 開啟表格的編輯模式
    myTableView.editing = true

    // 翻轉表格的編輯模式,直接出現
    myTableView.editing = !myTableView.editing

    // 翻轉表格的編輯模式,帶動畫效果
    myTableView.setEditing(!myTableView.editing, animated: true)
設定表格選擇狀態
    // 設定表格普通模式下是否允許單選
    /*
        default is YES. Controls whether rows can be selected when not in editing mode
    */
    myTableView.allowsSelection = false

    // 設定表格在編輯模式下是否允許單選
    /*
        default is NO. Controls whether rows can be selected when in editing mode
    */
    myTableView.allowsSelectionDuringEditing = true

    // 設定表格普通模式下是否允許多選
    /*
        default is NO. Controls whether multiple rows can be selected simultaneously
    */
    myTableView.allowsMultipleSelection = true

    // 設定表格在編輯模式下是否允許多選
    /*
        default is NO. Controls whether multiple rows can be selected simultaneously in editing mode
    */
    myTableView.allowsMultipleSelectionDuringEditing = true

    // 取消表格選擇
    /*
        在表格選中協議方法中設定,表格點選變色後恢復原來顏色,設定後無法實現表格多選
    */
    tableView.deselectRowAtIndexPath(indexPath, animated: true)
過載表格檢視
    // 過載表格檢視
    /*
        重走所有的表格檢視方法,重新整理所有的表格
    */
    tableView.reloadData()

    // 過載某一分段
    tableView.reloadSections(NSIndexSet(index: indexPath.section), withRowAnimation: .Automatic)

    // 過載某一個行
    tableView.reloadRowsAtIndexPaths(Array(arrayLiteral: indexPath), withRowAnimation: .Automatic)

    // 刪除一個 cell
    /*
        只重新整理刪除的 cell
    */
    tableView.deleteRowsAtIndexPaths(NSArray(object: indexPath) as! [NSIndexPath],
                    withRowAnimation: .Automatic)

    // 插入一個 cell
    /*
        只重新整理插入的 cell
    */
    tableView.insertRowsAtIndexPaths(NSArray(object: indexPath) as! [NSIndexPath],
                    withRowAnimation: .Automatic)
3、Cell 的建立(系統型別 Cell)
- 使用 dequeueReuseableCellWithIdentifier: 可不註冊,但是必須對獲取回來的 cell 進行判斷是否為空,若空則手動建立新的 cell;
使用 dequeueReuseableCellWithIdentifier: forIndexPath: 必須註冊,但返回的 cell 可省略空值判斷的步驟。
tableViewCell 的複用機制:
- 1、當一個 cell 滑出螢幕的時候,會被放到複用佇列裡(系統自動操作)。
- 2、當一個 cell 即將出現的時候,我們需要先從複用佇列裡查詢,找到就直接用,找不到就建立。
系統 Cell 的建立方式:
- 程式碼建立 cell。
- 註冊 cell。
- 從 storyboard 載入 cell。
3.1 建立 Cell
可以設定建立的 Cell 的型別。
Objective-C
    // 設定每一行顯示的內容
    - (UITableViewCell *)tableView:(UITableView *)tableView cellForRowAtIndexPath:(NSIndexPath *)indexPath {

        // 建立標識詞,標識詞隨意設定,但不能和其它 tableView 的相同
        static NSString *resumeID = @"testIdentifier";

        // 根據標識詞先從複用佇列裡查詢
        UITableViewCell *cell = [tableView dequeueReusableCellWithIdentifier:resumeID];

        // 複用佇列中沒有時再建立
        if (cell == nil) {

           // 建立新的 cell,預設為主標題模式
           cell = [[UITableViewCell alloc] initWithStyle: UITableViewCellStyleDefault reuseIdentifier:resumeID];
        }

        // 設定每一行顯示的文字內容,覆蓋資料
        cell.textLabel.text = [[myDataArray objectAtIndex:indexPath.section] objectAtIndex:indexPath.row];
        cell.imageView.image = [UIImage imageNamed:@"HQ_0003"];

        return cell;
    }
Swift
    // 設定每一行顯示的內容
    func tableView(tableView: UITableView, cellForRowAtIndexPath indexPath: NSIndexPath) -> UITableViewCell {

        // 建立標識詞,標識詞隨意設定,但不能和其它 tableView 的相同
        let resumeID = "testIdentifier"

        // 根據標識詞先從複用佇列裡查詢
        var cell = tableView.dequeueReusableCellWithIdentifier(resumeID)

        // 複用佇列中沒有時再建立
        if cell == nil {

            // 建立新的 cell,預設為主標題模式
            cell = UITableViewCell(style: .Default, reuseIdentifier: resumeID)
        }

        // 設定每一行顯示的文字內容,覆蓋資料
        cell!.textLabel?.text = myDataArray[indexPath.section][indexPath.row]
        cell!.imageView?.image = UIImage(named: "HQ_0003")

        return cell!
    }
3.2 註冊 Cell
在 tableView 建立時,從 iOS7 開始多了一種建立 cell 的方式(註冊),讓 tableView 註冊一種 cell,需要設定複用標誌。
建立的 Cell 為 UITableViewCellStyleDefault 預設型別,無法修改。
Objective-C
    // 定義重用標識,定義為全域性變數
    NSString *resumeID = @"testIdentifier";

    // 註冊 cell
    - (void)viewDidLoad {
        [super viewDidLoad];

        // 註冊某個標識對應的 cell 型別
        [myTableView registerClass:[UITableViewCell class] forCellReuseIdentifier:resumeID];
    }

    // 設定每一行顯示的內容
    - (UITableViewCell *)tableView:(UITableView *)tableView cellForRowAtIndexPath:(NSIndexPath *)indexPath {

        // 根據標識詞先從複用佇列裡查詢,複用佇列中沒有時根據註冊的 cell 自動建立
        UITableViewCell *cell = [tableView dequeueReusableCellWithIdentifier:resumeID forIndexPath:indexPath];

        // 設定每一行顯示的文字內容,覆蓋資料
        cell.textLabel.text = [[myDataArray objectAtIndex:indexPath.section] objectAtIndex:indexPath.row];
        cell.imageView.image = [UIImage imageNamed:@"HQ_0003"];

        return cell;
    }
Swift
    // 定義重用標識,定義為全域性變數
    let resumeID = "testIdentifier"

    // 註冊 cell
    override func viewDidLoad() {
        super.viewDidLoad()

        // 註冊某個標識對應的 cell 型別
        myTableView.registerClass(UITableViewCell.self, forCellReuseIdentifier: resumeID)
    }

    // 設定每一行顯示的內容
    func tableView(tableView: UITableView, cellForRowAtIndexPath indexPath: NSIndexPath) -> UITableViewCell {

        // 根據標識詞先從複用佇列裡查詢,複用佇列中沒有時根據註冊的 cell 自動建立
        var cell = tableView.dequeueReusableCellWithIdentifier(resumeID, forIndexPath: indexPath)

        // 設定每一行顯示的文字內容,覆蓋資料
        cell!.textLabel?.text = myDataArray[indexPath.section][indexPath.row]
        cell!.imageView?.image = UIImage(named: "HQ_0003")

        return cell!
    }
3.3 StoryBoard 載入 Cell
在 storyboard 中設定 UITableView 的 Dynamic Prototypes Cell。

設定 cell 的重用標識。
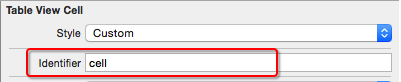
在程式碼中利用重用標識獲取 cell。
Objective-C
    // 設定每一行顯示的內容
    - (UITableViewCell *)tableView:(UITableView *)tableView cellForRowAtIndexPath:(NSIndexPath *)indexPath {

        // 建立標識詞,標識詞隨意設定,但不能和其它 tableView 的相同
        static NSString *resumeID = @"cell";

        // 根據標誌詞從先複用佇列裡查詢,複用佇列中沒有時根據 storyboard 自動建立
        UITableViewCell *cell = [tableView dequeueReusableCellWithIdentifier:resumeID forIndexPath:indexPath];

        // 設定每一行顯示的文字內容,覆蓋資料
        cell.textLabel.text = [[myDataArray objectAtIndex:indexPath.section] objectAtIndex:indexPath.row];
        cell.imageView.image = [UIImage imageNamed:@"HQ_0003"];

        return cell;
    }
Swift
    // 設定每一行顯示的內容
    func tableView(tableView: UITableView, cellForRowAtIndexPath indexPath: NSIndexPath) -> UITableViewCell {

        // 建立標識詞,標識詞隨意設定,但不能和其它 tableView 的相同
        let resumeID = "cell"

        // 根據標誌詞從先複用佇列裡查詢,複用佇列中沒有時根據 storyboard 自動建立
        var cell = tableView.dequeueReusableCellWithIdentifier(resumeID, forIndexPath: indexPath)

        // 設定每一行顯示的文字內容,覆蓋資料
        cell!.textLabel?.text = myDataArray[indexPath.section][indexPath.row]
        cell!.imageView?.image = UIImage(named: "HQ_0003")

        return cell!
    }
4、Cell 的設定
UITableView 的每一行都是一個 UITableViewCell,通過 dataSource的tableView:cellForRowAtIndexPath: 方法來初始化每一行。
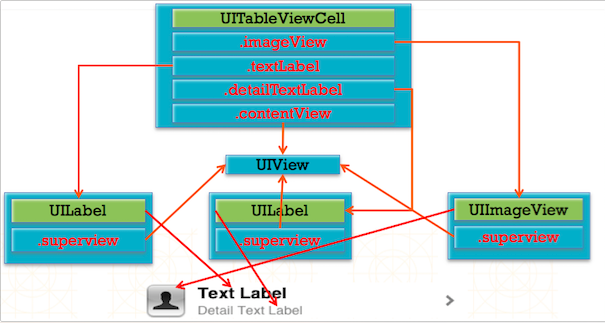
UITableViewCell 內部有個預設的子檢視 contentView,contentView 是 UITableViewCell 所顯示內容的父檢視,可顯示一些輔助指示檢視。輔助指示檢視的作用是顯示一個表示動作的圖示,可以通過設定 UITableViewCell 的 accessoryType 來顯示,預設是 UITableViewCellAccessoryNone (不顯示輔助指示檢視)。
- contentView 下預設有 3 個子檢視
- 其中 2 個是 UILabel (通過 UITableViewCell 的 textLabel 和 detailTextLabel 屬性訪問)。
- 第 3 個是 UIImageView (通過 UITableViewCell 的 imageView 屬性訪問)。
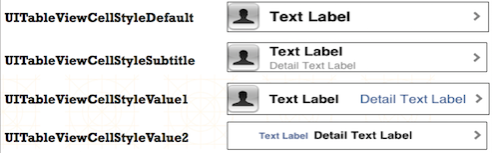
UITableViewCell 還有一個 UITableViewCellStyle 屬性,用於決定使用 contentView 的哪些子檢視,以及這些子檢視在 contentView 中的位置。
UITableViewCell 結構
Objective-C
設定 Cell 的型別
    /*
        UITableViewCellStyleDefault,  // 可選圖片 + 主標題模式,預設
        UITableViewCellStyleValue1,   // 可選圖片 + 左右主副標題模式,兩端對齊
        UITableViewCellStyleValue2,   // 左右主副標題模式,中間對齊
        UITableViewCellStyleSubtitle  // 可選圖片 + 上下主副標題模式
    */

    // 主標題模式,預設型別
    cell = [[UITableViewCell alloc] init];

    // 設定型別
    cell = [[UITableViewCell alloc] initWithStyle:UITableViewCellStyleSubtitle reuseIdentifier:@"testIdentifier"];
設定 Cell 的顯示內容
    // 主標題模式

        // 設定主標題內容
        cell.textLabel.text = [[myDataArray objectAtIndex:indexPath.section] objectAtIndex:indexPath.row];

        // 設定圖片內容,圖片在 Cell 的左端,圖片大小自動壓縮
        cell.imageView.image = [UIImage imageNamed:@"HQ_0003"];

    // 主副標題模式

        // 設定主標題內容
        cell.textLabel.text = [[myDataArray objectAtIndex:indexPath.section] objectAtIndex:indexPath.row];

        // 設定副標題內容
        cell.detailTextLabel.text = [NSString stringWithFormat:@"第 %li 行", indexPath.row];

        // 設定圖片內容,圖片在 Cell 的左端,圖片大小自動壓縮
        cell.imageView.image = [UIImage imageNamed:@"HQ_0003"];
往 cell 上新增自定義 view
- 不是直接新增在 cell 上,cell 給我們提供了一個專門用來新增子 view 的東西,當 cell 被複用的時候,不允許建立物件,如果想給系統的 cell 上新增一些子 view,需要在建立 cell 的時候新增,然後在複用的時候修改子 view 顯示的內容。
    // 新增 cell 自定義 view 檢視
    UILabel *myCellView = [[UILabel alloc] initWithFrame:CGRectMake(0, 0, 300, 44)];
    myCellView.tag = 100;

    // 在建立新的 cell 後新增
    [cell.contentView addSubview:myCellView];
// 設定 cell 自定義 view 顯示內容,在 cell 複用的時候設定 UILabel *myCellView = (id)[self.view viewWithTag:100]; myCellView.text = [NSString stringWithFormat:@"自定義 Cell View %@", [[myDataArray objectAtIndex:indexPath.section] objectAtIndex:indexPath.row]];設定 Cell 的背景檢視
    // Cell 的背景檢視設定
    /*
        設定自定義檢視為 Cell 背景檢視
        圖片大小自動壓縮填充
    */
    cell.backgroundView = myBackgroundView;


    // Cell 選中時的背景檢視設定
    cell.selectedBackgroundView = myBackgroundView;
設定 Cell 的顏色
    // Cell 背景顏色的設定
    cell.backgroundColor = [UIColor yellowColor];

    // 設定 cell 被點選時的顏色
    /*
        UITableViewCellSelectionStyleNone,     // 無色,表格點選時無顏色變化
        UITableViewCellSelectionStyleBlue,     // 灰色
        UITableViewCellSelectionStyleGray,     // 灰色
        UITableViewCellSelectionStyleDefault   // 灰色,預設
    */
    cell.selectionStyle = UITableViewCellSelectionStyleDefault;

    // 取消表格選擇變色
    /*
        在表格選中協議方法中設定,表格點選變色後恢復原來顏色,設定後無法實現表格多選
    */
    [tableView deselectRowAtIndexPath:indexPath animated:YES];
設定 Cell 的附屬控制元件
    // Cell 附屬控制元件型別的設定
    /*
        如果附屬控制元件裡有 button ,這個 button 會獨立出來

        UITableViewCellAccessoryNone,                    // 無附屬控制元件,預設
        UITableViewCellAccessoryDisclosureIndicator,     // 箭頭,不能點選
        UITableViewCellAccessoryDetailDisclosureButton,  // 詳情按鈕和箭頭,可以點選
        UITableViewCellAccessoryCheckmark,               // 對號,不能點選
        UITableViewCellAccessoryDetailButton             // 詳情按鈕,可以點選
    */
    cell.accessoryType = UITableViewCellAccessoryCheckmark;

    // Cell 附屬控制元件檢視的設定
    /*
        設定自定義檢視為 Cell 的附屬控制元件,需設定 view 的大小
    */
    cell.accessoryView = myAccessoryView;
獲取 cell
    // 獲取指定行的 cell
    UITableViewCell *cell = [tableView cellForRowAtIndexPath:[NSIndexPath indexPathForRow:3 inSection:0]];

    // 獲取所有被選中的行
    NSArray *indexPaths = [tableView indexPathsForSelectedRows];
Swift
設定 Cell 的型別
    /*
        case Default   // 可選圖片 + 主標題模式
        case Value1    // 可選圖片 + 左右主副標題模式,兩端對齊
        case Value2    // 左右主副標題模式,中間對齊
        case Subtitle  // 可選圖片 + 上下主副標題模式
    */

    // 主標題模式,預設型別
    cell = UITableViewCell()

    // 設定型別
    cell = UITableViewCell(style: .Subtitle, reuseIdentifier: "testIdentifier")
設定 Cell 的顯示內容
    // 主標題模式

        // 設定主標題內容
        cell!.textLabel?.text = myDataArray[indexPath.section][indexPath.row]

        // 設定圖片內容,圖片在 Cell 的左端,圖片大小自動壓縮
        cell!.imageView?.image = UIImage(named: "HQ_0003")

    // 主副標題模式

        // 設定主標題內容
        cell!.textLabel?.text = myDataArray[indexPath.section][indexPath.row]

        // 設定副標題內容
        cell!.detailTextLabel?.text = "第 \(indexPath.row) 行"

        // 設定圖片內容,圖片在 Cell 的左端,圖片大小自動壓縮
        cell!.imageView?.image = UIImage(named: "HQ_0003")
往 cell 上新增自定義 view
- 不是直接新增在 cell 上,cell 給我們提供了一個專門用來新增子 view 的東西,當 cell 被複用的時候,不允許建立物件,如果想給系統的 cell 上新增一些子 view,需要在建立 cell 的時候新增,然後在複用的時候修改子 view 顯示的內容。
    // 新增 cell 自定義 view 檢視
    let myCellView:UILabel = UILabel(frame: CGRectMake(0, 0, 300, 44))
    myCellView.tag = 100

    // 在建立新的 cell 後新增
    cell!.contentView.addSubview(myCellView)

    // 設定 cell 自定義 view 顯示內容,在 cell 複用的時候設定

    if (self.view.viewWithTag(100) != nil) {

        let myCellView = self.view.viewWithTag(100) as! UILabel
        myCellView.text = String("自定義 Cell View \(myDataArray[indexPath.section][indexPath.row])")
    }
設定 Cell 的背景檢視
    // Cell 的背景檢視設定
    /*
        設定自定義檢視為 Cell 背景檢視
        圖片大小自動壓縮填充
    */
    cell!.backgroundView = myBackgroundView


    // Cell 選中時的背景檢視設定
    cell!.selectedBackgroundView = myBackgroundView
設定 Cell 的顏色
    // Cell 背景顏色的設定
    cell!.backgroundColor = UIColor.yellowColor()

    // 設定 cell 被點選時的顏色
    /*
        case None     // 無色,表格點選時無顏色變化
        case Blue     // 灰色
        case Gray     // 灰色
        case Default  // 灰色,預設
    */
    cell!.selectionStyle = UITableViewCellSelectionStyle.Default

    // 取消表格選擇變色
    /*
        在表格選中協議方法中設定,表格點選變色後恢復原來顏色,設定後無法實現表格多選
    */
    tableView.deselectRowAtIndexPath(indexPath, animated: true)
設定 Cell 的附屬控制元件
    // Cell 附屬控制元件型別的設定
    /*
        如果附屬控制元件裡有 button ,這個 button 會獨立出來

        case None                      // 無附屬控制元件,預設
        case DisclosureIndicator       // 箭頭,不能點選
        case DetailDisclosureButton    // 詳情按鈕和箭頭,可以點選
        case Checkmark                 // 對號,不能點選
        case DetailButton              // 詳情按鈕,可以點選
    */
    cell!.accessoryType = UITableViewCellAccessoryType.DetailButton

    // Cell 附屬控制元件檢視的設定
    /*
        設定自定義檢視為 Cell 的附屬控制元件,需設定 view 的大小
    */
    cell!.accessoryView = myAccessoryView
獲取 cell
    // 獲取指定行的 cell
    let cell:UITableViewCell = tableView.cellForRowAtIndexPath(NSIndexPath(forItem: 3, inSection: 0))!

    // 獲取所有被選中的行
    let indexPaths:[NSIndexPath] = tableView.indexPathsForVisibleRows!
5、自定義資料模型的建立與引用
Objective-C
BookModel.h
    @interface BookModel : NSObject

    // 根據需要使用的資料建立資料模型屬性變數

    @property(nonatomic, copy)NSString *title;
    @property(nonatomic, copy)NSString *detail;
    @property(nonatomic, copy)NSString *icon;
    @property(nonatomic, copy)NSString *price;

    + (instancetype)bookModelWithDict:(NSDictionary *)dict;

    @end
BookModel.m
    + (instancetype)bookModelWithDict:(NSDictionary *)dict {

        BookModel *model = [[self alloc] init];

        // KVC - Key Value Coding
        [model setValuesForKeysWithDictionary:dict];

        return model;
    }
ViewController.m
    // 向資料來源中新增資料

        // 定義資料來源
        @property(nonatomic, retain)NSArray *myDataArray;

        // 懶載入
        - (NSArray *)myDataArray {
            if (_myDataArray == nil) {

                // 載入 plist 中的字典陣列
                NSString *filePath = [[NSBundle mainBundle] pathForResource:@"bookData" ofType:@"plist"];
                NSArray *bookDataArray = [NSArray arrayWithContentsOfFile:filePath];

                // 字典陣列 -> 模型陣列
                NSMutableArray *dataArrayM = [NSMutableArray arrayWithCapacity:bookDataArray.count];
                for (NSDictionary *bookInfoDic in bookDataArray) {
                    BookModel *bookModel = [BookModel bookModelWithDict:bookInfoDic];
                    [dataArrayM addObject:bookModel];
                }

                // 將從檔案中取出的資料新增到資料來源陣列中
                _myDataArray = [dataArrayM copy];
            }
            return _myDataArray;
        }

    // 從資料來源中取出資料

        // UITableViewDataSource 協議方法
        - (UITableViewCell *)tableView:(UITableView *)tableView cellForRowAtIndexPath:(NSIndexPath *)indexPath {

            // 從資料來源陣列中取出資料
            BookModel *bookModel = [self.myDataArray objectAtIndex:indexPath.row];

            // 配置自定義 Cell 子檢視上顯示的內容
            cell.book = bookModel;
        }
Swift
BookModel.swift
    class BookModel: NSObject {

        // 根據需要使用的資料建立資料模型屬性變數

        var title:String?
        var detail:String?
        var icon:String?
        var price:String?

        class func bookModelWithDict(dict:[String : AnyObject]) -> AnyObject {

            let model = BookModel()

            // KVC - Key Value Coding
            model.setValuesForKeysWithDictionary(dict)

            return model
        }
    }
ViewController.swift
    // 向資料來源中新增資料

        // 定義資料來源,懶載入
        lazy var myDataArray:[BookModel] = {

            // 載入 plist 中的字典陣列
            let filePath:String = NSBundle.mainBundle().pathForResource("bookData", ofType: "plist")!
            let bookDataArray:NSArray = NSArray(contentsOfFile: filePath)!

            // 字典陣列 -> 模型陣列
            var dataArrayM:NSMutableArray = NSMutableArray(capacity: bookDataArray.count)
            for bookInfoDic in bookDataArray {
                let bookModel:BookModel = BookModel.bookModelWithDict(bookInfoDic as! NSDictionary)
                dataArrayM.addObject(bookModel)
            }

            // 將從檔案中取出的資料新增到資料來源陣列中
            return dataArrayM.copy() as! [BookModel]
        }()

    // 從資料來源中取出資料

        // UITableViewDataSource 協議方法
        func tableView(tableView: UITableView, cellForRowAtIndexPath indexPath: NSIndexPath) -> UITableViewCell {

            // 從資料來源陣列中取出資料
            let bookModel:BookModel = self.myDataArray[indexPath.row]

            // 配置自定義 Cell 子檢視上顯示的內容
            cell!.configWithModel(bookModel)
        }
6、自定義等高 Cell
6.1 StoryBoard 自定義 cell
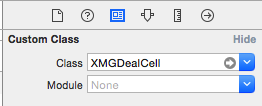
建立一個繼承自 UITableViewCell 的子類,比如 XMGDealCell。

- 在 storyboard 中
往 cell 裡面增加需要用到的子控制元件。

設定 cell 的重用標識 。

設定 cell 的 class 為 XMGDealCell。
- 在 XMGDealCell 中
- 將 storyboard 中的子控制元件連線到類擴充套件中。
- 需要提供一個模型屬性,重寫模型的 set 方法,在這個方法中設定模型資料到子控制元件上。
- 在控制器中
- 利用重用標識找到 cell。
- 給 cell 傳遞模型資料。
Objective-C
XMGDeal.h
    @interface XMGDeal : NSObject

    @property (strong, nonatomic) NSString *buyCount;
    @property (strong, nonatomic) NSString *price;
    @property (strong, nonatomic) NSString *title;
    @property (strong, nonatomic) NSString *icon;

    + (instancetype)dealWithDict:(NSDictionary *)dict;

    @end
XMGDeal.m
    @implementation XMGDeal

    + (instancetype)dealWithDict:(NSDictionary *)dict {

        XMGDeal *deal = [[self alloc] init];
        [deal setValuesForKeysWithDictionary:dict];
        return deal;
    }

    @end
XMGDealCell.h
    @class XMGDeal;

    @interface XMGDealCell : UITableViewCell

    /** 模型資料 */
    @property (nonatomic, strong) XMGDeal *deal;

    @end
XMGDealCell.m
    @interface XMGDealCell()

    @property (weak, nonatomic) IBOutlet UIImageView *iconView;
    @property (weak, nonatomic) IBOutlet UILabel *titleLabel;
    @property (weak, nonatomic) IBOutlet UILabel *priceLabel;
    @property (weak, nonatomic) IBOutlet UILabel *buyCountLabel;

    @end

    @implementation XMGDealCell

    - (void)setDeal:(XMGDeal *)deal {

        _deal = deal;

        // 設定資料
        self.iconView.image = [UIImage imageNamed:deal.icon];
        self.titleLabel.text = deal.title;
        self.priceLabel.text = [NSString stringWithFormat:@"¥%@", deal.price];
        self.buyCountLabel.text = [NSString stringWithFormat:@"%@人已購買", deal.buyCount];
    }

    @end
XMGDealsViewController.m
    @interface XMGDealsViewController ()

    /** 所有的團購資料 */
    @property (nonatomic, strong) NSArray *deals;

    @end

    @implementation XMGDealsViewController

    - (NSArray *)deals {

        if (_deals == nil) {

            // 載入plist中的字典陣列
            NSString *path = [[NSBundle mainBundle] pathForResource:@"deals.plist" ofType:nil];
            NSArray *dictArray = [NSArray arrayWithContentsOfFile:path];

            // 字典陣列 -> 模型陣列
            NSMutableArray *dealArray = [NSMutableArray array];
            for (NSDictionary *dict in dictArray) {
                XMGDeal *deal = [XMGDeal dealWithDict:dict];
                [dealArray addObject:deal];
            }

            _deals = dealArray;
        }
        return _deals;
    }

    #pragma mark - Table view data source
    - (NSInteger)tableView:(UITableView *)tableView numberOfRowsInSection:(NSInteger)section {
        return self.deals.count;
    }

    - (UITableViewCell *)tableView:(UITableView *)tableView cellForRowAtIndexPath:(NSIndexPath *)indexPath {

        static NSString *ID = @"deal";
        XMGDealCell *cell = [tableView dequeueReusableCellWithIdentifier:ID];

        // 取出模型資料
        cell.deal = self.deals[indexPath.row];

        return cell;
    }

    @end
6.2 xib 自定義 cell
- 建立一個繼承自 UITableViewCell 的子類,比如 BookCell2。
- 建立一個 xib 檔案(檔名建議跟 cell 的類名一樣),比如 BookCell2.xib。
- 拖拽一個 UITableViewCell 出來。
- 修改 cell 的 class 為 BookCell2。
- 設定 cell 的重用標識。
- 往 cell 中新增需要用到的子控制元件。
- 在 BookCell2 中
- 將 xib 中的子控制元件連線到類擴充套件中。
- 需要提供一個模型屬性,重寫模型的 set 方法,在這個方法中設定模型資料到子控制元件上。
- 也可以將建立獲得 cell 的程式碼封裝起來(比如 cellWithTableView: 方法)。
- 在控制器中
- 手動載入 xib 檔案,或者利用 registerNib... 方法註冊 xib 檔案。
- 利用重用標識找到 cell。
- 給 cell 傳遞模型資料。
6.2.1 xib 建立 cell
在 xib 檔案中必須設定 Identifier 屬性,否則 cell 不會被複用,會一直建立新的 cell,佔用大量的記憶體。
Objective-C
BookCell2.xib

- xib 的 Identifier 屬性設定為 Book2ID
BookCell2.h
    @class BookModel;

    @interface BookCell2 : UITableViewCell

    // 定義 Cell 的資料模型
    @property (nonatomic, retain)BookModel *book;

    @end
BookCell2.m
    #import "BookCell2.h"
    #import "BookModel.h"

    @interface BookCell2 ()

    // 建立自定義 Cell 檢視包含的內容

    // 按住 control 鍵拖動 或右鍵拖動過來生成
    @property (weak, nonatomic) IBOutlet UIImageView *iconView;
    @property (weak, nonatomic) IBOutlet UILabel *titleLabel;
    @property (weak, nonatomic) IBOutlet UILabel *detailLabel;
    @property (weak, nonatomic) IBOutlet UILabel *priceLabel;

    @end

    @implementation BookCell2

    // 設定顯示的資料

    - (void)setBook:(BookModel *)book {

        _book = book;

        // 設定資料,設定 cell 檢視上顯示的內容 內容
        self.iconView.image = [UIImage imageNamed:book.icon];
        self.titleLabel.text = book.title;
        self.detailLabel.text = book.detail;
        self.priceLabel.text = book.price;
    }

    @end
ViewController.m
    // 使用 xib 定義的 Cell 建立,UITableViewDataSource 協議方法
    - (UITableViewCell *)tableView:(UITableView *)tableView cellForRowAtIndexPath:(NSIndexPath *)indexPath {

        // 使用 xib 定義的 Cell 定義
        BookCell2 *cell = [tableView dequeueReusableCellWithIdentifier:@"Book2ID"];

        if (cell == nil) {

            // 通過 xib 檔案建立新的 cell
            cell = [[[NSBundle mainBundle] loadNibNamed:@"BookCell2" owner:self options: nil] lastObject];
        }

        BookModel *bookModel = [self.myDataArray objectAtIndex:indexPath.row];
        cell.book = bookModel;

        return cell;
    }
Swift
BookCell2.xib
- xib 的 Identifier 屬性設定為 Book2ID 。
BookCell2.swift
    class BookCell2: UITableViewCell {

        // 建立自定義 Cell 檢視包含的內容

        @IBOutlet weak var iconView: UIImageView!
        @IBOutlet weak var titleLabel: UILabel!
        @IBOutlet weak var detailLabel: UILabel!
        @IBOutlet weak var priceLabel: UILabel!

        // 設定顯示的資料

        func configWithModel(bookModel:BookModel){

            // 設定資料,設定 cell 檢視上顯示的內容 內容
            iconView!.image = UIImage(named: bookModel.icon!)
            titleLabel!.text = bookModel.title
            detailLabel!.text = bookModel.detail
            priceLabel!.text = bookModel.price
        }
    }
ViewController.swift
    // 使用 xib 定義的 Cell 建立,UITableViewDataSource 協議方法
    func tableView(tableView: UITableView, cellForRowAtIndexPath indexPath: NSIndexPath) -> UITableViewCell {

        // 使用 xib 定義的 Cell 定義
        var cell:BookCell2? = tableView.dequeueReusableCellWithIdentifier("BookCell2") as? BookCell2

        if cell == nil {

            // 通過 xib 檔案建立新的 cell
            cell = NSBundle.mainBundle().loadNibNamed("BookCell2", owner: self, options: nil).last as? BookCell2
        }

        let bookModel:BookModel = self.myDataArray[indexPath.row]
        cell!.configWithModel(bookModel)

        return cell!
    }
6.2.2 xib 註冊 cell
如果 cell 使用 xib 註冊的方式,xib 中可以不指定複用標識 Identifier 屬性,如果 xib 中指定了,那麼所有地方都要同步。但無論如何程式碼中必須設定 Identifier 屬性。
- 在 tableView 建立時,從 iOS7 開始多了一種建立 cell 的方式(註冊),讓 tableView 註冊一種 cell,需要設定複用標誌。
用註冊方式建立 cell,如果 tableView 已經註冊了某一種 cell,從複用佇列裡查詢,如果找不到,系統會自動通過註冊的 cell 類來建立 cell 物件。
Objective-C
- BookCell2.xib
- BookCell2.h
BookCell2.m
- xib 自定義 Cell 部分同上。
ViewController.m
    // 註冊 cell
    [myTableView registerNib:[UINib nibWithNibName:NSStringFromClass([BookCell2 class]) bundle:nil] forCellReuseIdentifier:@"Book2ID"];

    // 使用註冊的 xib cell 建立,UITableViewDataSource 協議方法
    - (UITableViewCell *)tableView:(UITableView *)tableView cellForRowAtIndexPath:(NSIndexPath *)indexPath {

        // 使用 xib 定義的 Cell 定義
        BookCell2 *cell = [tableView dequeueReusableCellWithIdentifier:@"Book2ID" forIndexPath:indexPath];

        BookModel *bookModel = [self.myDataArray objectAtIndex:indexPath.row];
        cell.book = bookModel;

        return cell;
    }
Swift
- BookCell2.xib
BookCell2.swift
- xib 自定義 Cell 部分同上。
ViewController.m
    // 註冊 cell
    myTableView.registerNib(UINib(nibName: "BookCell2", bundle: nil), forCellReuseIdentifier: "Book2ID")

    // 使用註冊的 xib cell 建立,UITableViewDataSource 協議方法
    func tableView(tableView: UITableView, cellForRowAtIndexPath indexPath: NSIndexPath) -> UITableViewCell {
        // 使用 xib 定義的 Cell 定義
        let cell:BookCell2? = tableView.dequeueReusableCellWithIdentifier("Book2ID", forIndexPath: indexPath) as? BookCell2

        let bookModel:BookModel = self.myDataArray[indexPath.row]

        cell!.configWithModel(bookModel)

        return cell!
    }
6.3 程式碼自定義 Cell
程式碼自定義 cell(使用 frame)
- 建立一個繼承自 UITableViewCell 的子類,比如 BookCell1。
- 在 initWithStyle:reuseIdentifier: 方法中。
- 新增子控制元件。
- 設定子控制元件的初始化屬性(比如文字顏色、字型)。
- 在 layoutSubviews 方法中設定子控制元件的 frame。
- 需要提供一個模型屬性,重寫模型的 set 方法,在這個方法中設定模型資料到子控制元件。
- 在 initWithStyle:reuseIdentifier: 方法中。
- 在控制器中
- 利用 registerClass... 方法註冊 BookCell1 類。
- 利用重用標識找到 cell(如果沒有註冊類,就需要手動建立 cell)。
- 給 cell 傳遞模型資料。
- 也可以將建立獲得 cell 的程式碼封裝起來(比如 cellWithTableView: 方法)。
- 建立一個繼承自 UITableViewCell 的子類,比如 BookCell1。
程式碼自定義 cell(使用 autolayout)
- 建立一個繼承自 UITableViewCell 的子類,比如 BookCell1。
- 在 initWithStyle:reuseIdentifier: 方法中。
- 新增子控制元件。
- 新增子控制元件的約束(建議使用 Masonry)。
- 設定子控制元件的初始化屬性(比如文字顏色、字型)。
- 需要提供一個模型屬性,重寫模型的 set 方法,在這個方法中設定模型資料到子控制元件。
- 在 initWithStyle:reuseIdentifier: 方法中。
- 在控制器中
- 利用 registerClass... 方法註冊 BookCell1 類。
- 利用重用標識找到 cell(如果沒有註冊類,就需要手動建立 cell)。
- 給 cell 傳遞模型資料。
- 也可以將建立獲得 cell 的程式碼封裝起來(比如 cellWithTableView: 方法)。
- 建立一個繼承自 UITableViewCell 的子類,比如 BookCell1。
6.3.1 程式碼建立 cell - frame
Objective-C
BookCell1.h
    @class BookModel;

    @interface BookCell1 : UITableViewCell

    // 定義 Cell 的資料模型
    @property (nonatomic, retain)BookModel *book;

    @end
BookCell1.m
    #import "BookCell1.h"
    #import "BookModel.h"

    @interface BookCell1()

    // 建立自定義 Cell 檢視包含的內容

    @property(nonatomic, retain)UIImageView *iconView;
    @property(nonatomic, retain)UILabel *titleLabel;
    @property(nonatomic, retain)UILabel *detailLabel;
    @property(nonatomic, retain)UILabel *priceLabel;

    @end

    @implementation BookCell1

    // 重寫初 Cell 始化方法,建立自定義 Cell

    - (instancetype)initWithStyle:(UITableViewCellStyle)style reuseIdentifier:(NSString *)reuseIdentifier {

        if (self = [super initWithStyle:style reuseIdentifier:reuseIdentifier]) {

            // 建立子檢視

            // 建立 iconView 檢視,並新增到自定義 Cell 上
            self.iconView = [[UIImageView alloc] init];
            self.iconView.layer.borderColor = [[UIColor greenColor] CGColor];
            self.iconView.layer.borderWidth = 2;
            [self.contentView addSubview:self.iconView];

            // 建立 titleLabel 檢視
            self.titleLabel = [[UILabel alloc] init];
            self.titleLabel.font = [UIFont boldSystemFontOfSize:14];
            self.titleLabel.textColor = [UIColor redColor];
            [self.contentView addSubview:self.titleLabel];

            // 建立 detailLabel 檢視
            self.detailLabel = [[UILabel alloc] init];
            self.detailLabel.font = [UIFont systemFontOfSize:12];
            [self.contentView addSubview:self.detailLabel];

            // 建立 priceLabel 檢視
            self.priceLabel = [[UILabel alloc] init];
            self.priceLabel.font = [UIFont systemFontOfSize:12];
            [self.contentView addSubview:self.priceLabel];
        }
        return self;
    }

    // 佈局子檢視

    - (void)layoutSubviews {

        [super layoutSubviews];

        // 佈局子檢視
        self.iconView.frame = CGRectMake(10, 10, 60, 60);
        self.titleLabel.frame = CGRectMake(90, 5, 200, 25);
        self.detailLabel.frame = CGRectMake(90, 30, 200, 25);
        self.priceLabel.frame = CGRectMake(90, 55, 200, 25);
    }

    // 設定顯示的資料

    - (void)setBook:(BookModel *)book {

        _book = book;

        // 設定資料,設定 cell 檢視上顯示的內容 內容
        self.iconView.image = [UIImage imageNamed:book.icon];
        self.titleLabel.text = book.title;
        self.detailLabel.text = book.detail;
        self.priceLabel.text = book.price;
    }

    @end
ViewController.m
    // 使用自定義 Cell 建立,UITableViewDataSource 協議方法
    - (UITableViewCell *)tableView:(UITableView *)tableView cellForRowAtIndexPath:(NSIndexPath *)indexPath {

        // 使用自定義的 Cell 定義
        BookCell1 *cell = [tableView dequeueReusableCellWithIdentifier:@"testIdentifier"];

        if (cell == nil) {

            // 使用自定義的 Cell 建立
            cell = [[BookCell1 alloc] initWithStyle:UITableViewCellStyleDefault reuseIdentifier:@"testIdentifier"];
        }

        BookModel *bookModel = [self.myDataArray objectAtIndex:indexPath.row];

        cell.book = bookModel;

        return cell;
    }
Swift
BookCell1.swift
    class BookCell1: UITableViewCell {

        // 建立自定義 Cell 檢視包含的內容

        var iconView:UIImageView?
        var titleLabel:UILabel?
        var detailLabel:UILabel?
        var priceLabel:UILabel?

        // 重寫初 Cell 始化方法,建立自定義 Cell

        override init(style: UITableViewCellStyle, reuseIdentifier: String?) {

            super.init(style: style, reuseIdentifier: reuseIdentifier)

            // 建立子檢視

            // 建立 _iconView 檢視,並新增到自定義 Cell 上
            iconView = UIImageView()
            iconView!.layer.borderColor = UIColor.greenColor().CGColor
            iconView!.layer.borderWidth = 2
            self.contentView.addSubview(iconView!)

            // 建立 _titleLabel 檢視
            titleLabel = UILabel()
            titleLabel!.font = UIFont.boldSystemFontOfSize(14)
            titleLabel!.textColor = UIColor.redColor()
            self.contentView.addSubview(titleLabel!)

            // 建立 _detailLabel 檢視
            detailLabel = UILabel()
            detailLabel!.font = UIFont.systemFontOfSize(12)
            self.contentView.addSubview(detailLabel!)

            // 建立 _priceLabel 檢視
            priceLabel = UILabel()
            priceLabel!.font = UIFont.systemFontOfSize(12)
            self.contentView.addSubview(priceLabel!)
        }

        // 佈局子檢視

        override func layoutSubviews() {
            super.layoutSubviews()

            // 佈局子檢視
            iconView?.frame = CGRectMake(10, 10, 60, 60)
            titleLabel?.frame = CGRectMake(90, 5, 200, 25)
            detailLabel?.frame = CGRectMake(90, 30, 200, 25)
            priceLabel?.frame = CGRectMake(90, 55, 200, 25)
        }

        // 設定顯示的資料

        func configWithModel(bookModel:BookModel){

            // 設定資料,設定 cell 檢視上顯示的內容 內容
            iconView?.image = UIImage(named: bookModel.icon!)
            titleLabel?.text = bookModel.title
            detailLabel?.text = bookModel.detail
            priceLabel?.text = bookModel.price
        }

        required init?(coder aDecoder: NSCoder) {
            fatalError("init(coder:) has not been implemented")
        }
    }
ViewController.swift
    // 使用自定義 Cell 建立,UITableViewDataSource 協議方法
    func tableView(tableView: UITableView, cellForRowAtIndexPath indexPath: NSIndexPath) -> UITableViewCell {

        // 使用自定義的 Cell 定義
        var cell:BookCell1? = tableView.dequeueReusableCellWithIdentifier("testIdentifier") as? BookCell1

        if cell == nil {

            // 使用自定義的 Cell 建立
            cell = BookCell1(style: UITableViewCellStyle.Default, reuseIdentifier: "testIdentifier")
        }

        let bookModel:BookModel = self.myDataArray[indexPath.row]

        cell!.configWithModel(bookModel)

        return cell!
    }
6.3.2 程式碼註冊 cell - frame
- 在 tableView 建立時,從 iOS7 開始多了一種建立 cell 的方式(註冊),讓 tableView 註冊一種 cell,需要設定複用標誌。
用註冊方式建立 cell,如果 tableView 已經註冊了某一種 cell,從複用佇列裡查詢,如果找不到,系統會自動通過註冊的 cell 類來建立 cell 物件。
Objective-C
- BookCell1.h
BookCell1.m
- 自定義 Cell 部分同上。
ViewController.m
    // 註冊 cell
    [myTableView registerClass:[BookCell1 class] forCellReuseIdentifier:@"testIdentifier"];

    // 使用註冊的 Cell 建立,UITableViewDataSource 協議方法
    - (UITableViewCell *)tableView:(UITableView *)tableView cellForRowAtIndexPath:(NSIndexPath *)indexPath {

        BookCell1 *cell = [tableView dequeueReusableCellWithIdentifier:@"testIdentifier" forIndexPath:indexPath];
        BookModel *bookModel = [self.myDataArray objectAtIndex:indexPath.row];

        cell.book = bookModel;

        return cell;
    }
Swift
BookCell1.swift
- 自定義 Cell 部分同上。
ViewController.swift
    // 註冊 cell
    myTableView.registerClass(BookCell1.self, forCellReuseIdentifier: "testIdentifier")

    // 使用註冊的 Cell 建立,UITableViewDataSource 協議方法
    func tableView(tableView: UITableView, cellForRowAtIndexPath indexPath: NSIndexPath) -> UITableViewCell {

        let cell:BookCell1? = tableView.dequeueReusableCellWithIdentifier("testIdentifier", forIndexPath: indexPath) as? BookCell1

        let bookModel:BookModel = self.myDataArray[indexPath.row]

        cell!.configWithModel(bookModel)

        return cell!
    }
6.3.3 程式碼建立 cell - autolayout
第三方框架 Masonry Github 網址:https://github.com/SnapKit/Masonry
StoryBoard
XMGDeal.h
    @interface XMGDeal : NSObject

    @property (strong, nonatomic) NSString *buyCount;
    @property (strong, nonatomic) NSString *price;
    @property (strong, nonatomic) NSString *title;
    @property (strong, nonatomic) NSString *icon;

    + (instancetype)dealWithDict:(NSDictionary *)dict;

    @end
XMGDeal.m
    @implementation XMGDeal

    + (instancetype)dealWithDict:(NSDictionary *)dict {

        XMGDeal *deal = [[self alloc] init];

        // KVC - Key Value Coding
        [deal setValuesForKeysWithDictionary:dict];

        return deal;
    }

    @end
XMGDealCell.h
    @class XMGDeal;

    @interface XMGDealCell : UITableViewCell

    /** 模型資料 */
    @property (nonatomic, strong) XMGDeal *deal;

    + (instancetype)cellWithTableView:(UITableView *)tableView;

    @end
XMGDealCell.m
    #define MAS_SHORTHAND
    #define MAS_SHORTHAND_GLOBALS

    #import "Masonry.h"

    @interface XMGDealCell()

    @property (weak, nonatomic) UIImageView *iconView;
    @property (weak, nonatomic) UILabel *titleLabel;
    @property (weak, nonatomic) UILabel *priceLabel;
    @property (weak, nonatomic) UILabel *buyCountLabel;

    @end

    @implementation XMGDealCell

    + (instancetype)cellWithTableView:(UITableView *)tableView {

        static NSString *ID = @"deal";

        // 建立cell
        XMGDealCell *cell = [tableView dequeueReusableCellWithIdentifier:ID];

        if (cell == nil) {
            cell = [[XMGDealCell alloc] initWithStyle:UITableViewCellStyleDefault reuseIdentifier:ID];
        }
        return cell;
    }

    // 1.在 initWithStyle:reuseIdentifier: 方法中新增子控制元件
    - (instancetype)initWithStyle:(UITableViewCellStyle)style reuseIdentifier:(NSString *)reuseIdentifier {

        if (self = [super initWithStyle:style reuseIdentifier:reuseIdentifier]) {

            UIImageView *iconView = [[UIImageView alloc] init];
            [self.contentView addSubview:iconView];
            self.iconView = iconView;

            UILabel *titleLabel = [[UILabel alloc] init];
            [self.contentView addSubview:titleLabel];
            self.titleLabel = titleLabel;

            UILabel *priceLabel = [[UILabel alloc] init];
            priceLabel.textColor = [UIColor orangeColor];
            [self.contentView addSubview:priceLabel];
            self.priceLabel = priceLabel;

            UILabel *buyCountLabel = [[UILabel alloc] init];
            buyCountLabel.textAlignment = NSTextAlignmentRight;
            buyCountLabel.font = [UIFont systemFontOfSize:14];
            buyCountLabel.textColor = [UIColor lightGrayColor];
            [self.contentView addSubview:buyCountLabel];
            self.buyCountLabel = buyCountLabel;
        }
        return self;
    }

    // 2.在 layoutSubviews 方法中設定子控制元件的 約束
    - (void)layoutSubviews {

        [super layoutSubviews];

        CGFloat margin = 10;

        [self.iconView makeConstraints:^(MASConstraintMaker *make) {
            make.width.equalTo(100);
            make.left.top.offset(margin);
            make.bottom.offset(-margin);
        }];

        [self.titleLabel makeConstraints:^(MASConstraintMaker *make) {
            make.top.equalTo(self.iconView);
            make.left.equalTo(self.iconView.right).offset(margin);
            make.right.offset(-margin);
        }];

        [self.priceLabel makeConstraints:^(MASConstraintMaker *make) {
            make.left.equalTo(self.titleLabel);
            make.bottom.equalTo(self.iconView);
            make.width.equalTo(70);
        }];

        [self.buyCountLabel makeConstraints:^(MASConstraintMaker *make) {
            make.bottom.equalTo(self.priceLabel);
            make.right.equalTo(self.titleLabel);
            make.left.equalTo(self.priceLabel.right).offset(margin);
        }];
    }

    // 3.重寫模型的 set 方法
    - (void)setDeal:(XMGDeal *)deal {

        _deal = deal;

        // 設定資料
        self.iconView.image = [UIImage imageNamed:deal.icon];
        self.titleLabel.text = deal.title;
        self.priceLabel.text = [NSString stringWithFormat:@"¥%@", deal.price];
        self.buyCountLabel.text = [NSString stringWithFormat:@"%@人已購買", deal.buyCount];
    }

    @end
XMGDealsViewController.m
    @interface XMGDealsViewController ()

    /** 所有的團購資料 */
    @property (nonatomic, strong) NSArray *deals;

    @end

    @implementation XMGDealsViewController

    - (NSArray *)deals {

        if (_deals == nil) {

            // 載入plist中的字典陣列
            NSString *path = [[NSBundle mainBundle] pathForResource:@"deals.plist" ofType:nil];
            NSArray *dictArray = [NSArray arrayWithContentsOfFile:path];

            // 字典陣列 -> 模型陣列
            NSMutableArray *dealArray = [NSMutableArray array];
            for (NSDictionary *dict in dictArray) {
                XMGDeal *deal = [XMGDeal dealWithDict:dict];
                [dealArray addObject:deal];
            }

            _deals = dealArray;
        }
        return _deals;
    }


    - (void)viewDidLoad {
        [super viewDidLoad];

    //    [self.tableView registerClass:[XMGDealCell class] forCellReuseIdentifier:@"deal"];
    }

    #pragma mark - Table view data source
    - (NSInteger)tableView:(UITableView *)tableView numberOfRowsInSection:(NSInteger)section {
        return self.deals.count;
    }

    - (UITableViewCell *)tableView:(UITableView *)tableView cellForRowAtIndexPath:(NSIndexPath *)indexPath {

        //建立cell
        XMGDealCell *cell = [XMGDealCell cellWithTableView:tableView];

        // 取出模型資料
        cell.deal = self.deals[indexPath.row];

        return cell;
    }

    @end
7、自定義非等高 Cell
7.1 StoryBoard / Xib 自定義 cell
- 在模型中增加一個 cellHeight 屬性,用來存放對應 cell 的高度。
- 在 cell 的模型屬性 set 方法中呼叫 [self layoutIfNeed] 方法強制佈局,然後計算出模型的 cellheight 屬性值。
- 在控制器中實現 tableView:estimatedHeightForRowAtIndexPath: 方法,返回一個估計高度,比如 200。
在控制器中實現 tableView:heightForRowAtIndexPath: 方法,返回 cell 的真實高度(模型中的 cellHeight 屬性)。
注意:StoryBoard 中 label 的約束不要設定右側約束值,否則編譯時會列印出一大堆提示資訊。
StoryBoard
Main.storyboard
在 cell 上新增子控制元件,並設定約束。

Xib
XMGStatusCell.xib
在 cell 上新增子控制元件,並設定約束。
Objective-C
XMGStatus.h
    @interface XMGStatus : NSObject

    @property (strong, nonatomic) NSString *name;
    @property (strong, nonatomic) NSString *text;
    @property (strong, nonatomic) NSString *icon;
    @property (strong, nonatomic) NSString *picture;
    @property (assign, nonatomic, getter=isVip) BOOL vip;

    /** cell 的高度 */
    @property (assign, nonatomic) CGFloat cellHeight;

    + (instancetype)statusWithDict:(NSDictionary *)dict;

    @end
XMGStatus.m
    @implementation XMGStatus

    + (instancetype)statusWithDict:(NSDictionary *)dict {

        XMGStatus *status = [[self alloc] init];
        [status setValuesForKeysWithDictionary:dict];
        return status;
    }

    @end
XMGStatusCell.h
    @class XMGStatus;

    @interface XMGStatusCell : UITableViewCell

    + (instancetype)cellWithTableView:(UITableView *)tableView;

    /** 模型資料 */
    @property (nonatomic, strong) XMGStatus *status;

    @end
XMGStatusCell.m
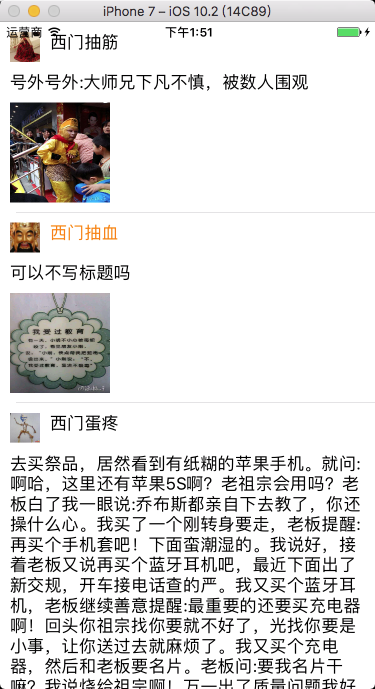
    @interface XMGStatusCell()

    @property (weak, nonatomic) IBOutlet UIImageView *iconView;
    @property (weak, nonatomic) IBOutlet UILabel *nameLabel;
    @property (weak, nonatomic) IBOutlet UIImageView *vipView;
    @property (weak, nonatomic) IBOutlet UILabel *contentLabel;
    @property (weak, nonatomic) IBOutlet UIImageView *pictureView;

    @end

    @implementation XMGStatusCell

    + (instancetype)cellWithTableView:(UITableView *)tableView {

        return [tableView dequeueReusableCellWithIdentifier:@"status"];
    }

    - (void)awakeFromNib {
        [super awakeFromNib];

        // 設定label每一行文字的最大寬度
        /*
            為了保證計算出來的數值 跟 真正顯示出來的效果 一致
        */
        self.contentLabel.preferredMaxLayoutWidth = [UIScreen mainScreen].bounds.size.width - 20;
    }

    - (void)setStatus:(XMGStatus *)status {

        _status = status;

        // 設定顯示的資料

        self.iconView.image = [UIImage imageNamed:status.icon];
        self.nameLabel.text = status.name;

        if (status.isVip) {
            self.nameLabel.textColor = [UIColor orangeColor];
            self.vipView.hidden = NO;
        } else {
            self.nameLabel.textColor = [UIColor blackColor];
            self.vipView.hidden = YES;
        }

        self.contentLabel.text = status.text;

        if (status.picture) {
            self.pictureView.hidden = NO;
            self.pictureView.image = [UIImage imageNamed:status.picture];
        } else {
            self.pictureView.hidden = YES;
        }

        // 計算 cell 高度

        // 強制佈局
        [self layoutIfNeeded];

        // 計算 cell 的高度
        if (self.pictureView.hidden) {  // 沒有配圖
            _status.cellHeight = CGRectGetMaxY(self.contentLabel.frame) + 10;
        } else {                        // 有配圖
            _status.cellHeight = CGRectGetMaxY(self.pictureView.frame) + 10;
        }
    }

    @end
XMGStatusesViewController.m
    @interface XMGStatusesViewController ()

    @property (strong, nonatomic) NSArray *statuses;

    @end

    @implementation XMGStatusesViewController

    - (NSArray *)statuses {

        if (_statuses == nil) {

            // 載入plist中的字典陣列
            NSString *path = [[NSBundle mainBundle] pathForResource:@"statuses.plist" ofType:nil];
            NSArray *dictArray = [NSArray arrayWithContentsOfFile:path];

            // 字典陣列 -> 模型陣列
            NSMutableArray *statusArray = [NSMutableArray array];
            for (NSDictionary *dict in dictArray) {
                XMGStatus *status = [XMGStatus statusWithDict:dict];
                [statusArray addObject:status];
            }
            _statuses = statusArray;
        }
        return _statuses;
    }

    #pragma mark - Table view data source

    - (NSInteger)tableView:(UITableView *)tableView numberOfRowsInSection:(NSInteger)section {
        return self.statuses.count;
    }

    - (UITableViewCell *)tableView:(UITableView *)tableView cellForRowAtIndexPath:(NSIndexPath *)indexPath {

        XMGStatusCell *cell = [XMGStatusCell cellWithTableView:tableView];
        cell.status = self.statuses[indexPath.row];
        return cell;
    }

    #pragma mark - 代理方法

    // 返回每一行的高度

    - (CGFloat)tableView:(UITableView *)tableView heightForRowAtIndexPath:(NSIndexPath *)indexPath {

        XMGStatus *staus = self.statuses[indexPath.row];
        return staus.cellHeight;
    }

    /**
     * 返回每一行的估計高度
     * 只要返回了估計高度,那麼就會先呼叫 tableView:cellForRowAtIndexPath: 方法建立 cell,
     * 再呼叫 tableView:heightForRowAtIndexPath: 方法獲取 cell 的真實高度
     */
    - (CGFloat)tableView:(UITableView *)tableView estimatedHeightForRowAtIndexPath:(NSIndexPath *)indexPath {

        return 200;
    }

    @end
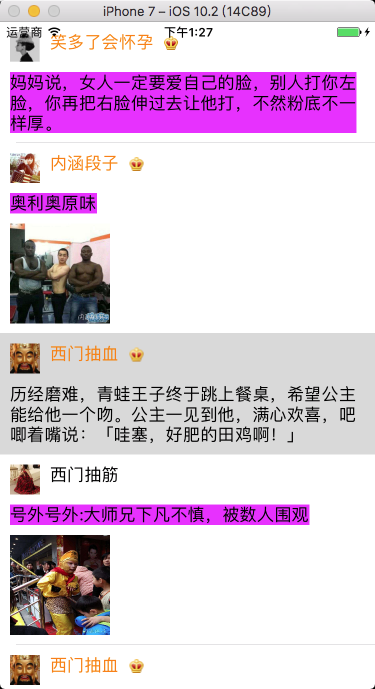
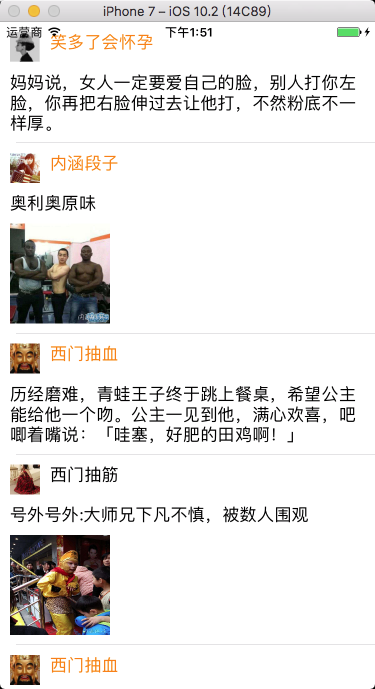
執行效果
7.2 程式碼自定義 cell
7.2.1 程式碼自定義(frame)
- 新建一個繼承自 UITableViewCell 的類。
- 重寫 initWithStyle:reuseIdentifier: 方法。
- 新增所有需要顯示的子控制元件(不需要設定子控制元件的資料和 frame, 子控制元件要新增到 contentView 中)。
- 進行子控制元件一次性的屬性設定(有些屬性只需要設定一次, 比如字型\固定的圖片)。
- 提供 2 個模型。
- 資料模型: 存放文字資料\圖片資料。
- frame 模型: 存放資料模型\所有子控制元件的 frame\cell 的高度。
- cell 擁有一個 frame 模型(不要直接擁有資料模型)。
- 重寫 cell frame 模型屬性的 setter 方法: 在這個方法中設定子控制元件的顯示資料和 frame。
- frame 模型資料的初始化已經採取懶載入的方式(每一個 cell 對應的 frame 模型資料只載入一次)。
7.2.2 程式碼自定義(Autolayout)
- 新建一個繼承自 UITableViewCell 的類。
- 重寫 initWithStyle:reuseIdentifier: 方法。
- 新增所有需要顯示的子控制元件(不需要設定子控制元件的資料和 frame, 子控制元件要新增到 contentView 中)。
- 進行子控制元件一次性的屬性設定(有些屬性只需要設定一次, 比如字型\固定的圖片)。
- 設定 cell 上子控制元件的約束。
- 在模型中增加一個 cellHeight 屬性,用來存放對應 cell 的高度。
- 在 cell 的模型屬性 set 方法中呼叫 [self layoutIfNeed] 方法強制佈局,然後計算出模型的 cellheight 屬性值。
- 在控制器中實現 tableView:estimatedHeightForRowAtIndexPath: 方法,返回一個估計高度,比如 200。
在控制器中實現 tableView:heightForRowAtIndexPath: 方法,返回 cell 的真實高度(模型中的 cellHeight 屬性)。
Objective-C
XMGStatus.h
    @interface XMGStatus : NSObject

    @property (strong, nonatomic) NSString *name;
    @property (strong, nonatomic) NSString *text;
    @property (strong, nonatomic) NSString *icon;
    @property (strong, nonatomic) NSString *picture;
    @property (assign, nonatomic, getter=isVip) BOOL vip;

    /** cell 的高度 */
    @property (assign, nonatomic) CGFloat cellHeight;

    + (instancetype)statusWithDict:(NSDictionary *)dict;

    @end
XMGStatus.m
    @implementation XMGStatus

    + (instancetype)statusWithDict:(NSDictionary *)dict {

        XMGStatus *status = [[self alloc] init];
        [status setValuesForKeysWithDictionary:dict];
        return status;
    }

    @end
XMGStatusCell.h
    @class XMGStatus;

    @interface XMGStatusCell : UITableViewCell

    + (instancetype)cellWithTableView:(UITableView *)tableView;

    /** 模型資料 */
    @property (nonatomic, strong) XMGStatus *status;

    @end
XMGStatusCell.m
    #define MAS_SHORTHAND
    #define MAS_SHORTHAND_GLOBALS

    #import "Masonry.h"

    @interface XMGStatusCell()

    @property (weak, nonatomic) UIImageView *iconView;
    @property (weak, nonatomic) UILabel *nameLabel;
    @property (weak, nonatomic) UIImageView *vipView;
    @property (weak, nonatomic) UILabel *contentLabel;
    @property (weak, nonatomic) UIImageView *pictureView;

    @end

    @implementation XMGStatusCell

    + (instancetype)cellWithTableView:(UITableView *)tableView {

        static NSString *ID = @"status";
        XMGStatusCell *cell = [tableView dequeueReusableCellWithIdentifier:ID];

        if (cell == nil) {
            cell = [[XMGStatusCell alloc] initWithStyle:UITableViewCellStyleDefault reuseIdentifier:ID];
        }
        return cell;
    }

    - (instancetype)initWithStyle:(UITableViewCellStyle)style reuseIdentifier:(NSString *)reuseIdentifier {

        if (self = [super initWithStyle:style reuseIdentifier:reuseIdentifier]) {

            UIImageView *iconView = [[UIImageView alloc] init];
            [self.contentView addSubview:iconView];
            self.iconView = iconView;

            UILabel *nameLabel = [[UILabel alloc] init];
            [self.contentView addSubview:nameLabel];
            self.nameLabel = nameLabel;

            UIImageView *vipView = [[UIImageView alloc] init];
            [self.contentView addSubview:vipView];
            self.vipView = vipView;

            UILabel *contentLabel = [[UILabel alloc] init];
            contentLabel.numberOfLines = 0;

            // 設定 label 每一行文字的最大寬度
            contentLabel.preferredMaxLayoutWidth = [UIScreen mainScreen].bounds.size.width - 20;

            [self.contentView addSubview:contentLabel];
            self.contentLabel = contentLabel;

            UIImageView *pictureView = [[UIImageView alloc] init];
            [self.contentView addSubview:pictureView];
            self.pictureView = pictureView;
        }
        return self;
    }

    - (void)layoutSubviews {

        [super layoutSubviews];

        CGFloat margin = 10;

        [self.iconView makeConstraints:^(MASConstraintMaker *make) {
            make.size.equalTo(30);
            make.left.top.offset(margin);
        }];

        [self.nameLabel makeConstraints:^(MASConstraintMaker *make) {
            make.top.equalTo(self.iconView);
            make.left.equalTo(self.iconView.right).offset(margin);
        }];

        [self.vipView makeConstraints:^(MASConstraintMaker *make) {
            make.size.equalTo(14);
            make.left.equalTo(self.nameLabel.right).offset(margin);
            make.centerY.equalTo(self.nameLabel.centerY);
        }];

        [self.contentLabel makeConstraints:^(MASConstraintMaker *make) {
            make.top.equalTo(self.iconView.bottom).offset(margin);
            make.left.offset(margin);
    //        make.right.offset(-margin);       // 可加可不加
        }];

        [self.pictureView makeConstraints:^(MASConstraintMaker *make) {
            make.size.equalTo(100);
            make.top.equalTo(self.contentLabel.bottom).offset(margin);
            make.left.offset(margin);
        }];
    }

    - (void)setStatus:(XMGStatus *)status {

        _status = status;

        // 設定顯示的資料

        self.iconView.image = [UIImage imageNamed:status.icon];
        self.nameLabel.text = status.name;

        if (status.isVip) {
            self.nameLabel.textColor = [UIColor orangeColor];
            self.vipView.hidden = NO;
        } else {
            self.nameLabel.textColor = [UIColor blackColor];
            self.vipView.hidden = YES;
        }

        self.contentLabel.text = status.text;

        if (status.picture) {
            self.pictureView.hidden = NO;
            self.pictureView.image = [UIImage imageNamed:status.picture];
        } else {
            self.pictureView.hidden = YES;
        }

        // 計算 cell 高度

        // 強制佈局
        [self layoutIfNeeded];

        // 計算 cell 的高度
        if (self.pictureView.hidden) {  // 沒有配圖
            _status.cellHeight = CGRectGetMaxY(self.contentLabel.frame) + 10;
        } else {                        // 有配圖
            _status.cellHeight = CGRectGetMaxY(self.pictureView.frame) + 10;
        }
    }

    @end
XMGStatusesViewController.m
    @interface XMGStatusesViewController ()

    @property (strong, nonatomic) NSArray *statuses;

    @end

    @implementation XMGStatusesViewController

    - (NSArray *)statuses {

        if (_statuses == nil) {

            // 載入plist中的字典陣列
            NSString *path = [[NSBundle mainBundle] pathForResource:@"statuses.plist" ofType:nil];
            NSArray *dictArray = [NSArray arrayWithContentsOfFile:path];

            // 字典陣列 -> 模型陣列
            NSMutableArray *statusArray = [NSMutableArray array];
            for (NSDictionary *dict in dictArray) {
                XMGStatus *status = [XMGStatus statusWithDict:dict];
                [statusArray addObject:status];
            }
            _statuses = statusArray;
        }
        return _statuses;
    }

    #pragma mark - Table view data source

    - (NSInteger)tableView:(UITableView *)tableView numberOfRowsInSection:(NSInteger)section {
        return self.statuses.count;
    }

    - (UITableViewCell *)tableView:(UITableView *)tableView cellForRowAtIndexPath:(NSIndexPath *)indexPath {

        XMGStatusCell *cell = [XMGStatusCell cellWithTableView:tableView];
        cell.status = self.statuses[indexPath.row];
        return cell;
    }

    #pragma mark - 代理方法

    // 返回每一行的高度

    - (CGFloat)tableView:(UITableView *)tableView heightForRowAtIndexPath:(NSIndexPath *)indexPath {

        XMGStatus *staus = self.statuses[indexPath.row];
        return staus.cellHeight;
    }

    /**
     * 返回每一行的估計高度
     * 只要返回了估計高度,那麼就會先呼叫 tableView:cellForRowAtIndexPath: 方法建立 cell,
     * 再呼叫 tableView:heightForRowAtIndexPath: 方法獲取 cell 的真實高度
     */
    - (CGFloat)tableView:(UITableView *)tableView estimatedHeightForRowAtIndexPath:(NSIndexPath *)indexPath {

        return 200;
    }

    @end
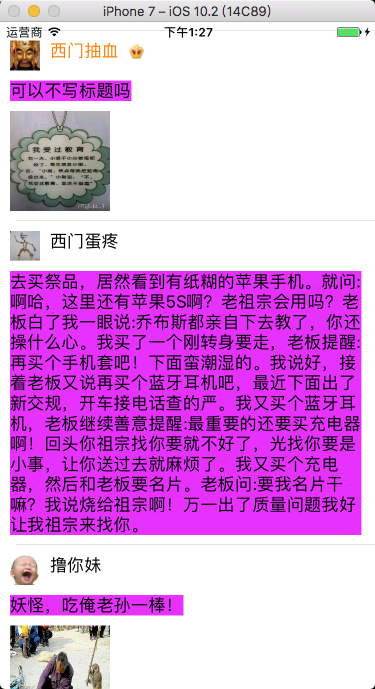
執行效果
7.3 其它設定方式
7.3.1 計算方式
Objective-C
BookModel.h
    @property(nonatomic, copy)NSString *title;
    @property(nonatomic, copy)NSString *detail;
    @property(nonatomic, copy)NSString *icon;
    @property(nonatomic, copy)NSString *price;
BookCell.h
    @property(nonatomic, retain)UILabel *titleLabel;
    @property(nonatomic, retain)UILabel *detailLabel;
    @property(nonatomic, retain)UIImageView *iconView;
    @property(nonatomic, retain)UILabel *priceLabel;
設定行高
    - (CGFloat)tableView:(UITableView *)tableView heightForRowAtIndexPath:(NSIndexPath *)indexPath {

        // 從資料來源陣列中取出資料
        BookModel *bookModel = [myDataArray objectAtIndex:indexPath.row];

        // 計算 detailLabel 佔用的高度
        CGFloat detialHeight = [bookModel.detail boundingRectWithSize:CGSizeMake(self.view.bounds.size.width - 40, CGFLOAT_MAX)
                                                              options:NSStringDrawingUsesLineFragmentOrigin
                                                           attributes:@{NSFontAttributeName: [UIFont systemFontOfSize:14]}
                                                              context:nil].size.height;

        // 判斷是否有圖片
        if (bookModel.icon.length) {

            // 60 為圖片的高度
            return 30 + detialHeight + 60 + 30;
        }
        else {
            return 30 + detialHeight + 30;
        }
    }
設定每一行顯示的內容
    // 設定每一行顯示的內容
    - (UITableViewCell *)tableView:(UITableView *)tableView cellForRowAtIndexPath:(NSIndexPath *)indexPath {

        BookCell3 *cell = [tableView dequeueReusableCellWithIdentifier:@"test" forIndexPath:indexPath];
        BookModel *bookModel = [myDataArray objectAtIndex:indexPath.row];

        // 設定 titleLabel
        cell.titleLabel.text = bookModel.title;

        // 設定 detailLabel

        // 計算 detailLabel 的高度
        CGSize detialSize = [bookModel.detail boundingRectWithSize:CGSizeMake(self.view.bounds.size.width - 40, CGFLOAT_MAX)
                                                           options:NSStringDrawingUsesLineFragmentOrigin
                                                        attributes:@{NSFontAttributeName: [UIFont systemFontOfSize:14]}
                                                           context:nil].size;

        CGRect detialFrame = cell.detailLabel.frame;
        detialFrame.size.height = detialSize.height + 5;    // 加偏移量 5,適應標點無法換行
        detialFrame.size.width = detialSize.width + 5;
        cell.detailLabel.frame = detialFrame;               // 設定 detailLabel 的 frame

        cell.detailLabel.text = bookModel.detail;

        // 判斷是否有圖片
        if (bookModel.icon.length) {

            // 設定 iconView

            CGRect iconFrame = cell.iconView.frame;
            iconFrame.origin.y = detialFrame.origin.y + detialFrame.size.height;
            cell.iconView.frame = iconFrame;

        cell.iconView.image = [UIImage imageNamed: bookModel.icon];

            // 設定 priceLabel

            CGRect priceFrame = cell.priceLabel.frame;
            priceFrame.origin.y = iconFrame.origin.y + iconFrame.size.height;
            cell.priceLabel.frame = priceFrame;

            cell.priceLabel.text = bookModel.price;
        }
        else {

            // 設定 priceLabel

            CGRect priceFrame = cell.priceLabel.frame;
            priceFrame.origin.y = detialFrame.origin.y + detialFrame.size.height;
            cell.priceLabel.frame = priceFrame;

            cell.priceLabel.text = bookModel.price;
        }
        return cell;
    }
Swift
BookModel.swift
    var title:String?
    var detail:String?
    var icon:String?
    var price:String?
BookCell.swift
    var titleLabel:UILabel?
    var detailLabel:UILabel?
    var iconView:UIImageView?
    var priceLabel:UILabel?
設定行高
    func tableView(tableView: UITableView, heightForRowAtIndexPath indexPath: NSIndexPath) -> CGFloat {

        // 從資料來源陣列中取出資料
        let bookModel:BookModel = myDataArray.objectAtIndex(indexPath.row) as! BookModel

        // 計算 detailLabel 佔用的高度
        let detialHeight:CGFloat = NSString(string: bookModel.detail!)
                       .boundingRectWithSize(CGSizeMake(self.view.bounds.size.width - 40, CGFloat.max),
                                     options: .UsesLineFragmentOrigin,
                                  attributes: [NSFontAttributeName : (UIFont.systemFontOfSize(14) as AnyObject)],
                                     context: nil).size.height

        // 判斷是否有圖片
        if bookModel.icon?.characters.count != 0 {
            return 30 + detialHeight + 60 + 30         // 60 為圖片的高度
        }
        else {
            return 30 + detialHeight + 30
        }
    }
設定每一行顯示的內容
    func tableView(tableView: UITableView, cellForRowAtIndexPath indexPath: NSIndexPath) -> UITableViewCell {

        let cell = tableView.dequeueReusableCellWithIdentifier("test", forIndexPath: indexPath) as! BookCell3
        let bookModel:BookModel = myDataArray.objectAtIndex(indexPath.row) as! BookModel

        // 設定 titleLabel
        cell.titleLabel!.text = bookModel.title

        // 設定 detailLabel

        // 計算 detailLabel 的高度
        let detialSize:CGSize = NSString(string: bookModel.detail!)
                            .boundingRectWithSize(CGSizeMake(self.view.bounds.size.width - 40, CGFloat.max),
                                          options: .UsesLineFragmentOrigin,
                                       attributes: [NSFontAttributeName : (UIFont.systemFontOfSize(14) as AnyObject)],
                                          context: nil).size

        var detialFrame:CGRect = cell.detailLabel!.frame
        detialFrame.size.height = detialSize.height + 5   // 加偏移量 5,適應標點無法換行
        detialFrame.size.width = detialSize.width + 5
        cell.detailLabel!.frame = detialFrame             // 設定 detailLabel 的 frame

        cell.detailLabel!.text = bookModel.detail

        // 判斷是否有圖片
        if bookModel.icon?.characters.count != 0 {

            // 設定 iconView

            var iconFrame:CGRect  = cell.iconView!.frame
            iconFrame.origin.y = detialFrame.origin.y + detialFrame.size.height
            cell.iconView!.frame = iconFrame

            cell.iconView!.image = UIImage(named: bookModel.icon!)

            // 設定 priceLabel

            var priceFrame:CGRect = cell.priceLabel!.frame
            priceFrame.origin.y = iconFrame.origin.y + iconFrame.size.height
            cell.priceLabel!.frame = priceFrame

            cell.priceLabel!.text = bookModel.price
        }
        else {

            // 設定 priceLabel

            var priceFrame:CGRect = cell.priceLabel!.frame
            priceFrame.origin.y = detialFrame.origin.y + detialFrame.size.height
            cell.priceLabel!.frame = priceFrame

            cell.priceLabel!.text = bookModel.price
        }
        return cell;
    }
7.3.2 系統自動佈局方式
- 自適應 cell 中較高的一個檢視的高度。
ImageView 與 Label 同行顯示,且都設定了上下邊緣約束,ImageView 的圖片填充模式為 Aspect Fit,否則圖片將會被拉長。
Objective-C
協議方法 方式設定
    // 動態設定行高
    - (CGFloat)tableView:(UITableView *)tableView estimatedHeightForRowAtIndexPath:(NSIndexPath *)indexPath {

        /*
            行高自適應 Label 高度
        */

        secondTableViewCell *cell = [tableView dequeueReusableCellWithIdentifier:@"secondTableViewCell" forIndexPath:indexPath];

        cell.secondLabel.text = [_labelArray objectAtIndex:indexPath.row];

        return [cell.contentView systemLayoutSizeFittingSize:(UILayoutFittingCompressedSize)].height + 1;
    }

    // 屬性變數 方式設定
    self.tableView.estimatedRowHeight = 80;
    self.tableView.rowHeight = UITableViewAutomaticDimension;
Swift
協議方法 方式設定
    // 動態設定行高
    override func tableView(tableView: UITableView, estimatedHeightForRowAtIndexPath indexPath: NSIndexPath) -> CGFloat {

        /*
            行高自適應 Label 高度
        */

        var cell = tableView.dequeueReusableCellWithIdentifier("secondTableViewCell", forIndexPath: indexPath) as! secondTableViewCell

        cell.secondLabel.text = labelArray[indexPath.row]

        return cell.contentView.systemLayoutSizeFittingSize(UILayoutFittingCompressedSize).height + 1
    }

    // 屬性變數 方式設定
    self.tableView.estimatedRowHeight = 80
    self.tableView.rowHeight = UITableViewAutomaticDimension
8、分段索引條的建立
Objective-C
建立索引條
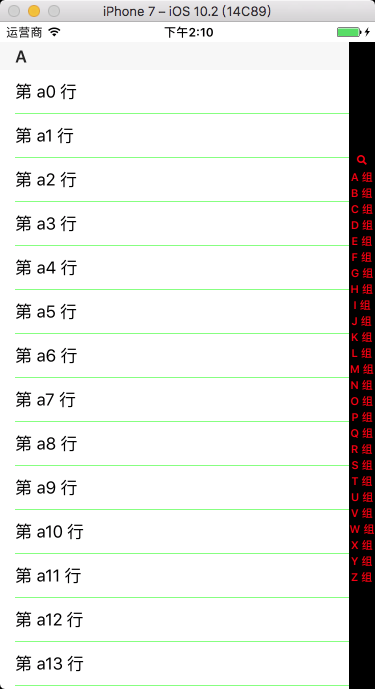
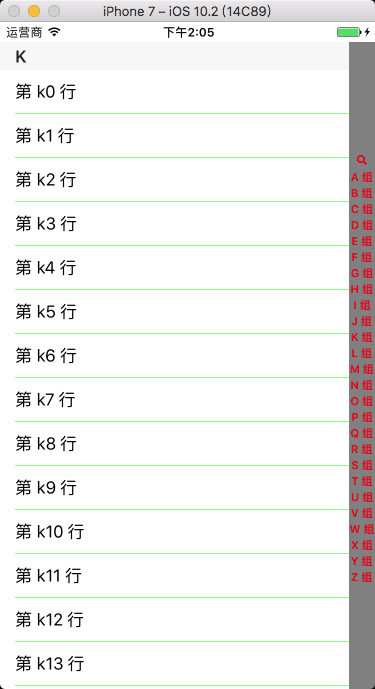
    // UITableViewDataSource 協議方法
    - (NSArray *)sectionIndexTitlesForTableView:(UITableView *)tableView {

        // 索引條資料來源陣列初始化,例項化索引條上的字元存放的陣列物件
        NSMutableArray *titleIndexArray = [NSMutableArray array];

        // 向陣列中新增系統自帶放大鏡圖示,會被處理成一個放大鏡
        [titleIndexArray addObject:UITableViewIndexSearch];

        // 向資料來源中新增資料
        for (int i = 'A'; i<='Z'; i++) {

            // 點選索引條上第幾個圖示,tableView 就會跳到第幾段
            [titleIndexArray addObject:[NSString stringWithFormat:@"%c 組 ", i]];
        }

        // 索引條上字元顏色,預設為藍色
        tableView.sectionIndexColor = [UIColor redColor];

        // 索引條上常規時背景顏色,預設為白色
        tableView.sectionIndexBackgroundColor = [UIColor blackColor];

        // 索引條上點選時背景顏色,預設為白色
        tableView.sectionIndexTrackingBackgroundColor = [UIColor grayColor];

        return titleIndexArray;
    }
設定索引條偏移量
    // UITableViewDataSource 協議方法
    /*
        預設索引條與分段一一對應時,可以不寫該方法。如果索引條的前面加了個搜尋小圖示等,需要重寫這個方法。A 所在的分段在 tableView 中為第 0 段
    */
    - (NSInteger)tableView:(UITableView *)tableView sectionForSectionIndexTitle:(NSString *)title atIndex:(NSInteger)index {
        return index - 1;
    }
Swift
建立索引條
    // UITableViewDataSource 協議方法
    func sectionIndexTitlesForTableView(tableView: UITableView) -> [String]? {

        // 索引條資料來源陣列初始化,例項化索引條上的字元存放的陣列物件
        var titleIndexArray:[String] = Array()

        // 向陣列中新增系統自帶放大鏡圖示,會被處理成一個放大鏡
        titleIndexArray.append(UITableViewIndexSearch)

            // 向資料來源中新增資料
            for i in 65...90 {

                // 點選索引條上第幾個圖示,tableView 就會跳到第幾段
                titleIndexArray.append("\(Character(UnicodeScalar(i))) 組 ")
            }

            // 索引條上索引條上字元顏色,預設為藍色
            tableView.sectionIndexColor = UIColor.redColor()

            // 索引條上常規時背景顏色,預設為白色
            tableView.sectionIndexBackgroundColor = UIColor.blackColor()

            // 索引條上點選時背景顏色,預設為白色
            tableView.sectionIndexTrackingBackgroundColor = UIColor.grayColor()

            return titleIndexArray
    }
設定索引條偏移量
    // UITableViewDataSource 協議方法
    /*
        預設索引條與分段一一對應時,可以不寫該方法。如果索引條的前面加了個搜尋小圖示等,需要重寫這個方法。A 所在的分段在 tableView 中為第 0 段
    */
    func tableView(tableView: UITableView, sectionForSectionIndexTitle title: String, atIndex index: Int) -> Int {
        return index - 1
    }
執行效果
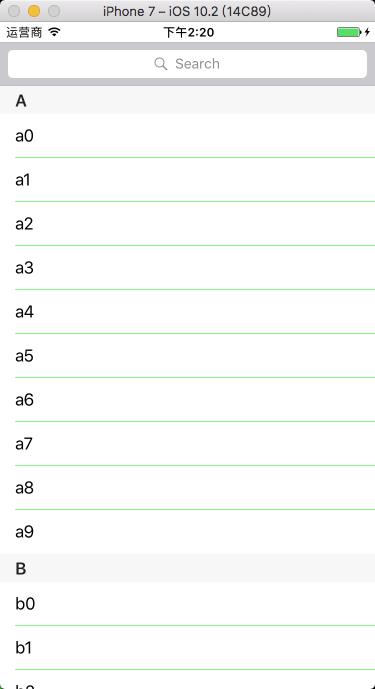
9、搜尋框的建立
在 iOS 8.0 以上版本中, 我們可以使用 UISearchController 來非常方便地在 UITableView 中新增搜尋框. 而在之前版本中, 我們還是必須使用 UISearchDisplayController + UISearchBar 的組合方式。
我們建立的 tableView 和搜尋控制器建立的 tableView 都會走代理方法,需要在代理方法中判斷響應代理方法的 tableView 是哪一個,如果響應代理方法的 tableView 不是我建立的,說明一定是搜尋控制器建立的。在 iOS 8.0 以下版本中需使用 tableView == myTableView 判斷,在 iOS 8.0 以上版本中需使用 mySearchController.active 判斷。
9.1 在 iOS 8.0 以下版本中
Objective-C
遵守協議 UISearchDisplayDelegate
搜尋結果陣列初始化
    // 宣告搜尋結果存放陣列
    @property(nonatomic, retain)NSMutableArray *mySearchResultArray;

    // 初始化搜尋結果存放陣列
    mySearchResultArray = [[NSMutableArray alloc] init];
searchDisplayController 初始化
    // 宣告搜尋控制器,自帶一個表格檢視,用來展示搜尋結果,必須設定為全域性變數
    @property(nonatomic, retain)UISearchDisplayController *mySearchDisplayController;

    // 例項化搜尋條
    UISearchBar *searchBar = [[UISearchBar alloc] initWithFrame:CGRectMake(0, 0, self.view.frame.size.width, 44)];

    // 例項化搜尋控制器物件
    mySearchDisplayController = [[UISearchDisplayController alloc] initWithSearchBar:searchBar contentsController:self];

    // 設定搜尋控制器的代理
    mySearchDisplayController.delegate = self;

    // 為搜尋控制器自帶 tableView 指定代理
    mySearchDisplayController.searchResultsDelegate = self;
    mySearchDisplayController.searchResultsDataSource = self;

    // 將搜尋條設定為 tableView 的表頭
    myTableView.tableHeaderView = searchBar;
UISearchDisplayDelegate 協議方法
    // 更新搜尋結果
    /*
        只要搜尋框的文字發生了改變,這個方法就會觸發。searchString 為搜尋框內輸入的內容。
    */
    - (BOOL)searchDisplayController:(UISearchDisplayController *)controller shouldReloadTableForSearchString:(NSString *)searchString {

        // 清空上一次搜尋的內容
        [mySearchResultArray removeAllObjects];

        for (NSArray *subArray in myDataArray) {

            // 將搜尋的結果存放到陣列中
            for (NSString *str in subArray) {

                NSRange range = [str rangeOfString:searchString];

                if (range.length) {
                    [mySearchResultArray addObject:str];
                }
            }
        }
        return YES;
    }
UITableView 協議方法
    // 設定分段頭標題
    - (NSString *)tableView:(UITableView *)tableView titleForHeaderInSection:(NSInteger)section {

        if (tableView == myTableView) {
            return [NSString stringWithFormat:@"%c", (char)('A' + section)];
        }
        return @"搜尋結果";
    }

    // 設定分段數
    - (NSInteger)numberOfSectionsInTableView:(UITableView *)tableView {

        if (tableView == myTableView) {
            return myDataArray.count;
        }
        return 1;
    }

    // 設定行數
    - (NSInteger)tableView:(UITableView *)tableView numberOfRowsInSection:(NSInteger)section {

        if (tableView == myTableView) {
            return [[myDataArray objectAtIndex:section] count];
        }
        return mySearchResultArray.count;
    }

    // 設定每段顯示的內容
    - (UITableViewCell *)tableView:(UITableView *)tableView cellForRowAtIndexPath:(NSIndexPath *)indexPath {

        UITableViewCell *cell = [tableView dequeueReusableCellWithIdentifier:@"testIdentifier"];

        if (!cell) {
            cell = [[UITableViewCell alloc] initWithStyle:UITableViewCellStyleDefault reuseIdentifier:@"testIdentifier"];
        }

        if (tableView == myTableView) {
            cell.textLabel.text = [[myDataArray objectAtIndex:indexPath.section] objectAtIndex:indexPath.row];
        }
        else {
            cell.textLabel.text = [mySearchResultArray objectAtIndex:indexPath.row];
        }
        return cell;
    }
Swift
遵守協議 UISearchDisplayDelegate
搜尋結果陣列初始化
    // 初始化搜尋結果存放陣列
    var mySearchResultArray:[String] = Array()
searchDisplayController 初始化
    // 宣告搜尋控制器,自帶一個表格檢視,用來展示搜尋結果,必須設定為全域性變數
    var mySearchDisplayController:UISearchDisplayController!

    // 例項化搜尋條
    let searchBar:UISearchBar = UISearchBar(frame: CGRectMake(0, 0, self.view.frame.size.width, 44))

    // 例項化搜尋控制器物件
    mySearchDisplayController = UISearchDisplayController(searchBar: searchBar, contentsController: self)

    // 設定搜尋控制器的代理
    mySearchDisplayController.delegate = self

    // 為搜尋控制器自帶 tableView 指定代理
    mySearchDisplayController.searchResultsDelegate = self
    mySearchDisplayController.searchResultsDataSource = self

    // 將搜尋條設定為 tableView 的表頭
    myTableView.tableHeaderView = searchBar
UISearchDisplayDelegate 協議方法
    // 更新搜尋結果
    /*
        只要搜尋框的文字發生了改變,這個方法就會觸發。searchString 為搜尋框內輸入的內容
    */
    func searchDisplayController(controller: UISearchDisplayController, shouldReloadTableForSearchString searchString: String?) -> Bool {

    // 清空上一次搜尋的內容
    mySearchResultArray.removeAll()

    // 將搜尋的結果存放到陣列中
    for subArray in myDataArray {
        for str in subArray {

            let range:NSRange = (str as NSString).rangeOfString(searchString!)

            if range.length != 0 {
                mySearchResultArray.append(str)
            }
        }
    }
    return true
}
UITableView 協議方法
    // 設定分段頭標題
    func tableView(tableView: UITableView, titleForHeaderInSection section: Int) -> String? {
        if tableView == myTableView {
            return "\(Character(UnicodeScalar(65 + section)))"
        }
        return "搜尋結果"
    }

    // 設定分段數
    func numberOfSectionsInTableView(tableView: UITableView) -> Int {

        if tableView == myTableView {
            return myDataArray.count
        }
        return 1
    }

    // 設定行數
    func tableView(tableView: UITableView, numberOfRowsInSection section: Int) -> Int {

        if tableView == myTableView {
            return myDataArray[section].count
        }
        return mySearchResultArray.count
    }

    // 設定每段顯示的內容
    func tableView(tableView: UITableView, cellForRowAtIndexPath indexPath: NSIndexPath) -> UITableViewCell {

        var cell = tableView.dequeueReusableCellWithIdentifier("testIdentifier")

        if cell == nil {
            cell = UITableViewCell(style: .Default, reuseIdentifier: "testIdentifier")
        }

        if tableView == myTableView {
            cell!.textLabel?.text = myDataArray[indexPath.section][indexPath.row]
        }
        else {
            cell!.textLabel?.text = mySearchResultArray[indexPath.row]
        }
        return cell!
    }
9.2 在 iOS 8.0 及以上版本中
Objective-C
遵守協議 UISearchResultsUpdating
搜尋結果陣列初始化
    // 宣告搜尋結果存放陣列
    @property(nonatomic, retain)NSMutableArray *mySearchResultArray;

    // 初始化搜尋結果存放陣列
    mySearchResultArray = [[NSMutableArray alloc] init];
searchController 初始化
    // 宣告搜尋控制器,自帶一個表格檢視控制器,用來展示搜尋結果,必須設定為全域性變數
    @property(nonatomic, retain)UISearchController *mySearchController;

    // 例項化搜尋控制器
    mySearchController = [[UISearchController alloc] initWithSearchResultsController:nil];

    // 設定搜尋代理
    mySearchController.searchResultsUpdater = self;

    // 設定搜尋條大小
    [mySearchController.searchBar sizeToFit];

    // 設定搜尋期間背景檢視是否取消操作,default is YES
    mySearchController.dimsBackgroundDuringPresentation = NO;

    // 設定搜尋期間是否隱藏導航條,default is YES
    mySearchController.hidesNavigationBarDuringPresentation = NO;

    // 將 searchBar 新增到表格的開頭
    myTableView.tableHeaderView = mySearchController.searchBar;
UISearchResultsUpdating 協議方法
    // 更新搜尋結果
    /*
        只要搜尋框的文字發生了改變,這個方法就會觸發。searchController.searchBar.text 為搜尋框內輸入的內容
    */
    - (void)updateSearchResultsForSearchController:(UISearchController *)searchController {

        // 清除上一次的搜尋結果
        [mySearchResultArray removeAllObjects];

        // 將搜尋的結果存放到陣列中
        for (NSArray *subArray in myDataArray) {
            for (NSString *str in subArray) {

                NSRange range = [str rangeOfString:searchController.searchBar.text];

                if (range.length) {
                    [mySearchResultArray addObject:str];
                }
            }
        }

        // 重新載入表格檢視,不載入的話將不會顯示搜尋結果
        [myTableView reloadData];
    }
UITableView 協議方法
    // 設定分段頭標題
    - (NSString *)tableView:(UITableView *)tableView titleForHeaderInSection:(NSInteger)section {

        if (mySearchController.active) {
            return @"搜尋結果";
        }
        return [NSString stringWithFormat:@"%c", (char)('A' + section)];
    }

    // 設定分段數
    - (NSInteger)numberOfSectionsInTableView:(UITableView *)tableView {

        if (mySearchController.active) {
            return 1;
        }
        return myDataArray.count;
    }

    // 設定行數
    - (NSInteger)tableView:(UITableView *)tableView numberOfRowsInSection:(NSInteger)section {

        if (mySearchController.active) {
            return mySearchResultArray.count;
        }
        return [[myDataArray objectAtIndex:section] count];
    }

    // 設定每段顯示的內容
    - (UITableViewCell *)tableView:(UITableView *)tableView cellForRowAtIndexPath:(NSIndexPath *)indexPath {

        UITableViewCell *cell = [tableView dequeueReusableCellWithIdentifier:@"testIdentifier"];

        if (!cell) {
            cell = [[UITableViewCell alloc] initWithStyle:UITableViewCellStyleDefault reuseIdentifier:@"testIdentifier"];
        }

        if (mySearchController.active) {
            cell.textLabel.text = [mySearchResultArray objectAtIndex:indexPath.row];
        }
        else {
            cell.textLabel.text = [[myDataArray objectAtIndex:indexPath.section] objectAtIndex:indexPath.row];
        }
        return cell;
    }
Swift
遵守協議 UISearchResultsUpdating
搜尋結果陣列初始化
    // 初始化搜尋結果存放陣列
    var searchResultArray:[String] = Array()
searchController 初始化
    // 宣告搜尋控制器,自帶一個表格檢視控制器,用來展示搜尋結果,必須設定為全域性變數
    var mySearchController:UISearchController!

    // 例項化搜尋控制器
    mySearchController = UISearchController(searchResultsController: nil)

    // 設定搜尋代理
    mySearchController.searchResultsUpdater = self

    // 設定搜尋條大小
    mySearchController.searchBar.sizeToFit()

    // 設定搜尋期間背景檢視是否取消操作,default is YES
    mySearchController.dimsBackgroundDuringPresentation = false

    // 設定搜尋期間是否隱藏導航條,default is YES
    mySearchController.hidesNavigationBarDuringPresentation = false

    // 將 searchBar 新增到表格的開頭
    myTableView.tableHeaderView = mySearchController.searchBar
UISearchResultsUpdating 協議方法
    // 更新搜尋結果
    /*
        只要搜尋框的文字發生了改變,這個方法就會觸發。searchController.searchBar.text 為搜尋框內輸入的內容
    */
    func updateSearchResultsForSearchController(searchController: UISearchController) {

        // 清除上一次的搜尋結果
        searchResultArray.removeAll()

        // 將搜尋的結果存放到陣列中
        for subArray in myDataArray {
            for str in subArray {

                let range:NSRange = (str as NSString).rangeOfString(searchController.searchBar.text!)

                if range.length != 0 {
                    searchResultArray.append(str)
                }
            }
        }

        // 重新載入表格檢視,不載入的話將不會顯示搜尋結果
        myTableView.reloadData()
    }
UITableView 協議方法
    // 設定分段頭標題
    func tableView(tableView: UITableView, titleForHeaderInSection section: Int) -> String? {

        if mySearchController.active {
            return "搜尋結果"
        }
        return "\(Character(UnicodeScalar(65 + section)))"
    }

    // 設定分段數
    func numberOfSectionsInTableView(tableView: UITableView) -> Int {

        if mySearchController.active {
            return 1
        }
        return myDataArray.count
    }

    // 設定行數
    func tableView(tableView: UITableView, numberOfRowsInSection section: Int) -> Int {

        if mySearchController.active {
            return searchResultArray.count
        }
        return myDataArray[section].count
    }

    // 設定每段顯示的內容
    func tableView(tableView: UITableView, cellForRowAtIndexPath indexPath: NSIndexPath) -> UITableViewCell {

        var cell = tableView.dequeueReusableCellWithIdentifier("testIdentifier")

        if cell == nil {
            cell = UITableViewCell(style: .Default, reuseIdentifier: "testIdentifier")
        }

        if mySearchController.active {
            cell!.textLabel?.text = searchResultArray[indexPath.row]
        }
        else {
            cell!.textLabel?.text = myDataArray[indexPath.section][indexPath.row]
        }
        return cell!
    }
執行效果

10、表格摺疊
通過改變分段的行數實現分段的摺疊與開啟。分段處於摺疊狀態時,設定分段的行數為 0。
Objective-C
分段摺疊狀態陣列初始化
    // 宣告記錄摺疊狀態陣列
    @property(nonatomic, retain)NSMutableArray *foldStatusArray;

    // 初始化記錄摺疊狀態陣列
    foldStatusArray = [[NSMutableArray alloc] init];

    // 給分段摺疊狀態陣列賦初值,狀態值為 1 時,分段摺疊
    for (int i = 0; i < myDataArray.count; i++) {
        [foldStatusArray addObject:[NSNumber numberWithBool:YES]];
    }
UITableView 協議方法
    // 設定行數,UITableViewDataSource 協議方法
    - (NSInteger)tableView:(UITableView *)tableView numberOfRowsInSection:(NSInteger)section {

        // 獲取分段的摺疊狀態,foldStatusArray 存放的是 NSNumber 型別的值
        BOOL isFold = [[foldStatusArray objectAtIndex:section] boolValue];

        if (isFold) {

            // 分段處於摺疊狀態時,設定分段的行數為 0
            return 0;
        }
        return [[myDataArray objectAtIndex:section] count];
    }

    // 設定分段頭標題高度,UITableViewDelegate 協議方法
    - (CGFloat)tableView:(UITableView *)tableView heightForHeaderInSection:(NSInteger)section {
        return 30;
    }

    // 設定分段頭標題檢視,UITableViewDelegate 協議方法
    - (UIView *)tableView:(UITableView *)tableView viewForHeaderInSection:(NSInteger)section {

        UIButton *headerButton = [UIButton buttonWithType:UIButtonTypeCustom];
        headerButton.frame = CGRectMake(0, 0, tableView.frame.size.width, 30);
        headerButton.backgroundColor = [UIColor orangeColor];

        headerButton.titleLabel.font = [UIFont boldSystemFontOfSize:20];
        headerButton.contentHorizontalAlignment = UIControlContentHorizontalAlignmentLeft;
        headerButton.contentVerticalAlignment = UIControlContentVerticalAlignmentCenter;
        headerButton.layer.borderColor = [[UIColor lightGrayColor] CGColor];
        headerButton.layer.borderWidth = 1;

        // 設定分段頭標題顯示內容
        [headerButton setTitle:[NSString stringWithFormat:@" %c", (char)('A' + section)] forState:UIControlStateNormal];

        // 設定分段的 tag 值
        headerButton.tag = 100 + section;

        // 新增分段頭標題點選響應事件
        [headerButton addTarget:self action:@selector(headerButtonClick:) forControlEvents:UIControlEventTouchUpInside];
        return headerButton;
    }
頭標題點選響應事件
    - (void)headerButtonClick:(UIButton *)button {

        // 獲取分段的摺疊狀態,foldStatusArray 存放的是 NSNumber 型別的值
        BOOL isFold = [[foldStatusArray objectAtIndex:button.tag - 100] boolValue];

        // 改變分段的摺疊狀態
        foldStatusArray[button.tag - 100] = [NSNumber numberWithInt: isFold ? NO : YES];

        // 過載分段
        [myTableView reloadSections:[NSIndexSet indexSetWithIndex:button.tag - 100] withRowAnimation:UITableViewRowAnimationAutomatic];
    }
Swift
分段摺疊狀態陣列初始化
    // 初始化分段摺疊狀態陣列
    var foldStatusArray:[NSNumber] = Array()

    // 分段摺疊狀態陣列賦值,狀態值為 1 時,分段摺疊
    for _ in 0 ..< myDataArray.count {
        foldStatusArray.append(NSNumber(bool: true))
    }
UITableView 協議方法
    // 設定行數
    func tableView(tableView: UITableView, numberOfRowsInSection section: Int) -> Int {

        // 獲取分段的摺疊狀態,foldStatusArray 存放的是 NSNumber 型別的值
        let isFold:Bool = foldStatusArray[section].boolValue

        if isFold {

            // 分段處於摺疊狀態時,設定分段的行數為 0
            return 0
        }
        return myDataArray[section].count
    }

    // 設定分段頭標題的高度
    func tableView(tableView: UITableView, heightForHeaderInSection section: Int) -> CGFloat {
        return 30
    }

    // 設定分段頭標題檢視
    func tableView(tableView: UITableView, viewForHeaderInSection section: Int) -> UIView? {

        let headerButton:UIButton = UIButton(type: .Custom)
        headerButton.frame = CGRectMake(0, 0, tableView.frame.size.width, 30)
        headerButton.backgroundColor = UIColor.orangeColor()

        headerButton.titleLabel!.font = UIFont.boldSystemFontOfSize(20)
        headerButton.contentHorizontalAlignment = UIControlContentHorizontalAlignment.Left
        headerButton.contentVerticalAlignment = UIControlContentVerticalAlignment.Center
        headerButton.layer.borderColor = UIColor.lightGrayColor().CGColor
        headerButton.layer.borderWidth = 1

        // 設定分段頭標題顯示內容
        headerButton.setTitle(" \(Character(UnicodeScalar(65 + section)))", forState: UIControlState.Normal)

        // 設定分段的 tag 值
        headerButton.tag = 100 + section

        // 新增分段頭標題點選響應事件
        headerButton.addTarget(self, action: #selector(UiTableViewController10.headerButtonClick(_:)),
                           forControlEvents: UIControlEvents.TouchUpInside)

        return headerButton
    }
頭標題點選響應事件
    func headerButtonClick(button:UIButton) {

        // 獲取分段的摺疊狀態,foldStatusArray 存放的是 NSNumber 型別的值
        let isFold:Bool = foldStatusArray[button.tag - 100].boolValue

        // 改變分段的摺疊狀態
        foldStatusArray[button.tag - 100] = NSNumber(bool: isFold ? false : true)

        // 過載分段
        myTableView.reloadSections(NSIndexSet(index: button.tag - 100), withRowAnimation: .Automatic)
    }
執行效果
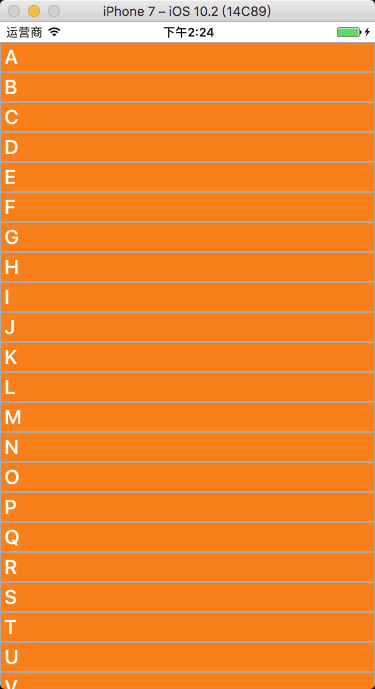
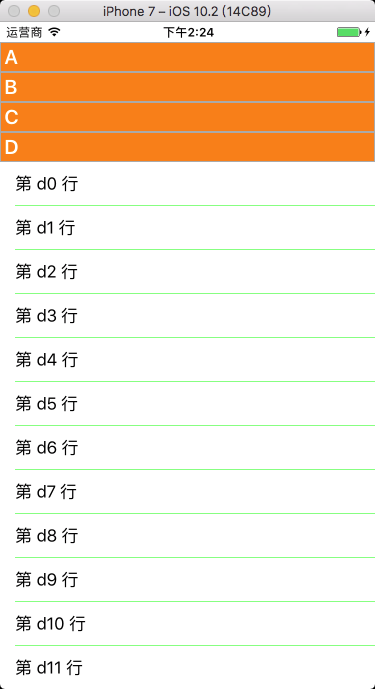
11、表格編輯
Objective-C
設定表格編輯開關狀態
    // 設定表格的編輯狀態
    myTableView.editing = YES;

    // 翻轉表格的編輯狀態
    myTableView.editing = !myTableView.editing;

    // 帶動畫翻轉表格的編輯狀態
    [myTableView setEditing:!myTableView.editing animated:YES];
修改左滑刪除按鈕的內容
    // UITableViewDelegate 協議方法
    /*
        預設為 Delete
    */
    - (NSString *)tableView:(UITableView *)tableView titleForDeleteConfirmationButtonForRowAtIndexPath:(NSIndexPath *)indexPath {
        return @"刪除";
    }
設定左滑多按鈕
    - (NSArray *)tableView:(UITableView *)tableView editActionsForRowAtIndexPath:(NSIndexPath *)indexPath {

        UITableViewRowAction *action0 = [UITableViewRowAction rowActionWithStyle:UITableViewRowActionStyleNormal
                                                                           title:@"關注"
                                                                         handler:^(UITableViewRowAction *action, NSIndexPath *indexPath) {

            NSLog(@"點選了關注");

            // 收回左滑出現的按鈕(退出編輯模式)
            tableView.editing = NO;
        }];

        UITableViewRowAction *action1 = [UITableViewRowAction rowActionWithStyle:UITableViewRowActionStyleDefault
                                                                           title:@"刪除"
                                                                         handler:^(UITableViewRowAction *action, NSIndexPath *indexPath) {

            [[myDataArray objectAtIndex:indexPath.section] removeObjectAtIndex:indexPath.row];
            [tableView deleteRowsAtIndexPaths:@[indexPath] withRowAnimation:UITableViewRowAnimationAutomatic];
        }];

        // 按鈕從右向左的順序排列
        return @[action1, action0];
    }
設定編輯模式
    /*
        UITableViewCellEditingStyleNone;        // 無
        UITableViewCellEditingStyleDelete;      // 刪除模式,預設
        UITableViewCellEditingStyleInsert;      // 插入模式
        UITableViewCellEditingStyleDelete | UITableViewCellEditingStyleInsert;   // 多選模式
    */

    // UITableViewDelegate 協議方法
    - (UITableViewCellEditingStyle)tableView:(UITableView *)tableView editingStyleForRowAtIndexPath:(NSIndexPath *)indexPath {

        // 刪除、插入、多選刪除,不設定預設時為刪除

        if (0 == indexPath.section) {
            return UITableViewCellEditingStyleDelete;
        }
        else {
            return UITableViewCellEditingStyleInsert;
        }
    }
表格刪除、插入
    表格刪除:
        1. 先將資料從資料來源裡刪除,
        2. 再從 tableView 裡刪除 cell:
                [tableView deleteRowsAtIndexPaths:[NSArray arrayWithObject:indexPath]
                                 withRowAnimation:UITableViewRowAnimationAutomatic];

            或者再直接過載整個表格:
                [tableView reloadData];

            或者在直接過載分段:
                [tableView reloadSections:[NSIndexSet indexSetWithIndex:indexPath.section]
                         withRowAnimation:UITableViewRowAnimationAutomatic];

    表格插入:
        1. 先將資料插入到資料來源中,
        2. 然後再插入一個 cell:
                [tableView insertRowsAtIndexPaths:[NSArray arrayWithObject:indexPath]
                                 withRowAnimation:UITableViewRowAnimationAutomatic];

            或者再直接過載整個表格:
                [tableView reloadData];

            或者在直接過載分段:
                [tableView reloadSections:[NSIndexSet indexSetWithIndex:indexPath.section]
                         withRowAnimation:UITableViewRowAnimationAutomatic];
// 表格刪除或插入,預設為刪除模式,寫入該方法即表示允許刪除 // UITableViewDataSource 協議方法 - (void)tableView:(UITableView *)tableView commitEditingStyle:(UITableViewCellEditingStyle)editingStyle forRowAtIndexPath:(NSIndexPath *)indexPath { // 判斷編輯風格,預設是刪除 if (editingStyle == UITableViewCellEditingStyleDelete) { // 表格刪除 // 從資料來源裡刪除 [[myDataArray objectAtIndex:indexPath.section] removeObjectAtIndex:indexPath.row]; // 從 tableView 裡刪除 cell [tableView deleteRowsAtIndexPaths:[NSArray arrayWithObject:indexPath] withRowAnimation:UITableViewRowAnimationAutomatic]; } else if (editingStyle == UITableViewCellEditingStyleInsert) { Person *person = [[Person alloc] init]; person.name = @"xiao bai"; person.age = 18; // 表格插入 // 插入到資料來源中 [[myDataArray objectAtIndex:indexPath.section] insertObject:person atIndex:indexPath.row]; // 插入一個 cell [tableView insertRowsAtIndexPaths:[NSArray arrayWithObject:indexPath] withRowAnimation:UITableViewRowAnimationAutomatic]; } }表格移動
    表格移動:
        1. 先在資料來源中找到需要移動的物件。
        2. 然後在資料來源陣列中從原始位置刪掉。
        3. 再在資料來源陣列中插入到新位置。
        4. 最後重新載入表格:
                [tableView reloadData];

            或者在直接過載分段:
                [tableView reloadSections:[NSIndexSet indexSetWithIndex:indexPath.section]
                         withRowAnimation:UITableViewRowAnimationAutomatic];
// 寫入該方法即表示允許移動 // UITableViewDataSource 協議方法 - (void)tableView:(UITableView *)tableView moveRowAtIndexPath:(NSIndexPath *)sourceIndexPath toIndexPath:(NSIndexPath *)destinationIndexPath { // 找到需要移動的物件 Person *person = [[myDataArray objectAtIndex:sourceIndexPath.section] objectAtIndex:sourceIndexPath.row]; // 從原始位置刪掉 [[myDataArray objectAtIndex:sourceIndexPath.section] removeObjectAtIndex:sourceIndexPath.row]; // 插入到新位置 [[myDataArray objectAtIndex:destinationIndexPath.section] insertObject:person atIndex:destinationIndexPath.row]; // 重新整理 tableView [tableView reloadData]; }
Swift
設定表格編輯開關狀態
    // 設定表格的編輯狀態
    myTableView.editing = true

    // 翻轉表格的編輯狀態
    myTableView.editing = !myTableView.editing

    // 帶動畫翻轉表格的編輯狀態
    myTableView.setEditing(!myTableView.editing, animated: true)
修改左滑刪除按鈕的內容
    // UITableViewDelegate 協議方法
    func tableView(tableView: UITableView, titleForDeleteConfirmationButtonForRowAtIndexPath indexPath: NSIndexPath) -> String? {

        // 預設為 Delete
        return "刪除"
    }
設定左滑多按鈕
    func tableView(tableView: UITableView, editActionsForRowAt indexPath: IndexPath) -> [UITableViewRowAction]? {

        let action0:UITableViewRowAction = UITableViewRowAction(style: .normal, title: "關注")
            { (action:UITableViewRowAction, indexPath:IndexPath) in

                print("點選了關注")

                // 收回左滑出現的按鈕(退出編輯模式)
                tableView.isEditing = false
            }

        let action1:UITableViewRowAction = UITableViewRowAction(style: .normal, title: "刪除")
            { (action:UITableViewRowAction, indexPath:IndexPath) in

                myDataArray[indexPath.section].remove(at: indexPath.row)
                tableView.deleteRows(at: NSArray(object: indexPath) as! [IndexPath], with: .automatic)
            }

        // 按鈕從右向左的順序排列
        return [action1, action0]
    }
設定編輯模式
    /*
        刪除、插入,不設定預設時為刪除,不能設定多選刪除模式,
        若要實現多選刪除,需設定 myTableView.allowsMultipleSelectionDuringEditing = true

        UITableViewCellEditingStyle.None       // 無
        UITableViewCellEditingStyle.Delete     // 刪除模式,預設
        UITableViewCellEditingStyle.Insert     // 插入模式
    */
    // UITableViewDelegate 協議方法
    func tableView(tableView: UITableView, editingStyleForRowAtIndexPath indexPath: NSIndexPath) -> UITableViewCellEditingStyle {

        if 0 == indexPath.section {
            return .Delete
        }
        else {
            return .Insert
        }
    }
表格刪除、插入
    表格刪除:
        1. 先將資料從資料來源裡刪除,
        2. 再從 tableView 裡刪除 cell:
                tableView.deleteRowsAtIndexPaths(NSArray(object: indexPath) as! [NSIndexPath],
                                withRowAnimation: .Automatic)

            或者再直接過載整個表格:
                tableView.reloadData()

            或者在直接過載分段:
                tableView.reloadSections(NSIndexSet(index: indexPath.section) ,
                        withRowAnimation: .Automatic)

    表格插入:
        1. 先將資料插入到資料來源中,
        2. 然後再插入一個 cell:
                tableView.insertRowsAtIndexPaths(NSArray(object: indexPath) as! [NSIndexPath],
                                withRowAnimation: .Automatic)

            或者再直接過載整個表格:
                tableView.reloadData()

            或者在直接過載分段:
                tableView.reloadSections(NSIndexSet(index: indexPath.section) ,
                        withRowAnimation: .Automatic)
// 表格刪除或插入,預設為刪除模式,寫入該方法即表示允許刪除 // UITableViewDataSource 協議方法 func tableView(tableView: UITableView, commitEditingStyle editingStyle: UITableViewCellEditingStyle, forRowAtIndexPath indexPath: NSIndexPath) { // 判斷編輯風格,預設是刪除 if editingStyle == UITableViewCellEditingStyle.Delete { // 表格刪除 // 從資料來源裡刪除 myDataArray[indexPath.section].removeAtIndex(indexPath.row) // 從 tableView 裡刪除 cell tableView.deleteRowsAtIndexPaths(NSArray(object: indexPath) as! [NSIndexPath], withRowAnimation: .Automatic) } else if editingStyle == UITableViewCellEditingStyle.Insert { let person:Person = Person() person.name = "xiao bai” person.age = 18 // 表格插入 // 插入到資料來源中 myDataArray[indexPath.section].insert(person, atIndex: indexPath.row) // 插入一個 cell tableView.insertRowsAtIndexPaths(NSArray(object: indexPath) as! [NSIndexPath], withRowAnimation: .Automatic) } }表格移動
    表格移動:
        1. 先在資料來源中找到需要移動的物件。
        2. 然後在資料來源陣列中從原始位置刪掉。
        3. 再在資料來源陣列中插入到新位置。
        4. 最後重新載入表格:
                tableView.reloadData()

            或者在直接過載分段:
                tableView.reloadSections(NSIndexSet(index: indexPath.section) ,
                        withRowAnimation: .Automatic)
// 寫入該方法即表示允許移動 // UITableViewDataSource 協議方法 func tableView(tableView: UITableView, moveRowAtIndexPath sourceIndexPath: NSIndexPath, toIndexPath destinationIndexPath: NSIndexPath) { // 找到需要移動的物件 let person:Person = myDataArray[sourceIndexPath.section][sourceIndexPath.row] // 從原始位置刪掉 myDataArray[sourceIndexPath.section].removeAtIndex(sourceIndexPath.row) // 插入到新位置 myDataArray[destinationIndexPath.section].insert(person, atIndex: destinationIndexPath.row) tableView.reloadData() }
執行效果

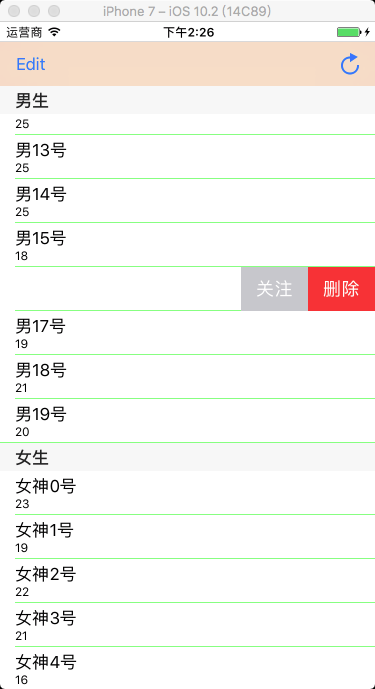
12、表格多選刪除
12.1 系統方式
將要刪除的資料新增到待刪陣列中,從資料來源中刪除待刪陣列中包含的資料,重新整理表格。
OC 中可設定編輯模式為 UITableViewCellEditingStyleDelete | UITableViewCellEditingStyleInsert; 或者設定 myTableView.allowsMultipleSelectionDuringEditing = YES; 進入多選模式。
Swift 需設定 myTableView.allowsMultipleSelectionDuringEditing = true 進入多選模式。
Objective-C
待刪資料陣列初始化
    // 宣告待刪資料陣列
    @property(nonatomic, retain)NSMutableArray *tempDeleteArray;

    // 初始化待刪資料陣列
    tempDeleteArray = [[NSMutableArray alloc] init];
自定義方法
    // 編輯按鈕點選響應事件
    - (void)editClick:(UIButton *)button {

        // 改變編輯開關狀態
        [myTableView setEditing:!myTableView.editing animated:YES];

        // 設定編輯模式,允許編輯時多選,或者在協議方法中設定
        myTableView.allowsMultipleSelectionDuringEditing = YES;

        // 當編輯狀態發生改變的時候,清空待刪陣列
        [tempDeleteArray removeAllObjects];

        [myTableView reloadData];
    }

    // 刪除按鈕點選響應事件
    - (void)deleteClick:(UIButton *)button {

        // 從資料來源中刪除待選陣列中包含的資料
        [myDataArray removeObjectsInArray:tempDeleteArray];

        // 清空待刪陣列
        [tempDeleteArray removeAllObjects];

        [myTableView reloadData];
    }
UITableView 協議方法
    // 設定編輯模式
    /*
        刪除、插入、多選刪除,不設定預設時為刪除,
        或者在編輯按鈕點選事件中直接設定 myTableView.allowsMultipleSelectionDuringEditing = YES;
    */
    - (UITableViewCellEditingStyle)tableView:(UITableView *)tableView editingStyleForRowAtIndexPath:(NSIndexPath *)indexPath {

        // 多選刪除
        return UITableViewCellEditingStyleDelete | UITableViewCellEditingStyleInsert;
    }

    // 表格選中點選響應事件
    - (void)tableView:(UITableView *)tableView didSelectRowAtIndexPath:(NSIndexPath *)indexPath {

        // 判斷 tableView 的編輯狀態,表格處於編輯狀態
        if (tableView.isEditing) {

            // 選中 cell 的時候,將對應的資料來源模型新增到待刪除陣列中
            [tempDeleteArray addObject:[myDataArray objectAtIndex:indexPath.row]];
        }
        else {

            // 恢復未選中狀態時的顏色
            [tableView deselectRowAtIndexPath:indexPath animated:YES];
        }
    }

    // 表格取消選中點選響應事件
    - (void)tableView:(UITableView *)tableView didDeselectRowAtIndexPath:(NSIndexPath *)indexPath {

        // 判斷 tableView 的編輯狀態,表格處於編輯狀態
        if (tableView.isEditing) {

            // 將對應的資料模型從待刪除陣列中移除
            [tempDeleteArray removeObject:[myDataArray objectAtIndex:indexPath.row]];
        }
    }
Swift
待刪資料陣列初始化
    // 初始化待刪資料陣列
    var tempDeleteArray:[Dog] = Array()
自定義方法
    // 編輯按鈕點選響應事件
    func editClick(button:UIButton){

        // 改變編輯開關狀態
        myTableView.setEditing(!myTableView.editing, animated: true)

        // 設定編輯模式,允許編輯時多選
        myTableView.allowsMultipleSelectionDuringEditing = true

        // 當編輯狀態發生改變的時候,清空待刪陣列
        tempDeleteArray.removeAll()

        myTableView.reloadData()
    }

    // 刪除按鈕點選響應事件
    func deleteClick(button:UIButton){

        // 從資料來源中刪除待選陣列中包含的資料
        myDataArray.removeObjectsInArray(tempDeleteArray)

        // 清空待刪陣列
        tempDeleteArray.removeAll()

        myTableView.reloadData()
    }
UITableView 協議方法
    // 表格被選中
    func tableView(tableView: UITableView, didSelectRowAtIndexPath indexPath: NSIndexPath) {

        // 判斷 tableView 的編輯狀態,表格處於編輯狀態
        if tableView.editing {

            // 選中 cell 的時候,將對應的資料來源模型新增到待刪除陣列中
            tempDeleteArray.append(myDataArray.objectAtIndex(indexPath.row) as! Dog)
        }
        else {

            // 恢復未選中狀態時的顏色
            tableView.deselectRowAtIndexPath(indexPath, animated: true)
        }
    }

    // 表格被取消選中
    func tableView(tableView: UITableView, didDeselectRowAtIndexPath indexPath: NSIndexPath) {

        // 判斷 tableView 的編輯狀態,表格處於編輯狀態
        if tableView.editing {

            // 將對應的資料模型從待刪除陣列中移除
            tempDeleteArray.append(myDataArray.objectAtIndex(indexPath.row) as! Dog)
        }
    }
執行效果

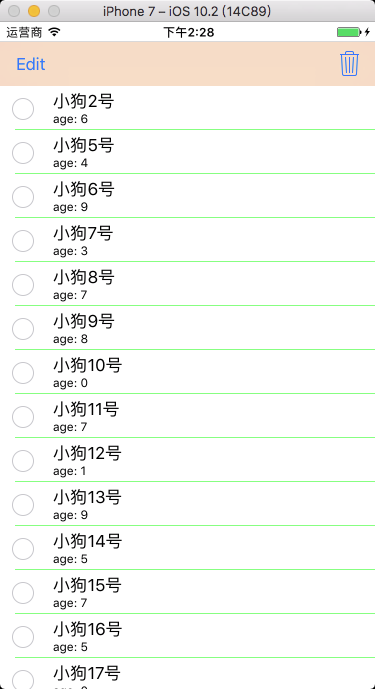
12.2 自定義方式 1
Objective-C
XMGDeal.h
    #import <Foundation/Foundation.h>

    @interface XMGDeal : NSObject

    @property (strong, nonatomic) NSString *buyCount;
    @property (strong, nonatomic) NSString *price;
    @property (strong, nonatomic) NSString *title;
    @property (strong, nonatomic) NSString *icon;

    /** 狀態量標識有無被打鉤 */
    @property (assign, nonatomic, getter=isChecked) BOOL checked;

    + (instancetype)dealWithDict:(NSDictionary *)dict;

    @end
XMGDeal.m
    #import "XMGDeal.h"

    @implementation XMGDeal

    + (instancetype)dealWithDict:(NSDictionary *)dict {

        XMGDeal *deal = [[self alloc] init];
        [deal setValuesForKeysWithDictionary:dict];

        return deal;
    }

    @end
XMGDealCell.xib
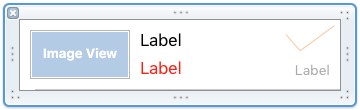
XMGDealCell.h
    #import <UIKit/UIKit.h>

    @class XMGDeal;

    @interface XMGDealCell : UITableViewCell

    /** 團購模型資料 */
    @property (nonatomic, strong) XMGDeal *deal;

    + (instancetype)cellWithTableView:(UITableView *)tableView;

    @end
XMGDealCell.m
    #import "XMGDealCell.h"
    #import "XMGDeal.h"

    @interface XMGDealCell()

    @property (weak, nonatomic) IBOutlet UIImageView *iconView;
    @property (weak, nonatomic) IBOutlet UILabel *titleLabel;
    @property (weak, nonatomic) IBOutlet UILabel *buyCountLabel;
    @property (weak, nonatomic) IBOutlet UIImageView *checkView;
    @property (weak, nonatomic) IBOutlet UILabel *priceLabel;

    @end

    @implementation XMGDealCell

    + (instancetype)cellWithTableView:(UITableView *)tableView {

        static NSString *ID = @"deal";
        XMGDealCell *cell = [tableView dequeueReusableCellWithIdentifier:ID];
        if (cell == nil) {
            cell = [[[NSBundle mainBundle] loadNibNamed:NSStringFromClass([XMGDealCell class])
                                                  owner:nil
                                                options:nil] lastObject];
        }
        return cell;
    }

    - (void)setDeal:(XMGDeal *)deal {

        _deal = deal;

        // 設定資料
        self.iconView.image = [UIImage imageNamed:deal.icon];
        self.titleLabel.text = deal.title;
        self.priceLabel.text = [NSString stringWithFormat:@"¥%@", deal.price];
        self.buyCountLabel.text = [NSString stringWithFormat:@"%@人已購買", deal.buyCount];

        // 設定打鉤控制元件的顯示和隱藏
        self.checkView.hidden = !deal.isChecked;
    }

    @end
XMGDealsViewController.m
    #import "XMGDealsViewController.h"
    #import "XMGDeal.h"
    #import "XMGDealCell.h"

    @interface XMGDealsViewController () <UITableViewDataSource, UITableViewDelegate>

    @property (weak, nonatomic) IBOutlet UITableView *tableView;

    /** 所有的團購資料 */
    @property (nonatomic, strong) NSMutableArray *deals;

    @end

    @implementation XMGDealsViewController

    - (NSMutableArray *)deals {

        if (_deals == nil) {

            // 載入plist中的字典陣列
            NSString *path = [[NSBundle mainBundle] pathForResource:@"deals.plist" ofType:nil];
            NSArray *dictArray = [NSArray arrayWithContentsOfFile:path];

            // 字典陣列 -> 模型陣列
            NSMutableArray *dealArray = [NSMutableArray array];
            for (NSDictionary *dict in dictArray) {
                XMGDeal *deal = [XMGDeal dealWithDict:dict];
                [dealArray addObject:deal];
            }

            _deals = dealArray;
        }
        return _deals;
    }

    - (IBAction)remove {

        // 臨時陣列:存放即將需要刪除的團購資料
        NSMutableArray *deletedDeals = [NSMutableArray array];
        for (XMGDeal *deal in self.deals) {
            if (deal.isChecked) [deletedDeals addObject:deal];
        }

        // 刪除模型資料
        [self.deals removeObjectsInArray:deletedDeals];

        // 重新整理表格
        [self.tableView reloadData];
    }

    #pragma mark - Table view data source
    - (NSInteger)tableView:(UITableView *)tableView numberOfRowsInSection:(NSInteger)section {
        return self.deals.count;
    }

    - (UITableViewCell *)tableView:(UITableView *)tableView cellForRowAtIndexPath:(NSIndexPath *)indexPath {

        XMGDealCell *cell = [XMGDealCell cellWithTableView:tableView];

        // 取出模型資料
        cell.deal = self.deals[indexPath.row];

        return cell;
    }

    #pragma mark - TableView 代理方法
    - (void)tableView:(UITableView *)tableView didSelectRowAtIndexPath:(NSIndexPath *)indexPath {

        // 取消選中這一行
        [tableView deselectRowAtIndexPath:indexPath animated:YES];

        // 模型的打鉤屬性取反
        XMGDeal *deal = self.deals[indexPath.row];
        deal.checked = !deal.isChecked;

        // 重新整理表格
        [tableView reloadData];
    }

    @end
執行效果
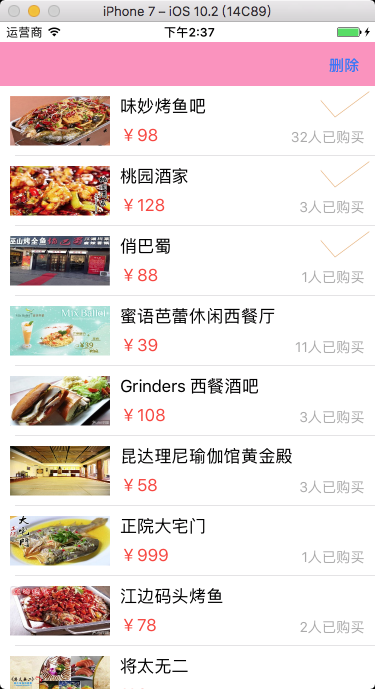
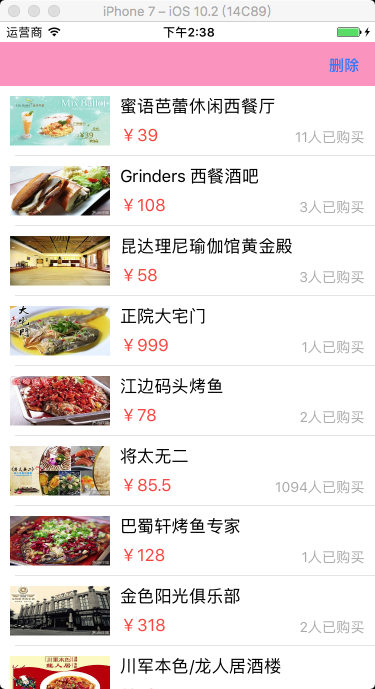
12.3 自定義方式 2
Objective-C
XMGDeal.h
    #import <Foundation/Foundation.h>

    @interface XMGDeal : NSObject

    @property (strong, nonatomic) NSString *buyCount;
    @property (strong, nonatomic) NSString *price;
    @property (strong, nonatomic) NSString *title;
    @property (strong, nonatomic) NSString *icon;

    + (instancetype)dealWithDict:(NSDictionary *)dict;

    @end
XMGDeal.m
    #import "XMGDeal.h"

    @implementation XMGDeal

    + (instancetype)dealWithDict:(NSDictionary *)dict {

        XMGDeal *deal = [[self alloc] init];
        [deal setValuesForKeysWithDictionary:dict];

        return deal;
    }

    @end
XMGDealCell.xib
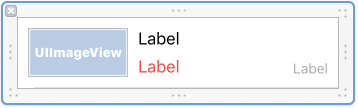
XMGDealCell.h
    #import <UIKit/UIKit.h>

    @class XMGDeal;

    @interface XMGDealCell : UITableViewCell

    /** 團購模型資料 */
    @property (nonatomic, strong) XMGDeal *deal;

    + (instancetype)cellWithTableView:(UITableView *)tableView;

    @end
XMGDealCell.m
    #import "XMGDealCell.h"
    #import "XMGDeal.h"

    @interface XMGDealCell()

    @property (weak, nonatomic) IBOutlet UIImageView *iconView;
    @property (weak, nonatomic) IBOutlet UILabel *titleLabel;
    @property (weak, nonatomic) IBOutlet UILabel *buyCountLabel;
    @property (weak, nonatomic) IBOutlet UIImageView *checkView;
    @property (weak, nonatomic) IBOutlet UILabel *priceLabel;

    @end

    @implementation XMGDealCell

    + (instancetype)cellWithTableView:(UITableView *)tableView {

        static NSString *ID = @"deal";
        XMGDealCell *cell = [tableView dequeueReusableCellWithIdentifier:ID];
        if (cell == nil) {
            cell = [[[NSBundle mainBundle] loadNibNamed:NSStringFromClass([XMGDealCell class])
                                                  owner:nil
                                                options:nil] lastObject];
        }
        return cell;
    }

    - (void)setDeal:(XMGDeal *)deal {

        _deal = deal;

        // 設定資料
        self.iconView.image = [UIImage imageNamed:deal.icon];
        self.titleLabel.text = deal.title;
        self.priceLabel.text = [NSString stringWithFormat:@"¥%@", deal.price];
        self.buyCountLabel.text = [NSString stringWithFormat:@"%@人已購買", deal.buyCount];
    }

    @end
XMGDealsViewController.m
    #import "XMGDealsViewController.h"
    #import "XMGDeal.h"
    #import "XMGDealCell.h"

    @interface XMGDealsViewController () <UITableViewDataSource, UITableViewDelegate>

    @property (weak, nonatomic) IBOutlet UITableView *tableView;

    /** 所有的團購資料 */
    @property (nonatomic, strong) NSMutableArray *deals;

    /** 即將要刪除的團購 */
    @property (nonatomic, strong) NSMutableArray *deletedDeals;

    @end

    @implementation XMGDealsViewController

    - (NSMutableArray *)deletedDeals {

        if (!_deletedDeals) {
            _deletedDeals = [NSMutableArray array];
        }
        return _deletedDeals;
    }

    - (NSMutableArray *)deals {

        if (_deals == nil) {

            // 載入plist中的字典陣列
            NSString *path = [[NSBundle mainBundle] pathForResource:@"deals.plist" ofType:nil];
            NSArray *dictArray = [NSArray arrayWithContentsOfFile:path];

            // 字典陣列 -> 模型陣列
            NSMutableArray *dealArray = [NSMutableArray array];
            for (NSDictionary *dict in dictArray) {
                XMGDeal *deal = [XMGDeal dealWithDict:dict];
                [dealArray addObject:deal];
            }

            _deals = dealArray;
        }
        return _deals;
    }

    - (IBAction)remove {

        // 刪除模型資料
        [self.deals removeObjectsInArray:self.deletedDeals];

        // 重新整理表格
        [self.tableView reloadData];

        // 清空陣列
        [self.deletedDeals removeAllObjects];
    }

    #pragma mark - Table view data source
    - (NSInteger)tableView:(UITableView *)tableView numberOfRowsInSection:(NSInteger)section {
        return self.deals.count;
    }

    - (UITableViewCell *)tableView:(UITableView *)tableView cellForRowAtIndexPath:(NSIndexPath *)indexPath {

        XMGDealCell *cell = [XMGDealCell cellWithTableView:tableView];

        // 取出模型資料
        cell.deal = self.deals[indexPath.row];

        cell.checkView.hidden = ![self.deletedDeals containsObject:cell.deal];

        return cell;
    }

    #pragma mark - TableView代理方法
    - (void)tableView:(UITableView *)tableView didSelectRowAtIndexPath:(NSIndexPath *)indexPath {

        // 取消選中這一行
        [tableView deselectRowAtIndexPath:indexPath animated:YES];

        // 取出模型
        XMGDeal *deal = self.deals[indexPath.row];
        if ([self.deletedDeals containsObject:deal]) {
            [self.deletedDeals removeObject:deal];
        } else {
            [self.deletedDeals addObject:deal];
        }

        // 重新整理表格
        [tableView reloadData];
    }

    @end
執行效果
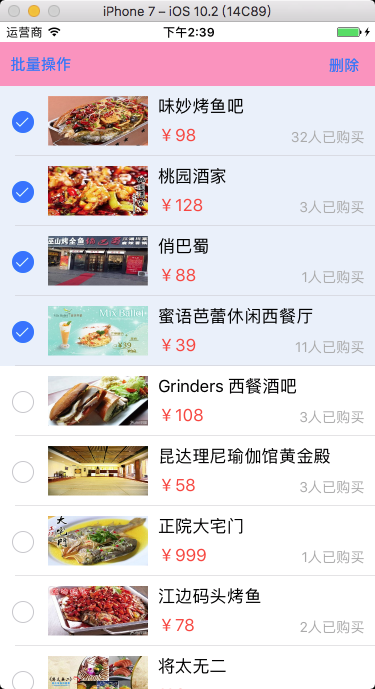
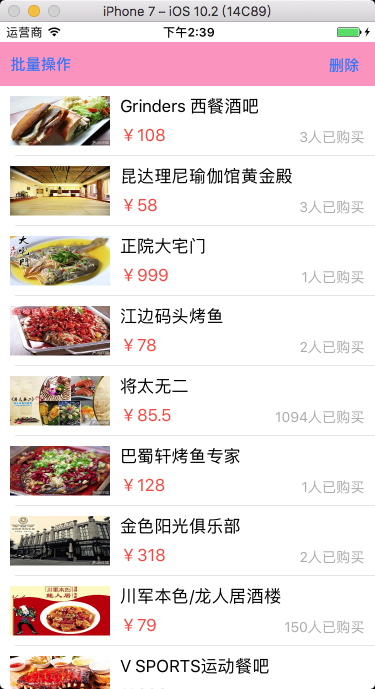
13、聊天佈局
Objective-C
XMGMessage.h
    #import <UIKit/UIKit.h>

    typedef enum {
        XMGMessageTypeMe = 0,
        XMGMessageTypeOther = 1
    } XMGMessageType;

    @interface XMGMessage : NSObject

    @property (nonatomic, strong) NSString *text;
    @property (nonatomic, strong) NSString *time;
    @property (nonatomic, assign) XMGMessageType type;

    /** cell 的高度 */
    @property (nonatomic, assign) CGFloat cellHeight;

    /** 是否隱藏時間 */
    @property (nonatomic, assign, getter=isHideTime) BOOL hideTime;

    + (instancetype)messageWithDict:(NSDictionary *)dict;

    @end
XMGMessage.m
    #import "XMGMessage.h"

    @implementation XMGMessage

    + (instancetype)messageWithDict:(NSDictionary *)dict {

        XMGMessage *message = [[self alloc] init];
        [message setValuesForKeysWithDictionary:dict];
        return message;
    }

    @end
Main.storyboard
設定 cell
單 Cell 佈局

多 Cell 佈局
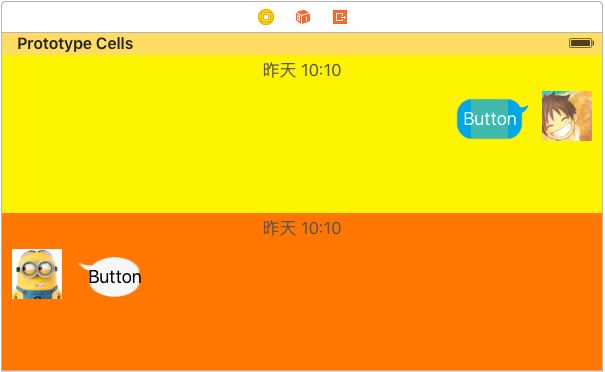
設定氣泡圖片拉伸
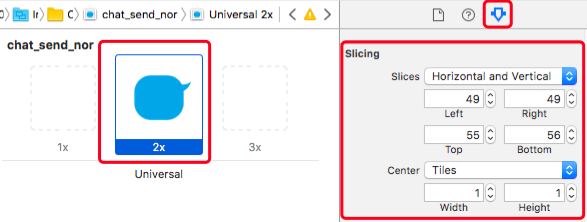
設定按鈕邊距
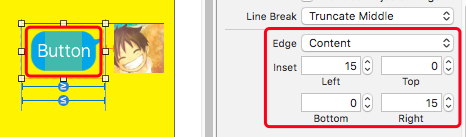
XMGMessageCell.h
    #import <UIKit/UIKit.h>

    @class XMGMessage;

    @interface XMGMessageCell : UITableViewCell

    @property (nonatomic, strong) XMGMessage *message;

    @end
XMGMessageCell.m
單 Cell 佈局
    #import "XMGMessageCell.h"
    #import "XMGMessage.h"

    #define MAS_SHORTHAND
    #define MAS_SHORTHAND_GLOBALS
    #import "Masonry.h"

    @interface XMGMessageCell()

    @property (weak, nonatomic) IBOutlet UILabel *timeLabel;

    @property (weak, nonatomic) IBOutlet UIButton *textButton;
    @property (weak, nonatomic) IBOutlet UIImageView *iconView;

    @property (weak, nonatomic) IBOutlet UIButton *otherTextButton;
    @property (weak, nonatomic) IBOutlet UIImageView *otherIconView;

    @end

    @implementation XMGMessageCell

    - (void)awakeFromNib {

        self.textButton.titleLabel.numberOfLines = 0;
        self.otherTextButton.titleLabel.numberOfLines = 0;
    }

    - (void)setMessage:(XMGMessage *)message {

        _message = message;

        if (message.hideTime) { // 隱藏時間
            self.timeLabel.hidden = YES;
            [self.timeLabel updateConstraints:^(MASConstraintMaker *make) {
                make.height.equalTo(0);
            }];
        } else { // 顯示時間
            self.timeLabel.text = message.time;
            self.timeLabel.hidden = NO;
            [self.timeLabel updateConstraints:^(MASConstraintMaker *make) {
                make.height.equalTo(21);
            }];
        }

        // 強制更新
        [self layoutIfNeeded];

        if (message.type == XMGMessageTypeMe) { // 右邊
            [self settingShowTextButton:self.textButton
                           showIconView:self.iconView
                         hideTextButton:self.otherTextButton
                           hideIconView:self.otherIconView];
        } else { // 左邊
            [self settingShowTextButton:self.otherTextButton
                           showIconView:self.otherIconView
                         hideTextButton:self.textButton
                           hideIconView:self.iconView];
        }
    }

    /**
     * 處理左右按鈕、頭像
     */
    - (void)settingShowTextButton:(UIButton *)showTextButton
                     showIconView:(UIImageView *)showIconView
                   hideTextButton:(UIButton *)hideTextButton
                     hideIconView:(UIImageView *)hideIconView {

        hideTextButton.hidden = YES;
        hideIconView.hidden = YES;

        showTextButton.hidden = NO;
        showIconView.hidden = NO;

        // 設定按鈕的文字
        [showTextButton setTitle:self.message.text forState:UIControlStateNormal];

        // 強制更新
        [showTextButton layoutIfNeeded];

        // 設定按鈕的高度就是titleLabel的高度
        [showTextButton updateConstraints:^(MASConstraintMaker *make) {
            CGFloat buttonH = showTextButton.titleLabel.frame.size.height + 30;
            make.height.equalTo(buttonH);
        }];

        // 強制更新
        [showTextButton layoutIfNeeded];

        // 計算當前 cell 的高度
        CGFloat buttonMaxY = CGRectGetMaxY(showTextButton.frame);
        CGFloat iconMaxY = CGRectGetMaxY(showIconView.frame);
        self.message.cellHeight = MAX(buttonMaxY, iconMaxY) + 10;
    }

    @end
多 Cell 佈局
    #import "XMGMessageCell.h"
    #import "XMGMessage.h"

    #define MAS_SHORTHAND
    #define MAS_SHORTHAND_GLOBALS
    #import "Masonry.h"

    @interface XMGMessageCell()

    @property (weak, nonatomic) IBOutlet UILabel *timeLabel;
    @property (weak, nonatomic) IBOutlet UIButton *textButton;
    @property (weak, nonatomic) IBOutlet UIImageView *iconView;

    @end

    @implementation XMGMessageCell

    - (void)awakeFromNib {

        self.textButton.titleLabel.numberOfLines = 0;
    }

    - (void)setMessage:(XMGMessage *)message {

        _message = message;

        // 時間處理
        if (message.hideTime) { // 隱藏時間
            self.timeLabel.hidden = YES;
            [self.timeLabel updateConstraints:^(MASConstraintMaker *make) {
                make.height.equalTo(0);
            }];
        } else { // 顯示時間
            self.timeLabel.text = message.time;
            self.timeLabel.hidden = NO;
            [self.timeLabel updateConstraints:^(MASConstraintMaker *make) {
                make.height.equalTo(21);
            }];
        }

        // 處理顯示的訊息文字
        // 設定按鈕的文字
        [self.textButton setTitle:self.message.text forState:UIControlStateNormal];

        // 強制更新
        [self layoutIfNeeded];

        // 設定按鈕的高度就是titleLabel的高度
        [self.textButton updateConstraints:^(MASConstraintMaker *make) {
            CGFloat buttonH = self.textButton.titleLabel.frame.size.height + 30;
            make.height.equalTo(buttonH);
        }];

        // 強制更新
        [self layoutIfNeeded];

        // 計算當前cell的高度
        CGFloat buttonMaxY = CGRectGetMaxY(self.textButton.frame);
        CGFloat iconMaxY = CGRectGetMaxY(self.iconView.frame);
        self.message.cellHeight = MAX(buttonMaxY, iconMaxY) + 10;
    }

    @end
XMGChatingViewController.m
    #import "XMGChatingViewController.h"
    #import "XMGMessage.h"
    #import "XMGMessageCell.h"

    @interface XMGChatingViewController () <UITableViewDataSource, UITableViewDelegate>

    @property (nonatomic, strong) NSArray *messages;

    @end

    @implementation XMGChatingViewController

    - (NSArray *)messages {

        if (_messages == nil) {

            // 載入plist中的字典陣列
            NSString *path = [[NSBundle mainBundle] pathForResource:@"messages.plist" ofType:nil];
            NSArray *dictArray = [NSArray arrayWithContentsOfFile:path];

            // 字典陣列 -> 模型陣列
            NSMutableArray *messageArray = [NSMutableArray array];

            // 用來記錄上一條訊息模型
            XMGMessage *lastMessage = nil;
            for (NSDictionary *dict in dictArray) {
                XMGMessage *message = [XMGMessage messageWithDict:dict];

                //埋下伏筆,載入資料時,判斷哪個時間值相等。
                message.hideTime = [message.time isEqualToString:lastMessage.time];
                [messageArray addObject:message];

                lastMessage = message;
            }

            _messages = messageArray;
        }
        return _messages;
    }

    #pragma mark - <UITableViewDataSource>
    - (NSInteger)tableView:(UITableView *)tableView numberOfRowsInSection:(NSInteger)section {
        return self.messages.count;
    }

    - (UITableViewCell *)tableView:(UITableView *)tableView cellForRowAtIndexPath:(NSIndexPath *)indexPath {

        XMGMessageCell *cell = [tableView dequeueReusableCellWithIdentifier:@"message"];

        cell.message = self.messages[indexPath.row];

        return cell;
    }

    #pragma mark - <UITableViewDelegate>
    - (CGFloat)tableView:(UITableView *)tableView estimatedHeightForRowAtIndexPath:(NSIndexPath *)indexPath {
        return 200;
    }

    - (CGFloat)tableView:(UITableView *)tableView heightForRowAtIndexPath:(NSIndexPath *)indexPath {

        XMGMessage *message = self.messages[indexPath.row];
        return message.cellHeight;
    }

    @end
效果

14、tableView 的協議方法
需遵守協議 UITableViewDataSource, UITableViewDelegate,並設定代理
UITableViewDelegate 繼承自 UIScrollViewDelegate
@protocol UITableViewDelegate<NSObject, UIScrollViewDelegate>
14.1 UITableViewDataSource 和 UITableViewDelegate 協議方法
Objective-C
分段、行 設定
    // 設定分段數,設定 tableView 有多少個分段
    - (NSInteger)numberOfSectionsInTableView:(UITableView *)tableView {

        return myDataArray.count;
    }

    // 設定行數,設定 tableView 中每段中有多少行,section 就是第幾分段
    - (NSInteger)tableView:(UITableView *)tableView numberOfRowsInSection:(NSInteger)section {

        return [[myDataArray objectAtIndex:section] count];
    }

    // 設定行高 ,預設為 44
    - (CGFloat)tableView:(UITableView *)tableView heightForRowAtIndexPath:(NSIndexPath *)indexPath {

        return 60;
    }

    // 設定估計行高
    - (CGFloat)tableView:(UITableView *)tableView estimatedHeightForRowAtIndexPath:(NSIndexPath *)indexPath {

        /*
            只要返回了估計高度,那麼就會先呼叫 tableView:cellForRowAtIndexPath: 方法建立 cell,
            再呼叫 tableView:heightForRowAtIndexPath: 方法獲取 cell 的真實高度,
            並且顯示一個 cell,呼叫一次 tableView:heightForRowAtIndexPath: 方法。

            如果不返回估計高度,會先呼叫 tableView:heightForRowAtIndexPath: 方法,
            再呼叫 tableView:heightForRowAtIndexPath: 方法,
            並且一次性全部呼叫總 cell 數量次 tableView:heightForRowAtIndexPath: 方法。
        */

        return 60;
    }

    // 設定每一行顯示的內容,每當有一個 cell 進入視野範圍內就會呼叫
    - (UITableViewCell *)tableView:(UITableView *)tableView cellForRowAtIndexPath:(NSIndexPath *)indexPath {

        return cell;
    }
分段的頭、腳標題 設定
    // 設定分段的頭標題高度
    - (CGFloat)tableView:(UITableView *)tableView heightForHeaderInSection:(NSInteger)section {

        return 40;
    }

    // 設定分段的腳標題高度
    - (CGFloat)tableView:(UITableView *)tableView heightForFooterInSection:(NSInteger)section {

        return 30;
    }

    // 設定分段的頭標題估計高度
    - (CGFloat)tableView:(UITableView *)tableView estimatedHeightForHeaderInSection:(NSInteger)section {

        return 40;
    }

    // 設定分段的腳標題估計高度
    - (CGFloat)tableView:(UITableView *)tableView estimatedHeightForFooterInSection:(NSInteger)section {

        return 30;
    }

    // 設定分段的頭標題內容
    - (NSString *)tableView:(UITableView *)tableView titleForHeaderInSection:(NSInteger)section {

        if (0 == section) {
            return @"1 Header";
        }
        else{
            return @"2 rHeader";
        }
    }

    // 設定分段的腳標題內容
    - (NSString *)tableView:(UITableView *)tableView titleForFooterInSection:(NSInteger)section {

        if (0 == section) {
            return @"2 Footer";
        }
        else{
            return @"2 Footer";
        }
    }

    // 設定分段頭標題檢視,返回自定義的標題檢視
    - (UIView *)tableView:(UITableView *)tableView viewForHeaderInSection:(NSInteger)section {

        return myView;
    }

    // 設定分段腳標題檢視,返回自定義的標題檢視
    - (UIView *)tableView:(UITableView *)tableView viewForFooterInSection:(NSInteger)section {

        return myView;
    }
分段索引條 設定
    // 建立索引條
    - (NSArray *)sectionIndexTitlesForTableView:(UITableView *)tableView {

        return array;
    }

    // 設定索引條偏移量,預設索引條與分段一一對應時,可以不寫該方法
    - (NSInteger)tableView:(UITableView *)tableView sectionForSectionIndexTitle:(NSString *)title atIndex:(NSInteger)index {
        /*
             點選索引條上字串的時候 tableView 會跳轉到對應的分段,是根據位置計算的,點選索引條上第幾個,tableView 就會跳到第幾段。

             如果索引條的前面加了個搜尋小圖示等,需要重寫這個方法。
         */
    }
表格點選 設定
    // 表格選中點選響應事件,表格被選中
    - (void)tableView:(UITableView *)tableView didSelectRowAtIndexPath:(NSIndexPath *)indexPath {

    }

    // 表格取消選中點選響應事件,表格被取消選中
    - (void)tableView:(UITableView *)tableView didDeselectRowAtIndexPath:(NSIndexPath *)indexPath {

    }

    // 附屬控制元件 button 點選響應事件
    - (void)tableView:(UITableView *)tableView accessoryButtonTappedForRowWithIndexPath:(NSIndexPath *)indexPath {

        // 如果系統自帶的附屬控制元件裡有 button ,附屬控制元件的點選事件會獨立出來
    }
表格編輯 設定
    // 表格刪除、插入
    - (void)tableView:(UITableView *)tableView commitEditingStyle:(UITableViewCellEditingStyle)editingStyle forRowAtIndexPath:(NSIndexPath *)indexPath {

        // 表格刪除或插入,預設為刪除模式,寫入該方法即表示允許刪除。
    }

    // 設定編輯模式
    - (UITableViewCellEditingStyle)tableView:(UITableView *)tableView editingStyleForRowAtIndexPath:(NSIndexPath *)indexPath {

        // 刪除、插入、多選刪除,不設定預設時為刪除
    }

    // 修改左滑刪除按鈕的內容
    - (NSString *)tableView:(UITableView *)tableView titleForDeleteConfirmationButtonForRowAtIndexPath:(NSIndexPath *)indexPath {

        return @"刪除";
    }

    // 設定左滑多按鈕
    - (NSArray *)tableView:(UITableView *)tableView editActionsForRowAtIndexPath:(NSIndexPath *)indexPath {

        // 按鈕從右向左的順序排列
        return @[action1, action0];
    }

    // 表格移動
    - (void)tableView:(UITableView *)tableView moveRowAtIndexPath:(NSIndexPath *)sourceIndexPath toIndexPath:(NSIndexPath *)destinationIndexPath {

    }
Swift
分段、行 設定
    // 設定分段數,設定 tableView 有多少個分段
    func numberOfSectionsInTableView(tableView: UITableView) -> Int {

        return myDataArray.count
    }

    // 設定行數,設定 tableView 中每段中有多少行,section 就是第幾分段
    func tableView(tableView: UITableView, numberOfRowsInSection section: Int) -> Int {

        return myDataArray[section].count
    }

    // 設定行高,預設為 44
    func tableView(tableView: UITableView, heightForRowAtIndexPath indexPath: NSIndexPath) -> CGFloat {

        return 60
    }

    // 設定估計行高
    func tableView(tableView: UITableView, estimatedHeightForRowAtIndexPath indexPath: NSIndexPath) -> CGFloat {

        /*
            只要返回了估計高度,那麼就會先呼叫 tableView:cellForRowAtIndexPath: 方法建立 cell,
            再呼叫 tableView:heightForRowAtIndexPath: 方法獲取 cell 的真實高度,
            並且顯示一個 cell,呼叫一次 tableView:heightForRowAtIndexPath: 方法。

            如果不返回估計高度,會先呼叫 tableView:heightForRowAtIndexPath: 方法,
            再呼叫 tableView:heightForRowAtIndexPath: 方法,
            並且一次性全部呼叫總 cell 數量次 tableView:heightForRowAtIndexPath: 方法。
        */

        return 60
    }

    // 設定每一行顯示的內容,每當有一個 cell 進入視野範圍內就會呼叫
    func tableView(tableView: UITableView, cellForRowAtIndexPath indexPath: NSIndexPath) -> UITableViewCell {

        return cell
    }
分段的頭、腳標題 設定
    // 設定分段的頭標題高度
    func tableView(tableView: UITableView, heightForHeaderInSection section: Int) -> CGFloat {

        return 40
    }

    // 設定分段的腳標題高度
    func tableView(tableView: UITableView, heightForFooterInSection section: Int) -> CGFloat {

        return 30
    }

    // 設定分段的頭標題估計高度
    func tableView(tableView: UITableView, estimatedHeightForHeaderInSection section: Int) -> CGFloat {

        return 40
    }

    // 設定分段的腳標題估計高度
    func tableView(tableView: UITableView, estimatedHeightForFooterInSection section: Int) -> CGFloat {

        return 30
    }

    // 設定分段的頭標題內容
    func tableView(tableView: UITableView, titleForHeaderInSection section: Int) -> String? {

        if 0 == section {
            return "1 Header"
        }
        else {
            return "2 Header"
        }
    }

    // 設定分段的腳標題內容
    func tableView(tableView: UITableView, titleForFooterInSection section: Int) -> String? {

        if 0 == section {
            return "1 Footer"
        }
        else {
            return "2 Footer"
        }
    }

    // 設定分段頭標題檢視,返回自定義的標題檢視
    func tableView(tableView: UITableView, viewForHeaderInSection section: Int) -> UIView? {

        return myView
    }

    // 設定分段腳標題檢視,返回自定義的標題檢視
    func tableView(tableView: UITableView, viewForFooterInSection section: Int) -> UIView? {

        return myView
    }
分段索引條 設定
    // 建立索引條
    func sectionIndexTitlesForTableView(tableView: UITableView) -> [String]? {

        return array
    }

    // 設定索引條偏移量,預設索引條與分段一一對應時,可以不寫該方法
    func tableView(tableView: UITableView, sectionForSectionIndexTitle title: String, atIndex index: Int) -> Int {

        /*
            點選索引條上字串的時候 tableView 會跳轉到對應的分段,是根據位置計算的,點選索引條上第幾個,tableView 就會跳到第幾段。

            如果索引條的前面加了個搜尋小圖示等,需要重寫這個方法。
        */
    }
表格點選 設定
    // 表格選中點選響應事件,表格被選中
    func tableView(tableView: UITableView, didSelectRowAtIndexPath indexPath: NSIndexPath) {

    }

    // 表格取消選中點選響應事件,表格被取消選中
    func tableView(tableView: UITableView, didDeselectRowAtIndexPath indexPath: NSIndexPath) {

    }

    // 附屬控制元件 button 點選響應事件
    func tableView(tableView: UITableView, accessoryButtonTappedForRowWithIndexPath indexPath: NSIndexPath) {

        // 如果系統自帶的附屬控制元件裡有 button ,附屬控制元件的點選事件會獨立出來
    }
表格編輯 設定
    // 表格刪除、插入
    func tableView(tableView: UITableView, commitEditingStyle editingStyle: UITableViewCellEditingStyle, forRowAtIndexPath indexPath: NSIndexPath) {

        // 表格刪除或插入,預設為刪除模式,寫入該方法即表示允許刪除。
    }

    // 設定編輯模式
    func tableView(tableView: UITableView, editingStyleForRowAtIndexPath indexPath: NSIndexPath) -> UITableViewCellEditingStyle {

        // 刪除、插入、多選刪除,不設定預設時為刪除
    }

    // 修改左滑刪除按鈕的內容
    func tableView(tableView: UITableView, titleForDeleteConfirmationButtonForRowAtIndexPath indexPath: NSIndexPath) -> String? {

        return "刪除"
    }

    // 設定左滑多按鈕
    func tableView(tableView: UITableView, editActionsForRowAt indexPath: IndexPath) -> [UITableViewRowAction]? {

        // 按鈕從右向左的順序排列
        return [action1, action0]
    }

    // 表格移動
    func tableView(tableView: UITableView, moveRowAtIndexPath sourceIndexPath: NSIndexPath, toIndexPath destinationIndexPath: NSIndexPath) {

    }
14.2 UIScrollViewDelegate 協議方法
Objective-C
拖拽
    // 將要開始拖拽
    - (void)scrollViewWillBeginDragging:(UIScrollView *)scrollView {

    }

    // 將要結束拖拽
    - (void)scrollViewWillEndDragging:(UIScrollView *)scrollView withVelocity:(CGPoint)velocity targetContentOffset:(inout CGPoint *)targetContentOffset {

    }

    // 已經結束拖拽,decelerate 鬆手後 是否有慣性滾動 0:沒有,1:有
    - (void)scrollViewDidEndDragging:(UIScrollView *)scrollView willDecelerate:(BOOL)decelerate {

    }
滾動
    // 滾動過程中,只要滾動就會觸發
    - (void)scrollViewDidScroll:(UIScrollView *)scrollView {

    }

    // 已經結束滾動,滾動動畫停止時執行,程式碼改變時觸發,也就是 setContentOffset 改變時
    - (void)scrollViewDidEndScrollingAnimation:(UIScrollView *)scrollView {

    }
慣性滾動
    // 將要開始慣性滾動
    - (void)scrollViewWillBeginDecelerating:(UIScrollView *)scrollView {

    }

    // 已經結束慣性滾動
    - (void)scrollViewDidEndDecelerating:(UIScrollView *)scrollView {

    }
滾到頂端
    // 設定點選狀態列時是否滾到頂端
    - (BOOL)scrollViewShouldScrollToTop:(UIScrollView *)scrollView {

        return YES;
    }

    // 已經滾到頂端,點選狀態列時呼叫
    - (void)scrollViewDidScrollToTop:(UIScrollView *)scrollView {

    }
縮放
    // 設定被縮放的空間,一個 scrollView 中只能有一個子控制元件被縮放,如果有很多個子控制元件縮放時會引起錯亂
    - (UIView *)viewForZoomingInScrollView:(UIScrollView *)scrollView {

        return [scrollView.subviews[0] viewWithTag:100];
    }

    // 將要開始縮放
    - (void)scrollViewWillBeginZooming:(UIScrollView *)scrollView withView:(UIView *)view {

    }

    // 已經結束縮放
    - (void)scrollViewDidEndZooming:(UIScrollView *)scrollView withView:(UIView *)view atScale:(CGFloat)scale {

    }

    // 縮放過程中,只要縮放就會觸發
    - (void)scrollViewDidZoom:(UIScrollView *)scrollView {

    }
Swift
拖拽
    // 將要開始拖拽
    func scrollViewWillBeginDragging(scrollView: UIScrollView) {

    }

    // 將要結束拖拽
    func scrollViewWillEndDragging(scrollView: UIScrollView, withVelocity velocity: CGPoint, targetContentOffset: UnsafeMutablePointer<CGPoint>) {

    }

    // 已經結束拖拽,decelerate 鬆手後 是否有慣性滾動 0:沒有,1:有
    func scrollViewDidEndDragging(scrollView: UIScrollView, willDecelerate decelerate: Bool) {

    }
滾動
    // 滾動過程中,只要滾動就會觸發,只要滾動就會觸發
    func scrollViewDidScroll(scrollView: UIScrollView) {

    }

    // 已經結束滾動,滾動動畫停止時執行,程式碼改變時觸發,也就是 setContentOffset 改變時
    func scrollViewDidEndScrollingAnimation(scrollView: UIScrollView) {

    }
慣性滾動
    // 將要開始慣性滾動
    func scrollViewWillBeginDecelerating(scrollView: UIScrollView) {

    }

    // 已經結束慣性滾動
    func scrollViewDidEndDecelerating(scrollView: UIScrollView) {

    }
滾到頂端
    // 設定點選狀態列時是否滾到頂端
    func scrollViewShouldScrollToTop(scrollView: UIScrollView) -> Bool {

        return true
    }

    // 已經滾到頂端,點選狀態列時呼叫
    func scrollViewDidScrollToTop(scrollView: UIScrollView) {

    }
縮放
    // 設定被縮放的空間,一個 scrollView 中只能有一個子控制元件被縮放,如果有很多個子控制元件縮放時會引起錯亂
    func viewForZoomingInScrollView(scrollView: UIScrollView) -> UIView? {

        return scrollView.subviews[0].viewWithTag(100)
    }

    // 將要開始縮放
    func scrollViewWillBeginZooming(scrollView: UIScrollView, withView view: UIView?) {

    }

    // 已經結束縮放
    func scrollViewDidEndZooming(scrollView: UIScrollView, withView view: UIView?, atScale scale: CGFloat) {

    }

    // 縮放過程中,只要縮放就會觸發
    func scrollViewDidZoom(scrollView: UIScrollView) {

    }
15、Storyboard 中設定
在 Storyboard 場景中設定
Table View Controller
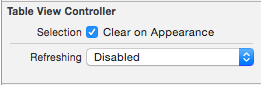
Selection 選項 -- Clear on Appearance Refreshing UIRefreshControl 重新整理設定 Table View

Content 設定表格 Cell 型別 -- Dynamic Prototypes 動態 Cell,可以設定自定義 Cell -- Static Cells 靜態 Cell,cell 的數量和內容無需(或大部分不需要)做動態的變化 Sections 設為靜態 Cell 時,設定分段數 Prototype Cells 設為動態 Cell 時,設定不同型別表格的數量,需設定不同的 Identifier Style 設定表格型別 Plain 懸浮顯示 Grouped 跟隨移動,多餘的表格將自動清除 Separator 設定分割線型別/顏色 Separator Insets 設定分割線邊距 Selection 設定表格選擇型別,不允許選擇/單選/多選 Editing 設定編輯狀態時表格的選擇型別 Show Selection on Touch 顯示選擇 Index Row Limit Text Background Table View Cell

Style 設定 Cell 的型別 Image 設定 Cell 顯示的圖片 Identifier 設定 Cell 的複用 ID Selection 設定 Cell 點選時的顏色 Accessory 設定 Cell 附屬控制元件型別 Editing Acc. Indentation Separator 設定分割線邊距 在 Storyboard 場景繫結的 Controller 中設定
    @interface TableViewController : UITableViewController

    self.tableView.backgroundColor = [UIColor greenColor];