Android原始碼解析Activity#setContentView()方法
在Activity初始化的過程中,會呼叫Activity的attach方法,在該方法中會建立一個PhoneWindow的例項,將其作為Activity的mWindow成員變數。
在執行完了Activity#attach()方法之後,會執行Activity#onCreate()方法。
我們在Activity#onCreate()方法中會就呼叫setContentView()方法,我們將一個Layout的資源ID傳入該方法,呼叫了該方法之後就將layout資源轉換成ViewGroup了,之後就可以呼叫findViewById()查詢ViewGroup中的各種View。
一圖勝千言
為了讓大家更清晰地理順程式碼的呼叫過程,我做了一張圖,如下所示:
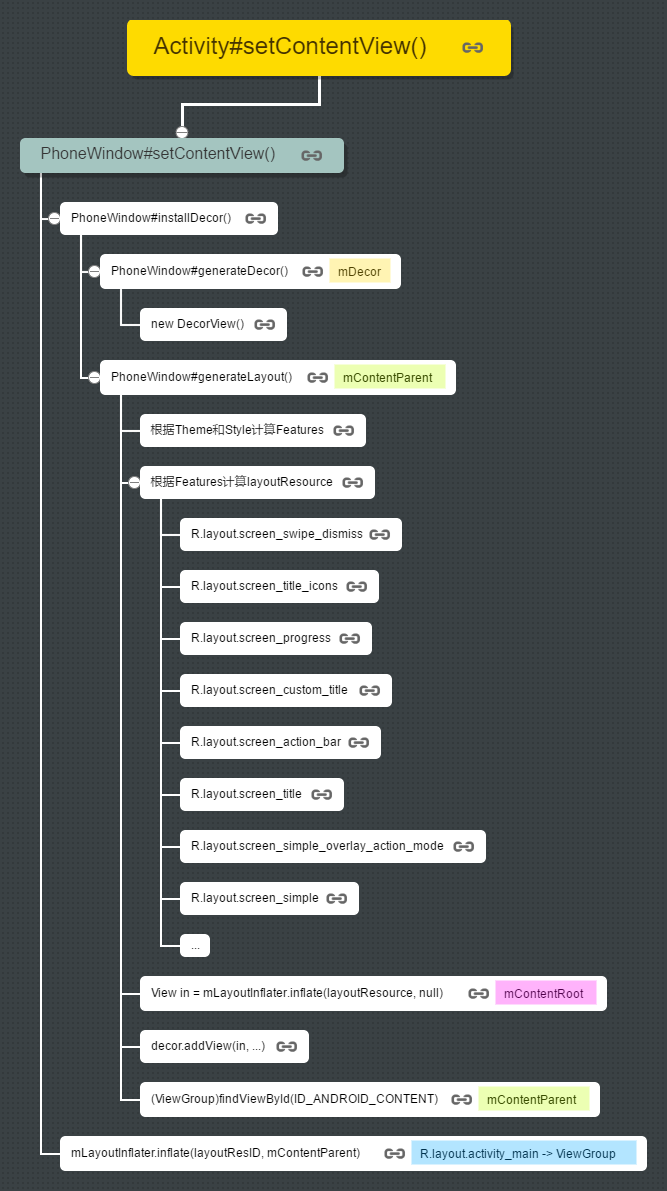
我在上圖中每一步都設定了一個超連結,如下圖所示:

但是Markdown中內嵌的SVG不支援超連結,如果想看一下每一步程式碼在Android原始碼中執行的位置,可以用瀏覽器開啟連結 https://ispring.github.io/svg/setContentView_zh.svg,然後單擊每一步的超連結就可以了。
原始碼解析
Activity#setContentView()原始碼如下所示:
public void setContentView(@LayoutRes int layoutResID) {
    getWindow().setContentView(layoutResID);
    initWindowDecorActionBar();
}首先通過getWindow()方法得到了mWindow,其實它是一個PhoneWindow型別的物件,我們之前提到PhoneWindow是在Activity#attach()方法中被初始化的。然後呼叫了PhoneWindow#setContentView()方法。
PhoneWindow#setContentView()原始碼如下所示:
public void setContentView(int layoutResID) {
    if (mContentParent == null) {
        //installDecor()方法會呼叫generateDecor()和generateLayout()方法
        installDecor();
    } else if (!hasFeature(FEATURE_CONTENT_TRANSITIONS)) {
        mContentParent.removeAllViews();
    }

    if (hasFeature(FEATURE_CONTENT_TRANSITIONS)) {
        final Scene newScene = Scene.getSceneForLayout(mContentParent, layoutResID,
                getContext());
        transitionTo(newScene);
    } else {
        mLayoutInflater.inflate(layoutResID, mContentParent);
    }
    mContentParent.requestApplyInsets();
    final Callback cb = getCallback();
    if (cb != null && !isDestroyed()) {
        //最後觸發內容變化的回撥
        cb.onContentChanged();
    }
}
該方法傳入了一個Activity的layout資源layoutResID,該資源就代表了Activity中的content內容,理解了此處content所代表的意義之後,要說一下PhoneWindow中有兩個比較重要的成員變數mContentParent和mContentRoot,這兩個欄位都是ViewGroup型別。mContentParent從字面上看就是content的parent,即Activity的layout是要放到mContentParent中去的。mContentRoot從字面上看就是content的root,即content的根結點,一般情況下,mContentParent是放置在mContentRoot中的。即mContentRoot > mContentParent > content。關於如何例項化mContentRoot 、mContentParent 和 content,後面會詳細說明。
PhoneWindow#setContentView()方法中會呼叫installDecor()方法。
PhoneWindow#installDecor()方法的原始碼如下所示:
private void installDecor() {
    if (mDecor == null) {
        //建立DecorView
        mDecor = generateDecor();
        mDecor.setDescendantFocusability(ViewGroup.FOCUS_AFTER_DESCENDANTS);
        mDecor.setIsRootNamespace(true);
        if (!mInvalidatePanelMenuPosted && mInvalidatePanelMenuFeatures != 0) {
            mDecor.postOnAnimation(mInvalidatePanelMenuRunnable);
        }
    }
    if (mContentParent == null) {
        //根據features生成Activity的layout資源的父節點
        mContentParent = generateLayout(mDecor);
        ...
    }
}
installDecor()中會呼叫generateDecor()和generateLayout()方法。
PhoneWindow#generateDecor()會建立DecorView,其原始碼如下所示:
protected DecorView generateDecor() {
    return new DecorView(getContext(), -1);
}執行完了generateDecor()之後,就會執行generateLayout(),其原始碼如下所示:
protected ViewGroup generateLayout(DecorView decor) {
    // Apply data from current theme.

    TypedArray a = getWindowStyle();

    ...
    //根據Theme和Style計算features

    if (a.getBoolean(R.styleable.Window_windowNoTitle, false)) {
        requestFeature(FEATURE_NO_TITLE);
    } else if (a.getBoolean(R.styleable.Window_windowActionBar, false)) {
        // Don't allow an action bar if there is no title.
        requestFeature(FEATURE_ACTION_BAR);
    }

    if (a.getBoolean(R.styleable.Window_windowActionBarOverlay, false)) {
        requestFeature(FEATURE_ACTION_BAR_OVERLAY);
    }

    if (a.getBoolean(R.styleable.Window_windowActionModeOverlay, false)) {
        requestFeature(FEATURE_ACTION_MODE_OVERLAY);
    }

    if (a.getBoolean(R.styleable.Window_windowSwipeToDismiss, false)) {
        requestFeature(FEATURE_SWIPE_TO_DISMISS);
    }

    ...


    // Inflate the window decor.

    //根據features計算layoutResource,此處的layoutResource表示要插入到DecorView中的子節點
    int layoutResource;
    int features = getLocalFeatures();
    // System.out.println("Features: 0x" + Integer.toHexString(features));
    if ((features & (1 << FEATURE_SWIPE_TO_DISMISS)) != 0) {
        layoutResource = R.layout.screen_swipe_dismiss;
    } else if ((features & ((1 << FEATURE_LEFT_ICON) | (1 << FEATURE_RIGHT_ICON))) != 0) {
        ...
        layoutResource = R.layout.screen_title_icons;
    } else if ((features & ((1 << FEATURE_PROGRESS) | (1 << FEATURE_INDETERMINATE_PROGRESS))) != 0
            && (features & (1 << FEATURE_ACTION_BAR)) == 0) {
        layoutResource = R.layout.screen_progress;
    } else if ((features & (1 << FEATURE_CUSTOM_TITLE)) != 0) {
        ...
    layoutResource = R.layout.screen_custom_title;
    } else if ((features & (1 << FEATURE_NO_TITLE)) == 0) {
        ...
        layoutResource = R.layout.screen_action_bar 或 R.layout.screen_title;
    } else if ((features & (1 << FEATURE_ACTION_MODE_OVERLAY)) != 0) {
        ...
        layoutResource = R.layout.screen_simple_overlay_action_mode;
    } else {
        // 不需要裝飾,直接用最簡單的資原始檔即可
        layoutResource = R.layout.screen_simple;
    }

    mDecor.startChanging();

    //將計算到的layoutResource轉換為實際的View,並將其插入到DecorView中,將其作為成員變數mContentRoot
    View in = mLayoutInflater.inflate(layoutResource, null);
    decor.addView(in, new ViewGroup.LayoutParams(MATCH_PARENT, MATCH_PARENT));
    mContentRoot = (ViewGroup) in;

    //計算出的layoutResource對應著mContentRoot,它其中肯定有一個ID叫做ID_ANDROID_CONTENT的ViewGroup
    //從中找到該Group,賦值給contentParent,contentParent就表示我們Actiivy的layout資原始檔的父節點
    ViewGroup contentParent = (ViewGroup)findViewById(ID_ANDROID_CONTENT);
    if (contentParent == null) {
        throw new RuntimeException("Window couldn't find content container view");
    }
    ...

    mDecor.finishChanging();

    //contentParent會賦值給成員變數mContentParent
    return contentParent;
}
generateDecor()這個方法從字面上看就知道是要產生layout,那麼要產生哪些layout呢?其實這個方法就是為了建立我們之前說的mContentRoot和mContentParent。generateDecor()方法的返回值就是mContentParent,我們具體分析一下程式碼的執行過程。
generateDecor()方法會首先根據Theme和Style,會多次呼叫requestFeature()方法,計算特性features,點此檢視對應原始碼。
然後會根據計算出的特性features,要計算一個layout資源layoutResource,layoutResource就是對應著mContentRoot。features具備的特性不同,layoutResource的值也就不同,layoutResource的可能取值有:
com.android.internal.R.layout.screen_swipe_dismiss.xml
com.android.internal.R.layout.screen_title_icons
com.android.internal.R.layout.screen_progress
com.android.internal.R.layout.screen_custom_title
com.android.internal.R.layout.screen_action_bar
com.android.internal.R.layout.screen_title
com.android.internal.R.layout.screen_simple_overlay_action_mode
com.android.internal.R.layout.screen_simple等。
根據features計算layoutResource的具體邏輯可參見原始碼。
在計算出layoutResource之後,會將計算到的layoutResource轉換為實際的View,將其作為成員變數mContentRoot,並將其插入到DecorView中,也就是說mDecor是mContentRoot的父節點,此時PhoneWindow中的View樹:mDecor -> mContentRoot
之後會呼叫findViewById()方法查詢ID為ID_ANDROID_CONTENT的View。PhoneWindow是繼承自Window的,PhoneWindow的findViewById()是在Window中定義,其原始碼如下所示:
public View findViewById(@IdRes int id) {
    return getDecorView().findViewById(id);
}由此我們可以看出PhoneWindow的findViewById()方法其實就是從mDecor中查詢View。ID_ANDROID_CONTENT也是在Window類中定義的,如下所示:
public static final int ID_ANDROID_CONTENT = com.android.internal.R.id.content;其實無論上面計算的layoutResource是哪個layout,該layout中都有一個id為content的ViewGroup。
舉例來說,我們有一個MainActivity,其直接繼承自Activity,Application和MainActivity都沒有設定任何Theme和Style,當App執行在Android 6.0系統上的時候,得到的layoutResource是com.android.internal.R.layout.screen_action_bar,具體如下所示:
<?xml version="1.0" encoding="utf-8"?>
<com.android.internal.widget.ActionBarOverlayLayout
    xmlns:android="http://schemas.android.com/apk/res/android"
    android:id="@+id/decor_content_parent"
    android:layout_width="match_parent"
    android:layout_height="match_parent"
    android:splitMotionEvents="false"
    android:theme="?attr/actionBarTheme">
    <FrameLayout android:id="@android:id/content"
                 android:layout_width="match_parent"
                 android:layout_height="match_parent" />
    <com.android.internal.widget.ActionBarContainer
        android:id="@+id/action_bar_container"
        android:layout_width="match_parent"
        android:layout_height="wrap_content"
        android:layout_alignParentTop="true"
        style="?attr/actionBarStyle"
        android:transitionName="android:action_bar"
        android:touchscreenBlocksFocus="true"
        android:gravity="top">
        <com.android.internal.widget.ActionBarView
            android:id="@+id/action_bar"
            android:layout_width="match_parent"
            android:layout_height="wrap_content"
            style="?attr/actionBarStyle" />
        <com.android.internal.widget.ActionBarContextView
            android:id="@+id/action_context_bar"
            android:layout_width="match_parent"
            android:layout_height="wrap_content"
            android:visibility="gone"
            style="?attr/actionModeStyle" />
    </com.android.internal.widget.ActionBarContainer>
    <com.android.internal.widget.ActionBarContainer android:id="@+id/split_action_bar"
                  android:layout_width="match_parent"
                  android:layout_height="wrap_content"
                  style="?attr/actionBarSplitStyle"
                  android:visibility="gone"
                  android:touchscreenBlocksFocus="true"
                  android:gravity="center"/>
</com.android.internal.widget.ActionBarOverlayLayout>
我們可以看到com.android.internal.R.layout.screen_action_bar中有一個android:id="@android:id/content"的FrameLayout,該FrameLayout就是mContentParent。
當generateLayout()執行完畢後,installDecor()方法也就執行完了。
這樣PhoneWindow#setContentView(layoutResID)中會執行下面的程式碼:
mLayoutInflater.inflate(layoutResID, mContentParent);此處的layoutResID是我們Activity的資原始檔,比如R.layout.activity_main,此處將該檔案inflate成具體的View,並將其放入到mContentParent中。
之後還會通過程式碼cb.onContentChanged()觸發內容變化回撥的執行。
這樣Activity#setContentView()也就執行完了,假設我們的R.layout.activity_main中只有一個RelativeLayout,那麼通過hierarchyviewer檢視到的View樹如下所示:
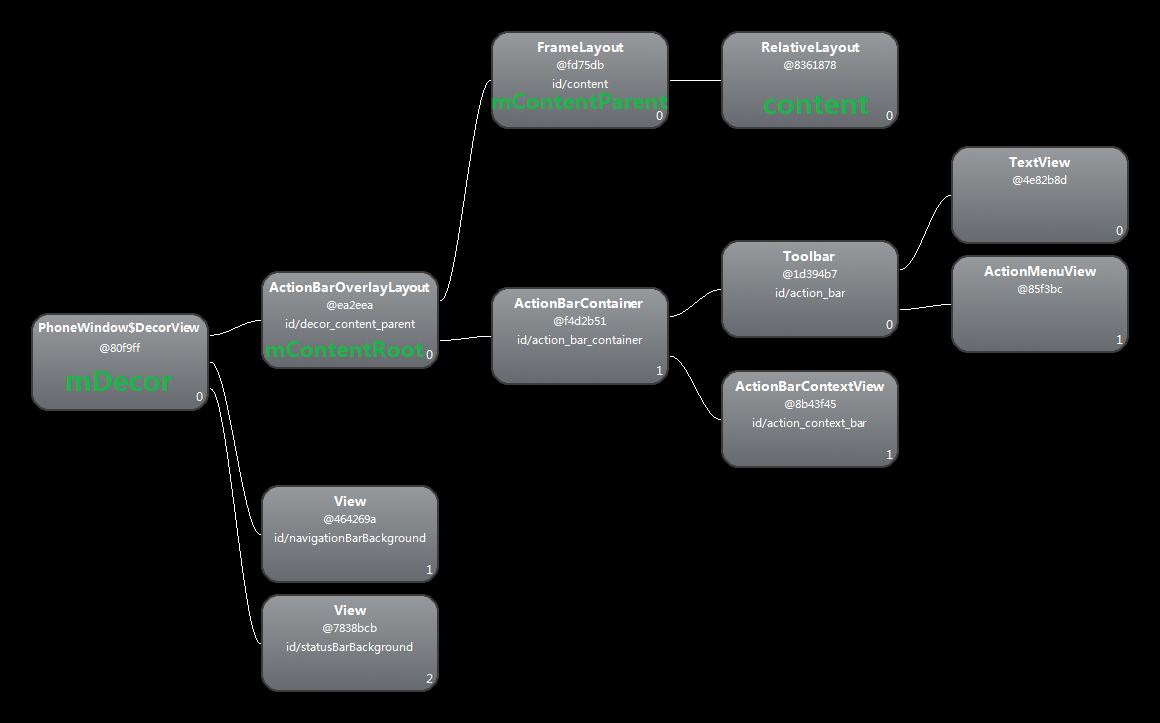
View樹的根結點是PhoneWindow$DecorView型別的,此處的$表示DecorView是PhoneWindow的一個內部類,該DecorView也就是PhoneWindow中的欄位mDecor。screen_action_bar定義的ActionBarOverlayLayout就是PhoneWindow的mContentRoot,其是mDecor的子節點。screen_action_bar中內部id為content的FrameLayout就是PhoneWindow中的mContentParent,其是我們Activity的layout的父節點。
我們回過頭來再思考一下DecorView這個類,英文decor的意思其實就是裝飾,也就是說這是一個起到裝飾的類,除了裝飾,DecorView還要作為我們自己layout的容器。那到底裝飾了什麼東西呢?我個人認為,上圖中除了綠色文字標識的其他的View都可以看做裝飾,因為這些View是根據features特性的不同而建立的,如果需要有Action Bar的特性,那麼就裝飾上一個View作為Action Bar的容器;如果不需要Action Bar,但需要顯示title,那麼就裝飾上一個View作為title的容器,等等。
最後我們再用一張圖理順Activity、PhoneWindow與View樹之間的關係。
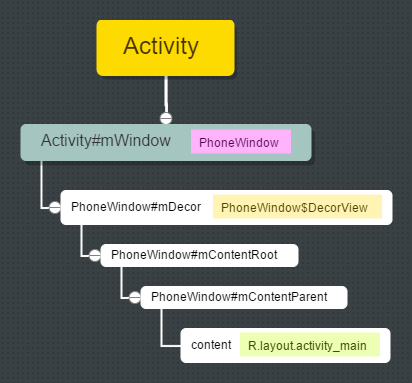
希望本文對大家理解setContentView()方法有所幫助!
相關閱讀:
[GitHub開源]Android自定義View實現微信打飛機遊戲
Android中View的量算、佈局及繪圖機制
相關文章
- Android Handler 原始碼解析Android原始碼
- Android Retrofit原始碼解析Android原始碼
- Android——LruCache原始碼解析Android原始碼
- android LruCache原始碼解析Android原始碼
- Android EventBus原始碼解析Android原始碼
- android原始碼解析--switchAndroid原始碼
- Android原始碼解析--LooperAndroid原始碼OOP
- Android 開源專案原始碼解析 -->PhotoView 原始碼解析(七)Android原始碼View
- Android 原始碼分析之 EventBus 的原始碼解析Android原始碼
- Android原始碼解析-LiveDataAndroid原始碼LiveData
- [Android] Retrofit原始碼:流程解析Android原始碼
- Android 8.1 Handler 原始碼解析Android原始碼
- Android LayoutInflater 原始碼解析Android原始碼
- WebRTC-Android原始碼解析WebAndroid原始碼
- android原始碼解析--DialogAndroid原始碼
- android原始碼解析--MessageQueueAndroid原始碼
- android原始碼解析--MessageAndroid原始碼
- Android fragment原始碼全解析AndroidFragment原始碼
- android原始碼解析--ListView(上)Android原始碼View
- Android 開源專案原始碼解析 -->Volley 原始碼解析(十五)Android原始碼
- Android 開源專案原始碼解析 -->Dagger 原始碼解析(十三)Android原始碼
- Android 開源專案原始碼解析 -->CircularFloatingActionMenu 原始碼解析(八)Android原始碼
- Glide原始碼解析二---into方法IDE原始碼
- Android LayoutInflater Factory 原始碼解析Android原始碼
- Android setContentView原始碼解析AndroidView原始碼
- Android Volley框架原始碼解析Android框架原始碼
- 集合的toString()方法原始碼解析原始碼
- Android系統原始碼目錄解析Android原始碼
- Android 網路框架 Retrofit 原始碼解析Android框架原始碼
- Android AccessibilityService機制原始碼解析Android原始碼
- weex原始碼解析(四)- android引入sdk原始碼Android
- Android原始碼解析(二)動畫篇-- ObjectAnimatorAndroid原始碼動畫Object
- Android開源庫——EventBus原始碼解析Android原始碼
- Android 原始碼解析 之 setContentViewAndroid原始碼View
- React Native 0.55.4 Android 原始碼分析(Java層原始碼解析)React NativeAndroid原始碼Java
- Android 開源專案原始碼解析 -->Android Universal Image Loader 原始碼分析(十四)Android原始碼
- JDK1.8_HashMap原始碼__tableSizeFor方法解析JDKHashMap原始碼
- Binder的使用方法和原始碼解析原始碼