MVC 3 基本操作增加修改
在MVC中實現基本的增刪改和傳統的asp .net 程式有很大的不同,剛開始使用MVC還是有些不太適應,但是它的頁面簡潔也相當的不同,同時對伺服器的訪問效能上也有很大的提高。基於此,下面對我學習過程記錄如下:
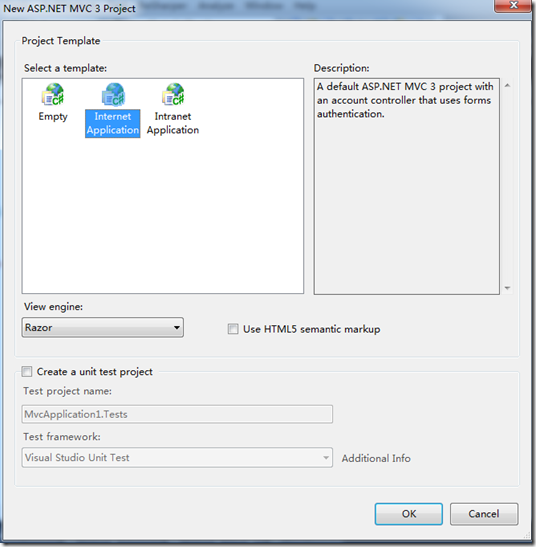
首先,使用VS建立一個以Internet為模板的專案,如下所示:
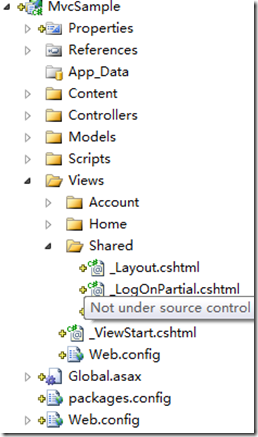
在“_Layout.cshtml”檔案中引入相關指令碼檔案,此檔案的路徑如下:
修改成如下內容:
1: <head>
2: <title>@ViewBag.Title</title>
3: <link href="@Url.Content("~/Content/themes/base/jquery.ui.all.css")" rel="Stylesheet" type="text/css" />
4: <link href="@Url.Content("~/Content/Site.css")" rel="stylesheet" type="text/css" />
5: <script src="@Url.Content("~/Scripts/jquery-1.5.1.min.js")" type="text/javascript"></script>1:2: <script src="@Url.Content("~/Scripts/jquery-ui-1.8.11.min.js")" type="text/javascript">1: </script>1: </script>2: <script src="@Url.Content("~/Scripts/jquery.validate.min.js")" type="text/javascript">1: </script></script>
6: </head>
在Models資料夾下,新建類檔案“Note.cs”,內容如下:
1: public class Note
2: {
3: public int Id { get; set; }
4: public string Title { get; set; }
5: public string Body { get; set; }
6: }
再建立類檔案“NoteManager.cs”,內容如下:
1: public class NoteManager
2: {
3: public Collection<Note> Notes
4: {
5: get
6: {
7: if (HttpRuntime.Cache["Notes"] == null)
8: loadInitialData(); return (Collection<Note>)HttpRuntime.Cache["Notes"];
9: }
10: }
11: private void loadInitialData()
12: {
13: var notes = new Collection<Note>
14: {
15: new Note
16: {
17: Id = 1,
18: Title = "Set DVR for Sunday",
19: Body = "Don't forget to record Game of Thrones!"
20: },
21: new Note
22: {Id = 2, Title = "Read MVC article", Body = "Check out the new iwantmymvc.com post"},
23: new Note
24: {
25: Id = 3,
26: Title = "Pick up kid",
27: Body = "Daughter out of school at 1:30pm on Thursday. Don't forget!"
28: },
29: new Note {Id = 4, Title = "Paint", Body = "Finish the 2nd coat in the bathroom"}
30: };
31: HttpRuntime.Cache["Notes"] = notes;
32: } public Collection<Note> GetAll() { return Notes; }
33: public Note GetById(int id)
34: {
35: return Notes.Where(i => i.Id == id).FirstOrDefault();
36: }
37: public int Save(Note item)
38: {
39: if (item.Id <= 0)
40: return SaveAsNew(item);
41: var existingNote = Notes.Where(i => i.Id == item.Id).FirstOrDefault();
42: if(existingNote == null)
43: {
44: return -1;
45: }
46:
47: existingNote.Title = item.Title;
48: existingNote.Body = item.Body;
49: return existingNote.Id;
50: }
51: private int SaveAsNew(Note item)
52: {
53: item.Id = Notes.Count + 1; Notes.Add(item); return item.Id;
54: }
55: }
修改“HomeController”為如下內容:
1: public class HomeController : Controller
2: {
3: public ActionResult Index()
4: {
5: return View();
6: }
7: [OutputCache(Duration = 0)]
8: public ActionResult List()
9: {
10: var manager = new NoteManager();
11: var model = manager.GetAll();
12: return PartialView(model);
13: }
14: [OutputCache(Duration = 0)]
15: public ActionResult Create()
16: {
17: var model = new Note();
18: return PartialView("NoteForm", model);
19: }
20:
21: [OutputCache(Duration = 0)]
22: public ActionResult Edit(int id)
23: {
24: var manager = new NoteManager();
25: var model = manager.GetById(id);
26: return PartialView("NoteForm", model);
27: }
28: [HttpPost]
29: public JsonResult Save(Note note)
30: {
31: var manager = new NoteManager();
32: var noteId = manager.Save(note);
33: return Json(new { Success = noteId > 0 });
34: }
35: }
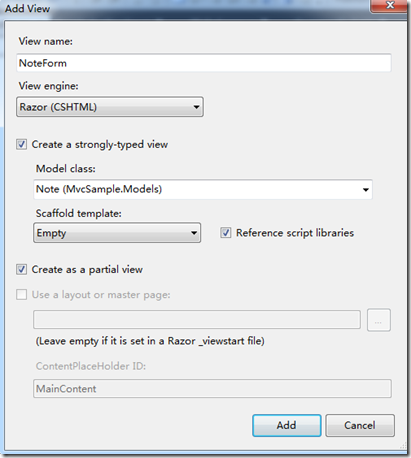
對專案編譯一下,再新建一個“NoteForm”View,如下圖所示:
注意:上圖中選擇部分檢視和使用強型別的View
修改後的內容如下所示:
1: @model MvcSample.Models.Note
2: <script src="@Url.Content("~/Scripts/jquery.validate.min.js")" type="text/javascript"></script>1:2: <script src="@Url.Content("~/Scripts/jquery.validate.unobtrusive.min.js")" type="text/javascript">1: </script>2:3: @using (Html.BeginForm("Save", "Home", FormMethod.Post, new { id = "NoteForm" }))4: {5:6:7: <div>8: @Html.ValidationSummary(true, "輸入的內容有錯,請糾正所有錯誤,再提交.")9: @Html.HiddenFor(m => m.Id)10: <div class="editor-label">11: @Html.LabelFor(m => m.Title, "標題")12: </div>13: <div class="editor-field">14: @Html.TextBoxFor(m => m.Title, new { data_val = "true", data_val_required = "標題不能為空。" })15: @Html.ValidationMessageFor(m => m.Title)16: </div>17:18: <div class="editor-label">19: @Html.LabelFor(m => m.Body, "內容")20: </div>21: <div class="editor-field">22: @Html.TextBoxFor(m => m.Body, new { data_val = "true", data_val_required = "內容不能為空。" })23: @Html.ValidationMessageFor(m => m.Body)24: </div>25:26: </div>27: }28:29: <script type="text/javascript" language="javascript">30: $("#NoteForm").submit(function () {31: $("#NoteForm").validate();32: return false;33: });</script>
再新建“List.cshtml”檢視,也是部分檢視,如下圖所示:
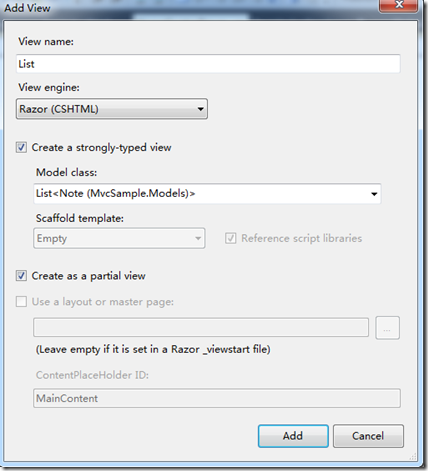
修改後的內容如下:
1: @model IEnumerable<MvcSample.Models.Note>
2: <ul class="NotesList">
3: @foreach (var note in Model)
4: {
5: <li> @note.Title <br /> @note.Body <br />
6: <span class="EditLink" noteid="@note.Id">Edit</span>
7: </li>
8: }
9: </ul>
在“Scripts”目錄下新建指令碼檔案“Common.js”,並加入如下內容:
1: function DialogObject(dialogId, formId, addUrl, editUrl, saveUrl, ajaxPostFunction, loadSuccessCallBack) {
2: dialogId = "#" + dialogId;
3: formId = "#" + formId;
4: Success = 0;
5: AlertError = 2;
6: this.saveUrl = saveUrl;
7: this.addUrl = addUrl;
8: this.editUrl = editUrl;
9: this.ajaxPostFunction = ajaxPostFunction;
10: this.width = 440;
11: this.height = 330;
12:
13:
14: this.dialogLoad = function () {
15: $(dialogId).dialog({
16: autoOpen: false, //對話方塊的是否自動開啟
17: width: this.width, //寬高
18: height: this.height,
19: modal: true, //模態對話方塊
20: buttons: {//自定義對話方塊的按鈕資訊
21: "儲存": this._saveFunction,
22: "返回": this._closedialog()
23: }
24: });
25: };
26:
27: this.loadEdit = function (id) {
28:
29: $(dialogId).html("")
30: .dialog("option", "title", "編輯")
31: .load(editUrl + "/" + id, this._openDialog());
32:
33: };
34: this.loadAdd = function () {
35: $(dialogId).html("")
36: .dialog("option", "title", "新增")
37: .load(addUrl, this._openDialog());
38: };
39: this._openDialog = function () {
40: return new Function("$('" + dialogId + "').dialog('open');");
41: };
42:
43: this._closedialog = function () {
44: return new Function("$('" + dialogId + "').dialog('close');");
45: };
46:
47: this.postFunction = function (formData, successCallback) {
48: $.post(saveUrl,
49: formData,
50: function (data, textStatus) {
51: switch (textStatus) {
52: case
53: "timeout":
54: break;
55: case "error":
56: break;
57: case "notmodified":
58: break;
59: case "success":
60: successCallback($(dialogId), $(formId), data);
61: break;
62: case "parsererror":
63: break;
64: default:
65: break;
66: }
67:
68: });
69:
70: };
71: defaultAjaxPostFunction = this.postFunction;
72:
73: this._saveFunction = function () {
74: var b = $(formId);
75: b.submit();
76: if (b.validate().numberOfInvalids() > 0) {
77: return;
78: }
79: if (ajaxPostFunction != null)
80: ajaxPostFunction();
81: else
82: defaultAjaxPostFunction($(formId).serialize(), function (dlgObject, formObject, data) {
83: if (data.Success == true) {
84: dlgObject.dialog("close");
85: if (loadSuccessCallBack != null) {
86: loadSuccessCallBack();
87: }
88: }
89: // else if (data.Success == AlertError) {
90: // alert(data.data);
91: // }
92: // else {
93: // formObject.html(data.data);
94: // }
95: });
96: };
97:
98:
99: }
修改預設的Index.cshtml檔案內容如下所示:
1: @{
2: ViewBag.Title = "Home Page";
3: }
4: <h2>
5: Notes</h2>
6: <div id="NoteListBlock">
7: </div>
8: <span class="AddLink">Add New Note</span>
9: <div id="NoteDialog" title="" class="Hidden">
10: </div>
11: <script src="@Url.Content("~/Scripts/Common.js?verion=1")" type="text/javascript"></script>1:2: <script type="text/javascript">3: var noteDialog = new DialogObject("NoteDialog", "NoteForm", "/Home/Create", "/Home/Edit", "/Home/Save", null, LoadList);4: $(function() {5: noteDialog.dialogLoad();6: $(".EditLink").live("click", function () {7: var id = $(this).attr("noteid");8: noteDialog.loadEdit(id);9: });10: $(".AddLink").click(function () {11: noteDialog.loadAdd();12: });13:14: LoadList();15: });16:17: function LoadList() {18: LoadMvcPage("/Home/List");19: }20:21: function AddRecord() {22: noteDialog.loadAdd();23: return false;24: }25:26: function LoadMvcPage(url) {27: $("#NoteListBlock").load(url);28: }</script>
在Contents/site.css下加入如下內容:
1: .EditLink
2: {
3: color: Blue;
4: cursor: pointer;
5: }
6: .EditLink:hover
7: {
8: text-decoration: underline;
9: }
10: .AddLink
11: {
12: color: Blue;
13: cursor: pointer;
14: }
15: .AddLink:hover
16: {
17: text-decoration: underline;
18: }
19: #NoteForm label
20: {
21: display: block;
22: margin-bottom: 6px;
23: }
24: #NoteForm label > span
25: {
26: font-weight: bold;
27: }
28: #NoteForm input[type=text]
29: {
30: width: 350px;
31: }
32: #NoteForm textarea
33: {
34: width: 350px;
35: height: 80px;
36: }
37:
38: .Hidden
39: {
40: display: none;
41: }
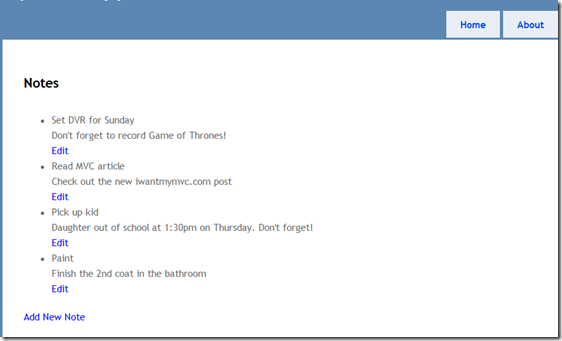
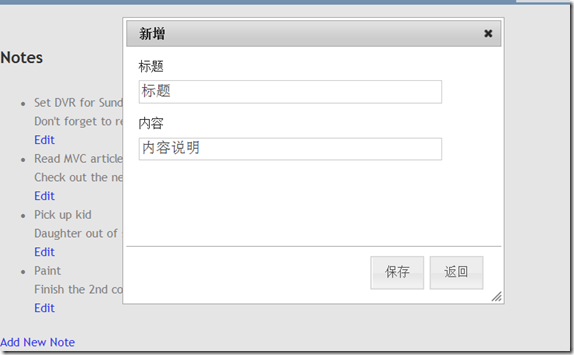
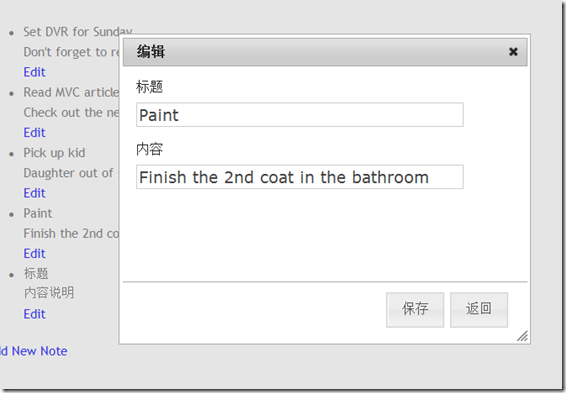
現在來執行程式,效果如下:
新增:
編輯:
相關文章
- redis-3.基本操作Redis
- 【 Nodejs 】- 3 node基本操作NodeJS
- MySQL系列:檢視基本操作(3)MySql
- 樹狀陣列3種基本操作陣列
- 亞馬遜雲 | AWS S3 | 基本操作亞馬遜S3
- Laravel MVC的基本流程LaravelMVC
- python3之os的基本操作Python
- Git學習3 --- Git命令列基本操作Git命令列
- C#運算元據庫進行簡單的增加修改操作C#
- 重建程式設計師能力(3)-asp.net MVC框架增加Controller程式設計師ASP.NETMVC框架Controller
- 【基本操作】快速恢復區存在時修改歸檔路徑
- Spring MVC 基本配製SpringMVC
- Oracle 增加 修改 刪除 列Oracle
- Python3資料庫操作基本類Python資料庫
- laravel admin 列展開 自定義行操作 增加編輯修改按鈕Laravel
- oracle修改表增加列刪除列修改列Oracle
- Oracle表 列欄位的增加、刪除、修改以及重新命名操作sqlOracleSQL
- Oracle 增加修改刪除欄位Oracle
- webpack 基本操作Web
- Git基本操作Git
- Laravel 基本操作Laravel
- 基本操作題
- dos 基本操作
- MongoDB基本操作MongoDB
- Redis基本操作Redis
- mongo基本操作Go
- HBase 基本操作
- candance 基本操作
- Hash基本操作
- svn基本操作
- oracle基本操作Oracle
- ElasticSearch基本操作Elasticsearch
- FFMPEG基本操作
- Kafka基本操作Kafka
- SQL基本操作SQL
- Docker 基本操作Docker
- JXL基本操作
- Hive基本操作Hive
