centos7的防火牆
官方文件介紹地址:
一、firewall介紹
CentOS 7中防火牆是一個非常的強大的功能,在CentOS 6.5中在iptables防火牆中進行了升級了。
1、官方介紹
The dynamic firewall daemon firewalld provides a dynamically managed firewall with support for network “zones” to assign a level of trust to a network and its associated connections and interfaces. It has support for IPv4 and IPv6 firewall settings. It supports Ethernet bridges and has a separation of runtime and permanent configuration options. It also has an interface for services or applications to add firewall rules directly.
2、什麼是區域Zone:
網路區域定義了網路連線的可信等級。這是一個 一對多的關係,這意味著一次連線可以僅僅是一個區域的一部分,而一個區域可以用於很多連線。
3、哪個區域可用?
由firewalld 提供的區域按照從不信任到信任的順序排序。
4、區域的分類?
Firewalls can be used to separate networks into different zones based on the level of trust the user has decided to place on the devices and traffic within that network. NetworkManager informs firewalld to which zone an interface belongs. An interface’s assigned zone can be changed by NetworkManager or via the firewall-config tool which can open the relevant NetworkManager window for you.
The zone settings in /etc/firewalld/ are a range of preset settings which can be quickly applied to a network interface. They are listed here with a brief explanation:
drop
Any incoming network packets are dropped, there is no reply. Only outgoing network connections are possible.
block
Any incoming network connections are rejected with an icmp-host-prohibited message for IPv4 and icmp6-adm-prohibited for IPv6. Only network connections initiated from within the system are possible.
public
For use in public areas. You do not trust the other computers on the network to not harm your computer. Only selected incoming connections are accepted.
external
For use on external networks with masquerading enabled especially for routers. You do not trust the other computers on the network to not harm your computer. Only selected incoming connections are accepted.
dmz
For computers in your demilitarized zone that are publicly-accessible with limited access to your internal network. Only selected incoming connections are accepted.
work
For use in work areas. You mostly trust the other computers on networks to not harm your computer. Only selected incoming connections are accepted.
home
For use in home areas. You mostly trust the other computers on networks to not harm your computer. Only selected incoming connections are accepted.
internal
For use on internal networks. You mostly trust the other computers on the networks to not harm your computer. Only selected incoming connections are accepted.
trusted
All network connections are accepted.
It is possible to designate one of these zones to be the default zone. When interface connections are added to NetworkManager, they are assigned to the default zone. On installation, the default zone in firewalld is set to be the public zone.
注:具體內容,請參見官方文件介紹!
二、firewall配置
The configuration for firewalld is stored in various XML files in /usr/lib/firewalld/ and /etc/firewalld/.
This allows a great deal of flexibility as the files can be edited, written to, backed up, used as templates for other installations and so on.
注意:以下firewalld 的操作只有重啟之後才有效:service firewalld restart 重啟
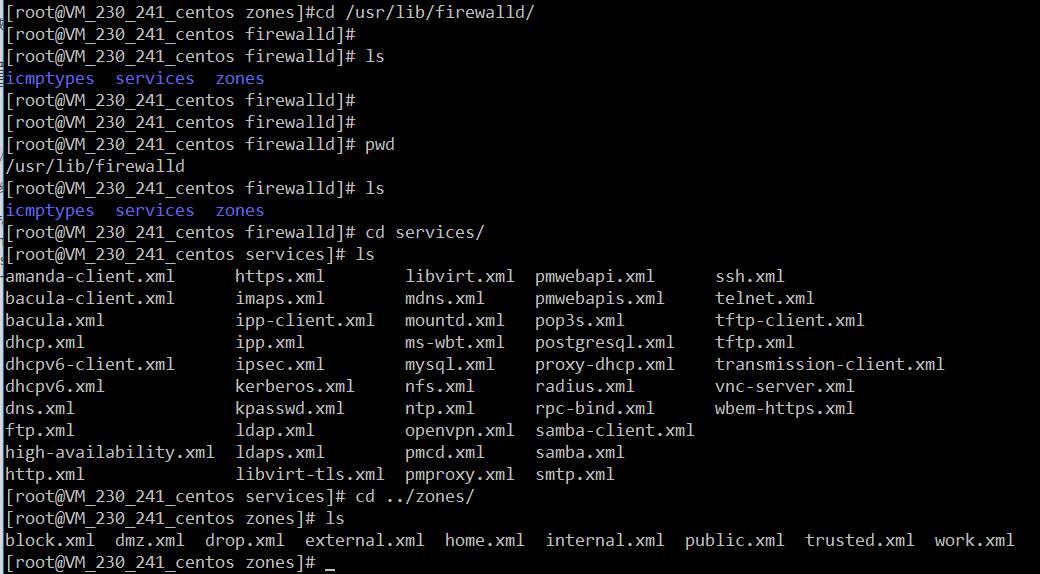
1、系統配置目錄
/usr/lib/firewalld/services- 1
- 1
目錄中存放定義好的網路服務和埠引數,系統引數,不能修改。
2、使用者配置目錄
/etc/firewalld/- 1
- 1
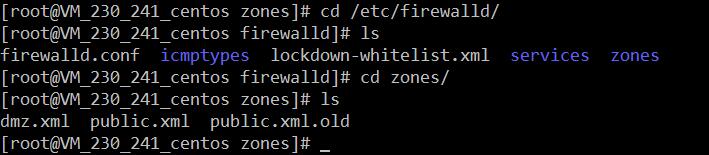
3、如何自定義新增埠
使用者可以通過修改配置檔案的方式新增埠,也可以通過命令的方式新增埠,注意,修改的內容會在/etc/firewalld/ 目錄下的配置檔案中還體現。
- 3.1、命令的方式新增埠
firwall-cmd --permanent --add-port=9527/tcp - 1
- 1
引數介紹:
1、firwall-cmd:是Linux提供的操作firewall的一個工具;
2、--permanent:表示設定為持久;
3、--add-port:標識新增的埠;- 1
- 2
- 3
- 1
- 2
- 3
另外,firewall中有Zone的概念,可以將具體的埠制定到具體的zone配置檔案中。
例如:新增8010埠
firewall-cmd --zone=public --permanent --add-port=8010/tcp- 1
- 1
--zone=public:指定的zone為public;- 1
- 1
新增結果如下:

如果–zone=dmz 這樣設定的話,會在dmz.xml檔案中新增一條。
- 3.2、修改配置檔案的方式新增埠
<?xml version="1.0" encoding="utf-8"?>
<zone>
  <short>Public</short>
  <description>For use in public areas.</description>
  <rule family="ipv4">
    <source address="122.10.70.234"/>
    <port protocol="udp" port="514"/>
    <accept/>
  </rule>
  <rule family="ipv4">
    <source address="123.60.255.14"/>
    <port protocol="tcp" port="10050-10051"/>
    <accept/>
  </rule>
 <rule family="ipv4">
    <source address="192.249.87.114"/> 放通指定ip,指定埠、協議
    <port protocol="tcp" port="80"/>
    <accept/>
  </rule>
<rule family="ipv4"> 放通任意ip訪問伺服器的9527埠
    <port protocol="tcp" port="9527"/>
    <accept/>
  </rule>
</zone>- 1
- 2
- 3
- 4
- 5
- 6
- 7
- 8
- 9
- 10
- 11
- 12
- 13
- 14
- 15
- 16
- 17
- 18
- 19
- 20
- 21
- 22
- 23
- 24
- 1
- 2
- 3
- 4
- 5
- 6
- 7
- 8
- 9
- 10
- 11
- 12
- 13
- 14
- 15
- 16
- 17
- 18
- 19
- 20
- 21
- 22
- 23
- 24
上述的一個配置檔案可以很好的看出:
1、新增需要的規則,開放通源ip為122.10.70.234,埠514,協議tcp;
2、開放通源ip為123.60.255.14,埠10050-10051,協議tcp;/3、開放通源ip為任意,埠9527,協議tcp;- 1
- 2
- 1
- 2
三、firewall常用命令
1、重啟、關閉、開啟firewalld.service服務
service firewalld restart 重啟
service firewalld start 開啟
service firewalld stop 關閉- 1
- 2
- 3
- 1
- 2
- 3
2、檢視firewall服務狀態
systemctl status firewall - 1
- 1
3、檢視firewall的狀態
firewall-cmd --state- 1
- 1

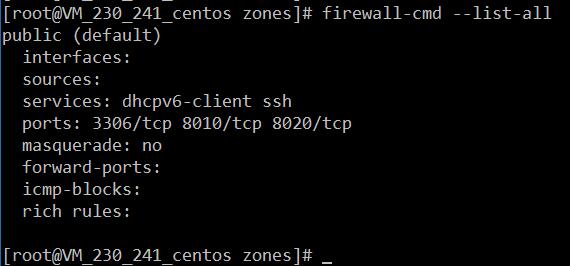
4、檢視防火牆規則
firewall-cmd --list-all - 1
- 1
四、CentOS切換為iptables防火牆
切換到iptables首先應該關掉預設的firewalld,然後安裝iptables服務。
1、關閉firewall:
service firewalld stop
systemctl disable firewalld.service #禁止firewall開機啟動- 1
- 2
- 1
- 2
2、安裝iptables防火牆
yum install iptables-services #安裝- 1
- 1
3、編輯iptables防火牆配置
vi /etc/sysconfig/iptables #編輯防火牆配置檔案- 1
- 1
下邊是一個完整的配置檔案:
Firewall configuration written by system-config-firewall

Manual customization of this file is not recommended.

*filter

:INPUT ACCEPT [0:0]

:FORWARD ACCEPT [0:0]

:OUTPUT ACCEPT [0:0]

-A INPUT -m state --state ESTABLISHED,RELATED -j ACCEPT

-A INPUT -p icmp -j ACCEPT

-A INPUT -i lo -j ACCEPT

-A INPUT -m state --state NEW -m tcp -p tcp --dport 22 -j ACCEPT

-A INPUT -m state --state NEW -m tcp -p tcp --dport 80 -j ACCEPT

-A INPUT -m state --state NEW -m tcp -p tcp --dport 3306 -j ACCEPT

-A INPUT -j REJECT --reject-with icmp-host-prohibited

-A FORWARD -j REJECT --reject-with icmp-host-prohibited

COMMIT- 1
- 2
- 3
- 4
- 5
- 6
- 7
- 8
- 9
- 10
- 11
- 12
- 13
- 14
- 15
- 16
- 17
- 18
- 19
- 20
- 21
- 22
- 23
- 24
- 25
- 26
- 27
- 28
- 29
- 1
- 2
- 3
- 4
- 5
- 6
- 7
- 8
- 9
- 10
- 11
- 12
- 13
- 14
- 15
- 16
- 17
- 18
- 19
- 20
- 21
- 22
- 23
- 24
- 25
- 26
- 27
- 28
- 29
:wq! #儲存退出
service iptables start #開啟
systemctl enable iptables.service #設定防火牆開機啟動- 1
- 2
- 1
- 2
相關文章
- centos7關閉防火牆命令 centos7永久防火牆關閉CentOS防火牆
- CentOS7 防火牆命令CentOS防火牆
- centos7 firewall 防火牆 命令CentOS防火牆
- CentOS7關閉防火牆CentOS防火牆
- Centos7 關閉防火牆CentOS防火牆
- CentOS7關閉防火牆方法CentOS防火牆
- centos7預設防火牆firewalldCentOS防火牆
- Centos7 防火牆(firewall)開埠CentOS防火牆
- Centos7設定關閉防火牆CentOS防火牆
- Centos7 防火牆firewall新增例外埠CentOS防火牆
- CentOS7檢視和關閉防火牆CentOS防火牆
- Centos7 開啟80埠防火牆命令CentOS防火牆
- CentOS之——CentOS7安裝iptables防火牆CentOS防火牆
- centos7怎麼永久關閉防火牆CentOS防火牆
- CentOS7下Firewall防火牆配置用法詳解CentOS防火牆
- 使用centos7的wall防火牆可能存在失效問題CentOS防火牆
- WAb防火牆與傳統防火牆防火牆
- 全面分析防火牆及防火牆的滲透(轉)防火牆
- 防火牆防火牆
- CentOS7使用firewalld開啟關閉防火牆與埠CentOS防火牆
- linux之openEuler /centos7防火牆基本使用指南LinuxCentOS防火牆
- Centos7預設防火牆之firewalld講解及配置CentOS防火牆
- centos7怎麼檢視、開啟和關閉防火牆CentOS防火牆
- 伺服器安全設定Centos7 防火牆firewall與iptables伺服器CentOS防火牆
- 防火牆的分類防火牆
- 防火牆(firewall)防火牆
- SQL防火牆SQL防火牆
- 防火牆IPTABLES防火牆
- RouterOS防火牆ROS防火牆
- iptables防火牆防火牆
- 防火牆配置防火牆
- 防火牆入侵於檢測——————3、思科 PIX 防火牆和 ASA 防火牆產品線防火牆
- AutoRun病毒防火牆如何使用 AutoRun病毒防火牆教程防火牆
- 軟體防火牆與硬體防火牆詳解防火牆
- 阿里雲ECS伺服器CentOS7防火牆firewalld設定阿里伺服器CentOS防火牆
- 什麼是防火牆?防火牆能發揮什麼樣的作用?防火牆
- Ceph 和防火牆的故事防火牆
- 關閉centos的防火牆CentOS防火牆