React Native 生命週期
前言:
在物件導向程式設計中,任何物件的存在都會存在生命週期。類似我們iOS 的View,就會有LoadView,ViewWillAppear,ViewDidLoad等等生命週期。RN也不例外,這篇主要學習RN的生命週期,在開發中如果掌握了並熟練的運用生命週期函式的話,往往開發能事半功倍。
React Native生命週期簡介
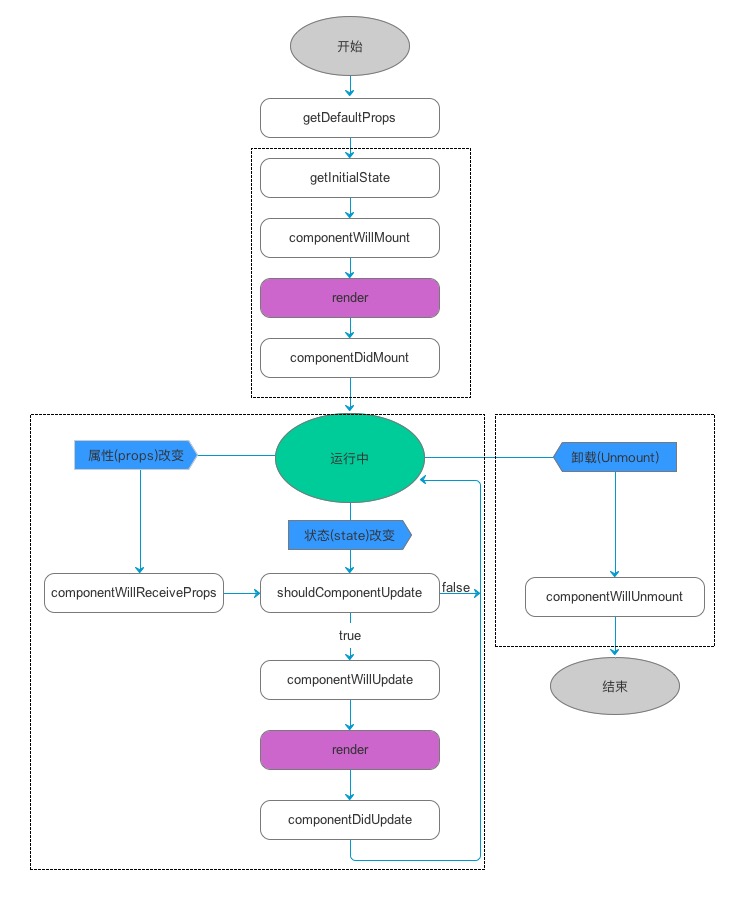
如圖,可以把元件生命週期大致分為三個階段:
- 第一階段:是元件第一次繪製階段,如圖中的上面虛線框內,在這裡完成了元件的載入和初始化;
- 第二階段:是元件在執行和互動階段,如圖中左下角虛線框,這個階段元件可以處理使用者互動,或者接收事件更新介面;
- 第三階段:是元件解除安裝消亡的階段,如圖中右下角的虛線框中,這裡做一些元件的清理工作。
生命週期回撥函式(ES5寫法)
下面來詳細介紹生命週期中的各回撥函式,先說下和上圖對應的ES5寫法。
getDefaultProps
在元件建立之前,會先呼叫 getDefaultProps(),這是全域性呼叫一次,嚴格地來說,這不是元件的生命週期的一部分。在元件被建立並載入候,首先呼叫 getInitialState(),來初始化元件的狀態。
componentWillMount
然後,準備載入元件,會呼叫 componentWillMount(),其原型如下:
void componentWillMount()
這個函式呼叫時機是在元件建立,並初始化了狀態之後,在第一次繪製 render() 之前。可以在這裡做一些業務初始化操作,也可以設定元件狀態。這個函式在整個生命週期中只被呼叫一次。
componentDidMount
在元件第一次繪製之後,會呼叫 componentDidMount(),通知元件已經載入完成。函式原型如下:
void componentDidMount()
這個函式呼叫的時候,其虛擬 DOM 已經構建完成,你可以在這個函式開始獲取其中的元素或者子元件了。需要注意的是,RN 框架是先呼叫子元件的 componentDidMount(),然後呼叫父元件的函式。從這個函式開始,就可以和
JS 其他框架互動了,例如設定計時 setTimeout 或者 setInterval,或者發起網路請求。這個函式也是隻被呼叫一次。這個函式之後,就進入了穩定執行狀態,等待事件觸發。
componentWillReceiveProps
如果元件收到新的屬性(props),就會呼叫 componentWillReceiveProps(),其原型如下:
void componentWillReceiveProps(
  object nextProps
)
輸入引數 nextProps 是即將被設定的屬性,舊的屬性還是可以通過 this.props 來獲取。在這個回撥函式裡面,你可以根據屬性的變化,通過呼叫 this.setState() 來更新你的元件狀態,這裡呼叫更新狀態是安全的,並不會觸發額外的 render() 呼叫。如下:
componentWillReceiveProps: function(nextProps) {
  this.setState({
    likesIncreasing: nextProps.likeCount > this.props.likeCount
  });
}
shouldComponentUpdate
當元件接收到新的屬性和狀態改變的話,都會觸發呼叫 shouldComponentUpdate(...),函式原型如下:
boolean shouldComponentUpdate(
  object nextProps, object nextState
)
輸入引數 nextProps 和上面的 componentWillReceiveProps 函式一樣,nextState 表示元件即將更新的狀態值。這個函式的返回值決定是否需要更新元件,如果 true 表示需要更新,繼續走後面的更新流程。否者,則不更新,直接進入等待狀態。
預設情況下,這個函式永遠返回 true 用來保證資料變化的時候 UI 能夠同步更新。在大型專案中,你可以自己過載這個函式,通過檢查變化前後屬性和狀態,來決定
UI 是否需要更新,能有效提高應用效能。
componentWillUpdate
如果元件狀態或者屬性改變,並且上面的 shouldComponentUpdate(...) 返回為 true,就會開始準更新元件,並呼叫 componentWillUpdate(),其函式原型如下:
void componentWillUpdate(
  object nextProps, object nextState
)
輸入引數與 shouldComponentUpdate 一樣,在這個回撥中,可以做一些在更新介面之前要做的事情。需要特別注意的是,在這個函式裡面,你就不能使用 this.setState 來修改狀態。這個函式呼叫之後,就會把 nextProps 和 nextState 分別設定到 this.props和 this.state 中。緊接著這個函式,就會呼叫 render() 來更新介面了。
componentDidUpdate
呼叫了 render() 更新完成介面之後,會呼叫 componentDidUpdate() 來得到通知,其函式原型如下:
void componentDidUpdate(
  object prevProps, object prevState
)
因為到這裡已經完成了屬性和狀態的更新了,此函式的輸入引數變成了 prevProps 和 prevState。
componentWillUnmount
當元件要被從介面上移除的時候,就會呼叫 componentWillUnmount(),其函式原型如下:
void componentWillUnmount()
在這個函式中,可以做一些元件相關的清理工作,例如取消計時器、網路請求等。
生命週期回撥函式學習筆記小例(ES6)
1、設定預設屬性
class RNHybrid extends Component {
render() {
return(
<View style={styles.container}>
<Text style={{padding:10, fontSize:42}}>
{this.props.name}
</Text>
</View>
);
}
}
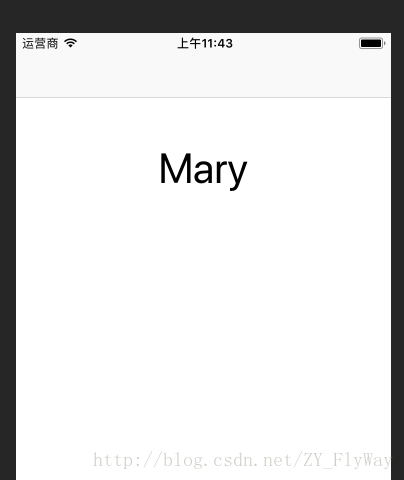
RNHybrid.defaultProps = {
name: 'Mary',
};
ES6
class Greeting extends React.Component {
  // ...
}

Greeting.defaultProps = {
  name: 'Mary'
};
ES5
var Greeting = createReactClass({
  getDefaultProps: function() {
    return {
      name: 'Mary'
    };
  },

  // ...

});2、設定狀態
ES6
class myClass extends React.Component {
  constructor(props) {
    super(props);    this.state = {text:''};
  }
  // ...
}
ES5
var myClass = createReactClass({
  getInitialState: function() {
    return {text: ''};
  },
  // ...
});
class RNHybrid extends Component {


  constructor(props) {
        super(props);
        this.state = {age:this.props.age};
    }

 handleClick() {
    alert(this.state.age);
  }

  render() {
      return(
        <View style={styles.container}>
          <Text style={{padding:10, fontSize:42}} onPress={this.handleClick}>
                {this.props.name}
          </Text>
        </View>
      );
   }
}
這樣寫你點選的時候將會報錯:
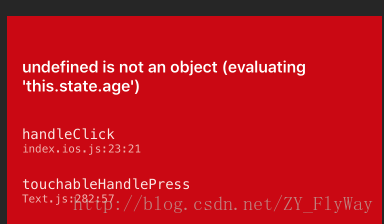
 constructor(props) {
        super(props);
        this.state = {age:this.props.age};
        this.handleClick = this.handleClick.bind(this);
    }
2.還可以在呼叫的時候繫結
 <Text style={{padding:10, fontSize:42}} onPress={this.handleClick.bind(this)}>
                {this.props.name}
 </Text>
3、其他生命週期函式驗證
import React, { Component } from 'react';
import {
   AppRegistry,
  StyleSheet,
  View,
  Text,
  TextInput,
} from 'react-native';

var  nowTime = new Date();
var  showText;

class RNHybrid extends Component {

  constructor(props) {
        super(props);
        console.log('state:'+nowTime);
        showText = 'state:'+nowTime+'\r\r';
        //設定當前狀態是text  初始值為空
        this.state = {text: ''};
  }


  componentWillMount(){
    console.log('componentWillMount:'+nowTime);
    showText = showText+'componentWillMount:'+nowTime+'\r\r';
  }

  componentDidMount(){
    console.log('componentDidMount:'+nowTime);
    showText = showText+'componentDidMount:'+nowTime+'\r\r';
    alert(showText);
  }

  shouldComponentUpdate(){
    console.log('shouldComponentUpdate:'+nowTime);
    showText = showText+'shouldComponentUpdate:'+nowTime+'\r\r';
    return true;
  }

  componentWillUpdate(){
    console.log('componentWillUpdate:'+nowTime);
    showText = showText+'componentWillUpdate:'+nowTime+'\r\r';
  }

  componentDidUpdate(){
    console.log('componentDidUpdate:'+nowTime);
    showText = showText+'componentDidUpdate:'+nowTime+'\r\r';
  }

  componentWillUnmount(){
    console.log('componentWillUnmount:'+nowTime);
    showText = showText+'componentWillUnmount:'+nowTime+'\r\r';
  }

  render() {
      return(
        <View style={styles.container}>
          <TextInput style={styles.TextInputStyles}
              onChangeText={(Text)=>{
                this.setState({text:Text});
              }}
          />
          <Text style={{marginTop:10,padding:10, fontSize:15,borderColor:'gray',borderWidth:1}}>
                {showText}
          </Text>
        </View>
      );
   }
}

RNHybrid.defaultProps = {
  name: 'Mary',
  age:'18',
};


const styles = StyleSheet.create({
   container:{
   		marginTop:100,
   		flexDirection:'row',
      flexWrap:'wrap',
      justifyContent:'space-around',
   },
   TextInputStyles:{
      width:200,
      height:60,
      borderWidth:2,
      borderColor:'red',
   },
});

AppRegistry.registerComponent('RNHybrid', () => RNHybrid);
相關文章
- react-native生命週期改造React
- React Native 元件(一)元件的生命週期React Native元件
- React生命週期React
- React 生命週期React
- react-native學習筆記之 生命週期React筆記
- React-生命週期React
- React 元件生命週期React元件
- React元件生命週期React元件
- React 渲染 和 生命週期React
- React 基礎_生命週期React
- react 生命週期變遷React
- React新的生命週期React
- React專題:生命週期React
- React生命週期總結React
- react之元件生命週期React元件
- React生命週期詳解React
- react生命週期筆記React筆記
- [React]元件的生命週期React元件
- React 生命週期淺談React
- 淺析 React 生命週期React
- React-生命週期雜記React
- React 元件生命週期詳解React元件
- React生命週期的變化React
- 重新認識 React 生命週期React
- 簡述React的生命週期React
- React原始碼分析 - 生命週期React原始碼
- 理解React-元件生命週期React元件
- React元件生命週期詳解React元件
- React筆記(元件生命週期)React筆記元件
- 理解React元件的生命週期React元件
- react的生命週期函式React函式
- 新手對React生命週期的理解React
- React生命週期學習筆記React筆記
- React生命週期以及注意事項React
- React元件和生命週期簡介React元件
- [譯]如何使用React生命週期方法React
- 10分鐘理解React生命週期React
- React生命週期簡明寶典React