Android 開源專案原始碼解析 -->CircularFloatingActionMenu 原始碼解析(八)
1. 功能介紹
一個與著名應用 Path 選單類似的圓形彈出選單,可方便的定製選單以及動畫。
選單可能是非完整圓形,本文統稱為圓形選單。
1.1 特點
可自定義動畫、選單、角度範圍、半徑等。
1.2 概念
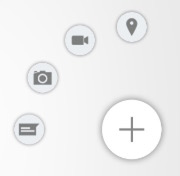
以上是簡單的圓形彈出選單示例,更詳細的示例圖見:Screenshot。
選單按鈕(Event):點選會彈出圓形選單的控制元件,如上圖的 + 對應控制元件,對應程式碼中的FloatingActionButton.java。
子選單按鈕(Event):圓形選單中的控制元件,如上圖的定位、視訊、相機、文字對應的控制元件,對應程式碼中的SubActionButton.java。
選單:整個選單,包含上面的選單按鈕和子選單按鈕,對應程式碼中的FloatingActionMenu.java。
選單動畫回撥:點選選單按鈕彈出子選單按鈕的動畫設定的抽象類,對應程式碼中的MenuAnimationHandler.java。
2. 總體設計
本專案較為簡單,總體設計省略。
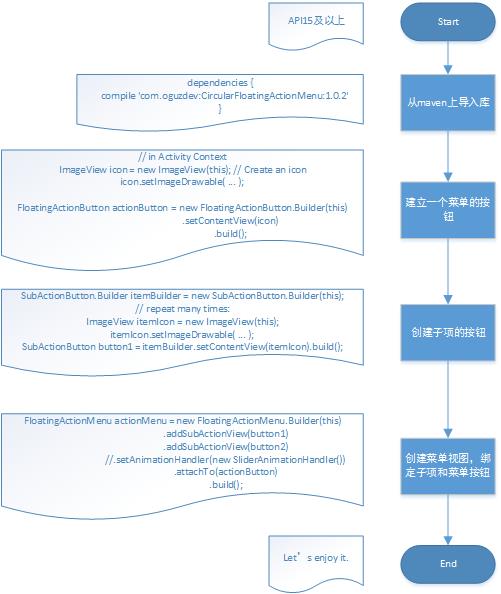
3. 流程圖
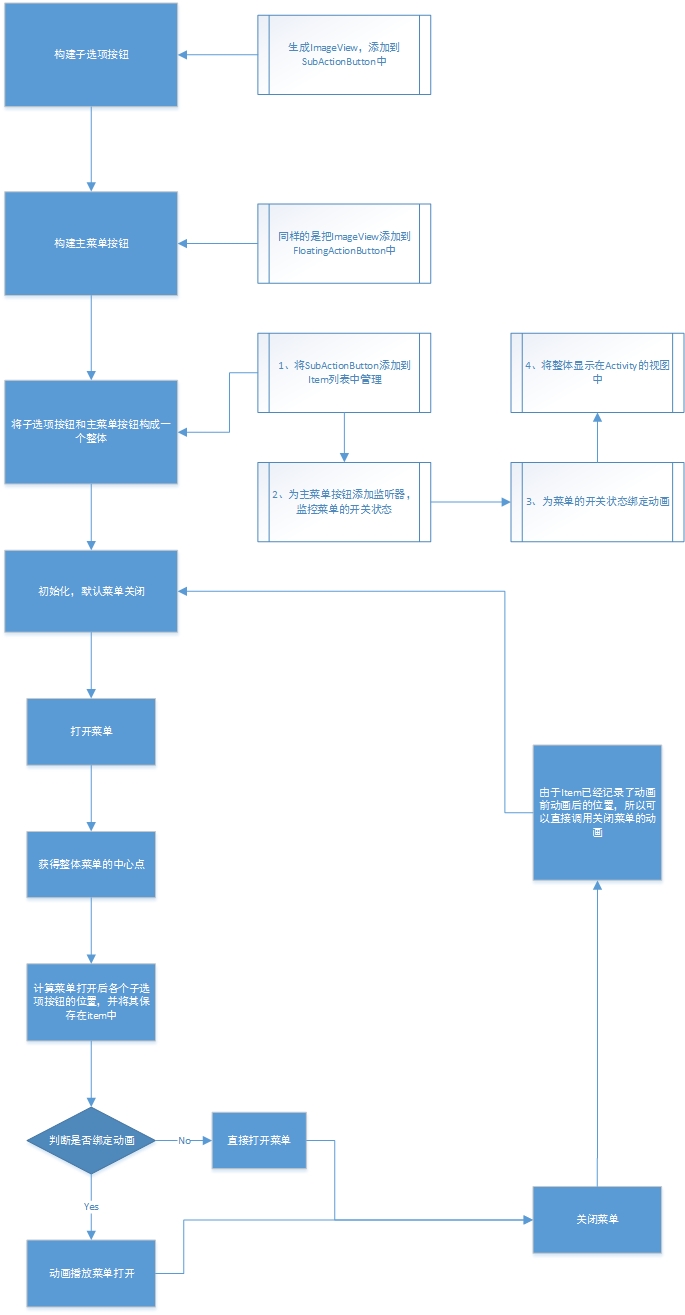
流程圖如上圖所示,中間最複雜的可能是計算子選單按鈕位置的地方。
4. 詳細設計
4.1 類關係圖
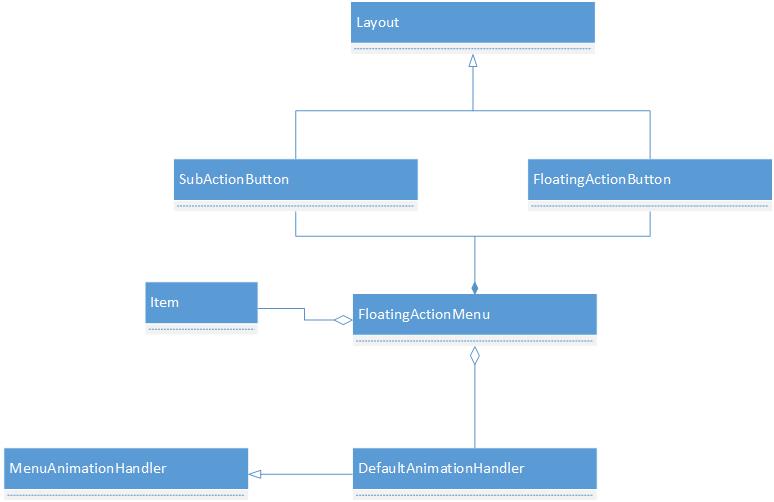
以上是CircularFloatingActionMenu主要類的關係圖。
FloatingActionButton、SubActionButton都是繼承自FrameLayout的自定義控制元件,可支援以其他
View 為內容,如ImageView、TextView。
FloatingActionMenu由FloatingActionButton、SubActionButton以及MenuAnimationHandler等構成。
4.2 類功能介紹
CircularFloatingActionMenu原始碼主要分成兩部分,一部分是構成選單的 View 部分,另一部分是動畫的操作類。
View 部分包含我們上面提到的選單按鈕FloatingActionButton.java、子選單按鈕SubActionButton.java、選單FloatingActionMenu.java。
動畫部分包含選單動畫回撥抽象類MenuAnimationHandler.java以及它預設的實現DefaultAnimationHandler.java。
4.2.1 SubActionButton.java
子選單按鈕,即按選單鍵彈出來的選項按鈕。這個類繼承自FrameLayout,實現一個自定義圖示的功能。
可以根據建構函式傳進來的引數來選擇不同風格的圖案底紋,然後將其傳給FloatingActionMenu以便控制。
首先是建構函式
public SubActionButton(Activity activity, LayoutParams layoutParams, int theme, Drawable backgroundDrawable, View contentView, LayoutParams contentParams) {
        super(activity);
        setLayoutParams(layoutParams);
        // If no custom backgroundDrawable is specified, use the background drawable of the theme.
        if(backgroundDrawable == null) {
            if(theme == THEME_LIGHT) {
                backgroundDrawable = activity.getResources().getDrawable(R.drawable.button_sub_action_selector);
            }
            else if(theme == THEME_DARK) {
                backgroundDrawable = activity.getResources().getDrawable(R.drawable.button_sub_action_dark_selector);
            }
            else if(theme == THEME_LIGHTER) {
                backgroundDrawable = activity.getResources().getDrawable(R.drawable.button_action_selector);
            }
            else if(theme == THEME_DARKER) {
                backgroundDrawable = activity.getResources().getDrawable(R.drawable.button_action_dark_selector);
            }
            else {
                throw new RuntimeException("Unknown SubActionButton theme: " + theme);
            }
        }
        else {
            //通過 mutate()方法解決 Drawable 共用一個記憶體空間的問題
            backgroundDrawable = backgroundDrawable.mutate().getConstantState().newDrawable();
        }
        //設定背景(考慮版本問題)
        setBackgroundResource(backgroundDrawable);
        if(contentView != null) {
            //新增 view(即選單的選項檢視)
            setContentView(contentView, contentParams);
        }
        setClickable(true);
    }
從建構函式可以看的出來,選項按鈕有四個主題可以選擇,分別是下面的四種顏色
    public static final int THEME_LIGHT = 0;
    public static final int THEME_DARK = 1;
    public static final int THEME_LIGHTER = 2;
    public static final int THEME_DARKER = 3;
之後是設定 ImageView 到這個按鈕上,並且設定與父 View 的距離。(通過 setMargins())
這個我們在建立 subActionButton 時就要呼叫。核心函式是 addView(contentView, params)。這個方法能夠在檢視上再新增一個 view,作為子檢視。
    /**
     * Sets a content view with custom LayoutParams that will be displayed inside this SubActionButton.
     * @param contentView
     * @param params
     */
    public void setContentView(View contentView, LayoutParams params) {
        if(params == null) {
            params = new LayoutParams(LayoutParams.WRAP_CONTENT, LayoutParams.WRAP_CONTENT, Gravity.CENTER);
            final int margin = getResources().getDimensionPixelSize(R.dimen.sub_action_button_content_margin);
            params.setMargins(margin, margin, margin, margin);
        }

        contentView.setClickable(false);
        this.addView(contentView, params);
    }
最後就是一個建造器了,專門生成用於生成該類的建造器,靜態全域性
    /**
     * A builder for {@link com.cpacm.library.SubActionButton} in conventional Java Builder format
     * 選單選項的建造器
     */
    public static class Builder {
        ...
       public SubActionButton build() {
            return new SubActionButton(activity,
                    layoutParams,
                    theme,
                    backgroundDrawable,
                    contentView,
                    contentParams);
        }
    }
傳入 activity,檢視特性配置,主題的 id,背景圖,imageview(子檢視),imageview(子檢視)的特性配置。用這些來配置選項按鈕。
4.2.2 FloatingActionButton.java
選單按鈕,點選會彈出圓形選單的控制元件。
這個類跟SubActionButton基本相似,同樣可以通過內部自定義的build構造器來定製自己的按鈕。
選單按鈕其實跟選項按鈕的程式碼模式差不多,也是由設定子檢視和一個建造器組成。
不過它多了幾個方法:
設定位置,如左下,右下等方位
    /**
     * Sets the position of the button by calculating its Gravity from the position parameter
     * @param position one of 8 specified positions.
     * @param layoutParams
     */
    public void setPosition(int position, FrameLayout.LayoutParams layoutParams) {
        int gravity;
        switch(position) {
            ...//具體程式碼請自行檢視原始碼
        }
        layoutParams.gravity = gravity;
        setLayoutParams(layoutParams);
    }
將檢視繫結到 activity 的主檢視中。這樣我們就能在 activity 的主檢視中操作這個 view 了。 FloatingActionButton 的建造器
    /**
     * A builder for {@link com.cpacm.library.FloatingActionButton} in conventional Java Builder format
     */
    public static class Builder {
    ...
        public FloatingActionButton build() {
                return new FloatingActionButton(activity,
                                               layoutParams,
                                               theme,
                                               backgroundDrawable,
                                               position,
                                               contentView,
                                               contentParams);
            }
    }
比 SubActionButton 多了一個位置的屬性。
4.2.3 FloatingActionMenu.java
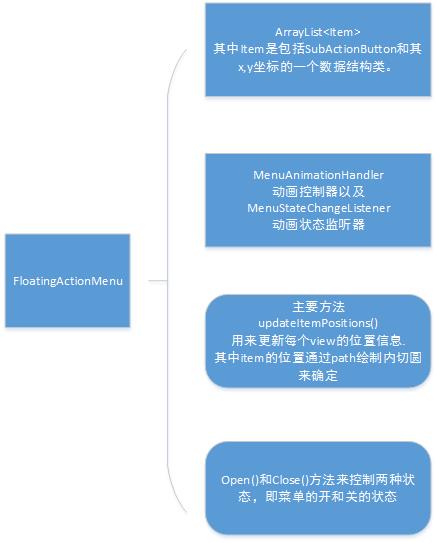
那麼最重要的類來了,FloatingActionMenu表示整個選單,它存放著所有的按鈕以及動畫操作。
基本結構圖如下:
這個類也是由一個建造器生成,那麼我們從建造器開始說起
我們先看看生成 Menu 的程式碼:
FloatingActionMenu rightLowerMenu = new FloatingActionMenu.Builder(this)
                .addSubActionView(rLSubBuilder.setContentView(rlIcon1).build())
                .addSubActionView(rLSubBuilder.setContentView(rlIcon2).build())
                .addSubActionView(rLSubBuilder.setContentView(rlIcon3).build())
                .addSubActionView(rLSubBuilder.setContentView(rlIcon4).build())
                .setAnimationHandler(new SliderAnimationHandler())
                .attachTo(rightLowerButton)
                .build();
- Builder(this) 將 activity 傳入 menu 中
- addSubActionView 新增選項按鈕到 activity 的檢視中。在 FloatingActionMenu 中管理 SubActionView 是一個 Item 的 list 集合,每次加一個按鈕就往裡面新增。Item 是一個輔助類,裡面包括一個檢視,x 座標,y 座標,長度,寬度。
- setAnimationHandler 則是設定動畫。
- attachTo 是將 menu 與 activity 的檢視繫結。(即把選單按鈕的檢視新增到 activity 的檢視中)
FloatingActionMenu 類主要是管理選單按鈕和選項按鈕的位置和狀態(開和關)
(1)首先是通過 view 的 onClick 監聽器來控制狀態
(2)開關主要是兩種狀態,開的時候會獲得選單按鈕的中心位置 center(getActionViewCenter())和計算 item 的位置(calculateItemPositions())。然後傳送動畫的請求到 AnimationHandler 中(animationHandler.animateMenuOpening(center))。
    /**
     * Simply opens the menu by doing necessary calculations.
     * @param animated if true, this action is executed by the current {@link MenuAnimationHandler}
     */
    public void open(boolean animated) {
        ...//具體程式碼請自行檢視原始碼
    }
其中 item 的 x,y 是記錄檢視的終點位置,然後經過動畫把 view 移到 x,y 的位置上。
stateChangeListener 為狀態變化的監聽器,開關都會響應相應的方法。主要在 AnimationHandler 中新增具體方法。
    /**
     * A listener to listen open/closed state changes of the Menu
     */
    public static interface MenuStateChangeListener {
        public void onMenuOpened(FloatingActionMenu menu);
        public void onMenuClosed(FloatingActionMenu menu);
    }
(3)計算位置
    /**
     * Calculates the desired positions of all items.
     */
    private void calculateItemPositions() {
        ...//具體程式碼請自行檢視原始碼
    }
4.2.4 MenuAnimationHandler.java
這是是所有動畫類的父類,它主要定義了選單開啟,關閉,以及執行結束後狀態的儲存的方法。
animateMenuOpening(Point center)
animateMenuClosing(Point center)
restoreSubActionViewAfterAnimation(FloatingActionMenu.Item subActionItem, ActionType actionType)
4.2.5 DefaultAnimationHandler.java
這一個預設的動畫類,當我們不對動畫做修改時就會預設使用這個類裡面的動畫效果。我們也可以參考這個類來進行設計新的動畫效果。
動畫效果主要是通過ObjectAnimator.ofPropertyValuesHolder(menu.getSubActionItems().get(i).view, pvhX, pvhY,
pvhR, pvhsX, pvhsY, pvhA)來實現。
動畫實現的主要類,繼承自 MenuAnimationHandler
主要通過 Animator 來實現屬性動畫。
裡面有一個 restoreSubActionViewAfterAnimation 的方法,它主要是恢復選項按鈕到未開啟的狀態。
    /**
     * Restores the specified sub action view to its final state, accoding to the current actionType
     * Should be called after an animation finishes.
     * @param subActionItem
     * @param actionType
     */
    protected void restoreSubActionViewAfterAnimation(FloatingActionMenu.Item subActionItem, ActionType actionType) {
        ...//具體程式碼請自行檢視原始碼
    }
Animator 屬性動畫以及其他動畫的實現請參考我寫的部落格
Android 的動畫效果
4.3 如何使用
    // Set up the white button on the lower right corner
    // more or less with default parameter
    ImageView fabIconNew = new ImageView(this);
    fabIconNew.setImageDrawable(getResources().getDrawable(R.drawable.ic_action_new_light));
    FloatingActionButton rightLowerButton = new FloatingActionButton.Builder(this)
            .setContentView(fabIconNew)
            .build();

    SubActionButton.Builder rLSubBuilder = new SubActionButton.Builder(this);
    ImageView rlIcon1 = new ImageView(this);
    ImageView rlIcon2 = new ImageView(this);
    ImageView rlIcon3 = new ImageView(this);
    ImageView rlIcon4 = new ImageView(this);

    rlIcon1.setImageDrawable(getResources().getDrawable(R.drawable.ic_action_chat_light));
    rlIcon2.setImageDrawable(getResources().getDrawable(R.drawable.ic_action_camera_light));
    rlIcon3.setImageDrawable(getResources().getDrawable(R.drawable.ic_action_video_light));
    rlIcon4.setImageDrawable(getResources().getDrawable(R.drawable.ic_action_place_light));

    // Build the menu with default options: light theme, 90 degrees, 72dp radius.
    // Set 4 default SubActionButtons
    FloatingActionMenu rightLowerMenu = new FloatingActionMenu.Builder(this)
            .addSubActionView(rLSubBuilder.setContentView(rlIcon1).build())
            .addSubActionView(rLSubBuilder.setContentView(rlIcon2).build())
            .addSubActionView(rLSubBuilder.setContentView(rlIcon3).build())
            .addSubActionView(rLSubBuilder.setContentView(rlIcon4).build())
            .setAnimationHandler(new SliderAnimationHandler())
            .attachTo(rightLowerButton)
            .build();
如以上程式碼所示
(1)先建立一個 view 來作為一個總容器,設定好圖片,然後作為選單的按鈕
(2)建立好選項選單的檢視,新增屬性後,新增到 FloatingActionMenu 中的 ArrayList 陣列中,並同時繫結上面的選單按鈕。
(3)如果使用自己定義的動畫,setAnimationHandler(new SliderAnimationHandler())。
這樣子,一個簡單的案例就做好了
5. 雜談
動畫的型別有點少,以及在螢幕尺寸異常的機子上測試時(如 mx3 的 1800x1080)會出現子選項偏離中心選單鍵的問題,原因出在 view 的位置計算上,它沒有考慮到一些特殊機型的機子。
相關文章
- Android 開源專案原始碼解析 -->PhotoView 原始碼解析(七)Android原始碼View
- Android 開源專案原始碼解析 -->Volley 原始碼解析(十五)Android原始碼
- Android 開源專案原始碼解析 -->Dagger 原始碼解析(十三)Android原始碼
- Android 開源專案原始碼解析 -->Android Universal Image Loader 原始碼分析(十四)Android原始碼
- Android開源庫——EventBus原始碼解析Android原始碼
- PandasTA 原始碼解析(八)AST原始碼
- android面試——開源框架的原始碼解析Android面試框架原始碼
- Android 開源專案原始碼解析 -->公共技術點之 Java 反射 Reflection(十六)Android原始碼Java反射
- Android熱更新開源專案Tinker原始碼解析系列之三:so熱更新Android原始碼
- Android八門神器(一):OkHttp框架原始碼解析AndroidHTTP框架原始碼
- Android 開源專案PhotoView原始碼分析AndroidView原始碼
- Android Handler 原始碼解析Android原始碼
- Android Retrofit原始碼解析Android原始碼
- Android——LruCache原始碼解析Android原始碼
- android LruCache原始碼解析Android原始碼
- Android EventBus原始碼解析Android原始碼
- android原始碼解析--switchAndroid原始碼
- Android原始碼解析--LooperAndroid原始碼OOP
- Android 開源專案原始碼解析 -->公共技術點之 View 事件傳遞(一)Android原始碼View事件
- OkHttp 開源庫使用與原始碼解析HTTP原始碼
- Android 原始碼分析之 EventBus 的原始碼解析Android原始碼
- 智慧合約開發dapp專案解析(原始碼)APP原始碼
- Android原始碼解析-LiveDataAndroid原始碼LiveData
- [Android] Retrofit原始碼:流程解析Android原始碼
- Android 8.1 Handler 原始碼解析Android原始碼
- Android LayoutInflater 原始碼解析Android原始碼
- WebRTC-Android原始碼解析WebAndroid原始碼
- android原始碼解析--DialogAndroid原始碼
- android原始碼解析--MessageQueueAndroid原始碼
- android原始碼解析--MessageAndroid原始碼
- Android fragment原始碼全解析AndroidFragment原始碼
- android原始碼解析--ListView(上)Android原始碼View
- 【移動開發】Checkout開源庫原始碼解析移動開發原始碼
- 【原始碼解析】- ArrayList原始碼解析,絕對詳細原始碼
- Lucene原始碼解析--Lock檔案原始碼
- Spark原始碼-SparkContext原始碼解析Spark原始碼Context
- Android LayoutInflater Factory 原始碼解析Android原始碼
- Android setContentView原始碼解析AndroidView原始碼