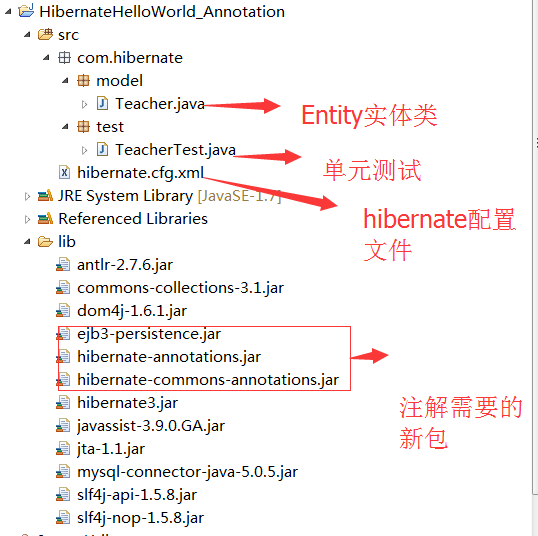
hibernate學習:HelloWorld_Annotation
一:HelloWorld註解實現
二:程式原始碼
@Entity
public class Teacher {
	@Id
	private int id;

	private String name;

	private String title;

	public int getId() {
		return id;
	}

	public void setId(int id) {
		this.id = id;
	}

	public String getName() {
		return name;
	}

	public void setName(String name) {
		this.name = name;
	}

	public String getTitle() {
		return title;
	}

	public void setTitle(String title) {
		this.title = title;
	}

}


<?xml version='1.0' encoding='utf-8'?>


com.mysql.jdbc.Driverjdbc:mysql://localhost:3306/hibernaterootrootorg.hibernate.dialect.MySQLDialect org.hibernate.cache.NoCacheProvidertrueupdate


public class TeacherTest {
	public static void main(String[] args) {
		Teacher t = new Teacher();
		t.setId(1);
		t.setName("劉彥亮");
		t.setTitle("中級");

		Configuration cfg = new AnnotationConfiguration();
		// 解析hibernate配置檔案cfg.configure()
		// buildSessionFactory建立session工廠
		SessionFactory factory = cfg.configure().buildSessionFactory();
		//建立session
		Session session = factory.openSession();
		//開啟事務
		session.beginTransaction();
		//持久化操作
		session.save(t);
		//提交事務
		session.getTransaction().commit();
		//關閉相關資源
		session.close();
		factory.close();

	}

}
三:Console輸出
Hibernate: insert into Teacher (name, title, id) values (?, ?, ?)
四:知識總結
與 HibernateHelloWorld_xml不用的是:
(1)model中使用了@Entity @Table @id @Column等註解,對映跟表的關係
(2)Hibernate配置檔案中對映實體,用class屬性
<mapping class="com.hibernate.model.Teacher" />
(3)單元測試中,解析配置檔案的時候,用的是AnnotationConfiguration
Configuration cfg = new AnnotationConfiguration();
相關文章
- Hibernate學習:初識hibernate
- Hibernate框架學習框架
- Hibernate學習大全
- 跪求 hibernate 學習方法
- hibernate學習資料
- 學習Hibernate原始碼二_Hibernate物件對映檔案hbm學習原始碼物件
- hibernate學習筆記(2)筆記
- hibernate學習筆記(1)筆記
- Hibernate學習筆記二筆記
- hibernate學習:HelloWorld_xmlXML
- hibernate學習筆記 1筆記
- Hibernate學習(一)建立資料表
- Hibernate學習(二)儲存資料
- Hibernate原始碼學習五_建立SessionFactory原始碼Session
- Java框架學習之Hibernate入門Java框架
- 學習Hibernate原始碼三_Hibernate中的配置檔案解析原始碼
- Hibernate學習(四)get和Load比較
- Hibernate學習:slf4j日誌框架框架
- Hibernate原始碼學習四 _服務註冊原始碼
- 框架學習:hibernate框架的結構和分析框架
- hibernate學習(六) flush()和clean()區別和使用
- 學習Hibernate5這一篇就夠了
- Hibernate學習(三)一對多資料的儲存
- JAVA高階程式設計之hibernate框架學習二Java程式設計框架
- Java新手如何學習Spring、Struts、Hibernate三大框架?JavaSpring框架
- 學習Hibernate原始碼一_下載hibernate原始碼並編譯為eclipse專案原始碼編譯Eclipse
- 學習Hibernate5 JPA這一篇就夠了
- hibernate初學問題
- 初學Hibernate,請教高手
- Spring4學習(四)Spring4中整合Hibernate4Spring
- Struts+Spring+Hibernate練習(完整)Spring
- 菜鳥學SSH(十)——Hibernate核心介面
- 學習學習再學習
- 菜鳥學SSH(九)——Hibernate——Session之save()方法Session
- Hibernate SQL方言 (hibernate.dialect)SQL
- 深度學習——學習目錄——學習中……深度學習
- 深度學習(一)深度學習學習資料深度學習
- 深度學習學習框架深度學習框架