Android中IntentService的原理及使用
在Android開發中,我們或許會碰到這麼一種業務需求,一項任務分成幾個子任務,子任務按順序先後執行,子任務全部執行完後,這項任務才算成功。那麼,利用幾個子執行緒順序執行是可以達到這個目的的,但是每個執行緒必須去手動控制,而且得在一個子執行緒執行完後,再開啟另一個子執行緒。或者,全部放到一個執行緒中讓其順序執行。這樣都可以做到,但是,如果這是一個後臺任務,就得放到Service裡面,由於Service和Activity是同級的,所以,要執行耗時任務,就得在Service裡面開子執行緒來執行。那麼,有沒有一種簡單的方法來處理這個過程呢,答案就是IntentService。
什麼是IntentService,首先看看官方的解釋:
IntentService is a base class forServices that handle asynchronous requests (expressed asIntents) on demand. Clients send requests throughstartService(Intent) calls; the service is started as needed, handles each Intent in turn using a worker thread, and stops itself when it runs out of work
還有一個說明是:
All requests are handled on a single worker thread -- they may take as long as necessary (and will not block the application's main loop), but only one request will be processed at a time.
大致意思是:所有請求都在一個單執行緒中,不會阻塞應用程式的主執行緒(UI Thread),同一時間只處理一個請求。那麼,用IntentService有什麼好處呢?首先,我們省去了在Service中手動開執行緒的麻煩,第二,當操作完成時,我們不用手動停止Service,第三,it's so easy to use!
ok,接下來讓我們來看看如何使用,我寫了一個Demo來模擬兩個耗時操作,Operation1與Operation2,先執行1,2必須等1執行完才能執行:
新建工程,新建一個繼承IntentService的類,我這裡是IntentServiceDemo.java
- public class IntentServiceDemo extends IntentService {
- public IntentServiceDemo() {
- //必須實現父類的構造方法
- super("IntentServiceDemo");
- }
- @Override
- public IBinder onBind(Intent intent) {
- System.out.println("onBind");
- return super.onBind(intent);
- }
- @Override
- public void onCreate() {
- System.out.println("onCreate");
- super.onCreate();
- }
- @Override
- public void onStart(Intent intent, int startId) {
- System.out.println("onStart");
- super.onStart(intent, startId);
- }
- @Override
- public int onStartCommand(Intent intent, int flags, int startId) {
- System.out.println("onStartCommand");
- return super.onStartCommand(intent, flags, startId);
- }
- @Override
- public void setIntentRedelivery(boolean enabled) {
- super.setIntentRedelivery(enabled);
- System.out.println("setIntentRedelivery");
- }
- @Override
- protected void onHandleIntent(Intent intent) {
- //Intent是從Activity發過來的,攜帶識別引數,根據引數不同執行不同的任務
- String action = intent.getExtras().getString("param");
- if (action.equals("oper1")) {
- System.out.println("Operation1");
- }else if (action.equals("oper2")) {
- System.out.println("Operation2");
- }
- try {
- Thread.sleep(2000);
- } catch (InterruptedException e) {
- e.printStackTrace();
- }
- }
- @Override
- public void onDestroy() {
- System.out.println("onDestroy");
- super.onDestroy();
- }
- }
我把生命週期方法全列印出來了,待會我們來看看它執行的過程是怎樣的。接下來是Activity,在Activity中來啟動IntentService:
- public class TestActivity extends Activity {
- /** Called when the activity is first created. */
- @Override
- public void onCreate(Bundle savedInstanceState) {
- super.onCreate(savedInstanceState);
- setContentView(R.layout.main);
- //可以啟動多次,每啟動一次,就會新建一個work thread,但IntentService的例項始終只有一個
- //Operation 1
- Intent startServiceIntent = new Intent("com.test.intentservice");
- Bundle bundle = new Bundle();
- bundle.putString("param", "oper1");
- startServiceIntent.putExtras(bundle);
- startService(startServiceIntent);
- //Operation 2
- Intent startServiceIntent2 = new Intent("com.test.intentservice");
- Bundle bundle2 = new Bundle();
- bundle2.putString("param", "oper2");
- startServiceIntent2.putExtras(bundle2);
- startService(startServiceIntent2);
- }
- }
最後,別忘了配置Service,因為它繼承於Service,所以,它還是一個Service,一定要配置,否則是不起作用的,開始我就是忘了,結果半天沒反應。
- <service android:name=".IntentServiceDemo">
- <intent-filter >
- <action android:name="com.test.intentservice"/>
- </intent-filter>
- </service>
ok,最後來看看執行結果:
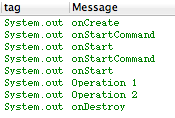
從結果可以看到,onCreate方法只執行了一次,而onStartCommand和onStart方法執行了兩次,開啟了兩個Work Thread,這就證實了之前所說的,啟動多次,但IntentService的例項只有一個,這跟傳統的Service是一樣的。Operation1也是先於Operation2列印,並且我讓兩個操作間停頓了2s,最後是onDestroy銷燬了IntentService。
這就是IntentService,一個方便我們處理業務流程的類,它是一個Service,但是比Service更智慧。希望本文對大家有用,有任何建議或想法歡迎留言和我交流。
相關文章
- Android IntentService 工作原理AndroidIntent
- Android 使用IntentServiceAndroidIntent
- Android中IntentService的使用及其原始碼解析AndroidIntent原始碼
- Android IntentService 的使用和解析AndroidIntent
- Android IntentService使用全面介紹及原始碼解析AndroidIntent原始碼
- 理解 IntentService 原理Intent
- Android中IntentService原始碼分析AndroidIntent原始碼
- Android IntentServiceAndroidIntent
- IntentService的使用Intent
- IntentService 和 HandlerThread 的原理Intentthread
- 淺談IntentService原理分析Intent
- Android中的LruCache的原理和使用Android
- Android面試相關 - IntentServiceAndroid面試Intent
- Android 中 Canvas 繪圖之 PorterDuffXfermode 使用及工作原理詳解AndroidCanvas繪圖
- Android中Canvas繪圖之PorterDuffXfermode使用及工作原理詳解AndroidCanvas繪圖
- Android中mmap原理及應用簡析Android
- sql中in和exists的原理及使用場景。SQL
- Express的使用及原理Express
- Android多執行緒之IntentServiceAndroid執行緒Intent
- HTTPS 原理淺析及其在 Android 中的使用HTTPAndroid
- Android IntentService完全解析 當Service遇到HandlerAndroidIntent
- MySQL的索引原理及使用MySql索引
- IntentServiceIntent
- Android中bindService的使用及Service生命週期Android
- Android中HandlerThread的使用及原始碼解析Androidthread原始碼
- Android中startService的使用及Service生命週期Android
- LruCache 使用及原理
- @Inner使用及原理
- Android LeakCanary的使用和原理Android
- Android後臺任務(HandlerThread、AsyncTask、IntentService)AndroidthreadIntent
- SPI擴充套件點在業務中的使用及原理分析套件
- Android Protobuf應用及原理Android
- android IPC及原理簡介Android
- nodeJs流的使用及原理NodeJS
- 轉_Buffer Cache的原理及使用
- expdp/impdp的原理及使用(轉)
- IntentService小酌Intent
- 優雅的構建 Android 專案——側滑返回使用及原理分析Android