CXF實現webService服務(一)
以前工作中也用CXF,但都是用別人現成搭好的環境,這次自己重頭搭建一遍環境。過程中也有遇到的問題,也做了簡單的整理。
對於CXF是幹什麼用的,我不想多說,大家都知道這是我們在java程式設計中webService技術的一種實現工具。我們說說為什麼用CXF來實現webService:
1. Java的webService實現本身就是一個很耗效能的實現方案(xml與java物件之間在服務端以及客戶端的互轉比較消耗效能)
2. 目前java主流的webService應用以CXF、AXIS2為主;
3. 通過網路渠道的瞭解,目前CXF的效率要比AXIS2高出至少50%;
4. 另外有一個webService的工具metro的效率比CXF高出10%;
5. CXF的實現資料網上可以隨便找出一大堆,metro的資料相對少一些;
6. CXF在java應用實現中已經很成熟,企業更傾向於用這樣一個成熟的解決方案;
基於以上原因,我選擇CXF來實現webService。
參考資料:
Java Web 服務: CXF 效能比較----CXF 與最新版本的 Axis2 和 Metro 之間的效能對比
http://www.ibm.com/developerworks/cn/java/j-jws14/
一 以annotation註解方式實現釋出webService應用
1、 基礎環境
新建java web工程cxf之後,下載cxf工具包。解壓CXF之後,把cxf工具包lib下的jar包全部放到工程的lib下。
此處用到的cxf工具包版本為:apache-cxf-2.7.12
下載地址:
http://www.apache.org/dyn/closer.cgi?path=/cxf/2.7.12/apache-cxf-2.7.12.zip
2、 編寫服務介面
package com.hsy.server;

import java.util.List;

import javax.jws.WebParam;
import javax.jws.WebService;

import com.hsy.pojo.User;

@WebService
public interface HelloWorld {
	String sayHi(@WebParam(name="text")String text);
    String sayHiToUser(User user);
    String[] SayHiToUserList(List<User> userList);
}
3、 服務介面實現
package com.hsy.server;

import java.util.LinkedHashMap;
import java.util.List;
import java.util.Map;

import javax.jws.WebParam;
import javax.jws.WebService;

import com.hsy.pojo.User;

@WebService(endpointInterface="com.hsy.server.HelloWorld",serviceName="HelloWorld")
public class HelloWorldImpl implements HelloWorld {
	Map<Integer, User> users = new LinkedHashMap<Integer, User>();

	public String sayHi(@WebParam(name = "text") String text) {
		return "Hello,"+text;
	}

	public String sayHiToUser(User user) {
		users.put(users.size()+1, user);
		return "Hello,"+user.getName();
	}

	public String[] SayHiToUserList(List<User> userList) {
		String[] result = new String[userList.size()];
		int i = 0;
		for(User u:userList){
			result[i] = "Hello " + u.getName();
            i++;
		}
		return result;
	}

	/**
	 * @param args
	 */
	public static void main(String[] args) {
		// TODO Auto-generated method stub

	}

}
4、 釋出服務app
package com.hsy.server;

import javax.xml.ws.Endpoint;

public class webServiceApp {

	/**
	 * @param args
	 */
	public static void main(String[] args) {
		 System.out.println("web service start");
         HelloWorldImpl implementor = new HelloWorldImpl();
         String address = "http://localhost:8080/helloWorld";
         Endpoint.publish(address, implementor);
         System.out.println("web service started");
	}

}
右鍵 run as 選擇java application釋出服務;然後在瀏覽器輸入地址:http://localhost:8080/helloWorld?wsdl
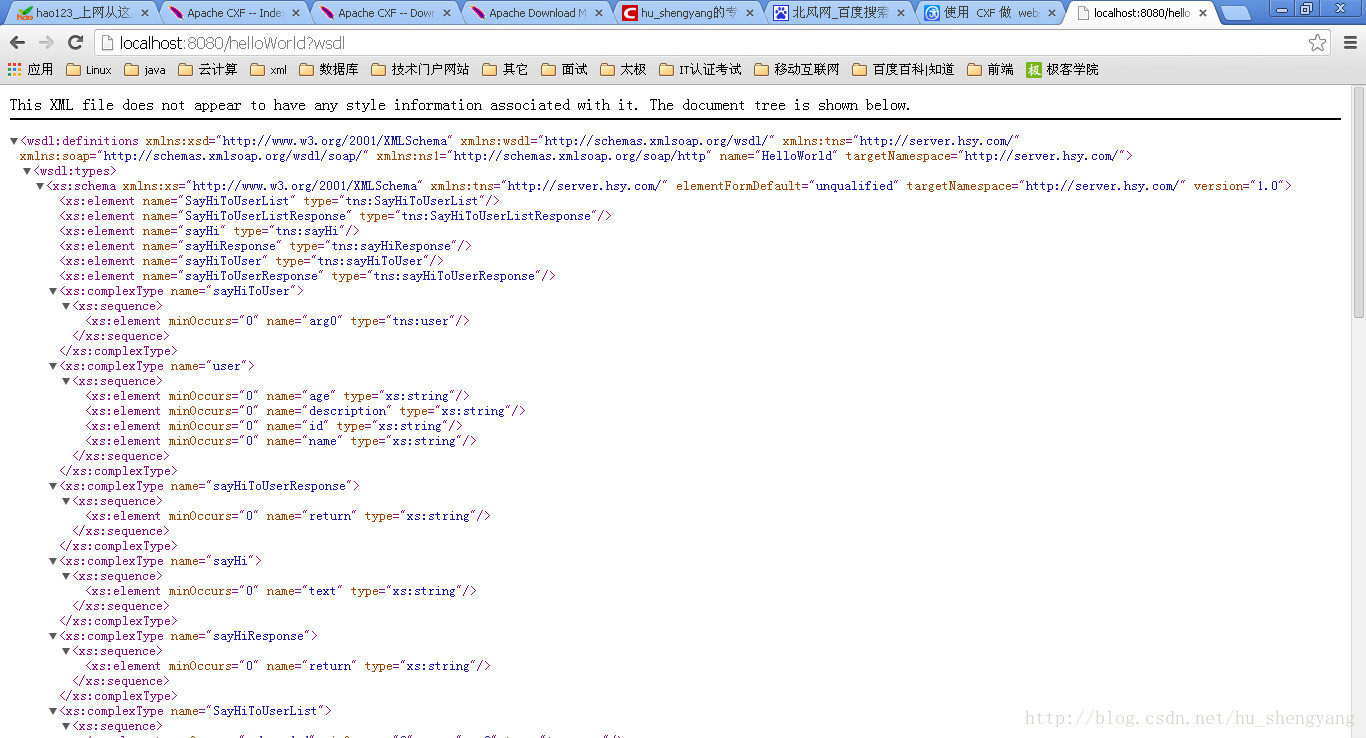
說明webService服務釋出成功。
5、 客戶端訪問服務
package com.hsy.client;

import org.apache.cxf.jaxws.JaxWsProxyFactoryBean;

import com.hsy.pojo.User;
import com.hsy.server.HelloWorld;

public class HelloWorldClient {

	/**
	 * @param args
	 */
	public static void main(String[] args) {

		//首先右鍵run as 執行com.hsy.server.webServiceApp類,然後再執行這段客戶端程式碼
		JaxWsProxyFactoryBean jwpfb = new JaxWsProxyFactoryBean();
		jwpfb.setServiceClass(HelloWorld.class);
		jwpfb.setAddress("http://localhost:8080/helloWorld");
        HelloWorld hw = (HelloWorld) jwpfb.create();
        User user = new User();
        user.setName("馬克思");
        user.setDescription("懷念馬克思");
        System.out.println(hw.sayHiToUser(user));

    }

}
右鍵 run as 選擇java application,控制檯列印如圖:
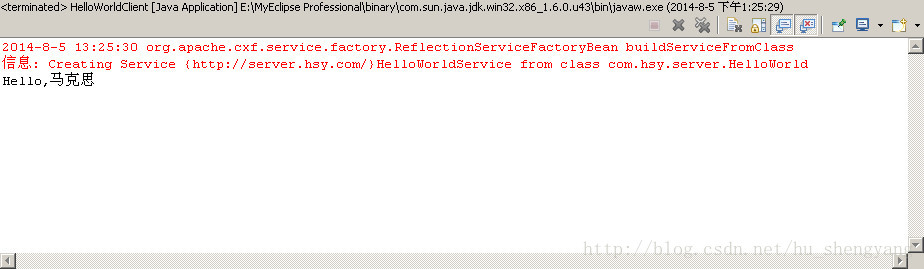
Ok,客戶端訪問也成功了。
6、 附:
package com.hsy.pojo;

import java.io.Serializable;

@SuppressWarnings("serial")
public class User implements Serializable {

	private String id;
	private String name;
	private String age;
	private String description;

	public User() {
		super();
	}

	public String getId() {
		return id;
	}

	public void setId(String id) {
		this.id = id;
	}

	public String getName() {
		return name;
	}

	public void setName(String name) {
		this.name = name;
	}

	public String getAge() {
		return age;
	}

	public void setAge(String age) {
		this.age = age;
	}

	public String getDescription() {
		return description;
	}

	public void setDescription(String description) {
		this.description = description;
	}


}
二與spring整合實現webService
1、 配置web.xml
見檔案web.xml
<?xml version="1.0" encoding="UTF-8"?>
<web-app xmlns:xsi="http://www.w3.org/2001/XMLSchema-instance" xmlns="http://java.sun.com/xml/ns/javaee" xmlns:web="http://java.sun.com/xml/ns/javaee/web-app_2_5.xsd" xsi:schemaLocation="http://java.sun.com/xml/ns/javaee http://java.sun.com/xml/ns/javaee/web-app_2_5.xsd" id="WebApp_ID" version="2.5">
  <display-name>cxf</display-name>
  <welcome-file-list>
    <welcome-file>index.html</welcome-file>
    <welcome-file>index.htm</welcome-file>
    <welcome-file>index.jsp</welcome-file>
    <welcome-file>default.html</welcome-file>
    <welcome-file>default.htm</welcome-file>
    <welcome-file>default.jsp</welcome-file>
  </welcome-file-list>

 	<context-param>
     	<param-name>contextConfigLocation</param-name>
     	<param-value>WEB-INF/classes/applicationContext.xml</param-value>
 	</context-param>

 	<listener>
      	<listener-class>
              org.springframework.web.context.ContextLoaderListener
      	</listener-class>
 	</listener>

  	<servlet>
        <servlet-name>CXFServlet</servlet-name>
        <servlet-class>
               org.apache.cxf.transport.servlet.CXFServlet
        </servlet-class>
        <load-on-startup>1</load-on-startup>
  	</servlet>

  	<servlet-mapping>
         <servlet-name>CXFServlet</servlet-name>
         <url-pattern>/webservice/*</url-pattern>
  	</servlet-mapping>


  <!-- 字元過濾器 -->
    <filter>
        <filter-name>encoding</filter-name>
        <filter-class>org.springframework.web.filter.CharacterEncodingFilter</filter-class>
        <init-param>
            <param-name>encoding</param-name>
            <param-value>UTF-8</param-value>
        </init-param>
        <init-param>
            <param-name>forceEncoding</param-name>
            <param-value>true</param-value>
        </init-param>
    </filter>


    <filter-mapping>
        <filter-name>encoding</filter-name>
        <url-pattern>*.jsp</url-pattern>
    </filter-mapping>
    <filter-mapping>
        <filter-name>encoding</filter-name>
        <url-pattern>*.html</url-pattern>
    </filter-mapping>
    <filter-mapping>
        <filter-name>encoding</filter-name>
        <url-pattern>*.do</url-pattern>
    </filter-mapping>
    <filter-mapping>
        <filter-name>encoding</filter-name>
        <url-pattern>*.action</url-pattern>
    </filter-mapping>
    <filter-mapping>
        <filter-name>encoding</filter-name>
        <url-pattern>*.jsp</url-pattern>
    </filter-mapping>
    <filter-mapping>
        <filter-name>encoding</filter-name>
        <url-pattern>*.html</url-pattern>
    </filter-mapping>
    <filter-mapping>
        <filter-name>encoding</filter-name>
        <url-pattern>*.do</url-pattern>
    </filter-mapping>
    <filter-mapping>
        <filter-name>encoding</filter-name>
        <url-pattern>*.3g</url-pattern>
    </filter-mapping>

</web-app>
2、 配置applicationContext.xml
<?xml version="1.0" encoding="UTF-8"?>
<beans xmlns="http://www.springframework.org/schema/beans"
       xmlns:xsi="http://www.w3.org/2001/XMLSchema-instance"
       xmlns:jaxws="http://cxf.apache.org/jaxws"
       xsi:schemaLocation="
             http://www.springframework.org/schema/beans
             http://www.springframework.org/schema/beans/spring-beans.xsd
             http://cxf.apache.org/jaxws
             http://cxf.apache.org/schemas/jaxws.xsd">

      <import resource="classpath:META-INF/cxf/cxf.xml"/>
      <import resource="classpath:META-INF/cxf/cxf-extension-soap.xml"/>
      <import resource="classpath:META-INF/cxf/cxf-servlet.xml"/>

      <jaxws:endpoint
             id="helloWorld"
             implementor="com.hsy.server.HelloWorldImpl"
             address="/helloWorld" />

     <bean id="client"
     		class="com.hsy.server.HelloWorld"
     		factory-bean="clientFactory"
     		factory-method="create"/>

     <bean id="clientFactory" class="org.apache.cxf.jaxws.JaxWsProxyFactoryBean">
            <property name="serviceClass" value="com.hsy.server.HelloWorld"/>
            <property name="address" value="http://localhost:8080/cxf/webservice/helloWorld"/>
     </bean>

</beans>
3、 修改客戶端程式碼
package com.hsy.client;

import java.util.ArrayList;
import java.util.List;

import org.springframework.beans.factory.BeanFactory;
import org.springframework.beans.factory.xml.XmlBeanFactory;
import org.springframework.context.ApplicationContext;
import org.springframework.context.support.ClassPathXmlApplicationContext;
import org.springframework.core.io.FileSystemResource;
import org.springframework.core.io.Resource;

import com.hsy.pojo.User;
import com.hsy.server.HelloWorld;

public class HelloWorldClient {

	/**
	 * @param args
	 */
	public static void main(String[] args) {

		//Resource resource= new FileSystemResource("F:/workspaces4me2013/.metadata/.me_tcat/WEB-INF/classes/applicationContext.xml");
		//BeanFactory factory= new XmlBeanFactory(resource );
		ApplicationContext factory = new ClassPathXmlApplicationContext("/applicationContext.xml");
		HelloWorld client = (HelloWorld)factory.getBean("client");
        User user1 = new User();
        user1.setName("馬克思");
        user1.setDescription("懷念馬克思");
        User user2 = new User();
        user2.setName("恩格斯");
        user2.setDescription("懷念恩格斯");
        List<User> userList= new ArrayList<User>();
        userList.add(user1);
        userList.add(user2);
        String[] res = client.SayHiToUserList(userList);
        System.out.println(res[0]);
        System.out.println(res[1]);

    }

}
4、 啟動tamcat釋出webService
然後在瀏覽器輸入地址:http://localhost:8080/cxf/webservice/helloWorld?wsdl

說明webService服務釋出成功。
5、 執行客戶端程式碼訪問webService
右鍵 run as 選擇java application,控制檯列印如圖:
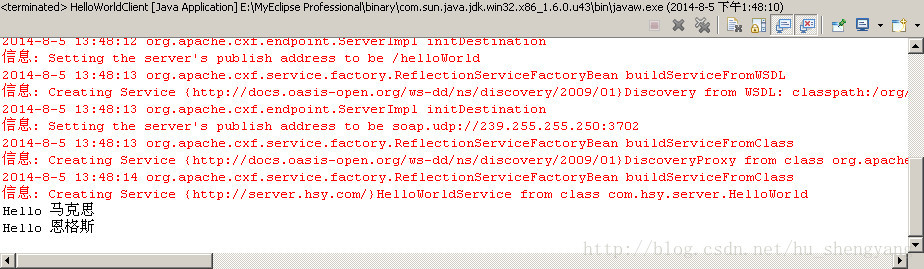
Ok,客戶端訪問也成功了。
此篇實現了webService服務的釋出以及在本工程下的客戶端呼叫服務的示例,或許不是很直觀。
請看下一篇:CXF客戶端程式碼生成與服務呼叫(二)
http://blog.csdn.net/hu_shengyang/article/details/38384839
本文參照了:使用 CXF做 webservice簡單例子
http://www.cnblogs.com/frankliiu-java/articles/1641949.html
相關文章
- WebService之Spring+CXF整合示例WebSpring
- python 搭建 webservice 服務端PythonWeb服務端
- 《遠端控制》-服務端實現(一)服務端
- NodeJs服務註冊與服務發現實現NodeJS
- SpringBoot與WebService的簡單實現Spring BootWeb
- Docker實現服務發現Docker
- etcd實現服務發現
- 用 Go + WebSocket 快速實現一個 chat 服務GoWeb
- Golang快速實現一個簡單RPC服務GolangRPC
- jwt 如何實現一個服務認證了另一個服務也可以認證JWT
- SpringBoot整合Apache-CXF實踐Spring BootApache
- PHP實現代理服務功能PHP
- Keepalived實現服務高可用
- 實現SSR服務端渲染服務端
- 服務發現-從原理到實現
- Zookeeper實現服務註冊/發現
- Spring+xfire和Spring+CXF在Weblogic上釋出服務遇到的問題SpringWeb
- 一文搞懂服務註冊發現的原理與實現
- 實現etcd服務註冊與發現
- Eureka實現服務註冊與發現
- socket實現簡單ssh服務
- 實現ssr服務端渲染demo服務端
- 如何實現高效地IT服務管理
- .Net Core微服務——服務發現:Consul(一)微服務
- GRPC 服務呼叫實踐(一)RPC
- 騰訊位置服務Flutter業務實踐——地圖SDK Flutter外掛實現(一)Flutter地圖
- 一篇搞定Sentinel-搭建Spring Cloud Alibaba服務元件Sentinel實現服務資源控制SpringCloud元件
- Spring Cloud實戰系列(一) - 服務註冊與發現EurekaSpringCloud
- 用 etcd 實現服務註冊和發現
- .NET Core HttpClientFactory+Consul實現服務發現HTTPclient
- C# 實現 gRPC 服務和呼叫C#RPC
- Go Web 服務框架實現詳解GoWeb框架
- flask實現python方法轉換服務FlaskPython
- eureka實現服務之間的呼叫
- NGINX如何實現rtmp推流服務Nginx
- 服務冪等以及常用實現方式
- React + Koa 實現服務端渲染(SSR)React服務端
- 用 Golang 實現百萬級 Websocket 服務GolangWeb
- shell——一鍵部署服務實戰