Flask Web 開發 使用者評論_2
國慶長假開始了。。。老老實實在家看書
評論功能做完了,後面就涉及到網站的管理員或者協管員對評論的操作了
這裡網站上主要是單獨做了一個按鈕給管理員和協管員,通過導航欄裡面這個按鈕,他可以進入一個頁面,裡面只顯示評論,並按照最近時間來排列!
說到導航欄的按鈕,那麼,這個連結肯定是要做在base.html裡面了
{% if current_user.can(Permission.MODERATE_COMMENTS) %}
<li><a href="{{ url_for('main.moderate') }}">Moderate Comments</a></li>
{% endif %}
如下圖所示

之後就要寫moderate頁面的路由功能了
@main.route('/moderate')
@login_required
@permission_required(Permission.MODERATE_COMMENTS)
def moderate():
	page = request.args.get('page',1,type=int)
	pagination = Comment.query.order_by(Comment.timestamp.desc()).paginate(
				page,per_page=current_app.config['FLASKY_COMMENTS_PER_PAGE'],error_out=False)
	comments=pagination.items
	return render_template('moderate.html',comments=comments,pagination=pagination,page=page)
這裡首先要求有協管員的評論功能
接著,他會匯出所有的評論列表,並以此分頁顯示
下面這個,是所對應的moderate.html檔案,通過引入_comments.html模板,將此頁中羅列出來的所有評論,進行分頁化顯示
{% extends "base.html" %}
{% import "_macros.html" as macros %}

{% block title %}Flasky - Comment Moderation{% endblock %}

{% block page_content %}
<div class = "page-header">
	<h1>Comment Moderation</h1>
</div>

{% set moderate = True %}
{% include '_comments.html' %}
{% if pagination %}
<div class = "pagination">
	{{ macros.pagination_widget(pagination,'.moderate') }}
</div>

{%endif%}
{%endblock%}{% set moderate = True %}
這是Jinja2的語法,設定變數,這個變數的設定,是用在了下面被引入的_comments.html裡面的
<ul class="comments">
    {% for comment in comments %}
    <li class="comment">
        <div class="comment-thumbnail">
            <a href="{{ url_for('.user', username=comment.author.username) }}">
                <img class="img-rounded profile-thumbnail" src="{{ comment.author.gravatar(size=40) }}">
            </a>
        </div>
        <div class="comment-content">
            <div class="comment-date">{{ moment(comment.timestamp).fromNow() }}</div>
            <div class="comment-author"><a href="{{ url_for('.user', username=comment.author.username) }}">{{ comment.author.username }}</a></div>
            <div class="comment-body">
                {% if comment.disabled %}
                <p><i>This comment has been disabled by a moderator.</i></p>
                {% endif %}

                {% if moderate or not comment.disabled %}
                    {% if comment.body_html %}
                        {{ comment.body_html | safe }}
                    {% else %}
                        {{ comment.body }}
                    {% endif %}
                {% endif %}
            </div>
            {% if moderate %}
                <br>
                {% if comment.disabled %}
                    <a class="btn btn-default btn-xs" href="{{ url_for('.moderate_enable',
                        id=comment.id, page=page) }}">Enable</a>
                {% else %}
                    <a class = "btn btn-danger btn-xs" href = "{{url_for('.moderate_disable',
                        id = comment.id,page=page) }}">Disable</a>
                {% endif %}
            {% endif %}
        </div>
    </li>
    {% endfor %}
</ul>
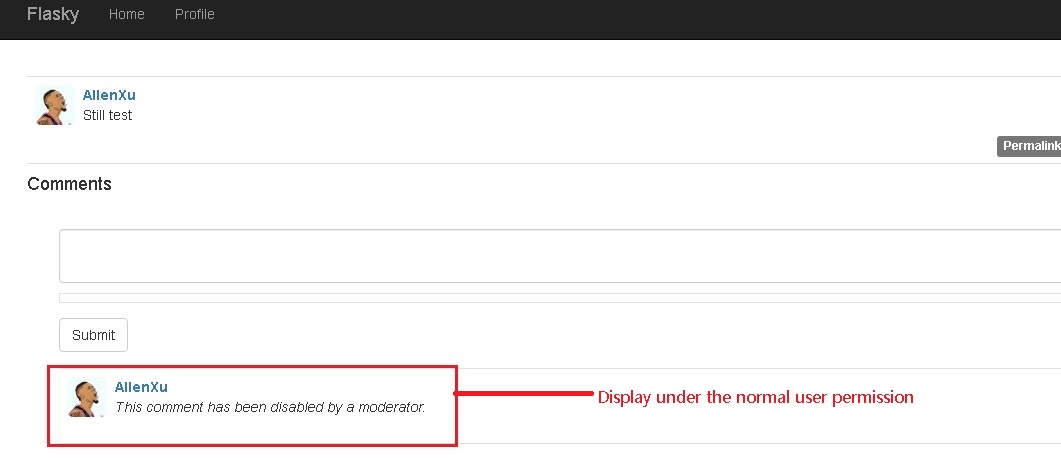
注意到在comment-body 這一塊區域裡面,他修改並新增了if語句判斷
當comment的disable屬性是True的時候,你會看到一句話提示:This comment has been disabled by a moderator
另外,當你有moderate的許可權,或者comment並沒有被disable的時候,你可以看到評論的內容
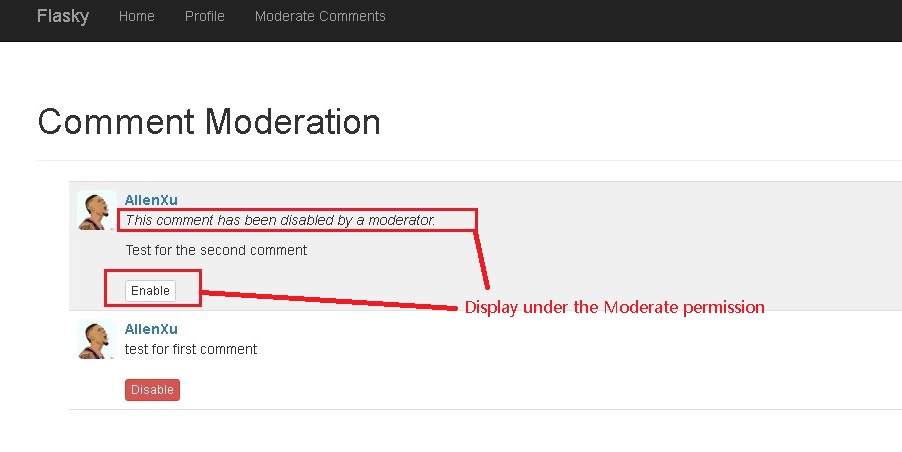
判斷是否有moderate的情況
當你有modertae許可權的時候,你就可以看到enable和disable的按鈕
總得來說,就是普通使用者,要麼看到comment內容,要麼看到被禁止的提示語句
有moderate許可權的使用者,無論什麼情況下,都能看到comment內容,還能看到disable和enable按鈕,以及被禁止的提示資訊。
最後,是關於上面的disable和enable按鈕的路由功能設定,其實很明顯了,就是通過點選按鈕,切換當前comment的disable屬性,是True還是False
@main.route('/moderate/enable/<int:id>')
@login_required
@permission_required(Permission.MODERATE_COMMENTS)
def moderate_enable(id):
	comment = Comment.query.get_or_404(id)
	comment.disabled = False
	db.session.add(comment)
	return redirect(url_for('.moderate', page = request.args.get('page',1,type=int)))

@main.route('/moderate/disable/<int:id>')
@login_required
@permission_required(Permission.MODERATE_COMMENTS)
def moderate_disable(id):
	comment = Comment.query.get_or_404(id)
	comment.disabled = True
	db.session.add(comment)
	return redirect(url_for('.moderate',page = request.args.get('page',1,type=int)))
相關文章
- 《Flask Web 開發指南 pt.2》FlaskWeb
- 《Flask Web開發 基於Python的Web應用開發實戰》簡評FlaskWebPython
- Flask web開發(3):模板FlaskWeb
- Flask web 開發(1):安裝FlaskWeb
- Flask Web開發學習之“HelloWorld”FlaskWeb
- 評論模組開發總結
- 關於 Flask Web 開發的個人小結FlaskWeb
- python web開發-flask中日誌的使用PythonWebFlask
- Flask RESTful API 開發----基礎篇 (2)FlaskRESTAPI
- question2answer論壇框架分析及web開發思考框架Web
- Flask web開發第五章資料庫FlaskWeb資料庫
- 《Flask Web開發》讀書筆記【Windows環境】FlaskWeb筆記Windows
- 《flask Web 開發》讀書筆記 & chapter6FlaskWeb筆記APT
- Flask RESTful Web服務的開發套路總結FlaskRESTWeb
- iOS開發之誘導使用者為自己的App評論功能iOSAPP
- Flask Web開發入門(十)之圖片上傳(使用Flask-Upload)FlaskWeb
- 評論功能完成,順便總結下開發評論的經驗
- Flask Web開發入門(十一)之圖片展現FlaskWeb
- 評論回覆功能,總結開發-JavaJava
- 《Flask Web開發:基於Python的Web應用開發實戰》學習筆記(二)FlaskWebPython筆記
- 使用者測評:G2L開發板初體驗
- Scrapy+Flask+Mongodb+Swift開發全攻略(2)FlaskMongoDBSwift
- React 小案例 使用者評論React
- WEB開發2--request&responseWeb
- web開發_j2eeWeb
- 網易雲音樂評論爬蟲(2):歌曲的全部評論爬蟲
- 開源了我獨立開發的評論元件 SaaS ? ?元件
- 使用者評論程式碼實現
- Laravel-Module 模組開發一:評論模組實現Laravel
- 淘寶訂單評論API文件分析,PHP開發攻略APIPHP
- Node.js實現使用者評論社群(體驗前後端開發的樂趣)Node.js後端
- 使用flask開發RESTful架構的api伺服器端(2)–flask的安裝和使用FlaskREST架構API伺服器
- 評論專欄: 使 Web 2.0 趨向成熟Web
- java web開發之上機指導(2)JavaWeb
- flask 專案開發實戰Flask
- 使用Flask開發簡單介面Flask
- flask:flask模板——使用Jinja2Flask
- 國外評論:中國開源發展緩慢的“病因”