Android 介面滑動卡頓分析與解決方案(入門)
Android 介面滑動卡頓分析與解決方案(入門)
導致Android介面滑動卡頓主要有兩個原因:
1.UI執行緒(main)有耗時操作
2.檢視渲染時間過長,導致卡頓
目前只講第1點,第二點相對比較複雜待以後慢慢研究。
眾所周知,介面的流暢度主要依賴FPS這個值,這個值是通過(1s/渲染1幀所花費的時間)計算所得,FPS值越大視訊越流暢,所以就需要渲染1幀的時間能儘量縮短。正常流暢度的FPS值在60左右,即渲染一幀的時間不應大於17ms。
先看一個例子:
見Video1,該應用通過一組URL載入網路上的圖片並顯示在ListView中。從視訊中可以看到滑動ListView存在一定的卡頓的現象。
分析工具1:Android systrace
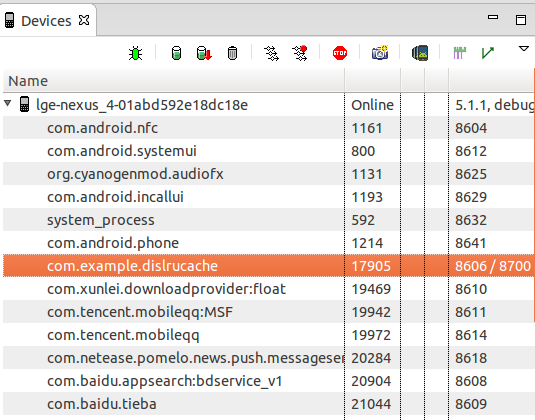
開啟Android開發工具中的DDMS,選中應用所在的程式並點選倒數第二個圖示出現如下介面:

填上相關資訊後點選OK,此時Android systrace已經開始工作,你只需要正常操作手機復現卡頓現象即可。
Android systrace 停止以後就會根據你上圖中的設定生成trace.xml檔案(注:此檔案在火狐瀏覽器中無法正常瀏覽,需使用chrome)。
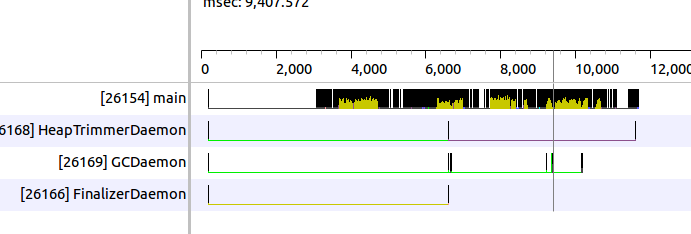
開啟trace.xml後觀察surfaceflinger存在很多斷斷續續,分佈不夠均勻。

放大看

在某間隔出的時間是48ms,這遠遠的大於17ms,正是這個原因直接導致了介面的卡頓感。
接著再看:

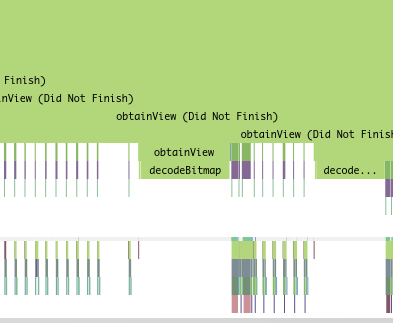
此處也存在不規則分佈,可以看到主要的耗時操作在:

obtainView和decodeBitmap上面,看到這兩個方法似乎是找到了罪魁禍首。那我們就看看這兩個方法是在哪裡被呼叫的。
通過查詢原始碼知道obtainView這個方法被定義在AbsListView.java這個類中,主要作用就是獲得一個和資料繫結過的檢視,在這個方法中呼叫到了
mAdapter.getView(position, transientView, this);這個方法大家再熟悉不過了,因為在自定義Adapter的時候都要去重寫getView方法,那我們可以推測卡頓的原因很有可能出自getView。畢竟這個方法裡有我們自己寫的很大一坨程式碼。
接著再看getView中最主要的方法
mCacheWrapper.getBitmapFromCache(url, mHandler, position,2);具體實現是:
    public void getBitmapFromCache(final String urlString, Handler handler,
            final int position, final int scale) {

        final String key = hashKeyForString(urlString);
        final Message msg = handler.obtainMessage();
        Bitmap bitmapCache = mMemoryCache.get(key);

        if (bitmapCache != null) {
            msg.arg1 = position;
            msg.obj = bitmapCache;
            msg.sendToTarget();
            Log.d(TAG, "memory include the key");
            return;
        }

        //InputStream is = getInputStreamFromCache(key);
        //if (is != null) {
        //    Bitmap bitmap = getBitmap(is, key, scale);
        //    if (bitmap != null) {
        //        mMemoryCache.put(key, bitmap);
        //        msg.arg1 = position;
        //        msg.obj = bitmap;
        //        msg.sendToTarget();
        //        Log.d(TAG, "disk include the key");
        //    }
        //    return;
        //}
        mExecutor.execute(new Runnable() {
            @Override
            public void run() {

                if (mCurrentTask.contains(key)) {
                    Log.d(TAG, "the key of task is still execute");
                    return;
                }
                mCurrentTask.add(key);


                boolean isOK = write2Cache(urlString);
                if (isOK) {
                    InputStream is = getInputStreamFromCache(key);
                    Log.d(TAG, "the file is write to disk cache");
                    is = getInputStreamFromCache(key);
                    if (is != null) {
                        Bitmap bitmap = getBitmap(is, key, scale);
                        if (bitmap != null) {
                            mMemoryCache.put(key, bitmap);
                            msg.arg1 = position;
                            msg.obj = bitmap;
                            msg.sendToTarget();
                        }
                    }
                }
                mCurrentTask.remove(key);
            }
        });
    }
看上面這段程式碼發現加註釋程式碼存在一定的嫌疑,因為它在主執行緒中做了IO操作和bitmap的decode操作。
我們稍微修改一下上面這段程式碼:
    public void getBitmapFromCache(final String urlString, Handler handler,
            final int position, final int scale) {

        final String key = hashKeyForString(urlString);
        final Message msg = handler.obtainMessage();
        Bitmap bitmapCache = mMemoryCache.get(key);

        if (bitmapCache != null) {
            msg.arg1 = position;
            msg.obj = bitmapCache;
            msg.sendToTarget();
            Log.d(TAG, "memory include the key");
            return;
        }

        mExecutor.execute(new Runnable() {
            @Override
            public void run() {

                if (mCurrentTask.contains(key)) {
                    Log.d(TAG, "the key of task is still execute");
                    return;
                }
                //mCurrentTask.add(key);
                //InputStream is = getInputStreamFromCache(key);
                //if (is != null) {
                //    Bitmap bitmap = getBitmap(is, key, scale);
                //    if (bitmap != null) {
                //        mMemoryCache.put(key, bitmap);
                //        msg.arg1 = position;
                //        msg.obj = bitmap;
                //        msg.sendToTarget();
                //        Log.d(TAG, "disk include the key");
                //    }
                //    mCurrentTask.remove(key);
                //    return;
                //}

                boolean isOK = write2Cache(urlString);
                if (isOK) {
                    Log.d(TAG, "the file is write to disk cache");
                    is = getInputStreamFromCache(key);
                    if (is != null) {
                        Bitmap bitmap = getBitmap(is, key, scale);
                        if (bitmap != null) {
                            mMemoryCache.put(key, bitmap);
                            msg.arg1 = position;
                            msg.obj = bitmap;
                            msg.sendToTarget();
                        }
                    }
                }
                mCurrentTask.remove(key);
            }
        });
}將置灰出的程式碼移動到主執行緒以外,在看看滑動流暢讀video2.mp4
可以看到卡頓現象已經沒有了,那罪魁禍首就是在主執行緒中有IO操作和bitmap的decode操作引起的。
上述分析過程跳躍性比較大,這裡再推薦一種簡單直觀的方法:
分析工具2:Method Profiling.
還是開啟DDMS,選中你的應用,點選第六個圖示,

這邊預設OK

點選OK開始抓取,接著滑動手機復現卡頓現象。最後再次點選第六個鈕即可。

這裡只看上圖中的main就可以了。

點選main方法後會展開它的父方法(即呼叫main的方法)和它的子方法(即在main中呼叫的方法)。這裡一般點選後面百分數較大的那個子方法(百分數表示方法執行所佔用的cpu時間)。
接著要做的就是一步一步往下點,直到找到我們要找的耗時操作。
最後我們還是來到了這邊

上圖已經定位了decodeStream方法,再往下走也是進到framework沒意義了。剩下的就是怎麼將decodeStream放到主執行緒以外的執行緒的事情了。
總結:
主執行緒中不要放置耗時的操作,耗時操作可以扔Thread再通過Handler與主執行緒同步或使用AsyncTask來完成耗時操作。
相關文章
- vue 介面在蘋果手機上滑動點選事件等卡頓解決方案Vue蘋果事件
- NestedScrollView+RecyclerView 滑動卡頓簡單解決方案View
- 解決ScrollView巢狀RecyclerView滑動卡頓問題View巢狀
- 不要在 XML 設定,解決 NestedScrollView 巢狀 RecyclerView 滑動卡頓XMLView巢狀
- 一種巢狀滑動衝突的解決方案巢狀
- 巢狀UIScrollview的滑動衝突解決方案巢狀UIView
- 解決方案 | IrfanView如何滑動滾輪影像縮放?View
- ScrollView 與ListView 滑動衝突解決View
- 介面自動化測試解決方案
- 移動端swiper嵌iframe無法滑動的解決方案
- 如何解決快應用頁面滑動卡頓問題
- Android入門教程 | DrawerLayout 側滑欄Android
- Android View 滑動衝突解決方式以及原理AndroidView
- JavaScript滑動門特效詳解JavaScript特效
- 一種非巢狀滑動衝突的解決方案巢狀
- 服務啟動過程效能波動的分析與解決方案
- Android事件分發機制、滑動衝突解決Android事件
- [android]uiautomator中文輸入解決方案AndroidUI
- ScrollView(RecyclerView等)為什麼會自動滾動原理分析,還有阻止自動滑動的解決方案View
- 優化動畫卡頓:卡頓原因分析及優化方案優化動畫
- Android自動化測試解決方案Android
- Android入門教程 | Handler,Looper與MessageQueue使用與分析AndroidOOP
- Android輸入鍵盤隱藏解決方案Android
- Android多個EditText輸入效果解決方案Android
- jquery實現滑動門效果詳解jQuery
- ViewPager 禁止左右滑動完美解決Viewpager
- Android 自定義View 滑動解鎖AndroidView
- 介面冪等性解決方案
- 介面測試的解決方案
- 滑動動效解決方案(CSS antd-mobile better-scroll react-transition-group)CSSReact
- UIPikerView 省市區三聯滑動,解決滑動崩潰問題UIView
- 移動APP卡頓問題解決實踐APP
- 蘋果容器超出內容overflow滑動卡頓問題蘋果
- Android 的滑動分析以及各種實現Android
- 調節閥振動原因分析及解決方案
- win10執行老遊戲卡頓怎麼解決 win10執行老遊戲頻繁卡頓解決方案Win10遊戲
- AI影片分析解決方案AI
- Android啟動頁黑屏及最優解決方案Android