Image Watch是在VS2012上使用的一款OpenCV工具,能夠實時顯示影象和矩陣Mat的內容,跟Matlab很像,方便程式除錯,相當好用。跟VS2012配合使用,簡直就是一款神器!讓我一下就愛上它了!
第一次看到Image Watch是今年3、4月份的時候,當時是在微博上看到新聞,點選連結的下載頁面一直出問題,後面就忘了這事,昨天碰巧在OpenCV主頁看到OpenCV2.4.5的Change Logs裡面有連結,點進能下載果斷試用下啊!

閒話少說,先看看部分相關連結。
1、Image Watch 的下載連結。
2、OpenCV關於Image Watch的介紹頁面連結。
3、OpenCV2.4.5線上文件關於Image Watch的介紹文件。
4、更詳細的資訊參見Image Watch的官方網站。
直接上圖,有個直觀印象。
下面利用一個實際的例子,來說明下Image Watch。
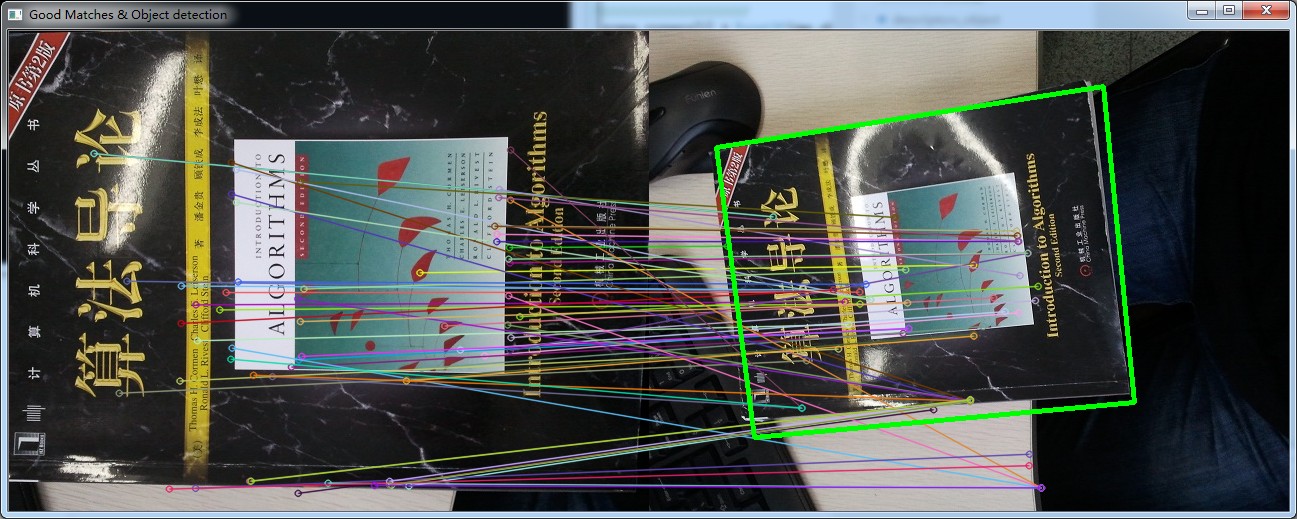
利用二維SURF特徵和單對映尋找已知物體。輸入兩幅影象,一幅是需要尋找的物體影象,另一幅是場景中包含此物體的影象。
SURF特徵的特徵描述方法封裝在SurfFeatureDetector類中,利用成員函式detect函式檢測出SURF特徵的關鍵點,儲存在vector容器中,再利用SurfDesciptorExtractor類進行特徵向量的計算,將之前的vector變數變成矩陣形式儲存在Mat中。
利用FLANN特徵匹配演算法進行匹配,此演算法封裝在FlannBaseMatcher類中,匹配後保留好的特徵匹配點。利用findHomography獲取匹配特徵點之間的變換,最後利用perspectiveTransform定位到場景圖中物體的4個點。
程式碼如下:
#include <stdio.h>
#include <iostream>
#include <opencv2\core\core.hpp>
#include <opencv2\imgproc\imgproc.hpp>
#include <opencv2\nonfree\features2d.hpp>
#include <opencv2\highgui\highgui.hpp>
#include <opencv2\calib3d\calib3d.hpp>

using namespace cv;

void usage()
{
    std::cout << "Usage: ./FindObjectByFeature <img1> <img2> " << std::endl;
}

int main(int argc, char *argv[])
{
    if(argc != 3)
    {
        usage();
        return -1;
    }

    Mat img_object = imread(argv[1], CV_LOAD_IMAGE_COLOR);
    Mat img_scene = imread(argv[2], CV_LOAD_IMAGE_COLOR);

    if(!img_object.data || !img_scene.data)
    {
        std::cout << "Error reading images!" << std::endl;
        return -1;
    }

    //step1:檢測SURF特徵點/////////////////////////////////////////////////////////////////
    int minHeassian = 400;
    SurfFeatureDetector detector(minHeassian);

    std::vector<KeyPoint> keypoints_object, keypoints_scene;

    detector.detect(img_object, keypoints_object);
    detector.detect(img_scene, keypoints_scene);

    //step2:計算特徵向量///////////////////////////////////////////////////////////////////
    SurfDescriptorExtractor extractor;

    Mat descriptors_object, descriptors_scene;

    extractor.compute(img_object, keypoints_object, descriptors_object);
    extractor.compute(img_scene, keypoints_scene, descriptors_scene);

    //step3:利用FLANN匹配演算法匹配特徵描述向量//////////////////////////////////////////////
    FlannBasedMatcher matcher;
    std::vector<DMatch> matches;
    matcher.match( descriptors_object, descriptors_scene, matches);

    double max_dist = 0; double min_dist = 100;

    //快速計算特徵點之間的最大和最小距離///////////////////////////////////////////////////
    for(int i = 0; i < descriptors_object.rows; i++)
    {
        double dist = matches[i].distance;
        if(dist < min_dist) min_dist = dist;
        if(dist > max_dist) max_dist = dist;
    }

    printf("---Max dist: %f \n", max_dist);
    printf("---Min dist: %f \n", min_dist);

    //只畫出好的匹配點(匹配特徵點之間距離小於3*min_dist)//////////////////////////////////
    std::vector<DMatch> good_matches;

    for(int i = 0; i < descriptors_object.rows; i++)
    {
        if(matches[i].distance < 3*min_dist)
            good_matches.push_back(matches[i]);
    }

    Mat img_matches;
    drawMatches(img_object, keypoints_object, img_scene, keypoints_scene,
        good_matches, img_matches, Scalar::all(-1), Scalar::all(-1),
        vector<char>(), DrawMatchesFlags::NOT_DRAW_SINGLE_POINTS);

    //定位物體////////////////////////////////////////////////////////////////////////////
    std::vector<Point2f> obj;
    std::vector<Point2f> scene;

    for(int i = 0; i < good_matches.size(); i++)
    {
        //從好的匹配中獲取特徵點/////////////////////////////////////
        obj.push_back(keypoints_object[good_matches[i].queryIdx].pt);
        scene.push_back(keypoints_scene[good_matches[i].trainIdx].pt);
    }

    //找出匹配特徵點之間的變換///////////////////
    Mat H = findHomography(obj, scene, CV_RANSAC);

    //得到image_1的角點(需要尋找的物體)//////////
    std::vector<Point2f> obj_corners(4);
    obj_corners[0] = cvPoint(0,0);
    obj_corners[1] = cvPoint(img_object.cols, 0);
    obj_corners[2] = cvPoint(img_object.cols, img_object.rows);
    obj_corners[3] = cvPoint(0, img_object.rows);
    std::vector<Point2f> scene_corners(4);

    //匹配四個角點/////////////////////////////////////
    perspectiveTransform(obj_corners, scene_corners, H);

    //畫出匹配的物體///////////////////////////////////////////////////////////////////////
    line(img_matches, scene_corners[0] + Point2f(img_object.cols, 0), scene_corners[1] + Point2f(img_object.cols, 0), Scalar(0,255,0), 4);
    line(img_matches, scene_corners[1] + Point2f(img_object.cols, 0), scene_corners[2] + Point2f(img_object.cols, 0), Scalar(0,255,0), 4);
    line(img_matches, scene_corners[2] + Point2f(img_object.cols, 0), scene_corners[3] + Point2f(img_object.cols, 0), Scalar(0,255,0), 4);
    line(img_matches, scene_corners[3] + Point2f(img_object.cols, 0), scene_corners[0] + Point2f(img_object.cols, 0), Scalar(0,255,0), 4);

    imshow("Good Matches & Object detection", img_matches);

    waitKey(0);
    return 0;
}
匹配結果圖如下(下圖中左邊子圖為待尋找的物體影象,右邊子圖場景中尋找到的物體影象):
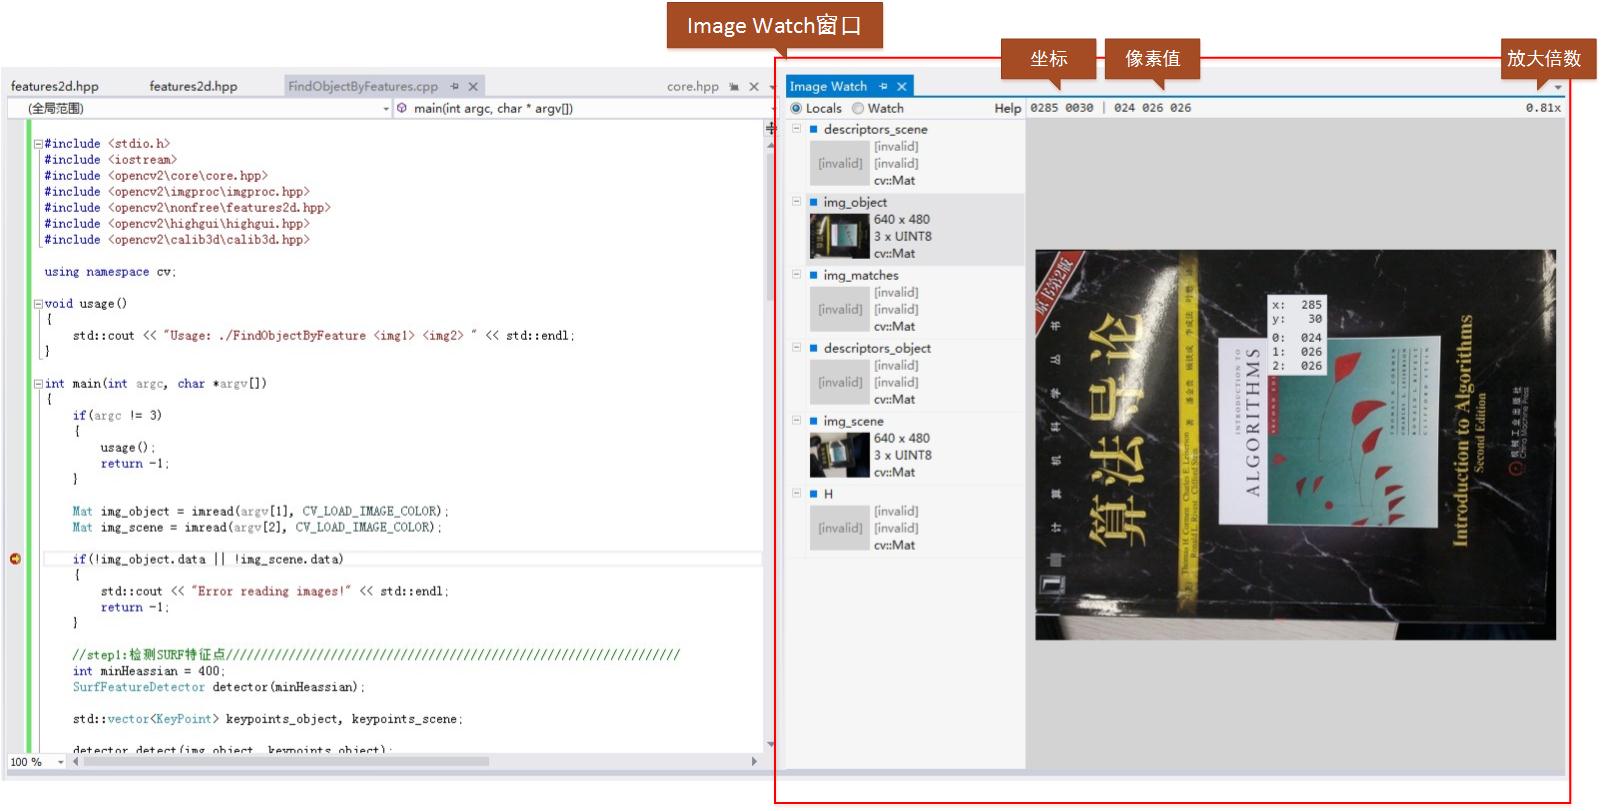
在Debug模式下,如果我們在程式某處設定除錯斷點,當程式執行到斷點處時,可以在Image Watch視窗(View->Other Windows->Image Watch)檢視已經分配記憶體的Mat影象。
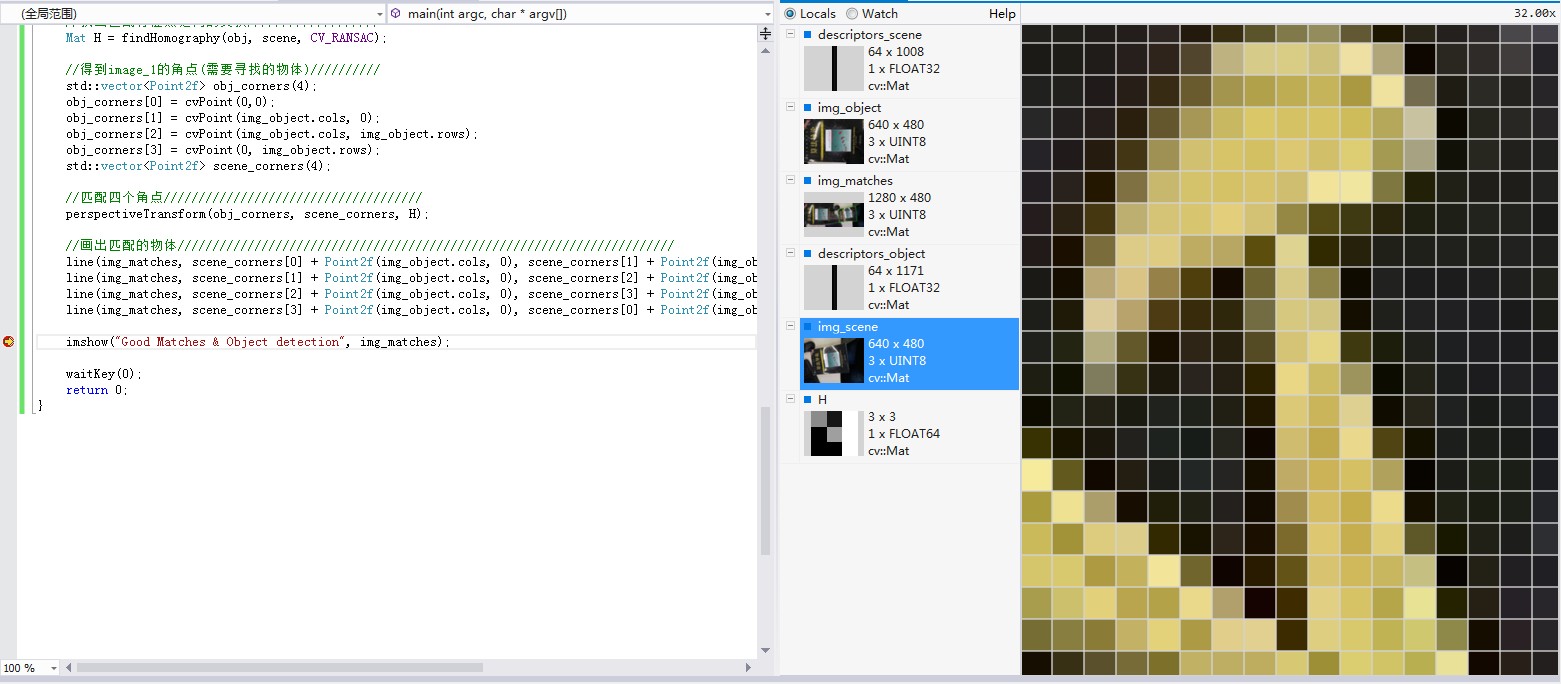
還在將滑鼠放置在所選影象上進行放大,最大能放大到畫素級別。如下圖所示:
在這個例子中,再稍微多說一點編譯工程時我遇到的問題。
1、如果用的是OpenCV2.4以後版本,在程式include中包含:#include <opencv2/features2d/features2d.hpp>,可能會出現SurfFeatureDetector無法解析的情況。
這是因為OpenCV2.4後,SurfFeatureDetector類移到了opencv2/nonfree/features2d.hpp,而不是opencv2/features2d/features2d.hpp。因此需要把#include<opencv2/features2d/features2d.hpp>改為
#include <opencv2/nonfree/features2d.hpp>,另外還需要把opencv_nonfree245d.lib庫檔案連結進去。
2、另外,對於工程中有兩個以上OpenCV版本的情況,加入#include <opencv2/nonfree/features2d.hpp>後編譯又可能出現重定義的情況。開始我一直沒搞清楚原因,後來在stackoverflow查了下。原因如下:
Your compiler and editor are confused by the two OpenCV versions installed on your system.

First, make sure that all the settings ( include paths in Visual Studio, lib path in Visual studio linker settings and bin path -probably an environment variable) point to the same version.

Next, make sure to include all the needed headers. In OpenCV 2.4 and above, SURF and SIFT have been moved to nonfree module, so you also have to install it. Do not forget that some functions may be moved to legacy.

And if you uninstall one version of OpenCV, the editor (which doesn't have all the parsing capabilities of the compiler) will not be confused anymore.
也就是說如果VS中安裝了兩個以上的OpenCV版本,VS可能會搞混,把include的地址解析到了兩個不同OpenCV目錄下的標頭檔案,因此引起重定義。
於是在VS中把include目錄下的OpenCV2.3.1的標頭檔案地址刪除,問題解決。
看來程式設計師真的應該多上下stackoverflow,能學到很多知識。