Enforcing the correct protocol for partially SSL secured SharePoint sites
This is the third in a series of posts detailing how to configure a partially SSL secured SharePoint site. In the previous post we covered how to enable SSL for the site. In this post we will cover how to force connections to use the correct protocol (HTTPS for sensitive data, HTTP otherwise). This is required so that if a user tries to browse to page that sends or displays sensitive data via HTTP (e.g.http://www.company.com/pages/login.aspx) they will be redirected to the HTTPS version of the page (e.g.https://www.company.com/pages/login.aspx – so they can login securely) and vice versa for pages like the homepage that should be delivered via HTTP so they do not incur the performance hit of encrypting and decrypting the page.
Ideally we would enter absolute links when linking to HTTPS pages from HTTP pages and vice versa. In reality, however, there are several reasons why this won’t always work so we need to have a ‘catch all’ method to ensure the correct protocol is used. Some reasons absolute URL’s don’t always work are:
- OOTB web parts such as the summary links web part will convert absolute links to relative links if they find an alternate access mapping for the site entered.
- Content authors may enter relative URL’s to secure pages such as the login page, for example by using the link selector tool.
- Content deployment will automatically replace absolute URL’s with relative URL’s if an alternate access mapping exists for the absolute URL. This affects all content pages and many OOTB web parts.
One way to ensure the correct protocol is used is to use redirection at the IIS level (this can also be done at the firewall but this won’t often be available for development/test environments). With the release of IIS 7 Microsoft has developed a URL Rewrite Module that provides an easy way for us to do this in IIS 7 Manager. The following steps show how to set this up.
Site setup
In this example we will partition the site into three areas.
- Secured and anonymous – pages that display or send sensitive information and therefore require SSL but are available to anonymous users. For example the login page would fit into this category.
- Secured and authenticated – page that display or send sensitive information and require the user to be logged in. For example a ‘My Details’ page that allows the user to view and edit their address details.
- Unsecured – pages that do not require the user to be logged in and do not contain sensitive information. All the remaining pages in the site fall into this category.
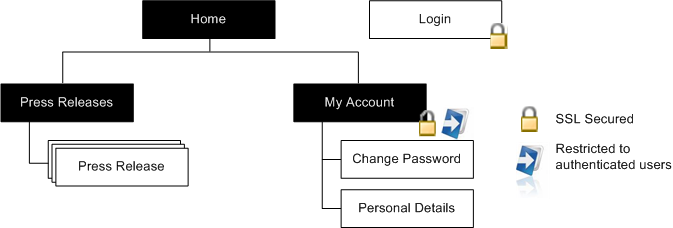
This is shown in the diagram below:
The site map above shows; an unsecured, anonymous homepage and ‘Press Releases’ site, a SSL secured and anonymous login page, and a SSL Secured ‘My Account’ site that requires authentication to access.
Enforcing SSL for anonymously accessible SharePoint pages
Step 1. Redirect login requests to the login form
As we are creating a public website we’ll replace the standard SharePoint branded login page with a publishing page that reflects our look and feel. In this example I’m using the Community Kit for SharePoint: Forms Based Authentication (CKS:FBA) solution’s web parts to allow me to quickly create some pages with the ASP.NET login controls packaged up as web parts. So to create the login page I’ve just created a page based on the Welcome Page template and dropped in the CKS:FBA Login web part as shown below:
We can then specify this as the login page by changing the loginUrl attribute of the forms element in the web.config as shown below:
<authentication mode="Forms">
<forms loginUrl="https://www.company.com/pages/login.aspx"/>
</authentication>
This will now redirect us to the login page (using SSL) if we try to access a secured resource.
Step 2. Secure the login page
While requests to secure pages will now be redirected to the login form it is still possible to view the page via HTTP so we need to apply some additional logic to ensure that if the user clicks on a link to the HTTP version of the page or types the HTTP URL into the browsers address bar the page is served via HTTPS. In this example we will use the URL Rewrite Module for IIS 7 but if your firewall supports it that might be a better solution. If you are using an earlier version of IIS you might need to look into third party rewrite tools or create a custom solution either using ISAPI or an HttpModule to do the redirection.
Once you have the URL Rewrite Module installed you should see the feature show up for your site in IIS.
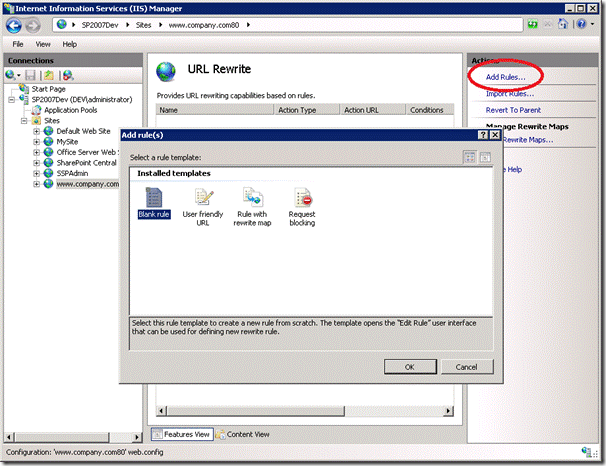
To secure the login page open up the feature and click ‘Add Rules…’ and select the ‘Blank rule’ template
Enter the following information to redirect HTTP requests to the login page to use HTTPS
- Name: HTTP to HTTPS
- Pattern: ^Pages/Login\.aspx
- Condition:
- Condition input: {HTTPS}
- Check if input string: Matches the pattern
- Pattern: off
- Action Type: Redirect
- Redirect URL: https://{HTTP_HOST}/{R:0}
- Redirect type: Permanent (301)
Note: detailed information on creating rewrite rules is covered in the article “Creating rewrite rules for the URL Rewrite Module” on the Official IIS Site.
Now if we type in http://www.company.com/pages/login.aspx we will automatically be redirected tohttps://www.company.com/pages/login.aspx.
Step 3. Enable authentication
We can extend this approach slightly to secure pages that should be delivered via SSL and only visible to authenticated users. Examples of these types of pages are ‘My Account’ type pages that allow logged in users to edit their personal information and/or view purchase history. In this example we will create a site called ‘My Account’ and create an example ‘Change Password’ page to show how we can control access to these pages and ensure the correct protocol is used.
Remove anonymous access for site
The first step in the process is to log into the forms authenticated site as a user who has administrative privileges. This can be done by specifying a forms user as the site collection administrator in Central Administration or by granting them the full rights policy.
1. Once you have logged in you will need to browse to the ‘My Account’ site and navigate to Site Actions > Site Settings > Modify All Site Settings > Users and Permissions | Advanced permissions.
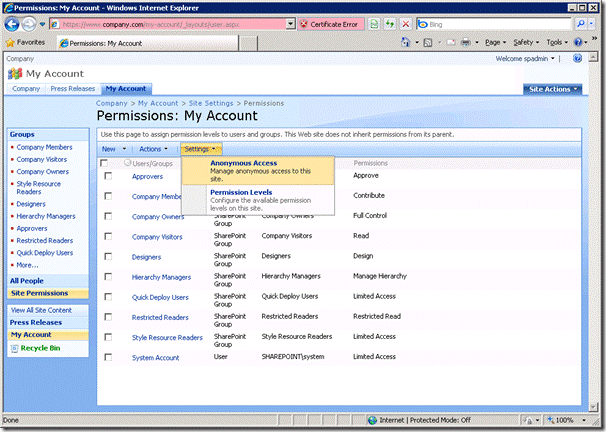
2. Select Actions > Edit Permissions. This will break permissions inheritance and allow us to remove anonymous access to the ‘My Account’ site.
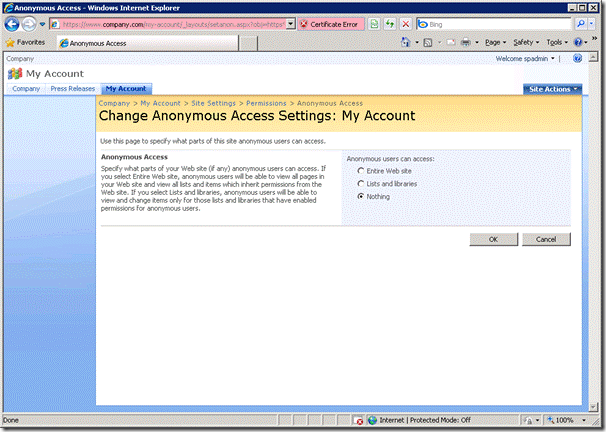
3. Select Settings > Anonymous Access
4. Select ‘Nothing’ and click OK.
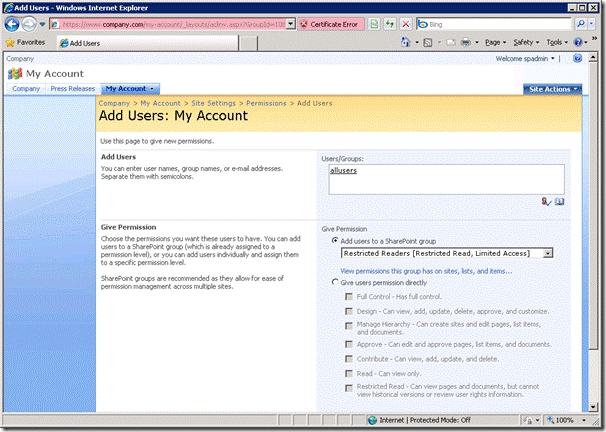
Anonymous users trying to access this site will now be redirected to the login page to authenticate before being able to view pages in this site. We now need to add forms users or roles to one of the groups that does have access to the site to allow them to view these pages. In this example I have created a role in the forms database named ‘AllUsers’ and assigned every user this permission. To give all users read only permission on the ‘My Account’ site we will add the ‘AllUsers’ role to the ‘Restricted Readers’ group in SharePoint.
5. Navigate to Site Settings > Modify All Site Settings > People and Groups and select the ‘Restricted Readers‘ group.
6. Enter the ‘AllUsers’ group into the people picker and select ‘OK’
We now have the correct permissions applied. To check that anonymous users can no longer access this site we can try to browse to the site directly as an anonymous user:
As we don’t have permission ASP.NET will redirect us to the login page specified in the web.config file:
Step 4. Secure additional sites
While the ‘My Account’ site is now restricted to anonymous users the pages within this site are not forced to use SSL. To do this we need to modify our rewrite rule as follows:
1. In IIS manager open the URL Rewrite feature
2. Select the rule we created to secure the login page and click ‘Edit’
3. Update the pattern to the following to additionally redirect HTTP requests to the ‘My Account’ site to use HTTPS:
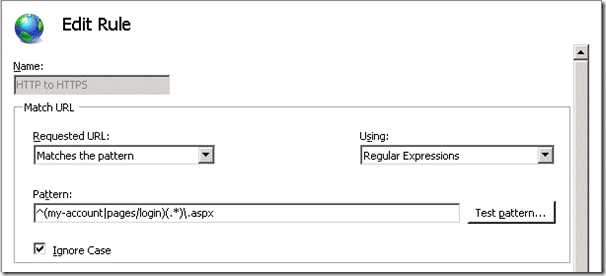
- Pattern: ^(my-account|pages/login)(.*)\.aspx
This will ensure any requests to the ‘My Account’ site are also sent via SSL.
Step 5. Ensure non-sensitive pages are delivered via HTTP.
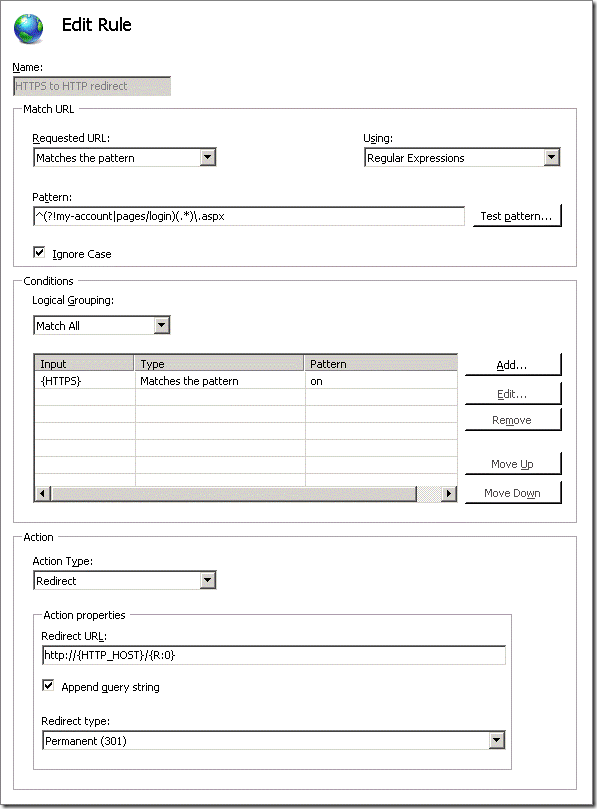
The last step is to force non-sensitive pages such as the homepage to use HTTP to avoid the overhead of encrypting and decrypting the page. This can be done by creating an additional rewrite rule as shown below:
1. In IIS manager open the URL Rewrite feature and click ‘Add Rules…’ and select the ‘Blank rule’ template
Enter the following information to redirect HTTPS requests to use HTTP for all other pages:
- Name: HTTPS to HTTP
- Pattern: ^(?!my-account|pages/login)(.*)\.aspx
- Condition:
- Condition input: {HTTPS}
- Check if input string: Matches the pattern
- Pattern: on
- Action Type: Redirect
- Redirect URL: http://{HTTP_HOST}/{R:0}
- Redirect type: Permanent (301)
Note the pattern above is a regular expression that matches any URL’s that do not start with ‘my-account’ or ‘pages/login’.
These rules will now ensure that all pages within the site use the correct protocol (HTTPS for pages that need to be secured, and HTTP for all other pages on the site):
Now if we try to navigate to the SSL version of a page that does not require SSL we will be redirected to the page using HTTP. For example if we enter https://www.company.com into the browsers address bar we will be redirected to http://www.company.com:
We have successfully secured the contents of the page but there is still a gaping hole in our security: the authentication token is sent via HTTP. This means that if we log in and then navigate to a unsecured page (e.g. the homepage) we will be sending our authentication information in the clear (i.e. the .ASPXAUTH cookie I mentioned in the Securing mixed SSL sites in SharePoint post). In the following article I’ll look at what we need to consider when forcing the authentication token to only be sent via HTTPS.




![clip_image006[1] clip_image006[1]](http://www.sharepointconfig.com/wp-content/uploads/2010/03/clip_image0061_thumb.gif)

