html5中,在新增加和廢除很多元素的同時,也增加和廢除了很多屬性。
一、新增屬性
1、表單屬性
a、autofocus
對input[所有型別]、select、textarea與button指定autofocus屬性。它以指定屬性的方式讓元素在頁面載入後自動獲得焦點。一個頁面只能有一個元素有autofocus屬性,同時設定多個,則第一個生效。
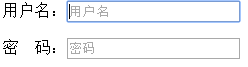
這個屬性對登入頁面很有用,可提升使用者體驗,有時登入頁面就一個使用者名稱,密碼,頁面載入後使用者要手動定位到輸入框,才能輸入,有了autofocus,頁面開啟即可直接輸入。
舉例:
<form> <p>使用者名稱:<input type="text" autofocus /></p> <p>密 碼:<input type="password"/></p> </form>

b、placeholder
對input[text, search, url, telephone, email 以及 password]、textarea指定placeholder屬性,它會對使用者的輸入進行提示,提示使用者期待什麼樣的輸入。
當輸入框獲取焦點時,提示字元消失。
這個屬性也能提升使用者體驗,用的已經相當普遍了。
舉例:


<form> <p>使用者名稱:<input type="text" autofocus placeholder="使用者名稱"/></p> <p>密 碼:<input type="password" placeholder="密碼"/></p> </form>
c、form屬性
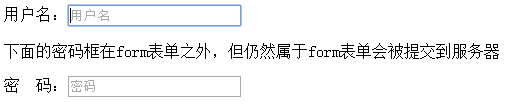
對input[所有型別]、output、select、textarea、button與fieldset指定form屬性。它宣告屬於哪個表單,然後將其放置在頁面的任何位置,都在表單之內。這個屬性解放了form表單裡的元素,給我們在複雜的佈局時帶來方便。
Note:
一個輸入域可以屬於一個或多個表單,多個表單用空格分隔開。
輸入域的form屬性必須引用所屬表單的id,這點有點像<label>標籤的for屬性。
舉例:
<form action="" method="" id="user_form"> <p>使用者名稱:<input type="text" autofocus placeholder="使用者名稱"/></p> </form> <p>下面的密碼框在form表單之外,但仍然屬於form表單會被提交到伺服器</p> <p>密 碼:<input type="password" placeholder="密碼" form="user_form"/></p>
d、required屬性
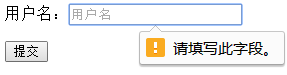
該屬性表示使用者提交時檢查該元素輸入域不能為空。
適用於以下型別的 input[text, search, url, telephone, email, password, date pickers, number, checkbox, radio, file]。
舉例:
<form action="" method="" id="user_form">
<p>使用者名稱:<input type="text" autofocus placeholder="使用者名稱" required/></p>
<p><input  type="submit" value="提交"/></p>
</form>
e、autocomplete屬性。
autocomplete:適用於form,input[text,search,url,telephone,email,password,datepickers,range,color]。
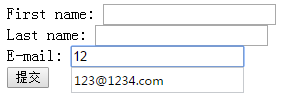
設定"autocomplete"屬性為"on",則使用者在自動完成域輸入時,瀏覽器會在該域內顯示填寫的選項。
<form action="" method="get" autocomplete="on">
        First name:
        <input type="text" name="fname" /><br />
        Last name:
        <input type="text" name="lname" /><br />
        E-mail:
        <input type="email" name="email"autocomplete="on"/><br />
        <input type="submit" />
</form>
f、重置表單預設行為的新屬性
html5中表單的自由度非常高,因為html5為input[submit,image]、button元素增加formaction、formenctype、formmethod、formnovalidate與formtarget幾個新屬性,能對form元素的某些屬性重置,比如能做到表單1的提交按鈕提交表單2等。
formaction:重寫表單action屬性
formenctype:重寫表單enctype屬性
formmethod:重寫表單method屬性
formnovalidate:重寫表單novalidate屬性
formtarget:重寫表單target屬性
舉例:formaction和formmethod
html中,一個表單內的所有元素都通過表單的action屬性統一提交到另一個頁面。html5中可通過formaction屬性實現點選不同提交按鈕,將表單提交到不同的頁面。
html中一個表單只有一個action屬性來對錶單內所有元素統一指定提交頁面,每個表單只有一個method屬性統一指定提交方法。html5中新增的formmethod方法,可以實現不同按鈕指定不同提交方法,比如post,get等。
<form action="server.jsp" method="get" id="user_form">
     E-mail:
     <input type="email" name="useremail" /><br />
     <input type="submit" formmethod="get"  formaction="s1.jsp" value="get方法提交到s1.jsp" /><br />
     <input type="submit" formmethod="post" formaction="s2.jsp" value="post方法提交到s2.jsp" /><br />
</form>

點"get方法提交到s1.jsp"按鈕,將表單以get方法提交到s1.jsp頁面,從url也可以看出位址列顯示提交引數。
點"post方法提交到s2.jsp"按鈕,將表單以post方法提交到s2.jsp頁面。
舉例:formnovalidate屬性,可以取消提交時進行的有關檢查,表單可以被無條件地提交[哪怕form裡有required,min,max等]。
<form action="demo_form.jsp" method="get" id="user_form">
    E-mail:   <input type="email" required name="useremail" /><br />
    <input type="submit" formnovalidate="true"  value="Submit without validation" />
</form>
點選“Submit without validation”按鈕時,Form 不會做任何校驗,雖然有required屬性,表單空仍然可以提交。
g、image提交按鈕新增width,height屬性
width和height來設定image型別的input標籤的影象的寬高。
舉例:用 來作為提交按鈕,通過width和height設定其寬高。
<form action="server.jsp" method="get" id="user_form">
     E-mail:
     <input type="email" name="useremail" /><br />
     <input type="image" src="img/submit.png"  width="30px" height="30px"/>
</form>

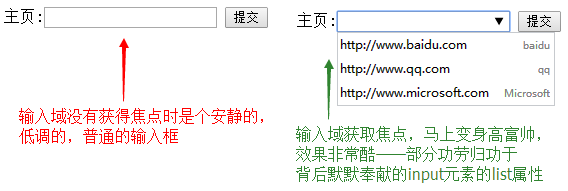
h、list屬性
list屬性與 datalist標籤配合使用,用來規定輸入域的datalist。datalist是輸入域的選項列表,該元素類似<select>,但是比select更好的一點在,當使用者要設定的值不在選擇列表內時,允許自行輸入,該元素本身不顯示,當文字框獲得焦點時以提示輸入的方式顯示。
list屬性適用於input[text,search,url,telephone,email,datepickers,numbers,range,color]
Note:
list值為文件中的 datalist 的 id,又看到了熟悉的id,回想一下form屬性引用的是表單的id,都類似label屬性引用input的id一樣。
舉例:
<form action="demo_form.jsp" method="get">
    主頁:<input type="url" list="url_list" name="link" />
    <datalist id="url_list">
        <option label="baidu" value="http://www.baidu.com" />
        <option label="qq" value="http://www.qq.com" />
        <option label="Microsoft" value="http://www.microsoft.com" />
      </datalist>
    <input type="submit" />
</form>
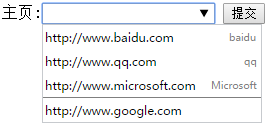
舉例:順便說一下datalist和autocomplete配合使用
前面講了autocomplete屬性可以讓使用者完成域輸入時,瀏覽器在該域內顯示填寫的選項。現在datalist元素與autocomplete屬性配合使用可更好的提升使用者體驗。
在上面程式碼基礎上給datalist增加autocomplete屬性,即<datalist id="url_list" autocomplete>。
使用者第一次輸入http:www.google.com提交後,再次輸入時會同時給出datalist的option提示和autocomplete增加的提示。
i、max,min和step屬性
max,min和step屬性用來為包含數字或日期的input型別規定限定或者說約束。
max屬性規定輸入域所允許的最大值。
min屬性規定輸入域允許的最小值。
step屬性為輸入域規定合法的數字間隔。(假如 step="3",則合法數字應該是 -3、0、3、6,以此類推)step 屬性可以與 max 以及 min 屬性配合使用,以建立合法值的範圍。
max,min,step屬性適用於input[datepickers,number,range]。
舉例:
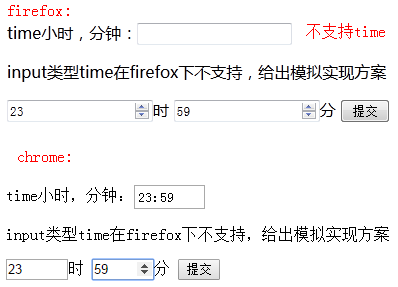
這是一個非常好的屬性,之前有人問我用<input type="time">來輸入時間,奈何firefox瀏覽器不支援怎麼辦。可以通過min max 模擬實現一個時間輸入框,小時允許輸入[0~23],分鐘允許輸入[0~59]。
<form action="demo_form.jsp" method="get">
    <label>time小時,分鐘:<input type="time" name="user_time"></label>
    <p>input型別time在firefox下不支援,給出模擬實現方案</p>
    <label><input type="number" min="0" max="23" step="1">時</label>
    <label><input type="number" min="0" max="59">分</label>
    <input type="submit" value="提交"/>
</form>
超出max提交時給出提示。

更多細節可參考HTML5 number型別文字框step屬性的驗證機制
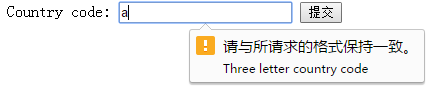
j、pattern屬性
pattern屬性用於驗證輸入欄位的模式,其實就是正規表示式,不用再寫js繫結正則驗證了,非常方便。
pattern屬性適用於input[text,search,url,telephone,email,password]
舉例:給輸入框定義了 Pattern 為“[A-z]{3}”,也就是包含三個字母的正規表示式約束,如果輸入不合法,我們會看到如下效果。
<form action="#" method="get" id="user_form">
    Country code:
    <input type="text" name="country_code" pattern="[A-z]{3}"title="Three letter country code" />
    <input type="submit" />
</form>
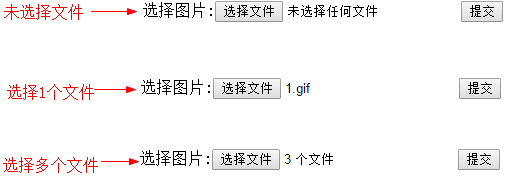
k、multiple屬性
multiple屬性規定輸入域中可選擇多個值。
multiple屬性適用於input[email,file]。
舉例:允許上傳時一次上傳多個檔案。
<form action="demo_form.jsp" method="get">
    選擇圖片:<input type="file" name="img" multiple="multiple" />
<input type="submit" />
</form>
l、<fieldset>增加disabled屬性
html5為 fieldset元素增加了disabled屬性,可以把它的子元素設為disabled狀態,但是注意不包括legend裡的元素。
舉例:點選legend中的checkbox,切換filed子元素的disabled狀態。
<form>
    <fieldset name="userInfo">
        <legend>
            <label><input type="checkbox" checked name="enableUserInfo" onchange="form.userInfo.disabled=!checked">啟用使用者資訊</label>
        </legend>
        <p>
            <label>姓名:<input name="userName" required></label>
        </p>
        <fieldset name="personalInfo">
            <legend>
                <label><input type="checkbox" checked  name="enablePersonalInfo" onchange="form.personalInfo.disabled=!checked">個人資訊</label>
            </legend>
            <p>
                <label>生日:<input name="birthday" required></label>
            </p>
        </fieldset>
        <fieldset name="companyInfo">
            <legend>
                <label><input type="checkbox" checked name="enableCompanyInfo" onchange="form.companyInfo.disabled=!checked">公司資訊</label>
            </legend>
            <p>
                <label>公司名稱:<input name="companyName" required></label>
            </p>
        </fieldset>
    </fieldset>
</form>

m、<label>增加control屬性
html5中為標籤新增了control屬性,在標籤內部放置一個表單元素,通過標籤的control屬性訪問該表單元素。
舉例:
<script>
    function setValue(){
        var label=document.getElementById("label");
        var textbox=label.control;
        textbox.value="718308";
    }
</script>
<form>
<label id="label">
    郵編:
    <input id="txt_zip" maxlength="6">
    <small>請輸入6位數字</small>
</label>
<input type="button" value="設定預設值" onclick="setValue()">
</form>

分析:通過label的control屬性控制input輸入框的value,所以點“設定預設值”按鈕,將郵編輸入框值初始化為"718308"。
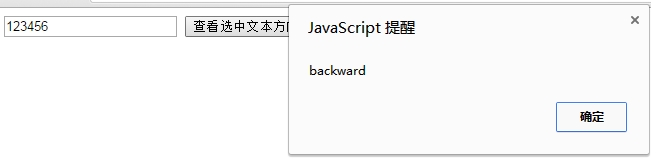
n、新增SelectionDirection屬性
selectionDirection適用於input元素和textarea元素。
使用者在input元素或textarea元素中用滑鼠選取部分文字時,可以使用該屬性來獲取選取方向。當使用者正向選取文字時,該屬性值為"forward",反向選取值為“backward”,且當使用者沒有選取任何文字時,該屬性值為"forward"。
舉例:
<script type="text/javascript">
    function alertSelectionDirection(){
        var testInput=document.getElementById("test");
        var direction=testInput.selectionDirection;
        alert(direction);
    }
</script>
<form>
    <input type="text" name="text" id="test">
    <input type="button" value="檢視選中文字方向" onclick="alertSelectionDirection()">
</form>
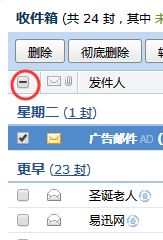
o、核取方塊的indeterminate屬性
這個屬性用來表示核取方塊部分選中,像qq郵箱中,郵件部分選中就有這樣的效果。
舉例:經測試,貌似還是必須通過指令碼控制indetermidate屬性。
<form>
     <input type="checkbox" checked/>
     <input type="checkbox" indeterminate/>只寫一個indeterminate不起作用
     <input type="checkbox" id="test"/>
     <input type="checkbox" />
</form>
 <script>
    document.getElementById('test').indeterminate = true;
</script>

indeterminate屬性主要是在核取方塊巢狀時使用,瞭解更多可參考css-tricks indetermidate-checkboxes
2、連結屬性
a、media屬性
為a、area增加media屬性。規定目標 URL 是為哪種型別的媒介/裝置進行優化的,只能在href屬性存在時使用。該屬性用於規定目標 URL 是為特殊裝置(比如 iPhone)、語音或列印媒介設計的,可接受多個值。
<a href="http://www.baidu.com" media="print and (resolution:300dpi)" >查詢</a>
取值如下:【沒懂這個media到底有什麼樣的優化措施】
運算子:[and]and運算子,[not]not運算子,[,]or運算子。

裝置:

    all:預設,適合所有裝置。
    aural:語音合成器
    braille:盲文反饋裝置
    handheld:手持裝置(小螢幕,有限的頻寬)
    projection:投影機
    print:列印預覽模式/列印頁面
    screen:計算機螢幕
    tty:電傳打字機以及使用等寬字元網格的類似媒介
    tv:電視型別裝置(低解析度,有限的分頁能力)

值:

    width:規定目標顯示區域的寬度,可使用"min-" 和 "max-" 字首。例:media="screen and (min-width:500px)"
    height:同width,用來設定高度。
    device-width:規定目標顯示器/紙張的寬度。可使用 "min-" 和 "max-" 字首。例:media="screen and (device-width:500px)"
    device-height:同device-height,用來設定高度。
    orientation:英文意思"方向",用來規定目標顯示器/紙張的取向。可能的值:"portrait" 或 "landscape"。例:media="all and(orientation: landscape)"
    aspect-ratio:規定目標顯示區域的寬高比。可使用 "min-" 和 "max-" 字首。例:media="screen and (aspect-ratio:16/9)"
    device-aspect-ratio:規定目標顯示器/紙張的 device-width/device-height 比率。可使用 "min-" 和 "max-" 字首。例:media="screen and (aspect-ratio:16/9)"
    color:規定目標顯示器的 bits per color。可使用 "min-" 和 "max-" 字首。例:media="screen and (color:3)"
    color-index:規定目標顯示器能夠處理的顏色數。可使用 "min-" 和 "max-" 字首。例:media="screen and (min-color-index:256)"
    monochrome:規定在單色幀緩衝中的每畫素位元。可使用 "min-" 和 "max-" 字首。例:media="screen and (monochrome:2)"
    resolution:規定目標顯示器/紙張的畫素密度 (dpi or dpcm)。可使用 "min-" 和 "max-" 字首。例:media="print and (resolution:300dpi)"
    scan:規定 tv 顯示器的掃描方法。可能的值是:"progressive" 和 "interlace"。例:media="tv and (scan:interlace)"
    grid:規定輸出裝置是網格還是點陣圖。可能的值:"1" 代表網格,"0" 是其他。例:media="handheld and (grid:1)"
更多可參考w3c media
b、<area>新增herflang、media、rel、type屬性
herflang,media,rel,type為了保證a元素和link元素的一致性。
hreflang【取值language_code】規定在被連結文件中的文字的語言。只有當設定了 href 屬性時,才能使用該屬性。註釋:該屬性是純諮詢性的。
media【取值media query】:對何種裝置優化。【具體怎麼優化?】
舉例:
<a media="handheld" href="#">手持裝置</a>
<a media="tv" href="#">電視</a>
rel 【取值alternate, author, bookmark, external, help, license, next, nofollow, noreferrer, prefetch, prev, search, sidebar, tag】規定當前文件與被連結文件/資源之間的關係。只有當使用 href 屬性時,才能使用 rel 屬性。
舉例:
<a href=http://www.mukewang.com/" hreflang="zh" rel="external">
表示超連結使用的是中文,並且這個超連結是個外部的超連結。
type【mime_type】規定目標 URL 的 MIME 型別。
c、<link>新增sizes屬性
為link增加sizes屬性。sizes 屬性規定被連結資源的尺寸。只有當被連結資源是圖示時 (rel="icon"),才能使用該屬性。該屬性可接受多個值。值由空格分隔。
網上千篇一律都是這樣寫的:
<link rel="icon" href="img/demo_icon.ico" type="image/gif" sizes="16x16" />
但是經過測試用不用sizes都一樣,沒看出sizes有什麼作用。查了一下目前幾乎沒有主流瀏覽器支援 sizes 屬性。
d、<base>新增target屬性
為base元素增加target屬性,主要是保持與a元素的一致性。
舉例:target表示頁面中超連結都將使用_blank在新視窗中開啟頁面,且加上http://localhost地址,後面相當於相對地址。
<!DOCTYPE html>
<html>
<head>
    <meta charset="UTF-8" />
    <title>base element target</title>
    <base href="http://localhost/ " target="_blank">
</head>
<body>
<a href="a.html" >a.html頁面</a>
</body>
</html>
點a.html頁面將在新視窗中開啟連結:http://localhost/a.html
3、其他屬性
a、ol新增reversed屬性
reversed是個bool屬性,規定有序列表倒序。
舉例:有序列表起始值50,倒序。
<ol start="50" reversed>
    <li>coffee</li>
    <li>Tea</li>
    <li>Milk</li>
</ol>

b、meta新增charset屬性
為meta增加charset屬性
c、menu新增type和label屬性
menu在html4.01中廢棄,後在html5中重新定義,為menu增加type和label屬性。label為選單定義一個選單的標註,type屬性讓才當可以以上下文選單、工具條與列表右鍵選單三種形式出現。
label取值是文字,表示選單名稱。
type取值三個:
popup:瀏覽器不支援。
toolbar:瀏覽器不支援。
context:右鍵選單。僅firefox支援。
可通過w3c menu元素瞭解更多。
舉例:toolbar
<menu type="toolbar" label="menu">
    <li><input type="checkbox" />red</li>
    <li><input type="checkbox">blue</li>
</menu>
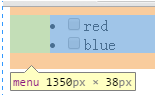
可見menu的瀏覽器預設樣式為:
menu {
    display: block;
    list-style-type: disc;
    margin-top: 1em;
    margin-bottom: 1em;
    margin-left: 0;
    margin-right: 0;
    padding-left: 40px;
}
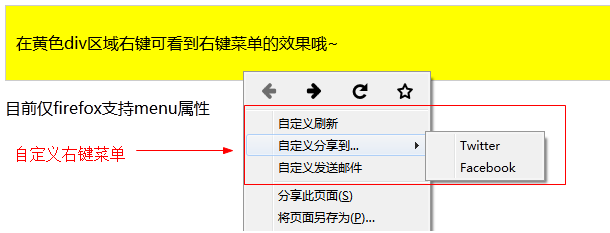
舉例:context
<div contextmenu="mymenu">
    <p>在黃色div區域右鍵可看到右鍵選單的效果哦~</p>
    <menu type="context" id="mymenu">
        <menuitem label="自定義重新整理" onclick="window.location.reload();" icon="ico_reload.png"></menuitem>
        <menu label="自定義分享到...">
            <menuitem label="Twitter" icon="ico_twitter.png" onclick="window.open('//twitter.com/intent/tweet?text=' + window.location.href);"></menuitem>
            <menuitem label="Facebook" icon="ico_facebook.png" onclick="window.open('//facebook.com/sharer/sharer.php?u=' + window.location.href);"></menuitem>
        </menu>
        <menuitem label="自定義傳送郵件" onclick="window.location='mailto:?body='+window.location.href;"></menuitem>
    </menu>
</div>
<p>目前僅firefox支援menu屬性</p>
d、style新增scoped屬性
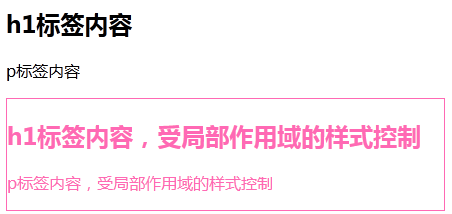
html5為style增加scoped屬性。有了一個樣式作用域的概念,它允許我們為文件的指定部分定義樣式,而不是整個文件。如果使用 "scoped" 屬性,那麼所規定的樣式只能應用到 style 元素的父元素及其子元素。 scoped為開發單頁面樣式帶來方便,但不能常用,否則css難以維護。
舉例:
<!-- 這個article正常使用head裡宣告的style -->
<article>
    <h1>h1標籤內容</h1>
    <p>p標籤內容</p>
</article>

<article>
    <!-- 這裡宣告的style只能讓該article以及子元素使用 -->
    <style scoped>
        h1,p{ color: hotpink; }
        article { border: solid 1px hotpink; }
    </style>
    <h1>h1標籤內容,受區域性作用域的樣式控制</h1>
    <p>p標籤內容,受區域性作用域的樣式控制</p>
</article>
e、script新增async屬性
html5為script新增了一個async屬性,用來定義指令碼是否非同步執行。async僅適用於外部指令碼(只有在使用src屬性時)。
和async【非同步執行】相近的還有一個屬性defer【推遲執行】,defer屬性過去也有,但在html5中進行了更好的支援。
使用:
如果 async="async":指令碼相對於頁面的其餘部分非同步地執行,因為async表示下載指令碼檔案,之後馬上執行,執行的同時並不阻止瀏覽器去解析下面的內容,所以稱之為非同步。
如果不使用 async 且 defer="defer":指令碼將在頁面完成解析時執行,因為defer表示指令碼下載完並不執行而是等頁面全部載入完之後再執行。
如果既不使用 async 也不使用 defer:在瀏覽器繼續解析頁面之前,立即讀取並執行指令碼。
舉例:
在jquery官網有兩個jquery檔案,如下。
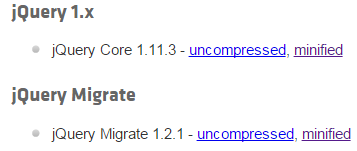
我們就拿這兩個檔案舉例,jquery-1.11.3.min.js是 標準庫檔案,93.7k。jquery-migrate-1.2.1.min.js是jquery向後相容的檔案,7.03k。程式碼如下。
<!DOCTYPE>
<meta charset="utf-8"></meta>
<meta http-equiv="prama" content="no-cache"><!--禁止掉頁面快取-->
<script defer src="http://code.jquery.com/jquery-1.11.3.min.js" onload="alert('a')"></script>
<script async src="http://code.jquery.com/jquery-migrate-1.2.1.min.js" onload="alert('b')"></script>
執行效果,先彈出b,後彈出a。
f、html元素新增manifest屬性
html5為html元素增加manifest,指向一個用於結合離線web應用API的應用程式快取清單。開發離線web應用程式時他與API結合使用,定義一個URL,在這個URL上描述文件的快取資訊。
訪問一次以後下次就是斷網了也能看到以前的內容。
用法:
首先,建立mainfest檔案
CACHE MANIFEST
#This is a comment

CACHE #需要快取的檔案
index.html
style.css

NETWORK: #不需要快取的檔案
search.php
login.php

FALLBACK: #資源不可用的情況下,重定向的地址
/api offline.html
然後將該mainfest檔案的地址加到html屬性中。
<html manifest="/offline.manifest">
詳細步驟可參考:How to create offline HTML5 web apps in 5 easy steps
瞭解更多可參考:w3c manifests
g、iframe元素新增sandbox、seamless、srcdoc屬性
為iframe增加三個屬性,sandbox、seamless、srcdoc。用來提高頁面安全性,防止不信任的web頁面執行某些操作。
seamless:有這個屬性,表示iframe框架沒有邊框,沒有邊距。
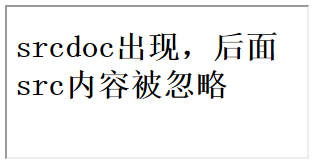
srcdoc:用來指定內嵌框架的內容,srcdoc和src屬性有順序區分,有了srcdoc,後面src的內容被忽略。
舉例:
<iframe srcdoc="<h1>srcdoc出現,後面src內容被忽略</h1>" src="http://www.baidu.com"></iframe>
sandbox:是個安全沙箱。有了sandbox,內嵌框架就有了嚴格的安全限制,禁止提交表單,禁止執行js指令碼,且內嵌頁面和外面頁面不同源。等。
當然可以通過給sandbox設定來取消限制。可選值:
"":應用以下所有限制。
allow-scripts:執行執行JavaScript。
allow-same-origin:允許iframe內容被視為與包含文件有相同的源。
allow-top-navigation:允許iframe內容從包含文件導航(載入)內容。
allow-forms:執行提交表單。
二、刪除屬性
刪除了一些可以用css代替的屬性,多餘屬性和其他屬性。
|
在HTML 4中使用的屬性 |
使用該屬性的元素 |
在HTML 5中的替代方案 |
|
rev |
link、a |
rel |
|
charset |
link、a |
在被連結的資源的中使用HTTP Content-type頭元素 |
|
shape、coords |
a |
使用area元素代替a元素 |
|
longdesc |
img、iframe |
使用a元素連結到校長描述 |
|
target |
link |
多餘屬性,被省略 |
|
nohref |
area |
多餘屬性,被省略 |
|
profile |
head |
多餘屬性,被省略 |
|
version |
html |
多餘屬性,被省略 |
|
name |
img |
id |
|
scheme |
meta |
只為某個表單域使用scheme |
|
archive、chlassid、codebose、codetype、declare、standby |
object |
使用data與typc屬性類呼叫外掛。需要使用這些屬性來設定引數時,使用param屬性 |
|
valuetype、type |
param |
使用name與value屬性,不宣告之的MIME型別 |
|
axis、abbr |
td、th |
使用以明確簡潔的文字開頭、後跟詳述文字的形式。可以對更詳細內容使用title屬性,來使單元格的內容變得簡短 |
|
scope |
td |
在被連結的資源的中使用HTTP Content-type頭元素 |
|
align |
caption、input、legend、div、h1、h2、h3、h4、h5、h6、p |
使用CSS樣式表替代 |
|
alink、link、text、vlink、background、bgcolor |
body |
使用CSS樣式表替代 |
|
align、bgcolor、border、cellpadding、cellspacing、frame、rules、width |
table |
使用CSS樣式表替代 |
|
align、char、charoff、height、nowrap、valign |
tbody、thead、tfoot |
使用CSS樣式表替代 |
|
align、bgcolor、char、charoff、height、nowrap、valign、width |
td、th |
使用CSS樣式表替代 |
|
align、bgcolor、char、charoff、valign |
tr |
使用CSS樣式表替代 |
|
align、char、charoff、valign、width |
col、colgroup |
使用CSS樣式表替代 |
|
align、border、hspace、vspace |
object |
使用CSS樣式表替代 |
|
clear |
br |
使用CSS樣式表替代 |
|
compace、type |
ol、ul、li |
使用CSS樣式表替代 |
|
compace |
dl |
使用CSS樣式表替代 |
|
compace |
menu |
使用CSS樣式表替代 |
|
width |
pre |
使用CSS樣式表替代 |
|
align、hspace、vspace |
img |
使用CSS樣式表替代 |
|
align、noshade、size、width |
hr |
使用CSS樣式表替代 |
|
align、frameborder、scrolling、marginheight、marginwidth |
iframe |
使用CSS樣式表替代 |
|
autosubmit |
menu |