前面的話
這幾天被redux折騰的夠嗆,看了很多視訊,也看了很多資料。很多時候,感覺好像頓悟了,但實際上只是理解了其中的一個小概念而已。真正去做專案的時候,還是會卡殼。可能是學CSS和Javascript時花的時間太久了,學redux的時候有點浮躁。還有就是redux內容實在是不少,全部都看都理解,好像沒什麼必要。不看吧,用的時候總是有點力不從心。於是,決定把這些資料按自己的理解寫成部落格,方便自己回憶思路,也希望能幫助到需要的人
核心概念
redux專注於狀態管理,把所有的狀態都存在一個物件中。核心概念包括:store、state、action、reducer
【store】
store是儲存資料的地方,redux提供createStore函式來生成 Store。函式引數是後面要介紹的reducer
import { createStore } from 'redux'
const store = createStore(reducer)
【state】
state是store的某個時刻的快照,可以通過store.getState()取得當前時刻的state
const state = store.getState()
【action】
action用來改變state。action是一個物件,其中的type屬性是必須的,其他的屬性一般用來設定改變state需要的資料
const action = {
  type: 'ADD_ONE',
  num: 1
}
store.dispatch()是發出action的唯一方法
const action = {
  type: 'ADD_ONE',
  num: 1
}
store.dispatch(action)
【reducer】
reducer 是一個函式,它接受action和當前state作為引數,返回一個新的state
import { createStore } from 'redux'
const store = createStore(reducer)
const reducer = (state = 10, action) => {
  switch (action.type) {
    case 'ADD_ONE':
      return state + action.num;
    default:
      return state;
  }
};
當store.dispatch傳送過來一個新的action,store就會自動呼叫reducer,得到新的state
簡單例項
多餘的概念不再介紹,下面用上面介紹的這四個核心概念實現一個簡單的例項,將create-react-app中index.js檔案內容更改如下,即可執行
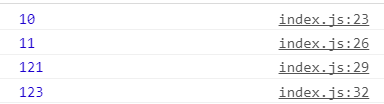
//第一步,建立action
const addOne = {
  type: 'ADD',
  num: 1
}
const addTwo = {
  type: 'ADD',
  num: 2
}
const square = {
  type: 'SQUARE'
}

//第二步,建立reducer
let math = (state = 10, action) => {
  switch (action.type) {
    case ADD:
      return state + action.num
    case SQUARE:
      return state * state
    default:
      return state
  }
}
//第三步,建立store
import { createStore } from 'redux'
const store = createStore(math)

//第四步,測試,通過dispatch發出action,並通過getState()取得當前state值
console.log(store.getState()) //預設值為10

store.dispatch(addOne) //發起'+1'的action
console.log(store.getState()) //當前值為10+1=11

store.dispatch(square) //發起'乘方'的action
console.log(store.getState()) //當前值為11*11=121

store.dispatch(addTwo) //發起'+2'的action
console.log(store.getState()) //當前值為121+2=123
結果如下
目錄結構
下面對目錄結構進行劃分
1、一般地,將action.type設定為常量,這樣在書寫錯誤時,會得到報錯提示
// constants/ActionTypes.js
export const ADD = 'ADD'
export const SQUARE = 'SQUARE'
2、可以將addOne物件和addTwo物件整合成add函式的形式
// action/math.js
import { ADD, SQUARE } from '../constants/ActionTypes'
export const add = num => ({ type: ADD, num })
export const square = { type: SQUARE }
3、根據action.type的分類來拆分reducer,最終通過combineReducers方法將拆分的reducer合併起來。上例中的action型別都是數字運算,無需拆分,只需進行如下變化
// reducer/math.js
import { ADD, SQUARE } from '../constants/ActionTypes'
const math = (state = 10, action) => {
  switch (action.type) {
    case ADD:
      return state + action.num
    case SQUARE:
      return state * state
    default:
      return state
  }
}
export default math
// reducer/index.js
import { combineReducers } from 'redux'
import math from './math'
const rootReducer = combineReducers({
  math
})
export default rootReducer
4、將store儲存到store/index.js檔案中
// store/index.js
import { createStore } from 'redux'
import rootReducer from '../reducer'
export default createStore(rootReducer)
5、最終,根路徑下的index.js內容如下所示
import store from './store'
import {add, square} from './action/math'

console.log(store.getState()) //預設值為10

store.dispatch(add(1)) //發起'+1'的action
console.log(store.getState()) //當前值為10+1=11

store.dispatch(square) //發起'乘方'的action
console.log(store.getState()) //當前值為11*11=121

store.dispatch(add(2)) //發起'+2'的action
console.log(store.getState()) //當前值為121+2=123
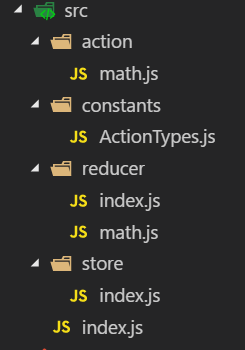
最終目錄路徑如下所示
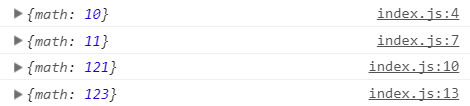
最終結果如下所示
UI層
前面的示例中,只是redux的狀態改變,下面利用UI層來建立view和state的聯絡,將根目錄下的index.js的內容更改如下
import store from './store'
import React from 'react'
import ReactDOM from 'react-dom'
import { add, square } from './action/math'

ReactDOM.render(
  <div store={store}>
    <p>{store.getState().math}</p>
    <input type="button" onClick={() => store.dispatch(add(1))} value="+1" />
    <input type="button" onClick={() => store.dispatch(add(2))} value="+2" />
    <input type="button" onClick={() => store.dispatch(square)} value="乘方" />
  </div>,
  document.getElementById('root')
)
雖然可以顯示數字,但是點選按鈕時,卻不能重新渲染頁面
【store.subscribe()】
接下來介紹store.subscribe()方法了,該方法用來設定監聽函式,一旦state發生變化,就自動執行這個函式。該方法的返回值是一個函式,呼叫這個函式可以解除監聽
下面將示例程式碼更改如下
import store from './store'
import React from 'react'
import ReactDOM from 'react-dom'
import { add, square } from './action/math'

const render = () => ReactDOM.render(
  <div store={store}>
    <p>{store.getState().math}</p>
    <input type="button" onClick={() => store.dispatch(add(1))} value="+1" />
    <input type="button" onClick={() => store.dispatch(add(2))} value="+2" />
    <input type="button" onClick={() => store.dispatch(square)} value="乘方" />
  </div>,
  document.getElementById('root')
)

render()
store.subscribe(render)
程式碼終於可以正常執行了
非同步
redux預設只處理同步,對於API請求這樣的非同步任務則無能為力
接下來嘗試使用axios的get方法來請求下面這個API
https://jsonplaceholder.typicode.com/posts/2
獲取的資料如下
{
  "userId": 1,
  "id": 2,
  "title": "qui est esse",
  "body": "est rerum tempore vitae\nsequi sint nihil reprehenderit dolor beatae ea dolores neque\nfugiat blanditiis voluptate porro vel nihil molestiae ut reiciendis\nqui aperiam non debitis possimus qui neque nisi nulla"
}
然後,將其id值設定為state.math的值
程式碼修改如下
// constants/ActionTypes.js
export const ADD = 'ADD'
export const SQUARE = 'SQUARE'
export const SET = 'SET'

// action/math.js
import { ADD, SQUARE, SET } from '../constants/ActionTypes'
export const add = num => ({ type: ADD, num })
export const square = { type: SQUARE }
export const setNum = num => ({type: SET,num})

// reduce/math.js
import { ADD, SQUARE,SET } from '../constants/ActionTypes'
const math = (state = 10, action) => {
  switch (action.type) {
    case ADD:
      return state + action.num
    case SQUARE:
      return state * state
    case SET:
      return action.num
    default:
      return state
  }
}
export default math

// index.js
import store from './store'
import React from 'react'
import ReactDOM from 'react-dom'
import { add, square, setNum } from './action/math'
import axios from 'axios'
let uri = 'https://jsonplaceholder.typicode.com/posts/2'
const render = () => ReactDOM.render(
  <div store={store}>
    <p>{store.getState().math}</p>
    <input type="button" onClick={() => {axios.get(uri).then(res => {store.dispatch(store.dispatch(setNum(res.data.id)))})}} value="設定Num" />
    <input type="button" onClick={() => store.dispatch(add(1))} value="+1" />
    <input type="button" onClick={() => store.dispatch(add(2))} value="+2" />
    <input type="button" onClick={() => store.dispatch(square)} value="乘方" />
  </div>,
  document.getElementById('root')
)
render()
store.subscribe(render)
效果如下
但是,雖然API是非同步操作,但store.dispatch並不是非同步,而axios通過get方法請求回來資料後,store.dispatch在axios中的then方法中同步取得資料
【redux-thunk】
如果要使用真正的非同步操作,即把axios方法封裝到store.dispatch中,需要使用redux-thunk中介軟體
首先,使用npm進行安裝
npm install --save redux-thunk
然後,使用applyMiddleware來使用thunk中介軟體
import { createStore, applyMiddleware } from 'redux'
import thunk from 'redux-thunk'
import rootReducer from '../reducer'
export default createStore(rootReducer,applyMiddleware(thunk))
接著來定義setNum這個action creator,然後在index.js檔案的DOM載入完成後就發出setNum
[注意]如果action是一個物件,則它就是一個action,如果action是一個函式,則它是一個action creator,即action製造器
修改的程式碼如下
// action/math.js
import { ADD, SQUARE, SET } from '../constants/ActionTypes'
import axios from 'axios'
const uri = 'https://jsonplaceholder.typicode.com/posts/2'
export const add = num => ({ type: ADD, num })
export const square = { type: SQUARE }
export const setNum = () => (dispatch, getState) => {
  return axios.get(uri).then(res => {
    dispatch({
      type: SET,
      num: res.data.id
    })
  })
}

// index.js
import store from './store'
import React from 'react'
import ReactDOM from 'react-dom'
import { add, square, setNum } from './action/math'
const render = () => ReactDOM.render(
  <div store={store}>
    <p>{store.getState().math}</p>
    <input type="button" onClick={() => store.dispatch(setNum())} value="設定Num" />
    <input type="button" onClick={() => store.dispatch(add(1))} value="+1" />
    <input type="button" onClick={() => store.dispatch(add(2))} value="+2" />
    <input type="button" onClick={() => store.dispatch(square)} value="乘方" />
  </div>,
  document.getElementById('root')
)
render()
store.subscribe(render)
效果如下
【提示資訊】
如果做的更完備一點,應該把非同步請求時的提示資訊也加上。增加一個fetch的action,用於控制fetch過程的提示資訊及顯示隱藏情況
程式碼更改如下
// action/fetch.js
import { SET_FETCH_MESSAGE, HIDE_FETCH_MESSAGE } from '../constants/ActionTypes'
export const startFetch = { type: SET_FETCH_MESSAGE,message: '開始傳送非同步請求' }
export const successFetch = { type: SET_FETCH_MESSAGE, message: '成功接收資料' }
export const failFetch = { type: SET_FETCH_MESSAGE, message: '接收資料失敗' }
export const hideFetchMessage = { type: HIDE_FETCH_MESSAGE }
// action/math.js
import { ADD, SQUARE, SET } from '../constants/ActionTypes'
import { startFetch, successFetch, failFetch, hideFetchMessage } from './fetch'
import axios from 'axios'
const uri = 'https://jsonplaceholder.typicode.com/posts/2'
export const add = num => ({ type: ADD, num })
export const square = { type: SQUARE }
export const setNum = () => (dispatch, getState) => {
  dispatch(startFetch)
  setTimeout(() => {
    dispatch(hideFetchMessage)
  }, 500)
  return axios
    .get(uri)
    .then(res => {
      setTimeout(() => {
        dispatch(successFetch)
        setTimeout(() => {
          dispatch(hideFetchMessage)
        }, 500)
        dispatch({ type: SET, num: res.data.id })
      }, 1000)
    })
    .catch(err => {
      dispatch(failFetch)
      setTimeout(() => {
        dispatch(hideFetchMessage)
      }, 500)
    })
}
// constants/ActionTypes.js
export const ADD = 'ADD'
export const SQUARE = 'SQUARE'
export const SET = 'SET'
export const SET_FETCH_MESSAGE = 'SET_FETCH_MESSAGE'
export const HIDE_FETCH_MESSAGE = 'HIDE_FETCH_MESSAGE'
// reduce/fetch.js
import { SET_FETCH_MESSAGE,HIDE_FETCH_MESSAGE } from '../constants/ActionTypes'
const initState = {
  message:'',
  isShow:false
}
const fetch = (state = initState, action) => {
  switch (action.type) {
    case SET_FETCH_MESSAGE:
      return {isShow: true, message: action.message}
    case HIDE_FETCH_MESSAGE:
      return { isShow: false, message: '' }
    default:
      return state
  }
}
export default fetch
// index.js
import store from './store'
import React from 'react'
import ReactDOM from 'react-dom'
import { add, square, setNum } from './action/math'
const render = () => ReactDOM.render(
  <div store={store}>
    <p>{store.getState().math}</p>
    <input type="button" onClick={() => store.dispatch(setNum())} value="設定Num" />
    <input type="button" onClick={() => store.dispatch(add(1))} value="+1" />
    <input type="button" onClick={() => store.dispatch(add(2))} value="+2" />
    <input type="button" onClick={() => store.dispatch(square)} value="乘方" />
    {store.getState().fetch.isShow && <p>{store.getState().fetch.message}</p>}
  </div>,
  document.getElementById('root')
)
render()
store.subscribe(render)
效果如下
展示和容器
下面來介紹react-redux。前面的程式碼中,我們是通過store.subscribe()方法監控state狀態的變化來更新UI層的。而使用react-redux,可以讓元件動態訂閱狀態樹。狀態樹一旦被修改,元件能自動重新整理顯示最新資料
react-redux將所有元件分成兩大類:展示元件和容器元件。展示元件只負責UI呈現,所有資料由引數props提供;容器元件則負責管理資料和業務邏輯,帶有內部狀態,可使用redux的API。要使用react-redux,就要遵守它的元件拆分規範
【provider】
react-redux提供Provider元件,可以讓容器元件預設可以拿到state,而不用當容器元件層級很深時,一級級將state傳下去
將index.js檔案更改如下
// index.js
import React from 'react'
import ReactDOM from 'react-dom'
import store from './store'
import MathContainer from './container/MathContainer'
import { Provider } from 'react-redux'
ReactDOM.render(
  <Provider store={store}>
    <MathContainer />
  </Provider>,
  document.getElementById('root')
)
按照元件拆分規範,將原來index.js中相關程式碼,分拆到container/MathContainer和component/Math這兩個元件中
【connect】
react-redux提供connect方法,用於從展示元件生成容器元件。connect的意思就是將這兩種元件連線起來
import { connect } from 'react-redux'
const MathContainer = connect()(Math);
Math是展示元件,MathContainer就是由React-redux通過connect方法自動生成的容器元件
為了定義業務邏輯,需要給出下面兩方面的資訊
1、輸入邏輯:外部的資料(即state物件)如何轉換為展示元件的引數
2、輸出邏輯:使用者發出的動作如何變為Action物件,從展示元件傳出去
因此,connect方法的完整API如下
import {connect} from 'react-redux'
const MathContainer= connect(
    mapStateToProps,
    mapDispatchToProps
)(Math)
上面程式碼中,connect方法接受兩個引數:mapStateToProps和mapDispatchToProps。它們定義了展示元件的業務邏輯。前者負責輸入邏輯,即將state對映到UI元件的引數(props),後者負責輸出邏輯,即將使用者對展示元件的操作對映成Action
【mapStateToProps()】
mapStateToProps建立一個從外部的state物件到展示元件的props物件的對映關係。作為引數,mapStateToProps執行後應該返回一個物件,裡面的每一個鍵值對就是一個對映。
const mapStateToProps = (state) => {
  return {
    num: getNum(state)
  }
}
mapStateToProps的第一個引數總是state物件,還可以使用第二個引數,代表容器元件的props物件。使用ownProps作為引數後,如果容器元件的引數發生變化,也會引發展示元件重新渲染
const mapStateToProps = (state,ownProps) => {
  return {
    num: getNum(state)
  }
}
mapStateToProps會訂閱Store,每當state更新的時候,就會自動執行,重新計算展示元件的引數,從而觸發展示元件的重新渲染。connect方法可以省略mapStateToProps引數,那樣,展示元件就不會訂閱Store,就是說Store的更新不會引起展示元件的更新
【mapDispatchToProps】
mapDispatchToProps是connect函式的第二個引數,用來建立展示元件的引數到store.dispatch方法的對映。也就是說,它定義了使用者的哪些操作應該當作action,傳給Store。它可以是一個函式,也可以是一個物件
如果mapDispatchToProps是一個函式,會得到dispatch和ownProps(容器元件的props物件)兩個引數
const mapDispatchToProps = (dispatch,ownProps) => {
  return {
    onSetNumClick: () => dispatch(setNum())
  }
}
mapDispatchToProps作為函式,應該返回一個物件,該物件的每個鍵值對都是一個對映,定義了展示元件的引數怎樣發出action
如果mapDispatchToProps是一個物件,它的每個鍵名也是對應展示元件的同名引數,鍵值應該是一個函式,會被當作action creator,返回的action會由redux自動發出
因此,上面的寫法簡寫如下所示
const mapDispatchToProps = {
  onsetNumClick: () => setNum()
}
最終結構
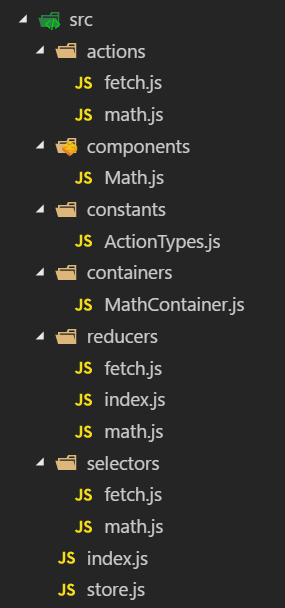
由於store目錄中,只能一個index.js檔案,且不會有內容擴充套件,將其更改為根目錄下的store.js檔案
將其他的目錄都變成複數形式,最終的目錄結構如下所示
效果如下
詳細程式碼如下所示,且可訪問github線上地址
【components】
// components/Math.js
import React from 'react'
const Math = ({
  num,
  isShow,
  fetchMessage,
  onSetNumClick,
  onAddOneClick,
  onAddTwoClick,
  onSqureClick
}) => (
  <section>
    <p>{num}</p>
    <input type="button" onClick={onSetNumClick} value="設定Num" />
    <input type="button" onClick={onAddOneClick} value="+1" />
    <input type="button" onClick={onAddTwoClick} value="+2" />
    <input type="button" onClick={onSqureClick} value="乘方" />
    {isShow && <p>{fetchMessage}</p>}
  </section>
)

export default Math
【containers】
// containers/MathContainer.js
import { connect } from 'react-redux'
import Math from '../components/Math'
import { getNum } from '../selectors/math'
import { getFetchMessage, getFetchIsShow } from '../selectors/fetch'
import { setNum, add, square } from '../actions/math'
const mapStateToProps = state => {
  return {
    num: getNum(state),
    fetchMessage: getFetchMessage(state),
    isShow: getFetchIsShow(state)
  }
}
const mapDispatchToProps = {
  onSetNumClick: () => setNum(),
  onAddOneClick: () => add(1),
  onAddTwoClick: () => add(2),
  onSqureClick: () => square
}
const MathContainer = connect(mapStateToProps, mapDispatchToProps)(Math)
export default MathContainer
【actions】
// actions/fetch.js
import { SET_FETCH_MESSAGE, HIDE_FETCH_MESSAGE } from '../constants/ActionTypes'
export const startFetch = { type: SET_FETCH_MESSAGE,message: '開始傳送非同步請求' }
export const successFetch = { type: SET_FETCH_MESSAGE, message: '成功接收資料' }
export const failFetch = { type: SET_FETCH_MESSAGE, message: '接收資料失敗' }
export const hideFetchMessage = { type: HIDE_FETCH_MESSAGE }
// actions/math.js
import { ADD, SQUARE, SET } from '../constants/ActionTypes'
import { startFetch, successFetch, failFetch, hideFetchMessage } from './fetch'
import axios from 'axios'
const uri = 'https://jsonplaceholder.typicode.com/posts/2'
export const add = num => ({ type: ADD, num })
export const square = { type: SQUARE }
export const setNum = () => (dispatch, getState) => {
  dispatch(startFetch)
  setTimeout(() => {dispatch(hideFetchMessage)}, 300)
  return axios
    .get(uri)
    .then(res => {
      dispatch(successFetch)
      setTimeout(() => {dispatch(hideFetchMessage)}, 300)
      dispatch({ type: SET, num: res.data.id })
    })
    .catch(err => {
      dispatch(failFetch)
      setTimeout(() => {dispatch(hideFetchMessage)}, 300)
    })
}
【constants】
// constants/ActionTypes.js
export const ADD = 'ADD'
export const SQUARE = 'SQUARE'
export const SET = 'SET'
export const SET_FETCH_MESSAGE = 'SET_FETCH_MESSAGE'
export const HIDE_FETCH_MESSAGE = 'HIDE_FETCH_MESSAGE'
【reducers】
// reducers/fetch.js
import { SET_FETCH_MESSAGE,HIDE_FETCH_MESSAGE } from '../constants/ActionTypes'
const initState = {
  message:'',
  isShow:false
}
const fetch = (state = initState, action) => {
  switch (action.type) {
    case SET_FETCH_MESSAGE:
      return {isShow: true, message: action.message}
    case HIDE_FETCH_MESSAGE:
      return { isShow: false, message: '' }
    default:
      return state
  }
}
export default fetch
// reducers/index.js
import { combineReducers } from 'redux'
import math from './math'
import fetch from './fetch'
const rootReducer = combineReducers({
  math,
  fetch
})

export default rootReducer
// reduces/math.js
import { ADD, SQUARE,SET } from '../constants/ActionTypes'
const math = (state = 10, action) => {
  switch (action.type) {
    case ADD:
      return state + action.num
    case SQUARE:
      return state * state
    case SET:
      return action.num
    default:
      return state
  }
}
export default math
【selectors】
// selectors/fetch.js
export const getFetchMessage = state => state.fetch.message
export const getFetchIsShow = state => state.fetch.isShow
// selectors/math.js
export const getNum = state => state.math
【根目錄】
// index.js
import React from 'react'
import ReactDOM from 'react-dom'
import store from './store'
import MathContainer from './containers/MathContainer'
import { Provider } from 'react-redux'
ReactDOM.render(
  <Provider store={store}>
    <MathContainer />
  </Provider>,
  document.getElementById('root')
)
// store.js
import { createStore, applyMiddleware } from 'redux'
import thunk from 'redux-thunk'
import rootReducer from './reducers'
export default createStore(rootReducer,applyMiddleware(thunk))