當今的軟體開發中,設計軟體的服務並將其通過網路對外發布,讓各種客戶端去使用服務已經是十分普遍的做法。就.NET而言,目前提供了Remoting,WebService和WCF服務,這都能開發出功能十分強大的服務。然而,越來越多的網際網路應用,希望將服務只是通過HTTP釋出出去,而不是使用複雜的SOAP協議。為了解決這個問題,ASP.NET WebAPI就出現了。
ASP.NET API簡單來說就是對REST協議進行了充分的支援,可以使用HTTP中的GET,POST,PUT和DELETE進行服務的釋出。在本文中,將以例子說明如何使用ASP.NET WEB API去建立一個REST風格的Web服務,並且如何編寫客戶端對其進行連線,此外在文中還將學會如何通過HTTP協議,使用Entity Framework和SQL Server去建立一個CRUD(增刪改)的應用程式。本文的閱讀物件為具備一定ASP.NET MVC基礎的使用者。
前期準備
為了繼續本文的學習,首先需要安裝ASP.NET MVC4和JSON.net,ASP.NET Web API是ASP.NET MVC 4 BETA版的一部分,可以從下面這個地址下載得到:http://www.asp.net/mvc/mvc4。
此外,還需要下載Json.NET,它是一個在.NET中高效能的對JSON進行解析處理的類庫,下載地址在:http://json.codeplex.com/releases/view/82120, 在本文的學習中,將會用到Json.net。
建立ASP.NET MVC4 WEB API應用
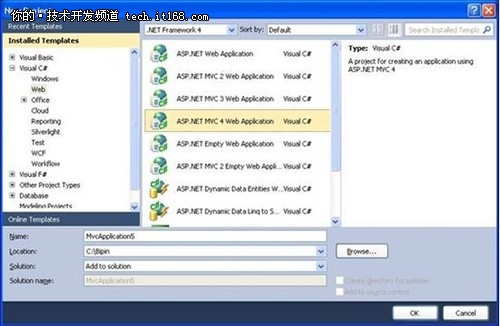
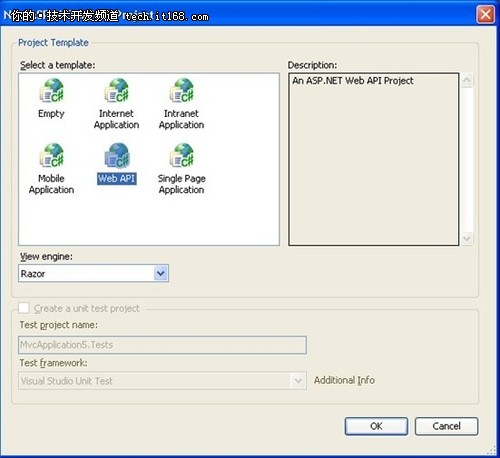
下面,首先開啟VS.NET 2010,然後建立一個新的專案,選擇使用C#語言,然後選擇ASP.NET MVC4 WEB APPLICATION,再選擇使用Web API 模板,如下兩個圖所示:
在建立好工程專案後,會發現專案的目錄結構跟普通的MVC結構是差不多的,但其中會發現在Controller資料夾中,會發現多一個ValuesController的類檔案,這個類是Web API的控制器類,它繼承了ApiController類,而不是一般MVC框架中的Controller類,程式碼如下:
{
...
}
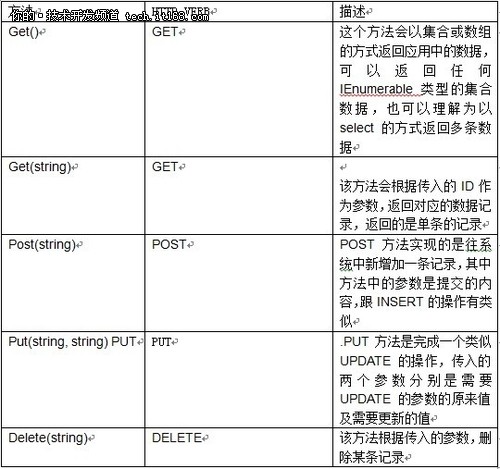
ValuesController類會自動生成一個基於REST風格的腳手架,以方便使用者進行編碼,其中提供了GET,POST,PUT和DELETE方法。下面的表格詳細列出了每個HTTP方法的含義:
要注意的是,Wep API 本身不會指定以上這些方法中每個方法的具體處理流程,比如,對於服務端的檔案系統,可以使用XML資料或者自定義資料儲存格式,從而在這些方法中使用,主要是根據目標的操作型別和資料的儲存形式,以上這些方法可以接收所需要的資料型別。
在我們繼續操作前,先在專案的根目錄下建立一個新的名為API的資料夾,並且將ValuesController.cs這個檔案放到其中,這樣做的目的,主要是為了將Web API控制器跟普通的MVC控制器進行分離,方便今後的開發。
利用Entity Framework建立資料層
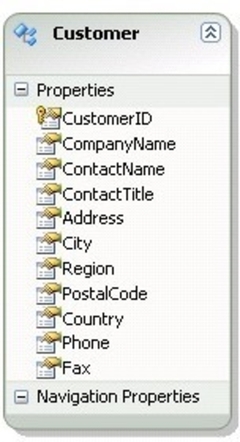
現在,往Models資料夾中,新增一個Entity Framework資料實體。我們使用的是Northwind資料庫中的Customers表進行操作,命名資料實體為Northwind,如下圖:

之後,選擇customer表,建立一個資料實體customer如下:
Web API控制器的編碼
接下來,我們對已經生成了框架的Web控制器進行完善其中的程式碼,程式碼如下:
{
//Select All
public IEnumerable Get()
{
NorthwindEntities db = new NorthwindEntities();
var data = from item in db.Customers
orderby item.CustomerID
select item;
return data.ToList();
}
//Select By Id
public Customer Get(string id)
{
NorthwindEntities db = new NorthwindEntities();
var data = from item in db.Customers
where item.CustomerID == id
select item;
return data.SingleOrDefault();
}
//Insert
public void Post(Customer obj)
{
NorthwindEntities db = new NorthwindEntities();
db.Customers.AddObject(obj);
db.SaveChanges();
}
//Update
public void Put(string id, Customer obj)
{
NorthwindEntities db = new NorthwindEntities();
var data = from item in db.Customers
where item.CustomerID == id
select item;
Customer old = data.SingleOrDefault();
old.CompanyName = obj.CompanyName;
old.ContactName = obj.ContactName;
old.Country = obj.Country;
db.SaveChanges();
}
//Delete
public void Delete(string id)
{
NorthwindEntities db = new NorthwindEntities();
var data = from item in db.Customers
where item.CustomerID == id
select item;
Customer obj = data.SingleOrDefault();
db.Customers.DeleteObject(obj);
db.SaveChanges();
}
}
其中,Get()方法返回了Customers表中的所有資料,是以LIST列表的形式返回的。customer表中的主鍵為CustomerId列,並且是字串型別,因此,另外的一個get帶引數的方法,是根據傳入的ID引數返回了某一個customer的物件例項。
Post()方法則接收一個Customer物件作為引數,並且將其新增到資料表中去,同樣,Put()方法中,接收一個customerid,然後在資料表中找出該customer物件,為該customer物件的屬性重新賦值,然後再儲存;最後Delete方法根據傳入的CustomerID引數刪除資料表中的資料並儲存。
從瀏覽器中訪問WEB API
在通過普通頁面作為客戶端訪問Web API前,首先在瀏覽器中通過輸入地址的方法先測試一下,如下圖:
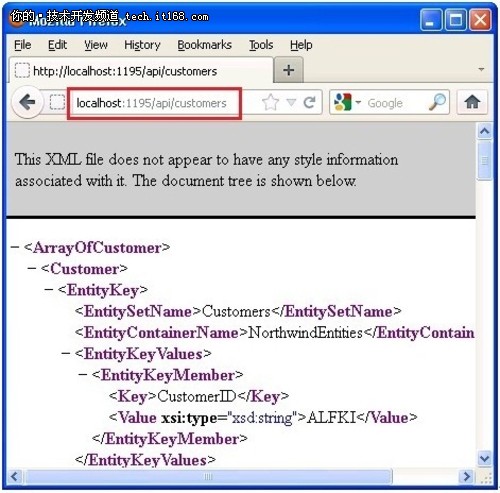
注意的是,訪問API的方式為:localhost/api/customers,在實際中將要根據情況替換合適的埠,預設所有的WEB API都是通過/api根目錄的方式訪問的,該路由是在Global.asax下進行定義,如下:
{
...
routes.MapHttpRoute(
name: "DefaultApi",
routeTemplate: "api/{controller}/{id}",
defaults: new { id = RouteParameter.Optional }
);
...
}
因此,現在由於我們的WEB API控制器是customers,因此如何要得到某個顧客的資訊,可以如下的方式訪問:
/api/customers/ALFKI
建立自定義JSON格式化器
在通過瀏覽器去訪問WEB API時,預設的顯示方式是XML。Web API框架會自動根據訪問客戶端的不同從而返回不同的格式的資料。現在,大多數情況下,使用者希望返回的格式資料是JSON形式。然而,在本文寫作時,使用預設的Web API提供的JSON格式化處理器以及Entity Framework搭配工作時,會出現一些小BUG.The entities of the EF data model have IsReference property of DataContractAttribute set to True.EF EF資料模型的實體將DataContractAttribute中的IsReference屬性設定為true,如下:
[Serializable()]
[DataContractAttribute(IsReference=true)]
public partial class Customer : EntityObject
{
...
}
預設情況下,Web API使用的是DataContractJsonSerializer類進行JSON序列化。但預設的JSON序列化類不能處理這樣的實體類,並且在執行期間丟擲如下異常:
The type 'WebAPIDemo.Models.Customer' cannot be serialized to JSON because its IsReference setting is 'True'. The JSON format does not support references because there is no standardized format for representing references. To enable serialization, disable the IsReference setting on the type or an appropriate parent class of the type.
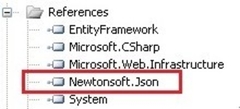
為了克服則個問題,可以建立一個自定義的JSON格式化器。幸運的是,有第三方的JSON序列化器給我們選擇使用,比如Json.NET。在本文中,將會簡單介紹使用JSON.NET去完成序列化,完整的程式碼可以在附件中下載。
一個自定義的序列化器主要是繼承了MediaTypeFormatter的基類。我們編寫的這個JSON序列化類為JsonNetFormatter,在使用前要確認你的應用工程中已經引用了Json.NET的類庫,如下圖:
下面我們來看下JsonNetFormatter的基礎程式碼:
{
...
}
可以通過重寫MediaTypeFormatter中的一些方法如下:
{
...
}
protected override bool CanWriteType(Type type)
{
...
}
protected override Task<object> OnReadFromStreamAsync(Type type, Stream stream,
HttpContentHeaders contentHeaders,
FormatterContext formatterContext)
{
...
}
protected override Task OnWriteToStreamAsync(Type type, object value, Stream stream,
HttpContentHeaders contentHeaders,
FormatterContext formatterContext,
TransportContext transportContext)
{
...
}
具體的程式碼在附件中可以詳細檢視。一旦建立了JSON序列化器後,就需要告訴Web API框架去替換使用原先預設的JSON序列化框架。可以在global.asx中實現:
{
HttpConfiguration config = GlobalConfiguration.Configuration;
JsonSerializerSettings settings = new JsonSerializerSettings();
settings.Converters.Add(new IsoDateTimeConverter());
JsonNetFormatter formatter = new WebAPIDemo.Http.Formatters.JsonNetFormatter(settings);
config.Formatters.Insert(0, formatter);
AreaRegistration.RegisterAllAreas();
RegisterGlobalFilters(GlobalFilters.Filters);
RegisterRoutes(RouteTable.Routes);
BundleTable.Bundles.RegisterTemplateBundles();
}
其中請注意粗體字部分,這裡建立了JSON自定義器的例項,並且增加到以HttpConfiguration類的配製的序列化配製集合中。
這樣,我們就可以開始在客戶端中呼叫WEB API,並使用自定義的JSON解析器進行處理。
使用jQuery 呼叫WEB API
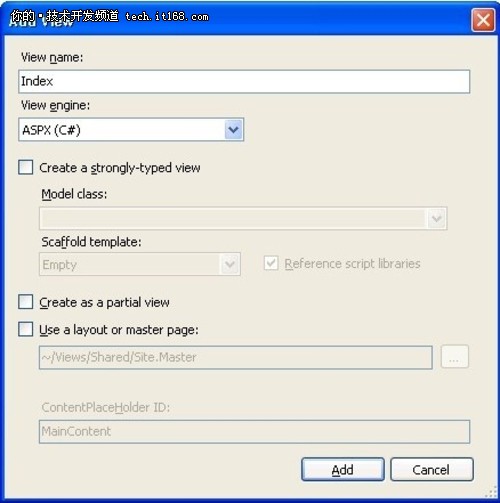
接下來,我們在Index控制器中新建立一個檢視,如下圖:
接下來就可以根據實際需要,決定在頁面中顯示customer表中的多少列,最後的頁面顯示如下:
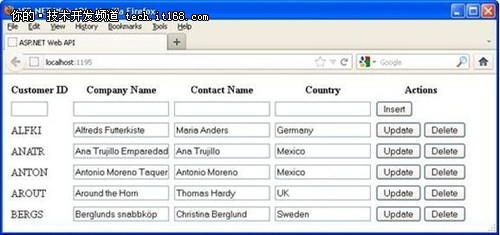
當頁面載入時,使用GET()方法去調出customer表的所有資料,而當使用INSERT,UPDATE,DELETE功能時,是通過jQuery去呼叫web api的。下面我們學習下通過jQuery去呼叫WEB API。
首先,我們設計每一行的HTML程式碼,如下:
<tr>
<th>Customer ID</th>
<th>Company Name</th>
<th>Contact Name</th>
<th>Country</th>
<th>Actions</th>
</tr>
<tr>
<td><input type="text" id="txtCustomerId" size="5"/></td>
<td><input type="text" id="txtCompanyName" /></td>
<td><input type="text" id="txtContactName" /></td>
<td><input type="text" id="txtCountry" /></td>
<td><input type="button" name="btnInsert" value="Insert" /></td>
</tr>
</table>
首先要引入jQuery類庫:
然後在jQuery中,通過$.getJSON的方法,呼叫WEB API,程式碼如下:
$(document).ready(function () {
$.getJSON("api/customers", LoadCustomers);
});
熟悉jQuery的朋友肯定明白,$.getJson方法中第一個引數是呼叫服務的地址,第二個引數是回撥方法,這個回撥方法LoadCustomers中,將展示服務端web api返回的資料,程式碼如下:
$("#customerTable").find("tr:gt(1)").remove();
$.each(data, function (key, val) {
var tableRow = '<tr>' +
'<td>' + val.CustomerID + '</td>' +
'<td><input type="text" value="' + val.CompanyName + '"/></td>' +
'<td><input type="text" value="' + val.ContactName + '"/></td>' +
'<td><input type="text" value="' + val.Country + '"/></td>' +
'<td><input type="button" name="btnUpdate" value="Update" />
<input type="button" name="btnDelete" value="Delete" /></td>'+
'</tr>';
$('#customerTable').append(tableRow);
});
$("input[name='btnInsert']").click(OnInsert);
$("input[name='btnUpdate']").click(OnUpdate);
$("input[name='btnDelete']").click(OnDelete);
}
在上面的程式碼中,首先移除所有表格中的行(除了表頭外),然後通過jQuery中的each方法,遍歷web api返回給前端的資料,最後展現所有的資料行。然後在Insert,update,delete三個按鈕中都繫結了相關的方法函式,下面先看update的程式碼:
var cell;
var customerId = $(this).parent().parent().children().get(0).innerHTML;
cell = $(this).parent().parent().children().get(1);
var companyName = $(cell).find('input').val();
cell = $(this).parent().parent().children().get(2);
var contactName = $(cell).find('input').val();
cell = $(this).parent().parent().children().get(3);
var country = $(cell).find('input').val();
var data = '{"id":"' + customerId + '", "obj":{"CustomerID":"' + customerId +
'","CompanyName":"' + companyName + '","ContactName":"' +
contactName + '","Country":"' + country + '"}}';
$.ajax({
type: 'PUT',
url: '/api/customers/',
data: data,
contentType: "application/json; charset=utf-8",
dataType: 'json',
success: function (results) {
$.getJSON("api/customers", LoadCustomers);
alert('Customer Updated !');
}
})
}
在上面的程式碼中,首先從每行的各個文字框中獲得要更新的值,然後組織成JSON資料,
其資料格式為包含兩項,其中一項包含customer的ID,另外一個是新的customer實體物件,因為WEB API的PUT方法需要的是兩個引數。
然後通過jQuery的$.ajax方法進行呼叫web api,注意這裡的type指定為put方法,並且注意編碼為UTF-8,然後在回撥方法success中,再此使用$.getJSON方法,獲得更新後的最新使用者列表。
而Insert,Delete的方法程式碼如下:
var customerId = $("#txtCustomerId").val();
var companyName = $("#txtCompanyName").val();
var contactName = $("#txtContactName").val();
var country = $("#txtCountry").val();
var data = '{"obj":{"CustomerID":"' + customerId + '","CompanyName":"' + companyName +
'","ContactName":"' + contactName + '","Country":"' + country + '"}}';
$.ajax({
type: 'POST',
url: '/api/customers/',
data: data,
contentType: "application/json; charset=utf-8",
dataType: 'json',
success: function (results) {
$("#txtCustomerId").val('');
$("#txtCompanyName").val('');
$("#txtContactName").val('');
$("#txtCountry").val('');
$.getJSON("api/customers", LoadCustomers);
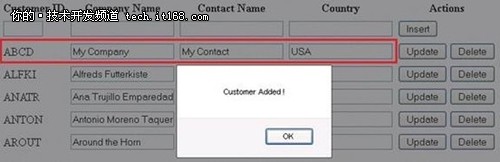
alert('Customer Added !');
}
})
}
function OnDelete(evt) {
var customerId = $(this).parent().parent().children().get(0).innerHTML;
var data = '{"id":"' + customerId + '"}';
var row = $(this).parent().parent();
$.ajax({
type: 'DELETE',
url: '/api/customers/',
data: data,
contentType: "application/json; charset=utf-8",
dataType: 'json',
success: function (results) {
$.getJSON("api/customers", LoadCustomers);
alert('Customer Deleted!');
}
})
}
讀者要注意的是,在實際應用中,可以使用含有GET,PUT,DELETE字首的方法名,比如
GetXXXX(), PutXXXX(), PostXXXX()都是可以的,XXX是自定義的名稱,WEB API框架依然會呼叫對應的GET,PUT和POST方法。
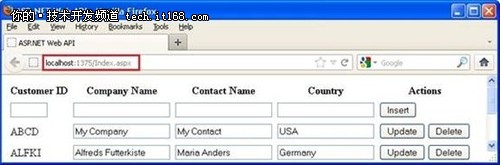
最後執行後,效果如下圖:
WebForm形式呼叫WEB API
儘管ASP.NET WEB API是ASP.NET MVC的其中一部分,但並沒規定只能在ASP.NET MVC架構中使用,可以在WebForm中進行呼叫,方法如下:
我們繼續在解決方案中新建一個Web Application,然後在應用中增加一個普通的asp.net Web Form頁面,然後將之前的API資料夾複製到這個新的web專案的根目錄中。
然後和之前的步驟一樣,通過Entitiy Framework建立customer實體類,然後開啟Global.ascx,寫入程式碼如下:
{
HttpConfiguration config = GlobalConfiguration.Configuration;
JsonSerializerSettings settings = new JsonSerializerSettings();
settings.Converters.Add(new IsoDateTimeConverter());
JsonNetFormatter formatter = new WebAPIWebFormDemo.Http.Formatters.JsonNetFormatter(settings);
config.Formatters.Insert(0, formatter);
RouteTable.Routes.MapHttpRoute(
name: "DefaultApi",
routeTemplate: "api/{controller}/{id}",
defaults: new { id = System.Web.Http.RouteParameter.Optional }
);
}
注意這裡做了兩個事情,首先在WEB API框架中註冊了自定義的JSON解析器,然後是註冊了web api 控制器的路由。
然後將前文說到的使用jQuery 呼叫web api的所有程式碼都複製到index.aspx(或default.aspx)中去。然後執行應用,如下圖:
可以看到瀏覽器的位址列,這裡是使用傳統的web form表單進行訪問的。
小結
本文介紹了ASP.NET MVC 4中新推出的符合REST架構的WEB API,並以實際例子講解了如何通過不同的方式呼叫web api返回的結果。本文的附件是程式碼,請在這個地址下載:
http://www.developer.com/imagesvr_ce/6193/Code.zip
本文轉載自:http://tech.it168.com/a2012/0606/1357/000001357231_all.shtml,僅供學習參考之用。