Simple Code First Example:
Let's assume that we want to create a simple application for XYZ School. Users of this School application should be able to add or update Students, Standard (Grade), Teacher, and Course information.
Instead of designing database tables first, let's start creating classes for our school domain, as and when needed. First, we will create two simple Student and Standard classes where every Student is associated with one Standard as shown below.
public class Student
{
    public Student()
    {

    }
    public int StudentID { get; set; }
    public string StudentName { get; set; }
    public DateTime? DateOfBirth { get; set; }
    public byte[]  Photo { get; set; }
    public decimal Height { get; set; }
    public float Weight { get; set; }

    public Standard Standard { get; set; }
}
The Standard (Grade) class should be able to accommodate multiple Students as shown below.
public class Standard
{
    public Standard()
    {

    }
    public int StandardId { get; set; }
    public string StandardName { get; set; }

    public ICollection<Student> Students { get; set; }

 }
Now, we are done with the initial domain classes for our school application. Code-First approach also requires context class which should be derived from DbContext as we have created in the basic tutorials section using Database-First approach. Visit DbContext for more information.
Create a context class as shown below, which derives from DBContext class and exposes DbSet properties for the types that you want to be part of the model, e.g. Student and Standard class, in this case. DbSet is a collection of entity classes (aka entity set), so we have given property name as plural of entity name like Students and Standards.
namespace EF_Code_First_Tutorials
{

    public class SchoolContext: DbContext
    {
        public SchoolContext(): base()
        {

        }

        public DbSet<Student> Students { get; set; }
        public DbSet<Standard> Standards { get; set; }

    }
}
Now, we are done with the required classes for the code-first approach. We will now add student using context class as shown below.
class Program
{
    static void Main(string[] args)
    {

        using (var ctx = new SchoolContext())
        {
            Student stud = new Student() { StudentName = "New Student" };

            ctx.Students.Add(stud);
            ctx.SaveChanges();
        }
    }
}
If you run the application, you will be surprised to see that the application runs successfully and one student is successfully inserted into the database.
But, where is the database and what are the tables and its columns?
This is the beauty of Code-First APIs of Entity Framework. It creates the database based on parameter passed in the base constructor of your context class. Since we have not passed any parameter in the constructor of our context class, it created "EF_Code_First_Tutorials.SchoolContext" database in the local SQLEXPRESS database, as shown below. It also created two tables in this database, Students and Standards tables based on Student and Standard domain classes defined above.
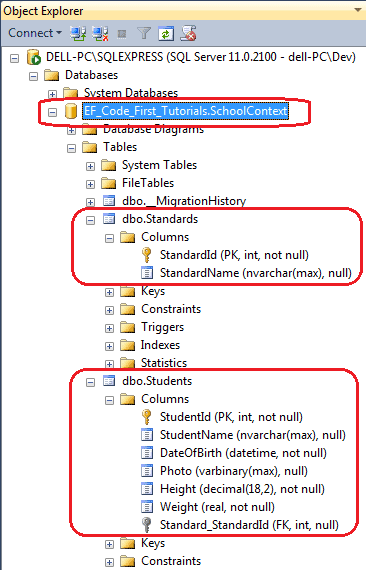
As you can see in the above figure, it has created Students and Standards tables and each table contains columns with appropriate datatype and length. The column names and datatype matches with the properties of the respective domain classes. It has also made StudentId and StandardId as PK (primary key) and Standard_StandardId column as FK (foreign key).
This way, without creating a database first, you can start writing an application that will eventually create the database from your domain classes.
You must be wondering how it has created columns with appropriate datatypes and lengh with PK & FK, right? The answer is, using code-first conventions.
Learn code-first conventions in the next section.