原文地址:http://www.codeproject.com/Articles/808213/Developing-a-Large-Scale-Application-with-a-Single
客戶管理頁面-新增、修改客戶
單頁應用中的頁面與asp.net頁面類似,兩者都是html頁面。 對於asp.net,瀏覽器載入html、js、資料,然後,瀏覽器進展示。而單頁應用,頁面內容通過ng-view 指令被注入到一個div標籤中。
頁面初始化時,瀏覽器通常只渲染html程式碼。 若在單頁應用中使用RequireJS,js會被動態載入。 當頁面載入完,瀏覽器以ajax非同步呼叫的方式從伺服器讀取資料。
使用SPA的好處之一:效能。SPA的每一個頁面會被快取到客戶端,最終你所有的頁面都會被快取,而你只是通過AJAX請求通過網路獲取伺服器資料而已. 所有這些都促成了高效的響應時間,以增強的使用者體驗.
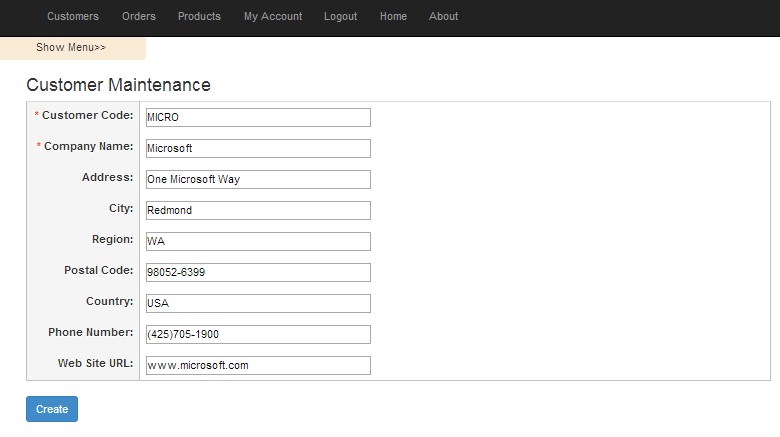
<!-- CustomerMaintenance.html -->

<div ng-controller="customerMaintenanceController" ng-init="initializeController()">

<h3> Customer Maintenance  </h3>
     <table class="table" style="width:100%">
<tr>
<td class="input-label" align="right"> <label class="required">Customer Code: </label> </td>
<td class="input-box">
<div ng-bind="CustomerCode" ng-show="DisplayMode"> </div>
<div ng-show="EditMode">
     <input ng-model="CustomerCode" type="text" style="width: 300px"
     ng-class="{'validation-error': CustomerCodeInputError}" />
</div>
</td>
</tr>
<tr>
<td class="input-label" align="right"> <label class="required">Company Name: </label> </td>
<td class="input-box">
<div ng-bind="CompanyName" ng-show="DisplayMode"> </div>
<div ng-show="EditMode">
     <input ng-model="CompanyName" type="text" style="width: 300px"
            ng-class="{'validation-error': CompanyNameInputError}" />
</div>
</td>
</tr>
<tr>
<td class="input-label" align="right"> <label>Address: </label> </td>
<td class="input-box">
<div ng-bind="Address" ng-show="DisplayMode"> </div>
<div ng-show="EditMode">
     <input ng-model="Address" type="text" style="width: 300px" />
</div>
</td>
</tr>
<tr>
<td class="input-label" align="right"> <label>City: </label> </td>
<td class="input-box">
<div ng-bind="City" ng-show="DisplayMode"> </div>
<div ng-show="EditMode">
     <input ng-model="City" type="text" style="width: 300px" />
</div>
</td>
</tr>
<tr>
<td class="input-label" align="right"> <label>Region: </label> </td>
<td class="input-box">
<div ng-bind="Region" ng-show="DisplayMode"> </div>
<div ng-show="EditMode">
     <input ng-model="Region" type="text" style="width: 300px" />
</div>
</td>
</tr>
<tr>
<td class="input-label" align="right"> <label>Postal Code: </label> </td>
<td class="input-box">
<div ng-bind="PostalCode" ng-show="DisplayMode"> </div>
<div ng-show="EditMode">
     <input ng-model="PostalCode" type="text" style="width: 300px" />
</div>
</td>
</tr>
<tr>
<td class="input-label" align="right"> <label>Country: </label> </td>
<td class="input-box">
<div ng-bind="CountryCode" ng-show="DisplayMode"> </div>
<div ng-show="EditMode">
     <input ng-model="CountryCode" type="text" style="width: 300px" />
</div>
</td>
</tr>
<tr>
<td class="input-label" align="right"> <label>Phone Number: </label> </td>
<td class="input-box">
<div ng-bind="PhoneNumber" ng-show="DisplayMode"> </div>
<div ng-show="EditMode">
     <input ng-model="PhoneNumber" type="text" style="width: 300px" />
</div>
</td>
</tr>
<tr>
<td class="input-label-bottom" align="right"> <label>Web Site URL: </label> </td>
<td class="input-box-bottom">
<div ng-bind="WebSiteURL" ng-show="DisplayMode"> </div>
<div ng-show="EditMode">
     <input ng-model="WebSiteURL" type="text" style="width: 300px" />
</div>
</td>
</tr>
</table>

<span ng-show="ShowCreateButton">
<button class="btn btn-primary btn-large" ng-click="createCustomer()">Create </button> </span>
<span ng-show="ShowEditButton">
<button class="btn btn-primary btn-large" ng-click="editCustomer()">Edit </button> </span>
<span ng-show="ShowUpdateButton">
<button class="btn btn-primary btn-large" ng-click="updateCustomer()">Update </button> </span>
<span ng-show="ShowCancelButton">
<button class="btn btn-primary btn-large" ng-click="cancelChanges()">Cancel </button> </span>
<div style="padding-top:20px">

<alert ng-repeat="alert in alerts" type="{{alert.type}}" close="closeAlert($index)">
<div ng-bind-html="MessageBox"> </div> </alert>

</div>
</div>
資料繫結及Separation of Concerns (SoC)
檢視上面用於示例程式的顧客維護頁面的HTML內容,你能夠看到這是一個看起來很清晰,很容易閱讀的HTML。內容裡面也沒有引用任何JavaScript。
藉助於data-binding指令,AngularJS提供了內容檢視及內容控制器之間清晰的關注點分離. 對於輸入控制,雙向資料繫結通過ng-bind這個指令以及客戶管理控制器的$scope屬性得到了實現. AngularJS中的資料繫結功能同其它的JavaScript庫,如KnockoutJS,功能相似, 對於文件物件模型的轉換需求已經成為過去式。
ng-show 指令是的顯示隱藏的HTML內容變得容易. 對於客戶管理頁面來說,這將會讓頁面只用設定一個JavaScript的AngularJS $scope變數,就可以同時支援編輯模式和只讀模式. ng-click 指令將會執行在按下按鈕時執行的控制器函式.
客戶管理控制器
示例中的每一個控制器都會被封裝到一個RequireJS定義語句中,幫助AngularJS對控制器進行註冊. 此外,定義語句將告知RequireJS顧客維護控制器正常執行所依賴的其它庫和服務. 在本例中,控制器依賴於 application-configuration,customersService 以及 alertsServices 這些功能. 這些JavaScript依賴將會通過RequireJS被動態載入進來.
AngularJS 使用了依賴注入, 因此控制器所需的所有東西都會通過引數被注入到其中. 如果你希望使用一種單元測試工具,比如Jasmine,來在你的JavaScript控制器上進行單元測試的話,這就會很有用.
$scope 物件提供了檢視和控制器之間的雙向資料繫結. 控制器裡面再也不需要對於HTML內容的直接引用了. 控制器通過執行initializeContent函式啟動,這個函式是藉助內容頁面中的ng-init指令被初始化的 .
客戶管理頁面將引用 $routeParams 服務來決定是否傳入了顧客的編號. 如果是,控制器就將在customerService上執行一個getCustomer函式,該函式會向伺服器發起一次AJAX呼叫,隨後返回的JSON格式的顧客資料將會被填充到$scope屬性中,繼而會更新HTML模板 .
當使用者點選建立按鈕時,控制層會呼叫 createCustormer 函式。 然後,createCustormer 函式會建立一個customer型別的js物件,控制層將js物件傳遞給伺服器,實現將資料儲存到資料庫中。 示例中使用了微軟的WEB API、Entity Framework ,伺服器端使用了 SQL Server 資料庫,從技術上講,AngularJS 可以與任意型別的資料庫進行互動。
// customerMaintenanceController.js

"use strict";
define(['application-configuration', 'customersService', 'alertsService'], function (app)
{
    app.register.controller('customerMaintenanceController',
    ['$scope', '$rootScope', '$routeParams', 'customersService', 'alertsService',

    function ($scope, $rootScope, $routeParams, customerService, alertsService)
    {
        $scope.initializeController = function () {

            var customerID = ($routeParams.id || "");

            $rootScope.alerts = [];
            $scope.CustomerID = customerID;

            if (customerID == "") {
                $scope.CustomerCode = "";
                $scope.CompanyName = "";
                $scope.Address = "";
                $scope.City = "";
                $scope.Region = "";
                $scope.PostalCode = "";
                $scope.CountryCode = "";
                $scope.PhoneNumber = ""
                $scope.WebSiteURL = "";

                $scope.EditMode = true;
                $scope.DisplayMode = false;
                $scope.ShowCreateButton = true;
                $scope.ShowEditButton = false;
                $scope.ShowCancelButton = false;
                $scope.ShowUpdateButton = false;

            }
            else
            {
                var getCustomer = new Object();
                getCustomer.CustomerID = customerID;
                customerService.getCustomer(getCustomer,
                                $scope.getCustomerCompleted,
                                $scope.getCustomerError);
            }

        }

        $scope.getCustomerCompleted = function (response) {

            $scope.EditMode = false;
            $scope.DisplayMode = true;
            $scope.ShowCreateButton = false;
            $scope.ShowEditButton = true;
            $scope.ShowCancelButton = false;
            $scope.ShowUpdateButton = false;

            $scope.CustomerCode = response.Customer.CustomerCode;
            $scope.CompanyName = response.Customer.CompanyName;
            $scope.Address = response.Customer.Address;
            $scope.City = response.Customer.City;
            $scope.Region = response.Customer.Region;
            $scope.PostalCode = response.Customer.PostalCode;
            $scope.CountryCode = response.Customer.Country;
            $scope.PhoneNumber = response.Customer.PhoneNumber;
            $scope.WebSiteURL = response.Customer.WebSiteUrl;
        }

        $scope.getCustomerError = function (response) {
            alertsService.RenderErrorMessage(response.ReturnMessage);
        }


        $scope.createCustomer = function () {
            var customer = $scope.createCustomerObject();
            customerService.createCustomer(customer,
                                            $scope.createCustomerCompleted,
                                            $scope.createCustomerError);
        }

        $scope.createCustomerCompleted = function (response, status) {

            $scope.EditMode = false;
            $scope.DisplayMode = true;
            $scope.ShowCreateButton = false;
            $scope.ShowEditButton = true;
            $scope.ShowCancelButton = false;
            $scope.CustomerID = response.Customer.CustomerID;

            alertsService.RenderSuccessMessage(response.ReturnMessage);

            $scope.setOriginalValues();
        }

        $scope.createCustomerError = function (response) {
            alertsService.RenderErrorMessage(response.ReturnMessage);
            $scope.clearValidationErrors();
            alertsService.SetValidationErrors($scope, response.ValidationErrors);
        }

        $scope.createCustomerObject = function () {

            var customer = new Object();

            customer.CustomerCode = $scope.CustomerCode;
            customer.CompanyName = $scope.CompanyName;
            customer.Address = $scope.Address;
            customer.City = $scope.City;
            customer.Region = $scope.Region;
            customer.PostalCode = $scope.PostalCode;
            customer.Country = $scope.CountryCode;
            customer.PhoneNumber = $scope.PhoneNumber;
            customer.WebSiteUrl = $scope.WebSiteURL;

            return customer;
        }

        $scope.clearValidationErrors = function () {
            $scope.CustomerCodeInputError = false;
            $scope.CompanyNameInputError = false;
        }

    }]);
});
Controller As 語法
示例中,顯示層和控制層使用 $scope 技術實現 web應用和資料庫的雙向繫結。在上面的控制層程式碼中,你可以看到很多地方都使用了 $scope 物件。 在 AngularJS 中,這是實現資料繫結比較常見的方式。 AngularJS 控制層程式碼近期進行了細微的、影響比較大的優化。
最新的趨勢是使用 Controller as ControllerName 這樣的語法,而不是直接將$scope注入到你的控制器中。例如,客戶管理控制器可以像如下檢視中這樣被引用:
<div ng-controller="customerController as customer">
<input ng-model="customer.FirstName" type="text" style="width: 300px" />
<input ng-model="customer.LastName" type="text" style="width: 300px" />
<div>
<button class="btn btn-primary btn-large" ng-click="createCustomer()"/>Create</button>
</div>
填充資料繫結屬性的控制器語法就可以像下面這樣:
this.FirstName = "";
this.LastName = "";
使用 "this" 物件來引用控制器的scope看上去比直接將$scope注入到控制器中更加清晰。這裡需要重申,$scope是“經典”技術,而“controller as"則是AngularJS裡更加新晉的東西. 它們倆都能能工作得很好,不管是選擇哪一種技術,都要記用著方便為出發點. 現有的例項更多使用的是$scope,而”controller as“則正在慢慢紅火起來. 其中一個會比另外一個好麼?這我們就得等待並觀察AngularJS隨時間發生的演變.
自定義服務 - AngularJS 服務
AngularJS 服務是可替換的物件,這些物件使用依賴注入連線在一起。 在程式裡,你可以使用服務來組織和共享你的程式碼。 AngularJS 服務是延遲初始化的 – 只有當應用程式元件依賴它時,AngularJS 才會初始化一個服務。
AngularJS 服務是單例型別 – 依賴服務的每個元件都會引用AngularJS 服務工廠類產生的一個例項。 雖然AngularJS 提供一些常用的服務(如$http),但是對於大多數應用來說,你可能想要建立自己的服務。
客戶管理控制器依賴於 CustomerService. 這個顧客服務元件被應用程式用於組織所有訪問和嚮應用程式伺服器傳遞顧客相關資料所需要的Web API路由. 為了保持示例應用程式所有控制器中路由的清晰, 我為每一個部分(包括客戶、訂單、產品)都建立了服務層. AngularJS 服務能幫助你組織好你的JavaScript,以獲得更好的重用性和可維護性.
顧客服務引用了由控制器設定的回撥函式. 這個回撥函式會在伺服器呼叫完成時執行. 如你所能看見的,客戶服務沒有執行向伺服器發起HTTP呼叫的實際工作。在定義語句中,則會依賴對將會被動態載入進來的ajaxService.
// customerService.js

define(['application-configuration', 'ajaxService'], function (app) {

    app.register.service('customersService', ['ajaxService', function (ajaxService) {

        this.importCustomers = function (successFunction, errorFunction) {
            ajaxService.AjaxGet("/api/customers/ImportCustomers",
                successFunction, errorFunction);
        };

        this.getCustomers = function (customer, successFunction, errorFunction) {
            ajaxService.AjaxGetWithData(customer, "/api/customers/GetCustomers",
                successFunction, errorFunction);
        };

        this.createCustomer = function (customer, successFunction, errorFunction) {
            ajaxService.AjaxPost(customer, "/api/customers/CreateCustomer",
                successFunction, errorFunction);
        };

        this.updateCustomer = function (customer, successFunction, errorFunction) {
            ajaxService.AjaxPost(customer, "/api/customers/UpdateCustomer",
                successFunction, errorFunction);
        };

        this.getCustomer = function (customerID, successFunction, errorFunction) {
            ajaxService.AjaxGetWithData(customerID, "/api/customers/GetCustomer",
                successFunction, errorFunction);
        };

    }]);

});
AJAX 服務
為本應用程式所建立的AJAX服務將會被所有的HTTP請求重用。AJAX 服務使用了AngularJS 的 $http 服務 , 該服務會實際執行面向伺服器的 HTTP GET 和 POST 呼叫. 伺服器呼叫的則是 RESTful 服務,返回的是簡單的 JSON 物件.
AJAX 服務還使用了blockUI在HTTP請求進行時使用UI來阻塞使用者的互動. 此外你還可以應用安全功能來檢查使用者是否已經被認證. 此應用程式使用了Forms Authentication,它會在每一個請求時附帶向伺服器傳送一個認證的token. 我已經新增了一行程式碼,通過檢查來自伺服器的響應訊息中一個普通的IsAuthenicated 屬性,來看看使用者是否仍然是通過認證的.
如果session已經超時,則對IsAuthenicated的檢查會將使用者路由到登陸頁面. 讓一個AJAX服務成為管理你所有的AJAX呼叫的中心,可以使得對整個應用程式的AJAX呼叫功能的實現和修改變得容易起來.
// ajaxService.js

define(['application-configuration'], function (app)
{
    app.register.service('ajaxService', ['$http', 'blockUI', function ($http, blockUI) {
        this.AjaxPost = function (data, route, successFunction, errorFunction) {
            blockUI.start();
            setTimeout(function () {
                $http.post(route, data).success(function
                          (response, status, headers, config)
                {
                    blockUI.stop();
                    successFunction(response, status);
                }).error(function (response) {
                    blockUI.stop();
                    if (response.IsAuthenicated == false)
                    {
                        window.location = "/index.html";
                    }
                    errorFunction(response);
                });
            }, 1000);
        }

        this.AjaxGet = function (route, successFunction, errorFunction) {
            blockUI.start();
            setTimeout(function () {
                $http({ method: 'GET', url: route }).success(
                function (response, status, headers, config) {
                    blockUI.stop();
                    successFunction(response, status);
                }).error(function (response) {
                    blockUI.stop();
                    if (response.IsAuthenicated == false)
                    {
                        window.location = "/index.html";
                    }
                    errorFunction(response);
                });
            }, 1000);
        }

        this.AjaxGetWithData = function (data, route, successFunction, errorFunction) {
            blockUI.start();
            setTimeout(function () {
                $http({ method: 'GET', url: route, params: data }).success(
                function (response, status, headers, config) {
                    blockUI.stop();
                    successFunction(response, status);
                }).error(function (response) {
                    blockUI.stop();
                    if (response.IsAuthenicated == false)
                    {
                        window.location = "/index.html";
                    }
                    errorFunction(response);
                });
            }, 1000);
        }

    }]);
});
用於AJAX服務的額外配置
在application-configuration.js檔案中,加入了用於AJAX伺服器請求的額外配置. 為了配置AngularJS 每次請求傳遞Forms Authentication的 cookie 資訊, $httpProvider 會需要一個用於讓 withCredentials 屬性被設定為true的值.
在http連線中,AngularJS 不預設返回一個XMLHttpRequest物件,但是你可以在$httpProvider服務裡配置。 當瀏覽器請求中含有一些阻塞UI展示的配置項時,你可以使用blockUI元件,實現在前臺展示自定義的訊息。
// application-configuration.js

app.config(function ($httpProvider) {
    $httpProvider.defaults.headers.common['X-Requested-With'] = 'XMLHttpRequest';
    $httpProvider.defaults.withCredentials = true;
});
app.config(function (blockUIConfigProvider) {
    // Change the default overlay message
    blockUIConfigProvider.message("executing...");
    // Change the default delay to 100ms before the blocking is visible
    blockUIConfigProvider.delay(1);
    // Disable automatically blocking of the user interface
    blockUIConfigProvider.autoBlock(false);
});
在每個頁面請求中進行身份驗證
在示例中,indexController控制前臺頁面的展示。 基於這一點,載入配置項時,我在application-configuration.js中定義indexController。這樣,在應用程式執行之前,indexController和AngularJS一起被載入、註冊。 大型的網頁應用中,對於每個頁面的請求,通常優先進行身份驗證、授權。 為了解決這個問題,indexController包含一個函式,實現在每個頁面請求前,對使用者身份進行驗證。
AngularJS 可以配置、監聽客戶端頁面上使用者觸發的事件。 其中一個事件是$routeChangeStart。 每次請求路由定位時,都會觸發這個事件。 為了使監聽器工作,你只需使用$scope.$on指令配置下這個事件。
由於indexController 控制頁面的跳轉,因此可以在indexController 裡配置$routeChangeStart 事件。在下面的示例中,為了判斷使用者是否被授權,瀏覽器在頁面請求前優先執行了一個http get請求。 如果返回的isAuthenicated值為false,瀏覽器會跳轉到登陸頁面。 另外,你可以進行額外的安全性檢查來判斷使用者是否有許可權訪問請求的頁面。
// indexController.js

var indexController = function ($scope, $rootScope, $http, $location, blockUI) {

    $scope.$on('$routeChangeStart', function (scope, next, current) {
        $scope.authenicateUser($location.path(),
                $scope.authenicateUserComplete, $scope.authenicateUserError);
    });

    $scope.authenicateUser = function (route, successFunction, errorFunction) {
        var authenication = new Object();
        authenication.route = route;
        $scope.AjaxGet(authenication, "/api/main/AuthenicateUser",
                successFunction, errorFunction);
    };

    $scope.authenicateUserComplete = function (response) {
        if (response.IsAuthenicated==false)
        {
            window.location = "/index.html";
        }
    }

};
AngularJS $rootScope
在AngularJS裡面,每個應用程式都有一個單獨的root scope. 所有其他scope都是root scope的衍生物. Scope隔離了模型和檢視. 你可以將屬性設定在$rootScope之下,這些屬性在外殼頁面(shell page)的生存週期內一直保留其屬性值. 只要使用者重新整理了瀏覽器,$rootScope的值就會消失,必須要重新設定.
當示例應用程式初始化載入的時候,它使用$rootScope儲存從伺服器返回的選單選項.在使用者登入後,擴充後的選單選項列表將會從伺服器返回,它允許使用者訪問應用程式的其它部分.$rootScope是一個很好的用來儲存選單選項等會話級別資訊的地方.
$rootScope.MenuItems = response.MenuItems;
在外殼頁面(shell page), 選單項是資料繫結到無序列表的,在每個頁面請求時保持設定的狀態.
<div class="navbar-collapse collapse" id="MainMenu">
<ul class="nav navbar-nav" ng-repeat="menuItem in MenuItems">
    <li> <a href="{{menuItem.Route}}">{{menuItem.Description}} </a> </li>
</ul>
</div>