一、是什麼
說起圖,大家一下就可能想到折線圖、柱狀圖和餅圖等,但是除了這些顯眼的東西以外其實還有很多東西輔助的存在著,有了這些輔助的東西圖才會看起來有意義,或者說更加的真實、有說服力。這些東西都包括那些呢?首先座標軸肯定是不能少了的,還有網格線、圖例和示意說明等。這一節我們就重點來圍繞這個示意說明也就是QCPAbstractItem來做以解釋
二、效果圖
這裡我將首先貼張效果圖,主要是為了展示QCPAbstractItem的用途,有需要的同學可以深入的瞭解下。圖上出了一條折線之外,還有座標軸、網格線和圖例,那麼下一小節我將會重點的來說這個示意說明都有哪些。
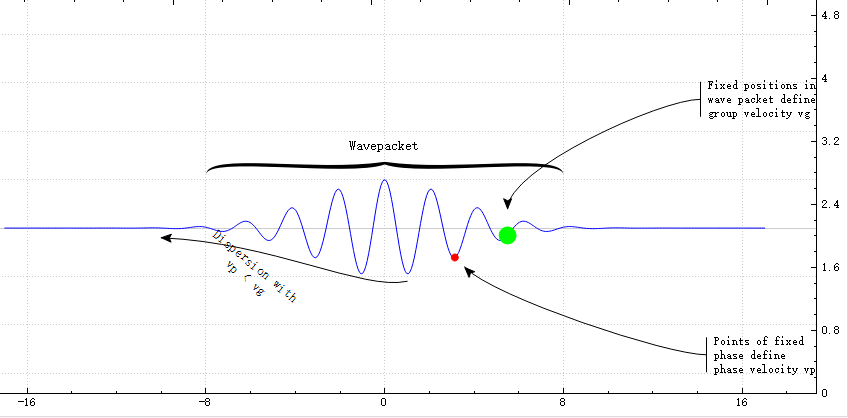
圖1 QCPAbstractItem示例
三、程式碼解讀
1、說這些示意類前,我先給大家介紹一個類QCPItemPosition,這個是描述位置的一個類,示意項都是包含了這個類才具有位置資訊,那麼這個類有什麼妙用呢,呵呵呵。。。那就要問他的成員PositionType列舉了,這個列舉有4個值,接下類我分別介紹下:
- ptAbsolute:Static positioning in pixels, starting from the top left corner of the viewport/widget.該值為預設值,根據畫素設定位置,從視口的左上角開始算起
- ptViewportRatio:Static positioning given by a fraction of the viewport size. For example, if you call setCoords(0, 0), the position will be at the top
left corner of the viewport/widget. setCoords(1, 1) will be at the bottom right corner, setCoords(0.5, 0) will be horizontally centered and
vertically at the top of the viewport/widget, etc.按比例設定,依賴於視口大小 - ptAxisRectRatio:Static positioning given by a fraction of the axis rect size (see \ref setAxisRect). For example, if you call setCoords(0, 0), the position will be at the top left corner of the axis rect. setCoords(1, 1) will be at the bottom right corner, setCoords(0.5, 0) will be horizontally centered and vertically at the top of the axis rect, etc. You can also go beyond the axis rect by providing negative coordinates or coordinates larger than 1.按比例設定位置,依賴於座標軸矩形大小,區別於按視口大小
- ptPlotCoords:Dynamic positioning at a plot coordinate defined by two axes (see \ref setAxes).依賴於兩個座標軸
看到上述4個列舉,小夥伴應該猜到他是什麼意思了吧,沒錯他就是表明這個位置資訊被解析的一種方式。
2、接下來我們來看一下到底有哪些示意說明
- 直線(QCPItemStraightLine):直線,顧名思義就是給定兩個點他會無限延伸,他使用了兩個QCPItemPosition變數來儲存位置
- 線段(QCPItemLine):比對於直線,線段就是一段,而不是兩端自動延長
- 曲線(QCPItemCurve):引數線,如圖1種的帶箭頭曲線
- 矩形(QCPItemRect):
- 橢圓(QCPItemEllipse)
- 文字(QCPItemText):圖1中所有的文字描述都來自這個類,可能有的同學會問,為什麼右側的兩個文字框有左側的垂直線,其實他不是文字框的,而是那條帶箭頭的線尾部的一種裝飾。
- 小圓球(QCPItemTracer):如圖1種所示的紅色和綠色實心圓
- 圖片(QCPItemPixmap)
- 括弧(QCPItemBracket):如圖1種Wavepacket表示的垂直右大括號
3、QCustomPlot提供了不少的示意類,接下來我說下QCPItemText和QCPItemCurve
QCPItemText示意程式碼如下:
1     QCPItemText *phaseTracerText = new QCPItemText(ui.widget_18);//構造一個文字
2     ui.widget_18->addItem(phaseTracerText);//新增到圖
3     phaseTracerText->position->setType(QCPItemPosition::ptAxisRectRatio);//設定文字座標解析方式,前文中有提到QCPItemPosition類的PositionType列舉
4     phaseTracerText->setPositionAlignment(Qt::AlignRight | Qt::AlignBottom);//設定位置在矩形區域的位置
5     phaseTracerText->position->setCoords(1.0, 0.95); // 設定位置,注意第三行程式碼的列舉型別和這兒的值解析方式有關係
6     phaseTracerText->setText("Points of fixed\nphase define\nphase velocity vp");//文字描述
7     phaseTracerText->setTextAlignment(Qt::AlignLeft);//設定文字在矩形區域的位置
8     phaseTracerText->setFont(QFont(font().family(), 9));//設定文字的字型
9     phaseTracerText->setPadding(QMargins(8, 0, 0, 0));//設定文字所在矩形的margins
QCPItemCurve示意程式碼如下:
 1     QCPItemCurve *phaseTracerArrow = new QCPItemCurve(ui.widget_18);//構造一個帶引數線
 2     ui.widget_18->addItem(phaseTracerArrow);//新增到圖中
 3     phaseTracerArrow->start->setParentAnchor(phaseTracerText->left);//曲線的開始點為文字的左位置
 4     phaseTracerArrow->startDir->setParentAnchor(phaseTracerArrow->start);//同步自身的錨點
 5     phaseTracerArrow->startDir->setCoords(-40, 0); // x軸偏移40個畫素
 6     phaseTracerArrow->end->setParentAnchor(phaseTracer->position);//曲線的結束點為實心圓的位置
 7     phaseTracerArrow->end->setCoords(10, 10);//偏移
 8     phaseTracerArrow->endDir->setParentAnchor(phaseTracerArrow->end);//同步自身的錨點
 9     phaseTracerArrow->endDir->setCoords(30, 30);//偏移
10     phaseTracerArrow->setHead(QCPLineEnding::esSpikeArrow);//設定首部形狀(箭頭)
11     phaseTracerArrow->setTail(QCPLineEnding(QCPLineEnding::esBar, (phaseTracerText->bottom->pixelPoint().y() - phaseTracerText->top->pixelPoint().y())*0.85));//設定尾部形狀(一條豎線)