前面提到了YV12轉RGB的各種實現方法和優化方法,主要是CPU上的實現。本文主要介紹基於GPU的YV12轉RGB的實現。
1. 基於OpenGL的實現
利用OpenGL shader實現將YV12轉RGB,將Y、U、V分量資料作為紋理資料,並構造YUV轉RGB的shader程式碼,最終紋理資料在shader程式碼作用下,實現YV12轉RGB。該方法適合於將YV12轉RGB後直接顯示,若YV12轉化成RGB後,還需要進行影象處理操作,則利用OpenGL進行紋理資料的影象處理操作不方便。說明:由於本文著重於基於Cuda的實現,因而未驗證基於OpenGL的程式碼實現。
具體資料可參考:
http://blog.csdn.net/xiaoguaihai/article/details/8672631
http://www.fourcc.org/source/YUV420P-OpenGL-GLSLang.c
2. 基於Cuda的實現
YV12轉RGB的過程是逐一獲取畫素的Y、U、V分量,然後通過轉換公式計算得RGB。基於CUDA的實現關鍵在於兩個步驟:Y、U、V分量的獲取,RGB的計算。Y、U、V分量的獲取與YUV的記憶體佈局有關,RGB的計算公式一般是固定不變。具體的程式碼實現如下所示,主要參考NV12ToARGB.cu的程式碼,在該程式碼的基礎上,保持RGB的計算方法不變,修改了Y、U、V分量的獲取方法。
|
#include "cuda.h" #include "cuda_runtime_api.h"
#define COLOR_COMPONENT_BIT_SIZE 10 #define COLOR_COMPONENT_MASK 0x3FF
__constant__ float constHueColorSpaceMat[9]={1.1644f,0.0f,1.596f,1.1644f,-0.3918f,-0.813f,1.1644f,2.0172f,0.0f};
__device__ staticvoid YUV2RGB(constint* yuvi,float* red,float* green,float* blue) { float luma, chromaCb, chromaCr;
// Prepare for hue adjustment luma =(float)yuvi[0]; chromaCb =(float)((int)yuvi[1]-512.0f); chromaCr =(float)((int)yuvi[2]-512.0f);
// Convert YUV To RGB with hue adjustment *red =(luma * constHueColorSpaceMat[0])+ (chromaCb * constHueColorSpaceMat[1])+ (chromaCr * constHueColorSpaceMat[2]);
*green =(luma * constHueColorSpaceMat[3])+ (chromaCb * constHueColorSpaceMat[4])+ (chromaCr * constHueColorSpaceMat[5]);
*blue =(luma * constHueColorSpaceMat[6])+ (chromaCb * constHueColorSpaceMat[7])+ (chromaCr * constHueColorSpaceMat[8]); }
__device__ staticint RGBA_pack_10bit(float red,float green,float blue,int alpha) { int ARGBpixel =0;
// Clamp final 10 bit results red =::fmin(::fmax(red, 0.0f),1023.f); green =::fmin(::fmax(green,0.0f),1023.f); blue =::fmin(::fmax(blue, 0.0f),1023.f);
// Convert to 8 bit unsigned integers per color component ARGBpixel =(((int)blue >>2)| (((int)green >>2)<<8) | (((int)red >>2)<<16)| (int)alpha);
return ARGBpixel; }
__global__ void YV12ToARGB_FourPixel(constunsignedchar* pYV12,unsignedint* pARGB,int width,int height) { // Pad borders with duplicate pixels, and we multiply by 2 because we process 4 pixels per thread constint x = blockIdx.x *(blockDim.x <<1)+(threadIdx.x <<1); constint y = blockIdx.y *(blockDim.y <<1)+(threadIdx.y <<1);
if((x +1)>= width ||(y +1)>= height) return;
// Read 4 Luma components at a time int yuv101010Pel[4]; yuv101010Pel[0]=(pYV12[y * width + x ])<<2; yuv101010Pel[1]=(pYV12[y * width + x +1])<<2; yuv101010Pel[2]=(pYV12[(y +1)* width + x ])<<2; yuv101010Pel[3]=(pYV12[(y +1)* width + x +1])<<2;
constunsignedint vOffset = width * height; constunsignedint uOffset = vOffset +(vOffset >>2); constunsignedint vPitch = width >>1; constunsignedint uPitch = vPitch; constint x_chroma = x >>1; constint y_chroma = y >>1;
int chromaCb = pYV12[uOffset + y_chroma * uPitch + x_chroma]; //U int chromaCr = pYV12[vOffset + y_chroma * vPitch + x_chroma]; //V
yuv101010Pel[0]|=(chromaCb <<( COLOR_COMPONENT_BIT_SIZE +2)); yuv101010Pel[0]|=(chromaCr <<((COLOR_COMPONENT_BIT_SIZE <<1)+2)); yuv101010Pel[1]|=(chromaCb <<( COLOR_COMPONENT_BIT_SIZE +2)); yuv101010Pel[1]|=(chromaCr <<((COLOR_COMPONENT_BIT_SIZE <<1)+2)); yuv101010Pel[2]|=(chromaCb <<( COLOR_COMPONENT_BIT_SIZE +2)); yuv101010Pel[2]|=(chromaCr <<((COLOR_COMPONENT_BIT_SIZE <<1)+2)); yuv101010Pel[3]|=(chromaCb <<( COLOR_COMPONENT_BIT_SIZE +2)); yuv101010Pel[3]|=(chromaCr <<((COLOR_COMPONENT_BIT_SIZE <<1)+2));
// this steps performs the color conversion int yuvi[12]; float red[4], green[4], blue[4];
yuvi[0]=(yuv101010Pel[0]& COLOR_COMPONENT_MASK ); yuvi[1]=((yuv101010Pel[0]>> COLOR_COMPONENT_BIT_SIZE) & COLOR_COMPONENT_MASK); yuvi[2]=((yuv101010Pel[0]>>(COLOR_COMPONENT_BIT_SIZE <<1))& COLOR_COMPONENT_MASK);
yuvi[3]=(yuv101010Pel[1]& COLOR_COMPONENT_MASK ); yuvi[4]=((yuv101010Pel[1]>> COLOR_COMPONENT_BIT_SIZE) & COLOR_COMPONENT_MASK); yuvi[5]=((yuv101010Pel[1]>>(COLOR_COMPONENT_BIT_SIZE <<1))& COLOR_COMPONENT_MASK);
yuvi[6]=(yuv101010Pel[2]& COLOR_COMPONENT_MASK ); yuvi[7]=((yuv101010Pel[2]>> COLOR_COMPONENT_BIT_SIZE) & COLOR_COMPONENT_MASK); yuvi[8]=((yuv101010Pel[2]>>(COLOR_COMPONENT_BIT_SIZE <<1))& COLOR_COMPONENT_MASK);
yuvi[9]=(yuv101010Pel[3]& COLOR_COMPONENT_MASK ); yuvi[10]=((yuv101010Pel[3]>> COLOR_COMPONENT_BIT_SIZE) & COLOR_COMPONENT_MASK); yuvi[11]=((yuv101010Pel[3]>>(COLOR_COMPONENT_BIT_SIZE <<1))& COLOR_COMPONENT_MASK);
// YUV to RGB Transformation conversion YUV2RGB(&yuvi[0],&red[0],&green[0],&blue[0]); YUV2RGB(&yuvi[3],&red[1],&green[1],&blue[1]); YUV2RGB(&yuvi[6],&red[2],&green[2],&blue[2]); YUV2RGB(&yuvi[9],&red[3],&green[3],&blue[3]);
pARGB[y * width + x ]= RGBA_pack_10bit(red[0], green[0], blue[0],((int)0xff<<24)); pARGB[y * width + x +1]= RGBA_pack_10bit(red[1], green[1], blue[1],((int)0xff<<24)); pARGB[(y +1)* width + x ]= RGBA_pack_10bit(red[2], green[2], blue[2],((int)0xff<<24)); pARGB[(y +1)* width + x +1]= RGBA_pack_10bit(red[3], green[3], blue[3],((int)0xff<<24)); }
bool YV12ToARGB(unsignedchar* pYV12,unsignedchar* pARGB,int width,int height) { unsignedchar* d_src; unsignedchar* d_dst; unsignedint srcMemSize =sizeof(unsignedchar)* width * height *3/2; unsignedint dstMemSize =sizeof(unsignedchar)* width * height *4;
cudaMalloc((void**)&d_src,srcMemSize); cudaMalloc((void**)*d_dst,dstMemSize); cudaMemcpy(d_src,pYV12,srcMemSize,cudaMemcpyHostToDevice);
dim3 block(32,8); int gridx =(width +2*block.x -1)/(2*block.x); int gridy =(height +2*block.y -1)/(2*block.y); dim3 grid(gridx,gridy);
YV12ToARGB<<<grid,block>>>(d_src,(unsignedint*)d_dst,width,height); cudaMemcpy(pARGB,d_dst,dstMemSize,cudaMemcpyDeviceToHost); returntrue; } |
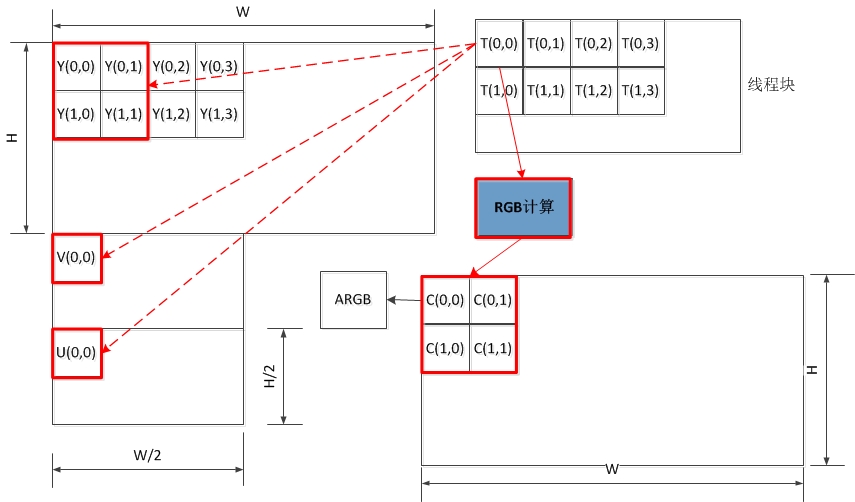
執行緒記憶體訪問示意圖如下所示,每個執行緒訪問4個Y、1個U、1個V,最終轉換得到4個ARGB值。由於YV12屬於YUV4:2:0取樣,每四個Y共用一組UV分量,即Y(0,0)、Y(0,1)、Y(1,0)、Y(1,1)共用V(0,0)和U(0,0),如紅色框標註所示。
3. 基於Cuda的實現優化
優化主要關注於兩個方面:單個執行緒處理畫素粒度和資料傳輸。單個執行緒處理粒度分為:OnePixelPerThread,TwoPixelPerThread,FourPixelPerThread。資料傳輸優化主要採用Pageable Memory,Pinned Memory,Mapped Memory(Zero Copy)。經測試,不同實現版本的轉換效率如下表所示,測試序列:1920*1080,時間統計包括核心函式執行時間和資料傳輸時間,單位為ms。
|
|
OnePixel |
TwoPixel |
FourPixel |
|
Pageable |
6.91691 |
6.64319 |
6.2873 |
|
Pinned |
5.31999 |
5.01890 |
4.71937 |
|
Mapped |
3.39043 |
48.5298 |
23.8327 |
由上表可知,不使用Mapped Memory(Zero Copy)時,單個執行緒處理畫素的粒度越大,核心函式執行的時間越小,轉換效率越好。使用Mapped Memory(Zero Copy)時,單執行緒處理單畫素時,轉換效率最好。
單個執行緒處理四個畫素時,核心函式執行時間最少;使用Pinned Memory會減少資料傳輸時間;使用Mapped Memory消除資料傳輸過程,但會增加核心函式執行時間,最終優化效果與核心函式訪問記憶體的方式有關。建議使用Pinned Memory+FourPixelPerThread的優化版本。
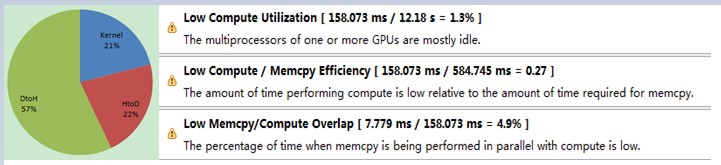
利用NVIDIA提供的效能分析工具,分析Pinned Memory+FourPixelPerThread版本程式,分析結果如下圖所示,核心計算時間佔1/4左右,資料傳輸時間佔3/4左右,總體而言,核心計算任務過少,導致並行優化的效果無法抵消資料傳輸的開銷。