前言:
Annotation註解在Android的開發中的使用越來越普遍,例如EventBus、ButterKnife、Dagger2等,之前使用註解的時候需要利用反射機制勢必影響到執行效率及效能,直到後來android-apt的出現通過註解根據反射機制動態編譯生成程式碼的方式來解決在執行時不再使用發射機制,不過隨著android-apt的退出不再維護,我們今天利用Android studio的官方外掛annotationProcessor來實現一下自己的ButterKnife UI註解框架。
需要了解的知識:
自動成程式碼:
1.)先看下整個專案結構
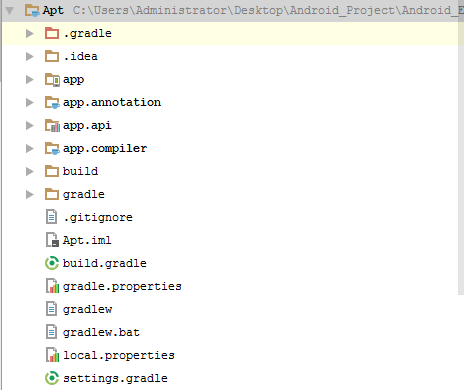
整個專案分一個app、app.api、app.annotation、app.complier
app:整個專案的入口 用於測試註解框架
app.annotation:主要用於申明app所有使用的UI註解
app.api:用於申明UI註解框架的api
app.complier:用於在編譯期間通過反射機制自動生成程式碼
2.)app.annotation 宣告註解框架中要使用的註解
這裡我宣告瞭一個BindView註解,宣告週期為Class,作用域為成員變數
@Retention(RetentionPolicy.CLASS)
@Target(ElementType.FIELD)
public @interface BindView {
    int value();
}
因為這裡僅僅想要實現繫結View控制元件,這裡就宣告瞭一個BindView註解
注意:
app.annotation module為java library,build.gradle配置如下
apply plugin: 'java'
sourceCompatibility =JavaVersion.VERSION_1_7
targetCompatibility =JavaVersion.VERSION_1_7
dependencies {
    compile fileTree(dir: 'libs', include: ['*.jar'])
}
3.)app.api 宣告UI註解框架中使用的api,比如繫結解綁,查詢View控制元件等
面向介面程式設計,定義一個繫結註解的介面
/**
 * UI繫結解綁介面
 *
 * @param <T>
 */
public interface ViewBinder<T> {

    void bindView(T host, Object object, ViewFinder finder);

    void unBindView(T host);
}
定義一個被繫結者查詢view的介面
/**
 * ui提供者介面
 */
public interface ViewFinder {

    View findView(Object object, int id);
}
這裡宣告一個Activity 預設的View查詢者
/**
 * Activity UI查詢提供者
 */

public class ActivityViewFinder implements ViewFinder {
    @Override
    public View findView(Object object, int id) {
        return ((Activity) object).findViewById(id);
    }
}
註解框架向外提供繫結方法,這裡使用靜態類來管理
public class LCJViewBinder {
    private static final ActivityViewFinder activityFinder = new ActivityViewFinder();//預設宣告一個Activity View查詢器
    private static final Map<String, ViewBinder> binderMap = new LinkedHashMap<>();//管理保持管理者Map集合

    /**
     * Activity註解繫結 ActivityViewFinder
     *
     * @param activity
     */
    public static void bind(Activity activity) {
        bind(activity, activity, activityFinder);
    }


    /**
     * '註解繫結
     *
     * @param host   表示註解 View 變數所在的類,也就是註解類
     * @param object 表示查詢 View 的地方,Activity & View 自身就可以查詢,Fragment 需要在自己的 itemView 中查詢
     * @param finder ui繫結提供者介面
     */
    private static void bind(Object host, Object object, ViewFinder finder) {
        String className = host.getClass().getName();
        try {
            ViewBinder binder = binderMap.get(className);
            if (binder == null) {
                Class<?> aClass = Class.forName(className + "$$ViewBinder");
                binder = (ViewBinder) aClass.newInstance();
                binderMap.put(className, binder);
            }
            if (binder != null) {
                binder.bindView(host, object, finder);
            }
        } catch (ClassNotFoundException e) {
            e.printStackTrace();
        } catch (InstantiationException e) {
            e.printStackTrace();
        } catch (IllegalAccessException e) {
            e.printStackTrace();
        }
    }

    /**
     * 解除註解繫結 ActivityViewFinder
     *
     * @param host
     */
    public static void unBind(Object host) {
        String className = host.getClass().getName();
        ViewBinder binder = binderMap.get(className);
        if (binder != null) {
            binder.unBindView(host);
        }
        binderMap.remove(className);
    }
}
4.)app.complier根據註解在編譯期間自動生成java程式碼
優先需要自定義一個AbstractProcessor,然後Annotation生成程式碼,完整的AbstractProcessor
public class LCJViewBinderProcessor extends AbstractProcessor {

    @Override
    public synchronized void init(ProcessingEnvironment env){ }

    @Override
    public boolean process(Set<? extends TypeElement> annoations, RoundEnvironment env) { }

    @Override
    public Set<String> getSupportedAnnotationTypes() { }

    @Override
    public SourceVersion getSupportedSourceVersion() { }

}
重要函式解說
- init(ProcessingEnvironment env): 每一個註解處理器類都必須有一個空的建構函式。然而,這裡有一個特殊的init()方法,它會被註解處理工具呼叫,並輸入ProcessingEnviroment引數。ProcessingEnviroment提供很多有用的工具類Elements,Types和Filer。
-
public boolean process(Set<? extends TypeElement> annoations, RoundEnvironment env)這相當於每個處理器的主函式main()。 在這裡寫掃描、評估和處理註解的程式碼,以及生成Java檔案。輸入引數RoundEnviroment,可以讓查詢出包含特定註解的被註解元素。
- getSupportedAnnotationTypes();這裡必須指定,這個註解處理器是註冊給哪個註解的。注意,它的返回值是一個字串的集合,包含本處理器想要處理的註解型別的合法全稱。換句話說,在這裡定義你的註解處理器註冊到哪些註解上。
- getSupportedSourceVersion();用來指定你使用的Java版本。
該module同樣是Java Library,build.gradle配置如下
apply plugin: 'java'
//apply plugin: 'com.github.dcendents.android-maven'
sourceCompatibility =JavaVersion.VERSION_1_7
targetCompatibility =JavaVersion.VERSION_1_7

dependencies {
    compile fileTree(dir: 'libs', include: ['*.jar'])
    compile 'com.google.auto.service:auto-service:1.0-rc2'
    compile 'com.squareup:javapoet:1.7.0'
    compile project(':app.annotation')
}
-
com.google.auto.service:auto-service:1.0-rc2 谷歌提供的Java 生成原始碼庫
-
com.squareup:javapoet:1.7.0 提供了各種 API 讓你用各種姿勢去生成 Java 程式碼檔案
定義一個被註解類物件AnnotedClass,用於儲存哪些被註解的物件
class AnnotatedClass {
    private static class TypeUtil {
        static final ClassName BINDER = ClassName.get("com.whoislcj.appapi", "ViewBinder");
        static final ClassName PROVIDER = ClassName.get("com.whoislcj.appapi", "ViewFinder");
    }

    private TypeElement mTypeElement;
    private ArrayList<BindViewField> mFields;
    private Elements mElements;

    AnnotatedClass(TypeElement typeElement, Elements elements) {
        mTypeElement = typeElement;
        mElements = elements;
        mFields = new ArrayList<>();
    }

    void addField(BindViewField field) {
        mFields.add(field);
    }

    JavaFile generateFile() {
        //generateMethod
        MethodSpec.Builder bindViewMethod = MethodSpec.methodBuilder("bindView")
                .addModifiers(Modifier.PUBLIC)
                .addAnnotation(Override.class)
                .addParameter(TypeName.get(mTypeElement.asType()), "host")
                .addParameter(TypeName.OBJECT, "source")
                .addParameter(TypeUtil.PROVIDER, "finder");

        for (BindViewField field : mFields) {
            // find views
            bindViewMethod.addStatement("host.$N = ($T)(finder.findView(source, $L))", field.getFieldName(), ClassName.get(field.getFieldType()), field.getResId());
        }

        MethodSpec.Builder unBindViewMethod = MethodSpec.methodBuilder("unBindView")
                .addModifiers(Modifier.PUBLIC)
                .addParameter(TypeName.get(mTypeElement.asType()), "host")
                .addAnnotation(Override.class);
        for (BindViewField field : mFields) {
            unBindViewMethod.addStatement("host.$N = null", field.getFieldName());
        }

        //generaClass
        TypeSpec injectClass = TypeSpec.classBuilder(mTypeElement.getSimpleName() + "$$ViewBinder")
                .addModifiers(Modifier.PUBLIC)
                .addSuperinterface(ParameterizedTypeName.get(TypeUtil.BINDER, TypeName.get(mTypeElement.asType())))
                .addMethod(bindViewMethod.build())
                .addMethod(unBindViewMethod.build())
                .build();

        String packageName = mElements.getPackageOf(mTypeElement).getQualifiedName().toString();

        return JavaFile.builder(packageName, injectClass).build();
    }
}
然後再定義一個BindViewField物件用於被註解的成員變數
class BindViewField {
    private VariableElement mVariableElement;
    private int mResId;

    BindViewField(Element element) throws IllegalArgumentException {
        if (element.getKind() != ElementKind.FIELD) {
            throw new IllegalArgumentException(String.format("Only fields can be annotated with @%s",
                    BindView.class.getSimpleName()));
        }
        mVariableElement = (VariableElement) element;

        BindView bindView = mVariableElement.getAnnotation(BindView.class);
        mResId = bindView.value();
        if (mResId < 0) {
            throw new IllegalArgumentException(
                    String.format("value() in %s for field %s is not valid !", BindView.class.getSimpleName(),
                            mVariableElement.getSimpleName()));
        }
    }

    /**
     * 獲取變數名稱
     *
     * @return
     */
    Name getFieldName() {
        return mVariableElement.getSimpleName();
    }

    /**
     * 獲取變數id
     *
     * @return
     */
    int getResId() {
        return mResId;
    }

    /**
     * 獲取變數型別
     *
     * @return
     */
    TypeMirror getFieldType() {
        return mVariableElement.asType();
    }
}
上面兩個物件定義好了之後,就下來實現一下根據註解生成程式碼過程
@AutoService(Processor.class)
public class LCJViewBinderProcessor extends AbstractProcessor {
    private Filer mFiler; //檔案相關的輔助類
    private Elements mElementUtils; //元素相關的輔助類
    private Messager mMessager; //日誌相關的輔助類
    private Map<String, AnnotatedClass> mAnnotatedClassMap;
    @Override
    public synchronized void init(ProcessingEnvironment processingEnv) {
        super.init(processingEnv);
        mFiler = processingEnv.getFiler();
        mElementUtils = processingEnv.getElementUtils();
        mMessager = processingEnv.getMessager();
        mAnnotatedClassMap = new TreeMap<>();
    }


    @Override
    public boolean process(Set<? extends TypeElement> annotations, RoundEnvironment roundEnv) {
        mAnnotatedClassMap.clear();
        try {
            processBindView(roundEnv);
        } catch (IllegalArgumentException e) {
            e.printStackTrace();
            error(e.getMessage());
        }

        for (AnnotatedClass annotatedClass : mAnnotatedClassMap.values()) {
            try {
                annotatedClass.generateFile().writeTo(mFiler);
            } catch (IOException e) {
                error("Generate file failed, reason: %s", e.getMessage());
            }
        }
        return true;
    }

    private void processBindView(RoundEnvironment roundEnv) throws IllegalArgumentException {

        for (Element element : roundEnv.getElementsAnnotatedWith(BindView.class)) {
            AnnotatedClass annotatedClass = getAnnotatedClass(element);
            BindViewField bindViewField = new BindViewField(element);
            annotatedClass.addField(bindViewField);
        }
    }

    private AnnotatedClass getAnnotatedClass(Element element) {
        TypeElement typeElement = (TypeElement) element.getEnclosingElement();
        String fullName = typeElement.getQualifiedName().toString();
        AnnotatedClass annotatedClass = mAnnotatedClassMap.get(fullName);
        if (annotatedClass == null) {
            annotatedClass = new AnnotatedClass(typeElement, mElementUtils);
            mAnnotatedClassMap.put(fullName, annotatedClass);
        }
        return annotatedClass;
    }

    private void error(String msg, Object... args) {
        mMessager.printMessage(Diagnostic.Kind.ERROR, String.format(msg, args));
    }


    @Override
    public SourceVersion getSupportedSourceVersion() {
        return SourceVersion.latestSupported();
    }


    @Override
    public Set<String> getSupportedAnnotationTypes() {
        Set<String> types = new LinkedHashSet<>();
        types.add(BindView.class.getCanonicalName());
        return types;
    }
}
原理是現解析儲存被註解的類,然後再根據註解解析被註解的成員變數,進行儲存,最後根據生成java類進行寫檔案
5.)app使用註解框架的應用
在build.gradle中新增如下配置
dependencies {
    compile fileTree(dir: 'libs', include: ['*.jar'])
    androidTestCompile('com.android.support.test.espresso:espresso-core:2.2.2', {
        exclude group: 'com.android.support', module: 'support-annotations'
    })
    compile 'com.android.support:appcompat-v7:24.2.1'
    testCompile 'junit:junit:4.12'
    compile project(':app.api')
    compile project(':app.annotation')
    annotationProcessor  project(':app.compiler')
}
Activity中使用
public class MainActivity extends AppCompatActivity {
    @BindView(R.id.test)
    Button mButton;

    @Override
    protected void onCreate(Bundle savedInstanceState) {
        super.onCreate(savedInstanceState);
        setContentView(R.layout.activity_main);
        LCJViewBinder.bind(this);
        mButton.setOnClickListener(new View.OnClickListener() {
            @Override
            public void onClick(View v) {
                Toast.makeText(MainActivity.this, "success", Toast.LENGTH_SHORT).show();
            }
        });
    }

    @Override
    protected void onDestroy() {
        super.onDestroy();
        LCJViewBinder.unBind(this);
    }
}
然後把專案重新build一下就會自動生成MainActivity$$ViewBinder類
public class MainActivity$$ViewBinder implements ViewBinder<MainActivity> {
  @Override
  public void bindView(MainActivity host, Object source, ViewFinder finder) {
    host.mButton = (Button)(finder.findView(source, 2131427413));
  }

  @Override
  public void unBindView(MainActivity host) {
    host.mButton = null;
  }
}
總結:
通過註解生成程式碼在平時的開發過程中可能很少接觸,因為目前很多開源框架幫我們處理了這部分,如果我們需要自己做一個使用註解的框架就需要這方面知識了,這個例子僅僅是我自己查詢資源然後模仿做出來的,其實我們專案中業務元件化之間可以通過註解來宣告路由scheme地址,後期有時間實現一下。