本文會涉及到的模組:
- json、pickle
- urllib、Requests
- xml.etree
- configparser
- shutil、zipfile、tarfile
1. json & pickle序列化
- json,用於字串和 python資料型別間進行轉換,不同語言之間相容性好,但是隻能轉換字串字典列表等簡單的資料型別。Json模組提供了四個功能:dumps、dump、loads、load。
- pickle,用於python特有的型別 和 python的資料型別間進行轉換。比較強大能轉換的資料型別比較多,但是隻在python下支援。pickle模組提供了四個功能:dumps、dump、loads、load。
(1) json
dumps、loads用的最多
import json

s = '{"k1": "v1", "k2": "v2"}'  #json在處理這種字串的時候,目標字典元素必須是"",否則報錯
result = json.loads(s)
print(result, type(result))  # {'k1': 'v1', 'k2': 'v2'} <class 'dict'>

result = json.load(open('db', 'r')) #讀取db中的內容,並把字串轉變成dict
print(result)       #{'k1': 'v1', 'k2': 'v2'}

dic = {'k1': 'v1', 'k2': 'v2'}
result = json.dumps(dic)
print(result, type(result))  # {"k2": "v2", "k1": "v1"} <class 'str'>

dic = {'k1': 'v1', 'k2': 'v2'}
result = json.dump(dic,open('db','w')) #輸出後寫入db檔案
注意:json提供的是一種通用式的序列化,因此它適用的資料型別比較有限,如list、dict,但是tuple就不支援,以為在其他語言中沒有tuple這種資料型別。
(2) pickle
dumps、loads用的最多
用法同上
2. http請求
傳送http請求後,伺服器一般會返回json、xml、html這幾種格式的資料
(1) urllib
Python標準庫中提供了:urllib等模組以供Http請求,但是,它的 API 太渣了。它是為另一個時代、另一個網際網路所建立的。它需要巨量的工作,甚至包括各種方法覆蓋,來完成最簡單的任務。
import urllib.request


f = urllib.request.urlopen('http://www.webxml.com.cn//webservices/qqOnlineWebService.asmx/qqCheckOnline?qqCode=424662508')
result = f.read().decode('utf-8')
import urllib.request
req = urllib.request.Request('http://www.example.com/')
req.add_header('Referer', 'http://www.python.org/')
r = urllib.request.urlopen(req)
result = f.read().decode('utf-8')
傳送攜帶請求頭的GET請求更多見Python官方文件:module-urllib
(2) Requests(第三方模組)
發起http請求,並獲取請求的返回值
Requests 是使用 Apache2 Licensed 許可證的 基於Python開發的HTTP 庫,其在Python內建模組的基礎上進行了高度的封裝,從而使得Pythoner進行網路請求時,變得美好了許多,使用Requests可以輕而易舉的完成瀏覽器可有的任何操作。
1、安裝模組
pip3 install requests2、使用模組
# 1、無引數例項

import requests

ret = requests.get('https://github.com/timeline.json')

print(ret.url)
print(ret.text)


# 2、有引數例項
#GET請求
import requests

payload = {'key1': 'value1', 'key2': 'value2'}
ret = requests.get("http://httpbin.org/get", params=payload)

print(ret.url)
print(ret.text)
# 1、基本POST例項

import requests

payload = {'key1': 'value1', 'key2': 'value2'}
ret = requests.post("http://httpbin.org/post", data=payload)

print(ret.text)


# 2、傳送請求頭和資料例項
#POST請求
import requests
import json

url = 'https://api.github.com/some/endpoint'
payload = {'some': 'data'}
headers = {'content-type': 'application/json'}

ret = requests.post(url, data=json.dumps(payload), headers=headers)

print(ret.text)
print(ret.cookies)
#其他請求
requests.get(url, params=None, **kwargs)
requests.post(url, data=None, json=None, **kwargs)
requests.put(url, data=None, **kwargs)
requests.head(url, **kwargs)
requests.delete(url, **kwargs)
requests.patch(url, data=None, **kwargs)
requests.options(url, **kwargs)

# 以上方法均是在此方法的基礎上構建
requests.request(method, url, **kwargs)
更多requests模組相關的文件:Requests: 讓 HTTP 服務人類
3、Http請求和XML例項
#例項1:檢測QQ賬號是否線上
import urllib
import requests
from xml.etree import ElementTree as ET
# 使用第三方模組requests傳送HTTP請求,或者XML格式內容
r = requests.get('http://www.webxml.com.cn//webservices/qqOnlineWebService.asmx/qqCheckOnline?qqCode=424662508')
result = r.text
# 解析XML格式內容
node = ET.XML(result)
# 獲取內容
if node.text == "Y":
print("線上")
else:
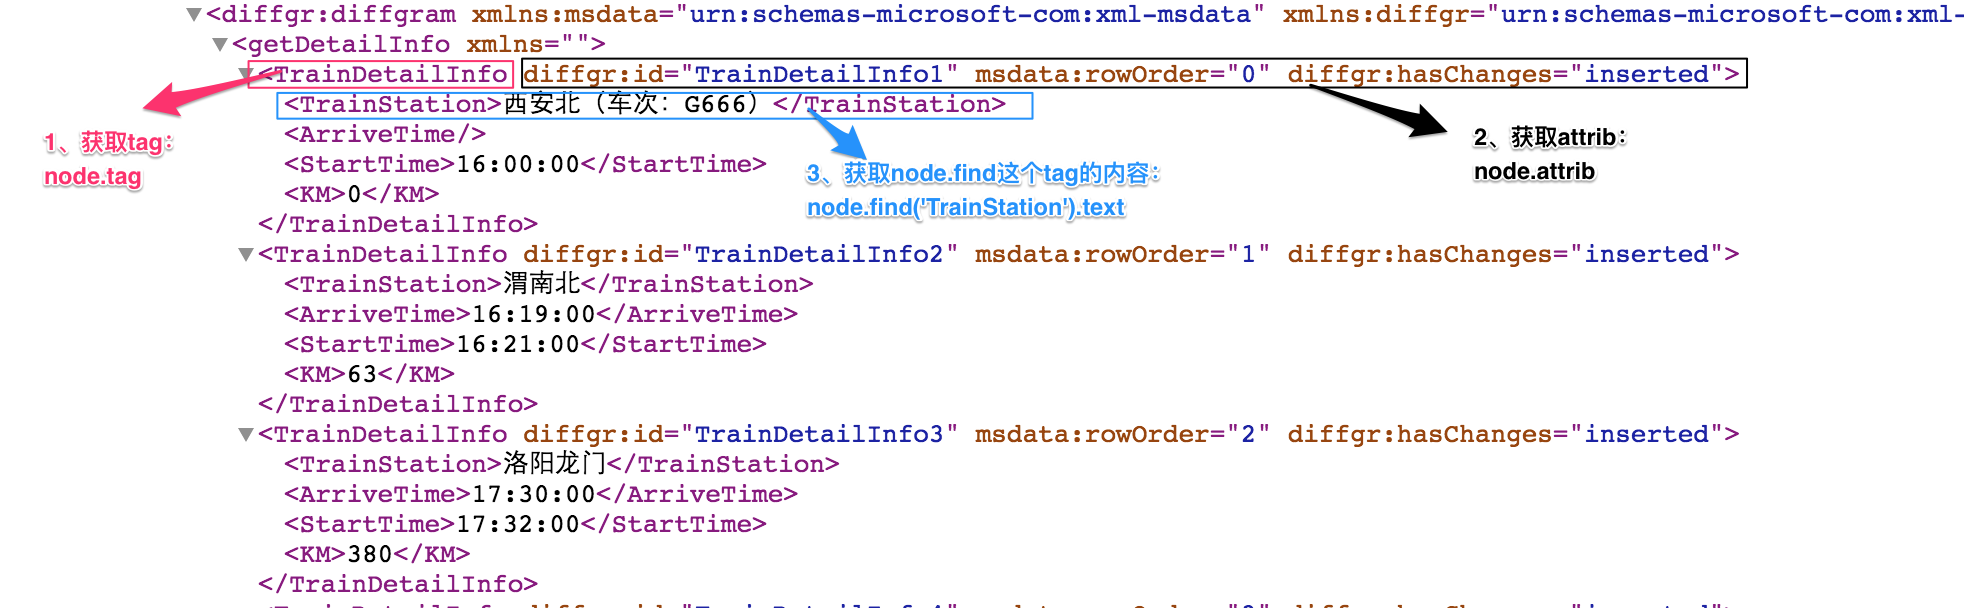
print("離線")#例項2:獲取火車時刻表
import urllib
import requests
from xml.etree import ElementTree as ET
# 使用第三方模組requests傳送HTTP請求,或者XML格式內容
r = requests.get('http://www.webxml.com.cn/WebServices/TrainTimeWebService.asmx/getDetailInfoByTrainCode?TrainCode=G666&UserID=')
result = r.text
# 解析XML格式內容
root = ET.XML(result)
for node in root.iter('TrainDetailInfo'):
print(node.find('TrainStation').text,node.find('StartTime').text,node.tag,node.attrib)3. xml處理
(1) 簡介
XML是實現不同語言或程式之間進行資料交換的協議,與json類似,XML檔案格式如下:
<data>
    <country name="Liechtenstein">
        <rank updated="yes">2</rank>    #<tag attrib>text</tag>
        <year>2023</year>
        <gdppc>141100</gdppc>
        <neighbor direction="E" name="Austria" />  #child
        <neighbor direction="W" name="Switzerland" />
    </country>
    <country name="Singapore">
        <rank updated="yes">5</rank>
        <year>2026</year>
        <gdppc>59900</gdppc>
        <neighbor direction="N" name="Malaysia" />
    </country>
    <country name="Panama">
        <rank updated="yes">69</rank>
        <year>2026</year>
        <gdppc>13600</gdppc>
        <neighbor direction="W" name="Costa Rica" />
        <neighbor direction="E" name="Colombia" />
    </country>
</data>
如果想通過python獲取一個xml裡的全部類容那麼
#例項:獲取火車時刻表

import urllib
import requests
from xml.etree import ElementTree as ET

# 使用第三方模組requests傳送HTTP請求,或者XML格式內容
r = requests.get('http://www.webxml.com.cn/WebServices/TrainTimeWebService.asmx/getDetailInfoByTrainCode?TrainCode=G666&UserID=')
result = r.text

# 解析XML格式內容
root = ET.XML(result)       #root在這裡就是最外層的節點


print(root.tag)
"""
{http://WebXml.com.cn/}DataSet
"""

for node in root:
    print(node)         #輸出root的兩個元素
"""
<Element '{http://www.w3.org/2001/XMLSchema}schema' at 0x102319cc8>
<Element '{urn:schemas-microsoft-com:xml-diffgram-v1}diffgram' at 0x1027c71d8>
"""
ElementTree(.py) as ET
ET. Element
ET. ElementTree

#建立整個tree
tree = ET.parse("檔名")
tree = ET.ElementTree(根節點(Element物件))   #通過根節點建立一個tree

#建立根節點
ele = ET.Element('family',{"age":"18"})     #建立一個根節點
(2) 解析xml
1.利用ElementTree.XML將字串解析成xml物件:
from xml.etree import ElementTree as ET


# 開啟檔案,讀取內容
str_xml = open('xo.xml', 'r').read()

# 將字串解析成xml特殊物件,root代指xml檔案的根節點
root = ET.XML(str_xml)      #<Element 'data' at 0x102122278>
2.利用ElementTree.parse將檔案直接解析成xml物件(不需要先open再read就可以直接解析xml檔案)
from xml.etree import ElementTree as ET

# 直接解析xml檔案
tree = ET.parse("xo.xml")

# 獲取xml檔案的根節點
root = tree.getroot()   #<Element 'data' at 0x102122278>
(3) 操作xml
print(dir(root)) #檢視一個節點的所有方法部分原始碼如下,詳細原始碼請參考:[source]class Element
class Element:
    """An XML element.
    This class is the reference implementation of the Element interface.
    An element's length is its number of subelements.  That means if you want to check if an element is truly empty, you should check BOTH its length AND its text attribute.
    The element tag, attribute names, and attribute values can be either bytes or strings.
    *tag* is the element name.  *attrib* is an optional dictionary containing element attributes. *extra* are additional element attributes given as keyword arguments.
    Example form:
        <tag attrib>text<child/>...</tag>tail
    """
a、遍歷XML文件的所有內容
from xml.etree import ElementTree as ET

############ 此處省略解析過程 ############

# 頂層標籤
print(root.tag)

# 遍歷XML文件的第二層
for child in root:
    # 第二層節點的標籤名稱和標籤屬性
    print(child.tag, child.attrib)
    # 遍歷XML文件的第三層
    for i in child:
        # 第三層節點的標籤名稱和內容
        print(i.tag,i.text)
b、遍歷XML中指定的節點
from xml.etree import ElementTree as ET

############ 此處省略解析過程 ############

### 操作

# 頂層標籤
print(root.tag)


# 遍歷XML中所有的year節點
for node in root.iter('year'):
    # 節點的標籤名稱和內容
    print(node.tag, node.text)
c、修改節點內容
由於修改的節點時,均是在記憶體中進行,其不會影響檔案中的內容。所以,如果想要修改,則需要重新將記憶體中的內容寫到檔案。
from xml.etree import ElementTree as ET

############ 解析方式一 ############

# 開啟檔案,讀取XML內容
str_xml = open('xo.xml', 'r').read()

# 將字串解析成xml特殊物件,root代指xml檔案的根節點
root = ET.XML(str_xml)

############ 操作 ############

# 頂層標籤
print(root.tag)

# 迴圈所有的year節點
for node in root.iter('year'):
    # 將year節點中的內容自增一
    new_year = int(node.text) + 1
    node.text = str(new_year)

    # 設定屬性
    node.set('name', 'alex')
    node.set('age', '18')
    # 刪除屬性
    del node.attrib['name']


############ 儲存檔案 ############
tree = ET.ElementTree(root)     #由於解析方式一沒有建立tree,因此我們在操作完檔案需要儲存的時候需要額外建立一個tree
tree.write("newnew.xml", encoding='utf-8')
from xml.etree import ElementTree as ET
############ 解析方式二 ############
# 直接解析xml檔案
tree = ET.parse("xo.xml")
# 獲取xml檔案的根節點
root = tree.getroot()
############ 操作 ############
# 頂層標籤
print(root.tag)
# 迴圈所有的year節點
for node in root.iter('year'):
# 將year節點中的內容自增一
new_year = int(node.text) + 1
node.text = str(new_year)
# 設定屬性
node.set('name', 'alex')
node.set('age', '18')
# 刪除屬性
del node.attrib['name']
############ 儲存檔案 ############
tree.write("newnew.xml", encoding='utf-8')d、刪除節點
from xml.etree import ElementTree as ET

############ 解析字串方式開啟 ############

# 開啟檔案,讀取XML內容
str_xml = open('xo.xml', 'r').read()

# 將字串解析成xml特殊物件,root代指xml檔案的根節點
root = ET.XML(str_xml)

############ 操作 ############

# 頂層標籤
print(root.tag)

# 遍歷data下的所有country節點
for country in root.findall('country'):
    # 獲取每一個country節點下rank節點的內容
    rank = int(country.find('rank').text)

    if rank > 50:
        # 刪除指定country節點
        root.remove(country)

############ 儲存檔案 ############
tree = ET.ElementTree(root)
tree.write("newnew.xml", encoding='utf-8')
from xml.etree import ElementTree as ET
############ 解析檔案方式 ############
# 直接解析xml檔案
tree = ET.parse("xo.xml")
# 獲取xml檔案的根節點
root = tree.getroot()
############ 操作 ############
# 頂層標籤
print(root.tag)
# 遍歷data下的所有country節點
for country in root.findall('country'):
# 獲取每一個country節點下rank節點的內容
rank = int(country.find('rank').text)
if rank > 50:
# 刪除指定country節點
root.remove(country)
############ 儲存檔案 ############
tree.write("newnew.xml", encoding='utf-8')
解析檔案方式開啟,刪除,儲存(4) 建立xml文件
建立方式1:Element
from xml.etree import ElementTree as ET

# 建立根節點
root = ET.Element("famliy")


# 建立節點大兒子
son1 = ET.Element('son', {'name': '兒1'})
# 建立小兒子
son2 = ET.Element('son', {"name": '兒2'})

# 在大兒子中建立兩個孫子
grandson1 = ET.Element('grandson', {'name': '兒11'})
grandson2 = ET.Element('grandson', {'name': '兒12'})
son1.append(grandson1)
son1.append(grandson2)


# 把兒子新增到根節點中
root.append(son1)
root.append(son2)

tree = ET.ElementTree(root)
tree.write('oooo.xml',encoding='utf-8', short_empty_elements=False)
---------------

#例項歸納:
ele = ET.Element('family',{"age":"18"})     #建立一個根節點
tree = ET.ElementTree(ele)   #通過根節點建立一個tree
tree.write("xx.xml")        #有了tree之後就可以把修改後的資料儲存到xx.xml檔案中
---------------
建立方式2:makeelement()
和Element()一樣
from xml.etree import ElementTree as ET

# 建立根節點
root = ET.Element("famliy")


# 建立大兒子
# son1 = ET.Element('son', {'name': '兒1'})
son1 = root.makeelement('son', {'name': '兒1'})
# 建立小兒子
# son2 = ET.Element('son', {"name": '兒2'})
son2 = root.makeelement('son', {"name": '兒2'})

# 在大兒子中建立兩個孫子
# grandson1 = ET.Element('grandson', {'name': '兒11'})
grandson1 = son1.makeelement('grandson', {'name': '兒11'})
# grandson2 = ET.Element('grandson', {'name': '兒12'})
grandson2 = son1.makeelement('grandson', {'name': '兒12'})

son1.append(grandson1)
son1.append(grandson2)


# 把兒子新增到根節點中
root.append(son1)
root.append(son2)

tree = ET.ElementTree(root)
tree.write('oooo.xml',encoding='utf-8', short_empty_elements=False)
建立方式3:SubElement
from xml.etree import ElementTree as ET


# 建立根節點
root = ET.Element("famliy")


# 建立節點大兒子
son1 = ET.SubElement(root, "son", attrib={'name': '兒1'})
# 建立小兒子
son2 = ET.SubElement(root, "son", attrib={"name": "兒2"})

# 在大兒子中建立一個孫子
grandson1 = ET.SubElement(son1, "age", attrib={'name': '兒11'})
grandson1.text = '孫子'


et = ET.ElementTree(root)  #生成文件物件
et.write("test.xml", encoding="utf-8", xml_declaration=True, short_empty_elements=False)     #xml_declaration,新增xml註釋
由於原生儲存的XML時預設無縮排,如果想要設定縮排的話, 需要修改儲存方式:
from xml.etree import ElementTree as ET
from xml.dom import minidom


def prettify(elem):
    """將節點轉換成字串,並新增縮排。
    """
    rough_string = ET.tostring(elem, 'utf-8')
    reparsed = minidom.parseString(rough_string)
    return reparsed.toprettyxml(indent="\t")

# 建立根節點
root = ET.Element("famliy")


# 建立大兒子
# son1 = ET.Element('son', {'name': '兒1'})
son1 = root.makeelement('son', {'name': '兒1'})
# 建立小兒子
# son2 = ET.Element('son', {"name": '兒2'})
son2 = root.makeelement('son', {"name": '兒2'})

# 在大兒子中建立兩個孫子
# grandson1 = ET.Element('grandson', {'name': '兒11'})
grandson1 = son1.makeelement('grandson', {'name': '兒11'})
# grandson2 = ET.Element('grandson', {'name': '兒12'})
grandson2 = son1.makeelement('grandson', {'name': '兒12'})

son1.append(grandson1)
son1.append(grandson2)


# 把兒子新增到根節點中
root.append(son1)
root.append(son1)


raw_str = prettify(root)

f = open("xxxoo.xml",'w',encoding='utf-8')
f.write(raw_str)
f.close()
(5)xml名稱空間
詳細請參考:名稱空間
from xml.etree import ElementTree as ET

ET.register_namespace('com',"http://www.company.com") #some name

# build a tree structure
root = ET.Element("{http://www.company.com}STUFF")
body = ET.SubElement(root, "{http://www.company.com}MORE_STUFF", attrib={"{http://www.company.com}hhh": "123"})
body.text = "STUFF EVERYWHERE!"

# wrap it in an ElementTree instance, and save as XML
tree = ET.ElementTree(root)

tree.write("page.xml",
           xml_declaration=True,
           encoding='utf-8',
           method="xml")
4. ConfigParser模組
configparser用於處理特定格式的檔案,其本質上是利用open來操作檔案。
(1) 指定格式
# 註釋1
;  註釋2

[section1] # 節點
k1 = v1    # 值
k2:v2       # 值

[section2] # 節點
k1 = v1    # 值
(2) 獲取所有節點
import configparser

config = configparser.r()    #建立一個config物件
config.read('xxxooo', encoding='utf-8')     #把檔案讀到記憶體裡
ret = config.sections()     #獲取所有節點
print(ret)  #['section1', 'section2']
(3) 獲取指定節點下所有的鍵值對
import configparser

config = configparser.ConfigParser()
config.read('xxxooo', encoding='utf-8')
ret = config.items('section1')
print(ret)      #[('k1', 'v1'), ('k2', 'v2')]
(4) 獲取指定節點下所有的建
import configparser

config = configparser.ConfigParser()
config.read('xxxooo', encoding='utf-8')
ret = config.options('section1')
print(ret)  #['k1', 'k2']
(5) 獲取指定節點下指定key的值
import configparser

config = configparser.ConfigParser()
config.read('xxxooo', encoding='utf-8')


v = config.get('section1', 'k1')
# v = config.getint('section1', 'k1')
# v = config.getfloat('section1', 'k1')
# v = config.getboolean('section1', 'k1')

print(v)
(6) 檢查、刪除、新增節點
configparser的修改都是在記憶體裡進行的,因此在改完之後需要把記憶體裡的資料重新儲存到檔案中。
import configparser

config = configparser.ConfigParser()
config.read('xxxooo', encoding='utf-8')

# 檢查
has_sec = config.has_section('section1')    #返回bool
print(has_sec)

# 新增節點
config.add_section("SEC_1")
config.write(open('xxxooo', 'w'))   #檔案儲存

# 刪除節點
config.remove_section("SEC_1")
config.write(open('xxxooo', 'w'))
(7) 檢查、刪除、設定指定組內的鍵值對
import configparser

config = configparser.ConfigParser()
config.read('xxxooo', encoding='utf-8')

# 檢查
has_opt = config.has_option('section1', 'k1')
print(has_opt)

# 刪除
config.remove_option('section1', 'k1')
config.write(open('xxxooo', 'w'))

# 設定
config.set('section1', 'k10', "123")
config.write(open('xxxooo', 'w'))   #如果key存在則修改,如果沒有則在後面追加新的items
5. shutil
高階的 檔案、資料夾、壓縮包 處理模組
(1) 拷貝檔案內容(先讀後寫)
shutil.copyfileobj(fsrc, fdst[, length])
將檔案內容拷貝到另一個檔案中
import shutil

shutil.copyfileobj(open('old.xml','r'), open('new.xml', 'w'))
(2) 拷貝檔案
shutil.copyfile(src, dst)
shutil.copyfile('f1.log', 'f2.log')(3) 拷貝許可權
shutil.copymode(src, dst)
僅拷貝許可權。內容、組、使用者均不變
shutil.copymode('f1.log', 'f2.log')(4) 拷貝狀態的資訊
shutil.copystat(src, dst)
僅拷貝狀態的資訊,包括:mode bits, atime, mtime, flags
shutil.copystat('f1.log', 'f2.log')(5) 拷貝檔案和許可權
shutil.copy(src, dst)
拷貝檔案和許可權
import shutil

shutil.copy('f1.log', 'f2.log')
(6) 拷貝檔案和狀態資訊
shutil.copy2(src, dst)
拷貝檔案和狀態資訊
import shutil

shutil.copy2('f1.log', 'f2.log')
(7) 遞迴拷貝
shutil.ignore_patterns(*patterns)
shutil.copytree(src, dst, symlinks=False, ignore=None)
遞迴的去拷貝資料夾
import shutil

shutil.copytree('folder1', 'folder2', ignore=shutil.ignore_patterns('*.pyc', 'tmp*'))
import shutil
shutil.copytree('f1', 'f2', symlinks=True, ignore=shutil.ignore_patterns('*.pyc', 'tmp*'))(8) 遞迴刪除
shutil.rmtree(path[, ignore_errors[, onerror]])
遞迴的去刪除檔案
import shutil

shutil.rmtree('folder1')
(9) 檔案移動
shutil.move(src, dst)
遞迴的去移動檔案,它類似mv命令,其實就是重新命名。
import shutil

shutil.move('folder1', 'folder3')
(10)壓縮
shutil.make_archive(base_name, format,...)
建立壓縮包並返回檔案路徑,例如:zip、tar
建立壓縮包並返回檔案路徑,例如:zip、tar
- base_name: 壓縮包的檔名,也可以是壓縮包的路徑。只是檔名時,則儲存至當前目錄,否則儲存至指定路徑,
如:www =>儲存至當前路徑
如:/Users/wupeiqi/www =>儲存至/Users/wupeiqi/ - format: 壓縮包種類,“zip”, “tar”, “bztar”,“gztar”
- root_dir: 要壓縮的資料夾路徑(預設當前目錄)
- owner: 使用者,預設當前使用者
- group: 組,預設當前組
- logger: 用於記錄日誌,通常是logging.Logger物件
#將 /Users/wupeiqi/Downloads/test 下的檔案打包放置當前程式目錄
import shutil
ret = shutil.make_archive("wwwwwwwwww", 'gztar', root_dir='/Users/wupeiqi/Downloads/test')


#將 /Users/wupeiqi/Downloads/test 下的檔案打包放置 /Users/wupeiqi/目錄
import shutil
ret = shutil.make_archive("/Users/wupeiqi/wwwwwwwwww", 'gztar', root_dir='/Users/wupeiqi/Downloads/test')
(11) 補充
shutil 對壓縮包的處理是呼叫 ZipFile 和 TarFile 兩個模組來進行的,詳細:
zipfile模組
import zipfile

# 壓縮
z = zipfile.ZipFile('laxi.zip', 'w')
z.write('a.log')
z.write('data.data')
z.close()

# 解壓
z = zipfile.ZipFile('laxi.zip', 'r')
z.extractall()
z.close()
tarfile模組
import tarfile

# 壓縮
tar = tarfile.open('your.tar','w')
tar.add('/Users/wupeiqi/PycharmProjects/bbs2.log', arcname='bbs2.log')     #arcname為壓縮後的檔名
tar.add('/Users/wupeiqi/PycharmProjects/cmdb.log', arcname='cmdb.log')
tar.close()

# 解壓
tar = tarfile.open('your.tar','r')
tar.extractall()  # 可設定解壓地址
tar.close()