前言
作為四大元件之一的Service,想必不少開發者都是瞭解的,那具體熟悉嗎?是不是對Service中的每個知識點是否瞭解,它與Activity的關係又是什麼樣的,我們所理解的後臺服務跟Service是否一樣,那跟Thread有什麼區別呢,帶著這些問題,就可以寫一篇文章來一一展開了。
目錄
- Service是什麼
- Service生命週期
- Service基本用法
- Service與Activity的關係
- Service與Thread的區別
- 小結
Service是什麼
從官網中,我們可以看到這麼一句:
Most confusion about the Service class actually revolves around what it is not:
- A Service is not a separate process. The Service object itself does not imply it is running in its own process; unless otherwise specified, it runs in the same process as the application it is part of.
- A Service is not a thread. It is not a means itself to do work off of the main thread (to avoid Application Not Responding errors).
Thus a Service itself is actually very simple, providing two main features:
- A facility for the application to tell the system about something it wants to be doing in the background (even when the user is not directly interacting with the application). This corresponds to calls to Context.startService(), which ask the system to schedule work for the service, to be run until the service or someone else explicitly stop it.
- A facility for an application to expose some of its functionality to other applications. This corresponds to calls to Context.bindService(), which allows a long-standing connection to be made to the service in order to interact with it.
簡單來說,Service不是一個獨立的程式,除非它被特殊指定,否則它也是我們應用程式的一部分,它需要依賴於建立服務時所在的應用程式。同時Service也不是一個執行緒,它其實是在主執行緒工作的,所以不能在Service中處理耗時的操作,不然就會出現ARN現象,如果要處理耗時的操作,可以新開一個子執行緒,單獨處理。
更進一步講,Service是 Android中實現程式後臺執行的解決方案,它非常適合用於去執行那 些不需要和使用者互動而且還要求長期執行的任務。服務的執行不依賴於任何使用者介面,即使 當程式被切換到後臺,或者使用者開啟了另外一個應用程式,服務仍然能夠保持正常執行。
Service有兩種啟動方式,一種是通過startService()方式,一種是通過bindService()方式,那這兩種具體有什麼區別呢,我們可以看下它們的生命週期來看出端倪。
Service生命週期
看張圖:
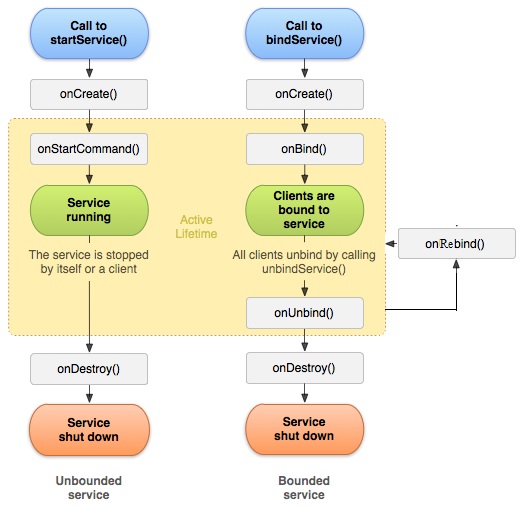
從圖中我們可以看到兩種不同的啟動方式,分別是context.startService()和context.bindService()。
startService()啟動的生命週期:
當我們第一次使用startService啟動一個服務時,系統例項化一個Service例項,然後依次呼叫onCreate()和onStartCommand()方法,然後執行,需要注意的是,再次使用startService方法時,不會在建立一個新的服務物件了,但還是會再次執行onStartCommand()方法,如果我們想要停掉一個服務,可以用stopService方法,此時,onDestroy()方法就會被呼叫,不管前面使用了多少次的startService,stopService方法呼叫一次,就可停掉服務。
bindService()啟動的生命週期:
當呼叫者首次使用bindService繫結一個服務時,系統會例項化一個Service例項,並一次呼叫其onCreate()方法和onBind()方法,然後呼叫者就可以和服務進行互動了,此後,如果再次使用bindService繫結服務,系統不會建立新的Service例項,也不會再呼叫onBind方法;如果我們需要解除與這個服務的繫結,可使用unbindService方法,此時onUnbind方法和onDestroy方法會被呼叫。
這兩個啟動方式的不同,導致生命週期也不同。startService與呼叫者沒有必然的聯絡,即呼叫者結束了自己的生命週期,只要沒有使用stopService方法停止這個服務,服務仍會執行。而bindService需要有個寄宿的物件,就相當於bind到某個宿主中去,誰繫結了,誰就要負責,負責它的生命週期,從開始到結束,如果宿主自己的生命週期結束了,bindService模式就要先把服務給銷燬掉。
值得注意的一點是,如果呼叫者首先是先用startService方式啟動服務,然後再用bindService方式繫結某個服務的話,一定要先用unbindService方式解綁,然後才用stopService方式銷燬服務物件,不然的話,僅僅只是stopService是不夠的,沒解綁的物件還是在的,就容易造成記憶體洩露了。
Service基本用法
首先要定義個類,繼承Service類,比如我們可以定義一個叫做MyService的類,具體如下:
public class MyService extends Service {

    private static final String TAG =  MyService.class.getSimpleName();
    private MyBinder mBinder = new MyBinder();

    @Override
    public void onCreate() {
        TLog.i(TAG,"onCreate()");
        super.onCreate();
    }

    @Override
    public void onDestroy() {
        TLog.i(TAG,"onDestroy()");
        super.onDestroy();
    }

    @Override
    public boolean onUnbind(Intent intent) {
        TLog.i(TAG,"onUnbind()");
        return super.onUnbind(intent);
    }

    @Override
    public int onStartCommand(Intent intent, int flags, int startId) {
        TLog.i(TAG,"onStartCommand()");
        return super.onStartCommand(intent, flags, startId);
    }

    @Nullable
    @Override
    public IBinder onBind(Intent intent) {
        TLog.i(TAG,"onBind()");
        return mBinder;
    }

    public class MyBinder extends Binder {

        public void startDownload() {
            Log.d("TAG", "startDownload()");
            // 執行具體的下載任務
        }
    }
}
然後寫個介面來控制服務的啟動和關閉
<?xml version="1.0" encoding="utf-8"?>
<LinearLayout xmlns:android="http://schemas.android.com/apk/res/android"
              android:orientation="vertical"
              android:layout_width="match_parent"
              android:layout_height="match_parent">

    <Button
        android:layout_width="wrap_content"
        android:layout_height="wrap_content"
        android:text="啟動服務"
        android:id="@+id/recommend_btn_start"/>

    <Button
        android:layout_width="wrap_content"
        android:layout_height="wrap_content"
        android:text="停止服務"
        android:id="@+id/recommend_btn_stop"/>

    <Button
        android:layout_width="wrap_content"
        android:layout_height="wrap_content"
        android:text="繫結服務"
        android:id="@+id/recommend_btn_bind"/>

    <Button
        android:layout_width="wrap_content"
        android:layout_height="wrap_content"
        android:text="解綁服務"
        android:id="@+id/recommend_btn_unbind"/>


</LinearLayout>
相應的後臺處理類,給按鈕增加事件處理。
public class RecommendFragment extends BaseFragment implements OnTabReselectListener {
    @BindView(R.id.recommend_btn_start)
    Button mStart;

    @BindView(R.id.recommend_btn_stop)
    Button mStop;

    @BindView(R.id.recommend_btn_bind)
    Button mBind;

    @BindView(R.id.recommend_btn_unbind)
    Button mUnBind;

    private Unbinder unbinder;

    private MyService.MyBinder myBinder;

    private ServiceConnection connection = new ServiceConnection() {

        @Override
        public void onServiceDisconnected(ComponentName name) {
        }

        @Override
        public void onServiceConnected(ComponentName name, IBinder service) {
            myBinder = (MyService.MyBinder) service;
            myBinder.startDownload();
        }
    };

    @Override
    protected int getLayoutId() {
        return R.layout.fragment_recommend;
    }

    @Override
    protected void initView(View view, Bundle savedInstanceState) {
        unbinder = ButterKnife.bind(this,view);
        mStart.setOnClickListener(this);
        mStop.setOnClickListener(this);
        mBind.setOnClickListener(this);
        mUnBind.setOnClickListener(this);
    }

    @Override
    public void onClick(View v) {
        switch (v.getId()){
            case R.id.recommend_btn_start:
                Intent startIntent = new Intent(getHoldingActivity(), MyService.class);
                getHoldingActivity().startService(startIntent);
                break;
            case R.id.recommend_btn_stop:
                Intent stopIntent = new Intent(getHoldingActivity(), MyService.class);
                getHoldingActivity().stopService(stopIntent);
                break;
            case R.id.recommend_btn_bind:
                Intent bindIntent = new Intent(getHoldingActivity(), MyService.class);
                getHoldingActivity().bindService(bindIntent,connection, Context.BIND_ADJUST_WITH_ACTIVITY);
                break;
            case R.id.recommend_btn_unbind:
                getHoldingActivity().unbindService(connection);
                break;
        }
    }

    @Override
    public void onTabReselect() {

    }

    @Override
    public void onDestroyView() {
        super.onDestroyView();
        unbinder.unbind();
    }
}
我們首先用startService方式來啟動服務
當點選啟動服務時,日誌列印如下:

當點選停止服務時,日誌列印如下:

我們再用bindService方式來啟動服務
此時我們可以看到一個ServiceConnection的一個例項,構成了Service與呼叫者的通訊,在Activity裡具體程式碼如下:
private ServiceConnection connection = new ServiceConnection() {

        @Override
        public void onServiceDisconnected(ComponentName name) {
        }

        @Override
        public void onServiceConnected(ComponentName name, IBinder service) {
            myBinder = (MyService.MyBinder) service;
            myBinder.startDownload();
        }
    };
然後在呼叫的時候開始啟動繫結服務,使用這麼一句:
getHoldingActivity().bindService(bindIntent,connection, Context.BIND_ADJUST_WITH_ACTIVITY);當點選繫結服務時,日誌列印如下:

當點選解綁服務時,日誌列印如下:

Service與Activity的關係
其實Service與Activity都是屬於四大元件之一,可能有幾個關鍵區別是:
1,Activity是相當於應用程式的門面,使用者看到最多的互動介面,可以點選滑動之類的,然而Service則是默默的後臺執行,默默的服務著,可以說它是沒有介面的Activity,也是有自己的生命週期。
2,Service與Activity都是屬於UI執行緒中執行,都不能做耗時操作,如果需要耗時,比如網路請求,I/O讀寫之類的,都需要重新開個非同步執行緒,然後進行回撥更新UI內容。
3,如果Service中是用bindService方式的話,一般同一個Service物件可以被多個Activity物件使用,可以共享Service例項,所以在Activity物件銷燬之前,先解綁Service物件。
4,在Service的onDestroy()方法裡去清理掉那些不再使用的資源,防止在Service被銷燬後還會有一些不再使用的物件仍佔用著記憶體。
5,一個Service物件在被啟動後,如果startService方法呼叫多次,返回的Service物件還是之前建立過的,不會啟動一個新的物件,這跟Activity是有點不一樣,Activity是有四種的標準模式。
Service與Thread的區別
說實話,Service與Thread這兩個是沒有什麼關係的。因為我們知道Service是執行在UI執行緒中,那麼當需要耗時操作的時候,就需要Thread幫助,不是說Service因為是在後臺執行,就跟Thread等同了。Thread是用於開啟一個子執行緒,在這裡去執行一些耗時操作就不會阻塞主執行緒的執行。而Service我們最初理解的時候,總會覺得它是用來處理一些後臺任務的,一些比較耗時的操作也可以放在這裡執行,這就會讓人產生混淆了。
Android的後臺就是指,它的執行是完全不依賴UI的。即使Activity被銷燬,或者程式被關閉,只要程式還在,Service就可以繼續執行。比如說一些應用程式,始終需要與伺服器之間始終保持著心跳連線,就可以使用Service來實現。
既然在Service裡要建立一個子執行緒,那為什麼不直接在Activity裡建立呢?這是因為Activity很難對Thread進行控制,當Activity被銷燬之後,就沒有任何其它的辦法可以再重新獲取到之前建立的子執行緒的例項。而且在一個Activity中建立的子執行緒,另一個Activity無法對其進行操作。但是Service就不同了,所有的Activity都可以與Service進行關聯,然後可以很方便地操作其中的方法,即使Activity被銷燬了,之後只要重新與Service建立關聯,就又能夠獲取到原有的Service中Binder的例項。因此,使用Service來處理後臺任務,Activity就可以放心地finish,完全不需要擔心無法對後臺任務進行控制的情況。
小結
經過上面的講訴,不知大家是否清楚點,可以說Service與Activity都是屬於四大元件之一,只不過我們平時用的多都是Activity,Service用的比較少。這跟所開發的應用程式型別有關吧,比如常見的聽歌應用,聽書應用的,當我們鎖屏的時候,一般都是在後臺播放,此時Service就派上用場了,還有一種場景是遠端Service的用法,程式之間的通訊,多個APP共用一個Service程式物件,具體可以參考這篇文章: Android Service完全解析,關於服務你所需知道的一切(下)
閱讀擴充套件
源於對掌握的Android開發基礎點進行整理,羅列下已經總結的文章,從中可以看到技術積累的過程。
1,Android系統簡介
2,ProGuard程式碼混淆
3,講講Handler+Looper+MessageQueue關係
4,Android圖片載入庫理解
5,談談Android執行時許可權理解
6,EventBus初理解
7,Android 常見工具類
8,對於Fragment的一些理解
9,Android 四大元件之 " Activity "
10,Android 四大元件之" Service "
11,Android 四大元件之“ BroadcastReceiver "
12,Android 四大元件之" ContentProvider "
13,講講 Android 事件攔截機制
14,Android 動畫的理解
15,Android 生命週期和啟動模式
16,Android IPC 機制
17,View 的事件體系
18,View 的工作原理
19,理解 Window 和 WindowManager
20,Activity 啟動過程分析
21,Service 啟動過程分析
22,Android 效能優化
23,Android 訊息機制
24,Android Bitmap相關
25,Android 執行緒和執行緒池
26,Android 中的 Drawable 和動畫
27,RecylerView 中的裝飾者模式
28,Android 觸控事件機制
29,Android 事件機制應用
30,Cordova 框架的一些理解
31,有關 Android 外掛化思考
32,開發人員必備技能——單元測試