1.棧
導航控制器自身有一個針對顯示內容的棧,也有一個對於導航欄的棧,當有新的內容欲顯示時,進的導航欄和顯示內容會被壓入此棧,這樣原本顯示中的導航欄和顯示內容則會進入到棧的更深一層中,根據棧的先進後出功能,最後被壓入棧的介面先出棧。不過導航檢視控制器始終有兩個棧,一個棧控制導航欄內容,一個棧控制顯示內容,並且開發者有義務也必須保持這兩個棧的深度一致,否則程式會將不同步異常丟擲。
對於顯示內容的壓棧操作API如下:
-(void)pushViewController:(UIViewController *)viewController animated:(BOOL )animated
對於顯示內容的出棧操作API如下:
-(UIViewController *)popViewControllerAnimated:(BOOL)animated
-(NSArray *)popToRootViewControllerAnimated:(BOOL)animated
-(NSArray *)popToViewController:(UIViewController *)viewController animated:(BOOL)animated
在pushViewController檢視控制器物件時,UINavigationController會對此物件retain一次,待到pop時才release,也就是說在pop時試圖控制器的引用計數應該為0.
不過有些時候,特別是當開發者重寫導航欄或者重寫導航試圖控制器時,還是會需要手動保持層次的平衡,這是可以額外的呼叫UINavigationBar物件的一下幾個API
-(void)pushNavigationItem:(UINavigationItem *)item animated:(BOOL)animated
-(UINavigationItem *)popNavigationItemAnimated:(BOOL)animated
2.導航檢視控制器的一下特性事例
(1)對UIViewController物件的navigationItem.title屬性進行字串賦值
(2)對UIViewController物件的title屬性進行字串配置
所以在viewDidLoad中修改如下
self.navigationItem.title=@"";
self.title=@""
(3)導航欄左中右位置的配置
-(void)initNavBar
{
    //建立一個UISegmentControl控制元件
    UISegmentedControl *aSegment=[[UISegmentedControl alloc]initWithFrame:CGRectMake(0.0f, 0.0f, 1000.0f, 30.0f)];

    //為控制元件新增三段內容
    [aSegment insertSegmentWithTitle:@"1" atIndex:0 animated:NO];

    [aSegment insertSegmentWithTitle:@"2" atIndex:1 animated:NO];

    [aSegment insertSegmentWithTitle:@"3" atIndex:2 animated:NO];

    //第一次出來顯示的選擇
    aSegment.selectedSegmentIndex=0;

    //將segment設定在中間
    self.navigationItem.titleView=aSegment;

    //為導航欄左邊配置一個系統自帶樣式的按鈕
    //按鈕相應函式時actionDone:
    self.navigationItem.leftBarButtonItem=[[UIBarButtonItem alloc]initWithBarButtonSystemItem:UIBarButtonSystemItemDone target:self action:@selector(actDone:)];

    //為導航欄右邊配置一個系統自帶式樣的按鈕
    //按鈕相應函式是actNext:
    self.navigationItem.rightBarButtonItem=[[UIBarButtonItem alloc]initWithBarButtonSystemItem:UIBarButtonSystemItemAction target:self action:@selector(actNext:)];
}
接下來就是工具欄的配置了。和導航欄一樣,導航檢視控制器也只有唯一一個底部的工具欄,如果我們打算使用導航控制器的那個工具欄,也需要遵循他的模式來進行。
如果我們並非打算所有檢視都需要顯示這個工具欄,所以我們將工具欄的配置程式碼放置在viewWillAppear函式中,每當檢視顯示時,進行工具欄的更新
-(void)updateToolBar
{
    //配置工具欄的樣式
    self.navigationController.toolbar.barStyle=UIBarStyleDefault;

    //顯示工具欄
    [self.navigationController setToolbarHidden:NO animated:YES];
    self.toolbarItems=[[NSArray alloc]initWithObjects:[[UIBarButtonItem alloc]initWithBarButtonSystemItem:UIBarButtonSystemItemAdd target:self action:@selector(actAdd:)], nil];

}
效果圖如: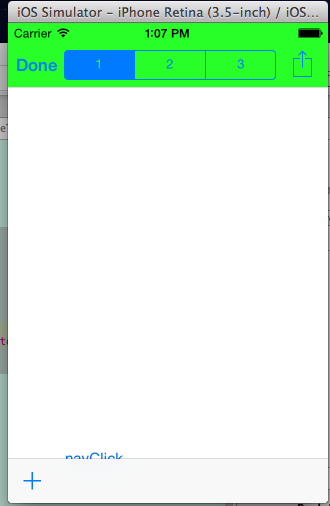
(4)導航欄右位置的多按鈕
撰寫initNavBar函式,以及隱藏工具欄,程式碼如下:
-(void)initNavBar
{
    UILabel *labTitle=[[UILabel alloc]initWithFrame:CGRectMake(0.0f, 0.0f, 1000.0f, 44.0f)];
    labTitle.backgroundColor=[UIColor darkGrayColor];
    labTitle.textColor=[UIColor whiteColor];
    labTitle.text=@"看右側";
    labTitle.textAlignment=NSTextAlignmentCenter;

    //配置一個UILabel到導航欄中間
    self.navigationItem.titleView=labTitle;

    UIView *aView=[[UIView alloc]initWithFrame:CGRectMake(0.0f, 0.0f, 60.0f, 36.0f)];
    aView.backgroundColor=[UIColor clearColor];

    //第一個按鈕
    UIButton *buttonA = [UIButton buttonWithType:UIButtonTypeRoundedRect];
    [buttonA setTitle:@"按鈕" forState:UIControlStateNormal];
    buttonA.titleLabel.font=[UIFont systemFontOfSize:12.0f];
    buttonA.frame=CGRectMake(0.0f, CGRectGetHeight(aView.frame)/2-13.0f, 30.0f, 26.0f);
    [buttonA addTarget:self action:@selector(actButtonA:) forControlEvents:UIControlEventTouchUpInside];
    [aView addSubview:buttonA];

    //第二個按鈕
    UIButton *buttonB = [UIButton buttonWithType:UIButtonTypeInfoLight];
    buttonA.frame=CGRectMake(CGRectGetWidth(aView.frame)-CGRectGetWidth(buttonA.frame), CGRectGetHeight(aView.frame)/2-CGRectGetHeight(buttonA.frame), CGRectGetWidth(buttonA.frame), CGRectGetHeight(buttonA.frame));
    [buttonB addTarget:self action:@selector(actButtonB:) forControlEvents:UIControlEventTouchUpInside];
    [aView addSubview:buttonB];

    self.navigationItem.rightBarButtonItem=[[UIBarButtonItem alloc]initWithCustomView:aView];

    //對於navgationItem左側的返回按鈕的修改
    self.navigationItem.backBarButtonItem=[[UIBarButtonItem alloc]initWithTitle:@"Go Back" style:UIBarButtonItemStyleBordered target:self action:NULL];

}
導航欄左右兩側的控制元件寬度是沒有固定的上限的,也就是說如果設定的過於寬,會對另一頭以及中間部分的顯示內容產生影響。
這裡,右側的兩個按鈕都暫時使用了系統自帶的按鈕式樣。由於是UIButton,可以新增圖片的
效果如下: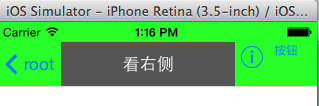
5.工具欄內容修改和全屏顯示
首先需要對當前的工具欄內容進行修改,實現程式碼的原理就是對工具欄的元素陣列進行再次賦值
-(void)initNav
{
    self.navigationItem.title=@"更改工具欄按鈕";
}

-(void)updateToolBar
{
    //工具欄的元素
    self.toolbarItems=[[NSArray alloc]initWithObjects:[[UIBarButtonItem alloc] initWithBarButtonSystemItem:UIBarButtonSystemItemStop target:self action:@selector(actStop:)],
                       [[UIBarButtonItem alloc] initWithBarButtonSystemItem:UIBarButtonSystemItemFlexibleSpace target:self action:@selector(actPlay:)],
                       [[UIBarButtonItem alloc] initWithBarButtonSystemItem:UIBarButtonSystemItemCamera target:self action:@selector(actCamera:)],nil
                       ];

    //修改工具欄的樣式
    self.navigationController.toolbar.barStyle=UIBarStyleBlackOpaque;
    [self.navigationController setToolbarHidden:NO animated:YES];

}
工具欄樣式設定為UIBarStyleBlackOpaque,是工具欄有某種透明的能力,連導航欄和系統的狀態列都能夠透明甚至隱藏,從而實現真正的一個試圖佔滿整個螢幕的情況。
這種全屏顯示的模式常見於視訊電影播放的應用程式和圖片遊覽的應用程式,對於全屏的支援,UIViewController主要依靠wantsFullScreenLayout屬性設定成YES來輔助實現。並且在UIViewController中屬性Top Bar選成Translucent Black Navigation,如圖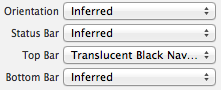
由於只在當前檢視中呈現透明黑色樣式的導航欄,所以在當前檢視被推出棧之前,將樣式變回才好,相關程式碼改寫如下:
 1 -(void)viewWillAppear:(BOOL)animated
 2 {
 3     [super viewWillAppear:animated];
 4     [self updateToolBar];
 5     [self updateNavBarStyle:YES];
 6 }
 7
 8 -(void)viewWillDisappear:(BOOL)animated
 9 {
10     [super viewWillDisappear:animated];
11     [self updateNavBarStyle:NO];
12 }
13
14 -(void)updateNavBarStyle:(BOOL)bAppear
15 {
16     //全屏模式
17     if(bAppear)
18     {
19         self.navigationController.navigationBar.translucent=YES;
20         self.navigationController.navigationBar.barStyle=UIBarStyleBlackTranslucent;
21     }
22     //預設模式
23     else
24     {
25         self.navigationController.navigationBar.translucent=NO;
26         self.navigationController.navigationBar.barStyle=UIBarStyleDefault;
27     }
28 }
全屏模式一般需要一個外部觸發器,不如我們自己製作一個觸發器,讓使用者在檢視上點選一次作為全屏和預設模式的切換訊號。把這個手勢事件在viewDidLoad中先進性註冊。
 1 - (void)viewDidLoad
 2 {
 3     [super viewDidLoad];
 4     // Do any additional setup after loading the view.
 5     [self initNav];
 6
 7     //單擊手勢的註冊
 8     UITapGestureRecognizer *tapGesture=[[UITapGestureRecognizer alloc] initWithTarget:self action:@selector(actTap:)];
 9     [self.view addGestureRecognizer:tapGesture];
10 }
對於手勢的響應函式
 1 -(IBAction)actTap:(id)sender
 2 {
 3     //全屏中
 4     if(self.navigationController.navigationBarHidden)
 5     {
 6         //狀態列顯示
 7         [[UIApplication sharedApplication]setStatusBarHidden:NO withAnimation:UIStatusBarAnimationFade];
 8
 9         //導航欄顯示
10         [self.navigationController setNavigationBarHidden:NO animated:YES];
11         //工具欄顯示
12         [self.navigationController setToolbarHidden:NO animated:YES];
13     }
14     //非全屏中
15     else
16     {
17         //狀態列隱藏
18         [[UIApplication sharedApplication]setStatusBarHidden:YES withAnimation:UIStatusBarAnimationFade];
19
20         //導航欄隱藏
21         [self.navigationController setNavigationBarHidden:YES animated:YES];
22
23         //工具欄隱藏
24         [self.navigationController setToolbarHidden:YES animated:YES];
25     }
26 }
隨後需要修改UISegmentController上第二標題“工具欄”
修改UISegment 點選事件 actNext的方法如下:
-(IBAction)actNext:(id)sender
{
     switch(_mySegments.selectedSegmentIndex)
     {
            case 0:
                break;
            case 1:
                break;
            case 2:
                HBNavToolBarController *aNewVC=[[HBNavToolBarController alloc]init];
                aNewVC.wantsFullScreenLayout=YES;
                 break;
            default:
                 break;
     }
     [self.navigationController pushViewController:aNewVC animated:YES];
}
顯示結果如下:
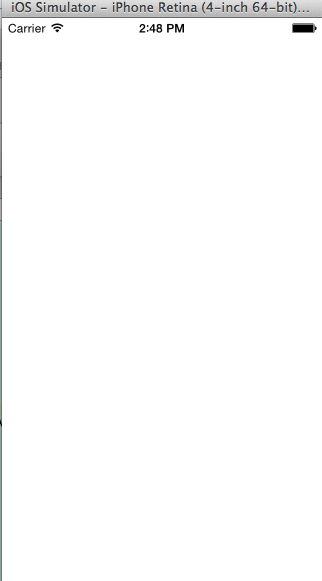
6.動畫過度和超大檢視
 1 - (IBAction)actNext:(id)sender {
 2     HBResizeViewController *resizeVC=[[HBResizeViewController alloc]init];
 3
 4     //自定義動畫
 5     CATransition *animation=[CATransition animation];
 6     animation.delegate=self;
 7     animation.duration=0.5;
 8     animation.timingFunction=UIViewAnimationCurveEaseInOut;
 9     animation.removedOnCompletion=NO;
10     animation.type=@"pageCur1";
11     animation.subtype=kCATransitionFromBottom;
12     animation.endProgress=1.0f;
13     [self.navigationController.view.layer addAnimation:animation forKey:@"animation"];
14     [self.navigationController pushViewController:resizeVC animated:NO];
15
16 }
當需要執行自定義動畫是,往往會將導航控制器的預設棧動畫首先進行關閉,即對pushViewController: animated: 方法的第二個引數傳入NO