【轉載請註明出處】http://www.cnblogs.com/lexingyu/p/3932475.html
本文是以下兩篇blog的綜合脫水,感謝兩位作者為解放碼農生產力所做的深入思考=。=
Smart Proxy Delegation
Elegant Delegation
使用delegate的情境通常是這樣
定義class和delegate
@protocol TestObjectDelegate <NSObject>
@optional
- (void)testObjectMethod;
- (NSString *)testObjectMethodWithReturnValue;

@end


@interface TestObject : NSObject

@property (nonatomic, weak) id<TestObjectDelegate> delegate;

- (void)print;
- (void)printWithLog;

@end
在類的內部呼叫delegate的方法
- (void)print
{
    //call the delegate to do the real work
}
呼叫的方法通常有以下兩種
普通青年:
if ([self.delegate respondsToSelector:@selector(testObjectMethod)])
    {
        [self.delegate testObjectMethod];
    }
這個辦法的缺點是
1)引入了大量glue code,每個optional function都需要3行程式碼。尤其在開啟clang的-Warc-repeated-use-of-weak時,多次使用self.delegate(通常情況下,是weak)會被警告;

所以很可能還得這麼寫
- (void)print
{
    id <TestObjectDelegate> delegate = self.delegate;
    if ([delegate respondsToSelector:@selector(testObjectMethod)])
    {
        [delegate testObjectMethod];
    }
}
2)呼叫的方法名需要寫兩次,很可能寫錯導致方法未被呼叫;
3)對於高頻率呼叫的方法而言,意味著需要反覆呼叫respondToSeletor,效能上有所影響(RunTime可能會對respondToSeletor進行快取,因此在大部分應用上這一點不需要計入考量)。
文藝青年
先新增flag
@interface TestObject : NSObject
{
    struct
    {
        unsigned int respond2TestObjectMethod:1;
    }_flags;
}

@property (nonatomic, weak) id<TestObjectDelegate> delegate;

- (void)print;

@end
再過載setDelegate以設定flag,將respondToSeletor的結果快取起來
- (void)setDelegate:(id<TestObjectDelegate>)delegate
{
    _delegate = delegate;

    BOOL respond2TestObjectMethod = [delegate respondsToSelector:@selector(testObjectMethod)];
    _flags.respond2TestObjectMethod = respond2TestObjectMethod ? 1 : 0;
}
最後在print中直接使用快取的結果
- (void)print
{
    if (_flags.respond2TestObjectMethod)
    {
        [self.delegate testObjectMethod];
    }
}
這個方法被Apple廣泛採用,在SDK中隨處可見。
它的優點是將respondToSeletor的結果手動快取了起來,不需要做效能上的猜測,同時避開了
-Warc-repeated-use-of-weak的警告。
但遺憾的是,程式碼的冗餘並沒有被移除,反而更為嚴重(呼叫時仍然需要3行glue code,且在標頭檔案和setDelegate中新增了大量程式碼)。當delegate中的方法名需要變動時,需要同時修改多處程式碼,真如噩夢一般。
嗯。。。。。。抱歉這裡沒有二逼青年

外國友人的想法
實際上我們真正想要的是類似於這樣的東西
- (void)print
{
    [self.delegateProxy testObjectMethod];
}
把glue code也好,其他額外處理也好,都放到一個統一的地方。在呼叫的時候,一句話簡單明瞭,解決問題。
那麼具體怎麼做呢?
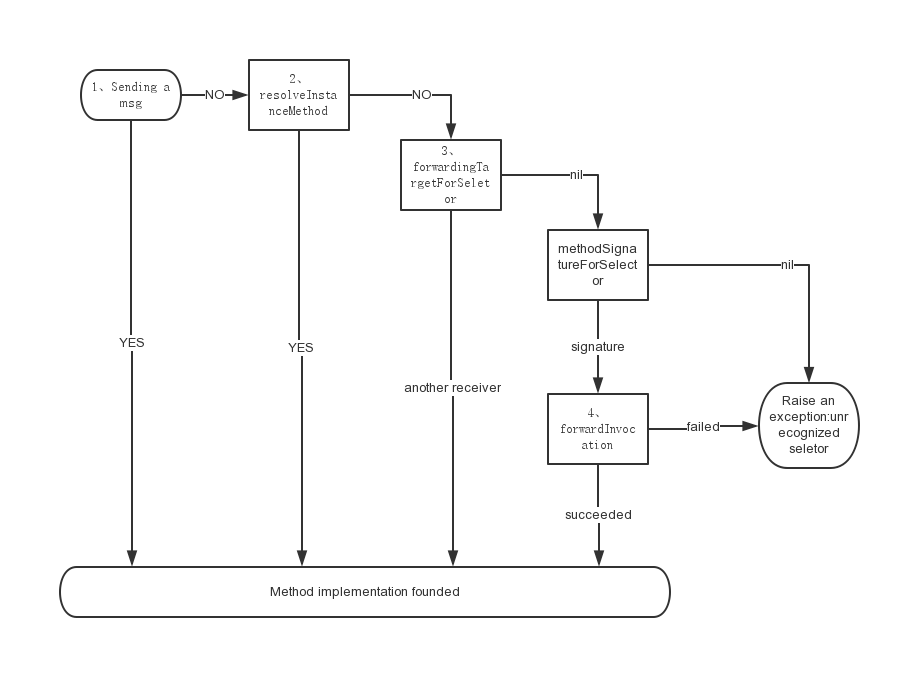
其實,OC的方法呼叫,或者準確地說,訊息傳遞,就是這樣一種機制。這裡上一張自繪的圖以便說明

OC中任何一次方法呼叫,都會從1開始走這個流程,一個步驟不行就進行下一步。若所有4個步驟走完仍然無法找到對應的impletation,則觸發異常,程式crash。簡單說一下各個步驟的作用
1)在類的方法表(methodList)中,根據seletor查詢對應的impletation;
2) resolveInstanceMethod用於集中處理類中一些類似的方法,比如在使用core data時需要指定多個property為@dynamic,它們的setter和getter就可以集中在這個方法裡做;
3)forwardingTargetForSelector,作用是將本物件無法處理的呼叫資訊轉給另一個物件處理,但不改變呼叫資訊;
4)forwardInvocation,作用是根據methodSignatureForSelector和呼叫引數等資訊生成的NSInvocation來指定一個物件處理本次呼叫,在指定時可以對呼叫資訊做任意的修改,比如增加引數個數。
3被稱為Fast message forwarding,相應地4則是Regular message forwarding,二者合在一起才是完整的Message forwarding。
C語言在呼叫函式時,需要知道函式的原型,以便將引數放入暫存器或壓入棧中,並視情況預留返回值的空間。OC作為C語言的超集,也需要顧及這一點。函式的呼叫資訊在OC中以NSMethodSignature的形式存在,在Regular message forwarding中由methodSignatureForSelector返回。
從以上說明不難看出,1和2的作用是在類內部尋找impletation,而3和4則是在類外部尋找合適的其他類的例項來處理呼叫資訊。顯而易見,3和4正是delegateProxy所需要的。
鋪墊了這麼多,終於到了正題。
用Message forwarding機制,來構建一個delegateProxy
在這裡構建了一個NSProxy的派生類作為delegateProxy,像這樣
@interface CDDelegateProxy : NSProxy

@property (nonatomic, weak, readonly) id delegate;
@property (nonatomic, strong, readonly) Protocol *protocol;
@property (nonatomic, strong, readonly) NSValue *defaultReturnValue;

@end
delegateProxy中分別儲存了被代理的delegate物件、delegate對應的protocol和方法未找到時提供的預設值。
在.m檔案中,首先將glue code放入,像這樣
//供外部需要時使用
- (BOOL)respondsToSelector:(SEL)selector
{
    return [_delegate respondsToSelector:selector];
}

//Fast message forwarding, 存放glue code
- (id)forwardingTargetForSelector:(SEL)selector
{
    id delegate = _delegate;
    return [delegate respondsToSelector:selector] ? delegate : self;
}
嗯。。。至此似乎就完事了=。=
大部分情況下確實如此。但當方法不存在又需要一個預設返回值時,比如
- (void)printWithLog
{
    //這裡已經用上delegateProxy了,哈哈
    NSString *logInfo = [self.delegateProxy testObjectMethodWithReturnValue];
    NSLog(@"%@", logInfo);
}
就需要用到Regular message forwarding了。具體做法如下
//Regular message forwarding
- (NSMethodSignature *)methodSignatureForSelector:(SEL)selector
{
    id delegate = _delegate;
    NSMethodSignature *signature = [delegate methodSignatureForSelector:selector];

    //若delegate未實現對應方法,則從protocol的宣告中獲取MethodSignature
    if (!signature)
    {
        if (!_signatures) _signatures = [self methodSignaturesForProtocol:_protocol];
        signature = CFDictionaryGetValue(_signatures, selector);
    }

    //此處如果return nil, 則不會觸發forwardInvocation
    return signature;
}

- (void)forwardInvocation:(NSInvocation *)invocation
{
    //若預設返回值和invocation中指定的返回值一致,則取預設返回值
    if (_defaultReturnValue
        && strcmp(_defaultReturnValue.objCType, invocation.methodSignature.methodReturnType) == 0)
    {
        char buffer[invocation.methodSignature.methodReturnLength];
        [_defaultReturnValue getValue:buffer];
        [invocation setReturnValue:&buffer];
    }
}
首先由methodSignatureForSelector根據protocol中的方法宣告,返回一個signature,再由forwardInvocation判斷與預設的返回值是否型別一致,一致則返回預設的預設值(即剛才提到的defaultReturnValue)。
這樣,delegateProxy就構建完畢了。在使用的時候,應注意delegateProxy的作用只是在類內部保持呼叫的簡潔,對於外部程式碼而言,它應該是透明的。具體來說,首先應該將deleagteProxy定義在class extension中
//.m檔案中
@interface SomeObject ()<TestObjectDelegate>

@property (nonatomic, strong) id<TestObjectDelegate> delegateProxy;

@end
這裡將delegateProxy直接宣告為id
接著override delegate(真正id
- (void)setDelegate:(id <TestObjectDelegate>)delegate
{
  self.delegateProxy = delegate ? (id <TestObjectDelegate>)[[CDDelegateProxy alloc] initWithDelegate:delegate] : nil;
}
- (id <TestObjectDelegate>)delegate
 {
  return ((CDDelegateProxy *)self.delegateProxy).delegate;
}
這個步驟看著有些繁瑣,可以通過巨集來簡化,比如
#define CD_DELEGATE_PROXY_CUSTOM(protocolname, GETTER, SETTER) \
- (id<protocolname>)GETTER { return ((PSTDelegateProxy *)self.GETTER##Proxy).delegate; } \
- (void)SETTER:(id<protocolname>)delegate { self.GETTER##Proxy = delegate ? (id<protocolname>)[[PSTDelegateProxy alloc] initWithDelegate:delegate conformingToProtocol:@protocol(protocolname) defaultReturnValue:nil] : nil; }

#define CD_DELEGATE_PROXY(protocolname) PST_DELEGATE_PROXY_CUSTOM(protocolname, delegate, setDelegate)
在使用的使用可以簡單地
CD_DELEGATE_PROXY(id <PSPDFResizableViewDelegate>)當然,對於比較個性化的delegate的名稱,可以通過擴充套件這個巨集來實現。
如此一來,外部訪問delegate時,獲取到的仍然是正確的物件。
以上,就是呼叫optional delegates的最佳方法,從起因到原理到解決方案的完整闡述。
文中為便於說明,使用了我自己寫的一個簡化版的delegateProxy,這裡提供一個原作者Peter steinberger的完整實現,有不少值得學習的點哦。
終於寫完啦!!!!