昨日看到有人在知乎上問這3個瑣碎的小知識點,今天索性就整理了一下,其實這些知識點並不難,但是很多開發者平時很少注意到這些,
導致的後果就是開發的時候 經常會被ide報錯,開發效率很低,或者看開原始碼的時候很多地方看不懂。
考慮到現在越來越多的人開發環境遷移到android studio,所以一切以android studio環境為準。和eclipse開發環境相比其實兩者是差不多的,
偶有區別 主要也是android studio引入的gradle指令碼造成差異。
首先來看看tools標籤。

這個地方很多人不明白xmlns:tools 這行程式碼是幹嘛的,好像刪除了以後對程式也沒麼影響,實際上這個tools標籤主要是為adt外掛使用的。
他裡面的很多屬效能在很大程度上方便我們的開發,但是並不會影響我們最終生成的apk包。比如大家在寫一個介面的時候一般都會給
textview寫上text的值,然後在開發完畢的時候再刪除他,這個操作就很麻煩,但是現在你就可以。

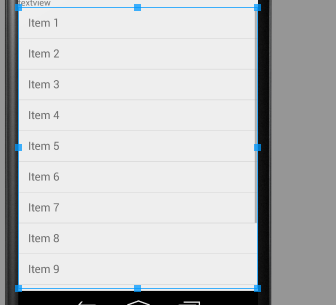
如果加上tools:text 你就可以在介面預覽中看到效果,但是實際執行時是不會有效果的。很方便的,同樣的以往我們在開發listview的時候之所以累就是無法預覽listview的item效果,
每次都得執行以後才能看到。但是現在你只需要利用tools標籤。
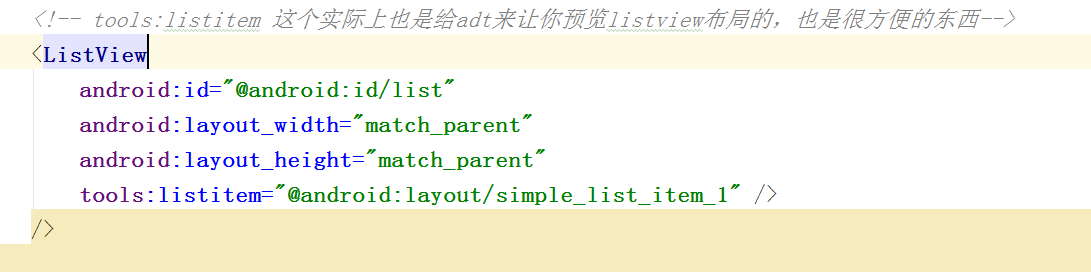
然後你無需run你的程式 直接在介面預覽就能看到item的效果
官方給出的文件在這裡 http://tools.android.com/tech-docs/tools-attributes
有興趣的同學可以上去自己看看,試試看這些標籤,對開發速度會有顯著的提升的~~
另外再說下 res和res-auto的區別。
1 xmlns:android="http://schemas.android.com/apk/res/android"
2
3 xmlns:customview="http://schemas.android.com/apk/res-auto"
這2個實際上前者是就是讓你引用系統自帶屬性的,後者是讓你使用lib庫裡自定義屬性的。
但是這個地方要注意,在eclipse中如果要使用你自定義的屬性 是不能用res-auto的
必須得替換成你自定義view所屬的包名,如果你在恰好使用的自定義屬性被做成了lib
那就只能使用res-auto了,而在android-studio裡,無論你是自己寫自定義view
還是引用的lib裡的自定義的view 都只能使用res-auto這個寫法。以前那個包名的寫法
在android-studio裡是被廢棄無法使用的。
最後我們來看看TypedArray和attrs之間的區別異同以及在自定義view裡的應用。
首先我們自定義幾個屬性
1 <?xml version="1.0" encoding="utf-8"?>
2 <resources>
3     <declare-styleable name="attrName">
4         <attr name="name" format="string"></attr>
5         <attr name="number" format="integer"></attr>
6     </declare-styleable>
7
8
9 </resources>
然後佈局檔案
<?xml version="1.0" encoding="utf-8"?>
<LinearLayout xmlns:android="http://schemas.android.com/apk/res/android"
    xmlns:customview="http://schemas.android.com/apk/res-auto"
    android:layout_width="match_parent"
    android:layout_height="match_parent"
    android:orientation="vertical">

    <com.example.administrator.popupmenu.CustomView
        android:layout_width="100dp"
        android:layout_height="100dp"
        android:padding="@dimen/padding"
        customview:name="@string/hello_world"
        customview:number="123" />


</LinearLayout>
然後看下自定義view的原始碼
 1 package com.example.administrator.popupmenu;
 2
 3 import android.content.Context;
 4 import android.content.res.TypedArray;
 5 import android.util.AttributeSet;
 6 import android.util.Log;
 7 import android.view.View;
 8
 9 /**
10  * Created by Administrator on 2015/8/18.
11  */
12 public class CustomView extends View {
13
14     private static final String TAG = CustomView.class.getSimpleName();
15
16     public CustomView(Context context, AttributeSet attrs) {
17         super(context, attrs);
18         TypedArray ta = context.obtainStyledAttributes(attrs, R.styleable.attrName);
19         String name = ta.getString(R.styleable.attrName_name);
20         int number = ta.getInteger(R.styleable.attrName_number, -1);
21         Log.e(TAG, "name=" + name + " number=" + number);
22
23         /**
24          * attrs在取值的時候 缺陷就是如果值裡面還有類似的引用 則取不到正確的值
25          * 需要額外
26          *
27          */
28         for (int i = 0; i < attrs.getAttributeCount(); i++) {
29             Log.e(TAG, "attrs name=" + attrs.getAttributeName(i) + " attrs value=" + attrs.getAttributeValue(i));
30             //取出來實際的畫素的值
31             if (attrs.getAttributeName(i).equals("padding")) {
32                 ;
33                 Log.e(TAG, "attrs name=" + attrs.getAttributeName(i) + " attrs value=" + getResources().getDimension(attrs.getAttributeResourceValue(i, -1)));
34
35             }
36             //這個地方就能看出來TypedArray比attrs要好用的多~同時也可以理解兩者區別了
37             if (attrs.getAttributeName(i).equals("name")) {
38                 ;
39                 Log.e(TAG, "attrs name=" + attrs.getAttributeName(i) + " attrs value=" + getResources().getString(attrs.getAttributeResourceValue(i, -1)));
40
41             }
42         }
43         ta.recycle();
44
45
46     }
47 }
最後看下我們的輸出。
