【萬里征程——Windows App開發】DatePickerFlyout、TimePickerFlyout的使用
已經有挺長時間沒有更新這個專欄了,不過剛才有網友私信問我一個問題現在就火速更新上一篇~
這一篇講解在WP上DataPickerFlyout和TimePickerFlyout的使用,但它們只能在WP上跑哦~
 <Grid Background="Blue">
        <Grid.RowDefinitions>
            <RowDefinition Height="*"/>
            <RowDefinition Height="*"/>
        </Grid.RowDefinitions>

            <StackPanel Grid.Row="0" Margin="12" Orientation="Vertical">
                <Button Content="Let's Show DatePicker" >
                    <Button.Flyout>
                        <DatePickerFlyout x:Name="datePickerFlyout" Title="選擇日期"
                                      DatePicked="datePickerFlyout_DatePicked" Closed="datePickerFlyout_Closed" />
                    </Button.Flyout>
                </Button>

                <DatePicker Header="Date"  Margin="4" />
                <TextBlock Name="textBlockDate" FontSize="20" Margin="4" />
            </StackPanel>

        <StackPanel Grid.Row="1" Margin="12" Orientation="Vertical">
            <Button Content="Let's Show TimePicker" >
                <Button.Flyout>
                    <TimePickerFlyout x:Name="timePickerFlyout" Title="選擇時間"
                                      TimePicked="timePickerFlyout_TimePicked" Closed="timePickerFlyout_Closed" />
                </Button.Flyout>
            </Button>

            <TimePicker Header="Time" Margin="4" />
            <TextBlock Name="textBlockTime" FontSize="20" Margin="4"/>
        </StackPanel>
    </Grid>
後臺事件如下:
 public sealed partial class MainPage : Page
    {
        public MainPage()
        {
            this.InitializeComponent();

            this.NavigationCacheMode = NavigationCacheMode.Required;
        }

        protected override void OnNavigatedTo(NavigationEventArgs e)
        {
            // 令天數加1
            datePickerFlyout.Date = DateTimeOffset.Now.AddDays(1);

            // 設定可選擇的最大年份和最小年份
            datePickerFlyout.MinYear = DateTimeOffset.Now.AddYears(-100);
            datePickerFlyout.MaxYear = DateTimeOffset.Now.AddYears(100);

            // 此處也可以令“年“、”月“、”日“中的某一個不顯示
            datePickerFlyout.YearVisible = true;
            datePickerFlyout.MonthVisible = true;
            datePickerFlyout.DayVisible = true;

            // 選擇的歷法
            // (Gregorian 公曆, Hebrew 希伯來曆, Hijri 回曆, Japanese 日本歷, Julian 羅馬儒略曆, Korean 朝鮮歷, Taiwan 臺灣歷, Thai 泰國曆, UmAlQura 古蘭經歷)
            datePickerFlyout.CalendarIdentifier = CalendarIdentifiers.Gregorian;


            // Time - TimePicker 控制元件當前顯示的時間
            timePickerFlyout.Time = new TimeSpan(18, 0, 0);

            // 設定TimePickerFlyout的分鐘選擇框內數字的增幅
            timePickerFlyout.MinuteIncrement = 2;

            //設定為24小時制,也可以為12小時制
            timePickerFlyout.ClockIdentifier = ClockIdentifiers.TwentyFourHour;
        }

        // 當使用者點選DatePicker的完成按鈕後啟用該事件
        private void datePickerFlyout_DatePicked(DatePickerFlyout sender, DatePickedEventArgs args)
        {
            textBlockDate.Text = args.NewDate.ToString("yyyy-MM-dd hh:mm:ss");
            textBlockDate.Text += Environment.NewLine;
        }

        // 當使用者點選DatePicker的取消按鈕或手機的返回按鈕後啟用該事件,當點選完成按鈕後也將呼叫該事件
        private void datePickerFlyout_Closed(object sender, object e)
        {
            textBlockDate.Text += "You just close the DatePickerFlyout.";
            textBlockDate.Text += Environment.NewLine;
        }

        // 當使用者點選TimePicker的完成按鈕後啟用該事件
        private void timePickerFlyout_TimePicked(TimePickerFlyout sender, TimePickedEventArgs args)
        {
            // e.OldTime - 原時間
            // e.NewTime - 新時間
            textBlockTime.Text = args.NewTime.ToString("c");
            textBlockTime.Text += Environment.NewLine;
        }

        // 當使用者點選TimePicker的取消按鈕或手機的返回按鈕後啟用該事件,當點選完成按鈕後也將呼叫該事件
        private void timePickerFlyout_Closed(object sender, object e)
        {
            textBlockTime.Text += "You just close the TimePickerFlyout.";
            textBlockTime.Text += Environment.NewLine;
        }
    }
時間倉促就記錄到這裡咯,掰掰~
該網友說我剛寫的不是他所需要的,so……重來一遍吧……
簡單的講,Flyout有兩種建立方式,一種就是上面的通過Button的Flyout屬性。另一種是通過FlyoutBase.AttachedFlyout屬性給任何的FrameworkElement物件新增它。
關於FrameworkElement的更多知識,可以訪問以下連結。
https://msdn.microsoft.com/zh-cn/library/vstudio/system.windows.frameworkelement(v=vs.100).aspx
https://msdn.microsoft.com/en-us/library/system.windows.frameworkelement(v=vs.110).aspx
而Flyout則有6種不同的型別:Flyout、DatePickerFlyout、ListPickerFlyout、MenuFlyout、TimePickerFlyout。
時間緊迫就直接Show程式碼了。
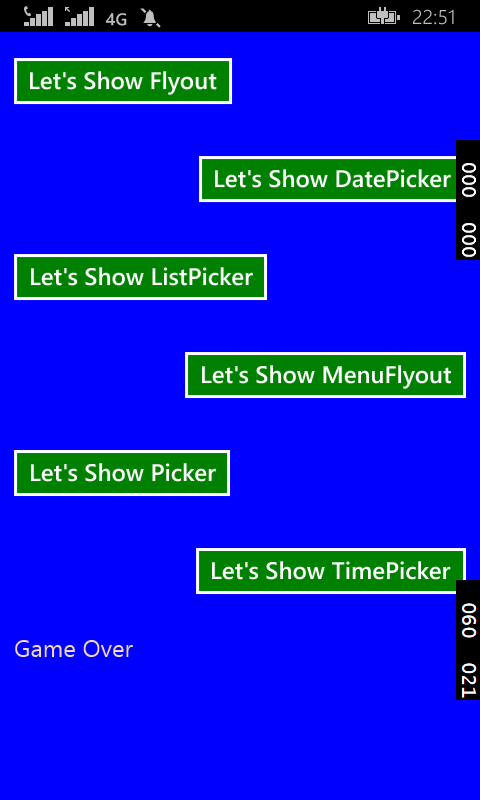
XAML程式碼:
    <Page.Resources>
        <Style TargetType="Button">
            <Setter Property="Margin" Value="12"/>
            <Setter Property="FontSize" Value="20"/>
            <Setter Property="Foreground"  Value="White"/>
            <Setter Property="Background" Value="Green"/>
        </Style>
    </Page.Resources>

    <Grid Background="Blue">
        <StackPanel Orientation="Vertical">
            <!-- Flyout -->
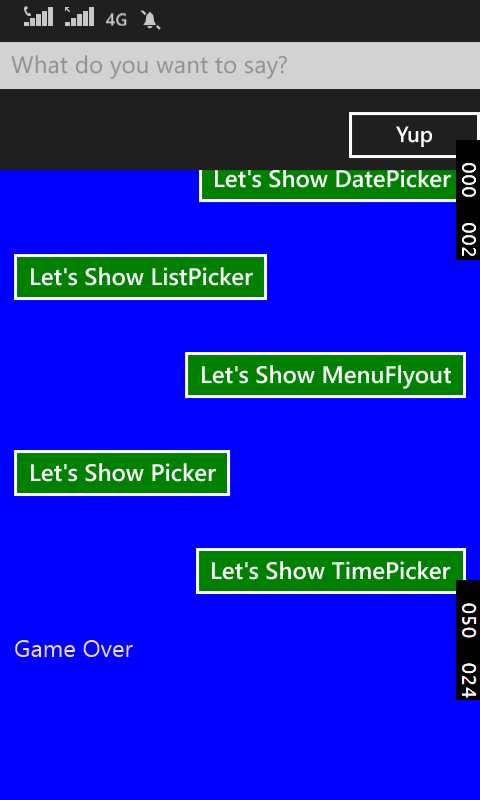
            <Button Content="Let's Show Flyout">
                <Button.Flyout>
                    <Flyout>
                        <StackPanel >
                            <TextBox PlaceholderText="What do you want to say?"/>
                            <Button HorizontalAlignment="Right" Content="Yup"/>
                        </StackPanel>
                    </Flyout>
                </Button.Flyout>
            </Button>

            <!-- DatePickerFlyout -->
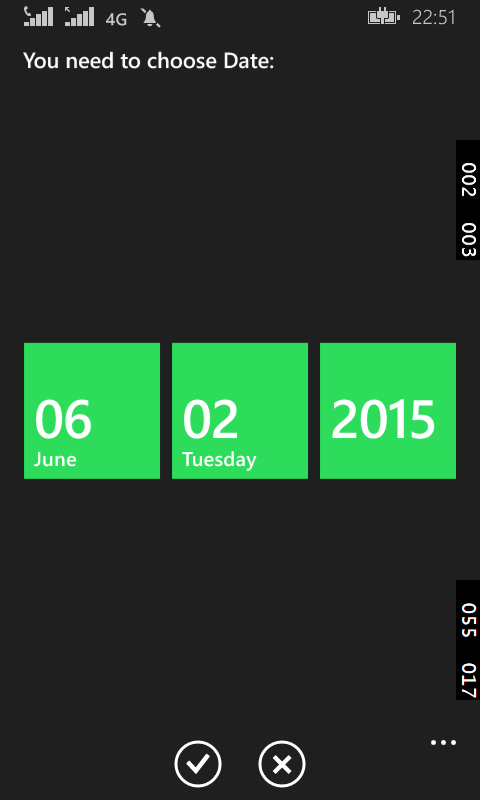
            <Button Content="Let's Show DatePicker" HorizontalAlignment="Right">
                <Button.Flyout>
                    <DatePickerFlyout Title="You need to choose Date: "  DatePicked="DatePickerFlyout_DatePicked"/>
                </Button.Flyout>
            </Button>

            <!-- ListPickerFlyout -->
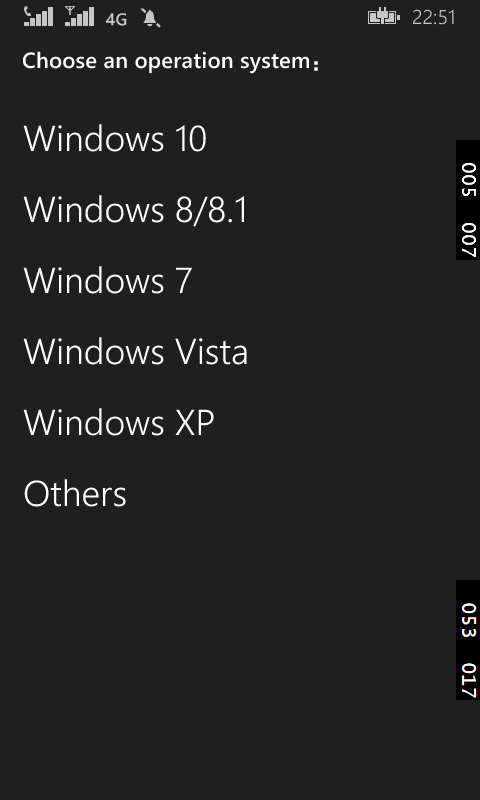
            <Button Content="Let's Show ListPicker" >
                <Button.Flyout>
                    <ListPickerFlyout x:Name="listPickerFlyout" Title="選擇作業系統:" ItemsPicked="listPickerFlyout_ItemsPicked"  >
                        <ListPickerFlyout.ItemTemplate>
                            <DataTemplate>
                                <TextBlock Text="{Binding}" FontSize="30"></TextBlock>
                            </DataTemplate>
                        </ListPickerFlyout.ItemTemplate>
                    </ListPickerFlyout>
                </Button.Flyout>
            </Button>

            <!--  MenuFlyout -->
            <Button x:Name="menuFlyoutButton" Content="Let's Show MenuFlyout" HorizontalAlignment="Right">
                <Button.Flyout >
                    <MenuFlyout>
                        <MenuFlyoutItem Text="You just say yes?" Click="MenuFlyoutItem_Click"/>
                        <MenuFlyoutItem Text="You just say no?" Click="MenuFlyoutItem_Click"/>
                        <MenuFlyoutItem Text="You say nothing..." Click="MenuFlyoutItem_Click"/>
                    </MenuFlyout>
                </Button.Flyout>
            </Button>

            <!--  PickerFlyout -->
            <Button Content="Let's Show Picker" >
                <Button.Flyout>
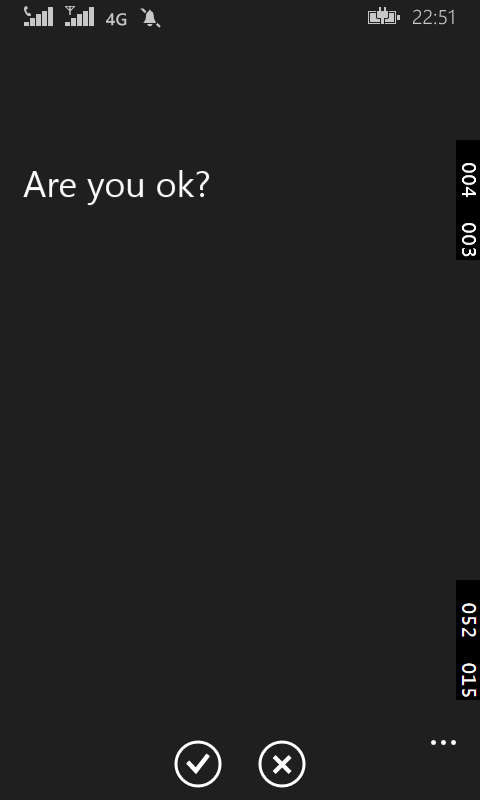
                    <PickerFlyout  Confirmed="PickerFlyout_Confirmed" ConfirmationButtonsVisible="True">
                        <TextBlock Text="Are you ok?" FontSize="30" Margin="0 100 0 0"/>
                    </PickerFlyout>
                </Button.Flyout>
            </Button>

            <!-- TimePickerFlyout -->
            <Button Content="Let's Show TimePicker" HorizontalAlignment="Right">
                <Button.Flyout>
                    <TimePickerFlyout Title="You need to choose Time: "  TimePicked="TimePickerFlyout_TimePicked"/>
                </Button.Flyout>
            </Button>

            <!-- FlyoutBase -->
            <TextBlock Text="Game Over" Margin="12" Foreground="Wheat" Tapped="TextBlock_Tapped" FontSize="20">
                <FlyoutBase.AttachedFlyout>
                    <Flyout>
                        <TextBox Text="哎喲,不錯哦!"/>
                    </Flyout>
                </FlyoutBase.AttachedFlyout>
            </TextBlock>
        </StackPanel>
    </Grid>
後臺C#程式碼:
    public sealed partial class MainPage : Page
    {
        public MainPage()
        {
            this.InitializeComponent();
            // 繫結List資料到ListPickerFlyout
            listPickerFlyout.ItemsSource = new List<string> { "Windows 10", "Windows 8/8.1", "Windows 7", "Windows Vista", "Windows XP","Others" };
        }

        // DatePickerFlyout的日期選中事件,此處事件內有是包含日期的MessageDialog控制元件
        private async void DatePickerFlyout_DatePicked(DatePickerFlyout sender, DatePickedEventArgs args)
        {
            await new MessageDialog(args.NewDate.ToString()).ShowAsync();
        }

        // ListPickerFlyout的選中事件,選擇列表中的一項後會以彈窗的方式顯示出來
        private async void listPickerFlyout_ItemsPicked(ListPickerFlyout sender, ItemsPickedEventArgs args)
        {
            if (sender.SelectedItem != null)
            {
                await new MessageDialog("You choose: " + sender.SelectedItem.ToString()).ShowAsync();
            }
        }

        // MenuFlyout的選單選項的點選事件,將選擇的本文賦值給Content
        private void MenuFlyoutItem_Click(object sender, RoutedEventArgs e)
        {
            menuFlyoutButton.Content = (sender as MenuFlyoutItem).Text;
        }

        // PickerFlyout的確認事件,此處事件內有是包含字串的MessageDialog控制元件
        private async void PickerFlyout_Confirmed(PickerFlyout sender, PickerConfirmedEventArgs args)
        {
            await new MessageDialog("You choose ok").ShowAsync();
        }

        // TimePickerFlyout的時間選中事件,此處事件內有是包含所選時間的MessageDialog控制元件
        private async void TimePickerFlyout_TimePicked(TimePickerFlyout sender, TimePickedEventArgs args)
        {
            await new MessageDialog(args.NewTime.ToString()).ShowAsync();
        }

        // 通過FlyoutBase.ShowAttachedFlyout方法來展示出Flyout控制元件
        private void TextBlock_Tapped(object sender, TappedRoutedEventArgs e)
        {
            FrameworkElement element = sender as FrameworkElement;
            if (element != null)
            {
                FlyoutBase.ShowAttachedFlyout(element);
            }
        }
    }
好了程式碼就到這裡了,來幾張截圖。童鞋們看出來我的手機型號了麼?
那這一篇就結束啦,我的手機是Lumia 638……
感謝您的訪問,希望對您有所幫助。 歡迎大家關注、收藏以及評論。
為使本文得到斧正和提問,轉載請註明出處:
http://blog.csdn.net/nomasp
相關文章
- 【萬里征程——Windows App開發】使用Toast通知WindowsAPPAST
- 【萬里征程——Windows App開發】使用華麗麗的字型WindowsAPP
- 【萬里征程——Windows App開發】動畫1WindowsAPP動畫
- 【萬里征程——Windows App開發】開發準備WindowsAPP
- 【萬里征程——Windows App開發】如何使用貼上板WindowsAPP
- 【萬里征程——Windows App開發】應用欄WindowsAPP
- 【萬里征程——Windows App開發】繪製圖形WindowsAPP
- 【萬里征程——Windows App開發】畫筆和影象WindowsAPP
- 【萬里征程——Windows App開發】補充:JSONWindowsAPPJSON
- 【萬里征程——Windows App開發】動態磁貼WindowsAPP
- 【萬里征程——Windows App開發】DatePicker&TimepickerWindowsAPP
- 【萬里征程——Windows App開發】ListView&GridView之分組WindowsAPPView
- 【萬里征程——Windows App開發】SemanticZoom檢視切換WindowsAPPOOM
- 【萬里征程——Windows App開發】控制元件大集合1WindowsAPP控制元件
- 【萬里征程——Windows App開發】控制元件大集合2WindowsAPP控制元件
- 【萬里征程——Windows App開發】在應用中整合搜尋WindowsAPP
- 【萬里征程——Windows App開發】頁面佈局和基本導航WindowsAPP
- 【萬里征程——Windows App開發】編輯文字及鍵盤輸入WindowsAPP
- 【萬里征程——Windows App開發】ListView&GridView之新增資料WindowsAPPView
- 【萬里征程——Windows App開發】應用設定和應用幫助WindowsAPP
- 【萬里征程——Windows App開發】用浮出控制元件做預覽效果WindowsAPP控制元件
- 【萬里征程——Windows App開發】檔案&資料——檔案選取器WindowsAPP
- 【萬里征程——Windows App開發】檔案&資料——寫入與讀取WindowsAPP
- 【萬里征程——Windows App開發】設定共享(共享源和共享目標)WindowsAPP
- 【萬里征程——Windows App開發】檔案&資料——獲取檔案屬性WindowsAPP
- 【萬里征程——Windows App開發】如何儲存、讀取、刪除應用資料WindowsAPP
- 【萬里征程——Windows App開發】檔案&資料——讀取檔案/資料夾名WindowsAPP
- 【萬里征程——Windows App開發】資料繫結——簡單示例、更改通知、資料轉換WindowsAPP
- 【萬里征程——Windows App開發】如何在多個頁面間讀取/儲存檔案【草稿】WindowsAPP
- Windows App 應用開發教程WindowsAPP
- 使用 Flutter 開發 macOS AppFlutterMacAPP
- Windows平臺上也可以進行iOS App的開發WindowsiOSAPP
- 使用duxapp開發 React Native App 事半功倍UXAPPReact Native
- 使用uniapp開發APP時的除錯/安卓打包等APP除錯安卓
- 使用Python開發windows桌面程式PythonWindows
- 即拼商城APP開發(開發APP)APP
- 多端開發之uniapp開發appAPP
- Windows 10 自帶App無法使用,開啟閃退WindowsAPP
