【萬里征程——Windows App開發】設定共享(共享源和共享目標)
上一篇部落格簡單介紹了通過貼上板來共享資料,這一節將會新增更為強大的功能哦。
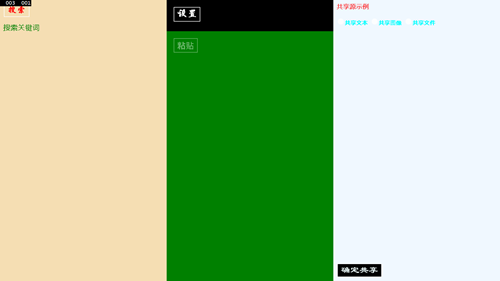
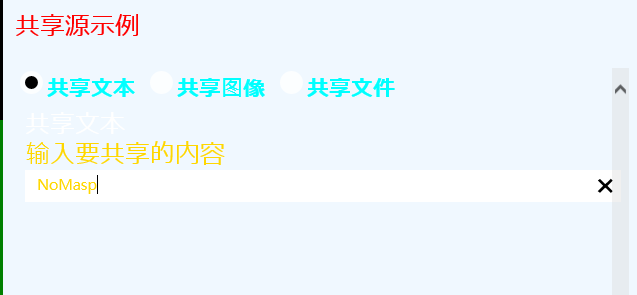
以下就是大概的樣式了,隨便看看就好了,這都不是重點。
     <Grid Background="AliceBlue">
            <Grid.RowDefinitions>
                <RowDefinition Height="auto"/>
                <RowDefinition />
                <RowDefinition Height="auto"/>
            </Grid.RowDefinitions>

            <TextBlock Grid.Row="0" FontSize="25"  Foreground="Red" Text="共享源示例"  Margin="12"/>

            <ScrollViewer Grid.Row="1" Margin="14" VerticalScrollMode="Auto" HorizontalScrollMode="Disabled">
                <StackPanel>
                    <StackPanel Orientation="Horizontal">
                        <RadioButton x:Name="radioBtnText" Foreground="Aqua" FontWeight="Bold" FontSize="22" Content="共享文字" Checked="OnChecked" GroupName="g" Tag="text"/>
                        <RadioButton x:Name="radioBtnImg"  Foreground="Aqua" FontWeight="Bold" FontSize="22" Content="共享影象" Margin="12,0,0,0" Checked="OnChecked" GroupName="g" Tag="image"/>
                        <RadioButton x:Name="radioBtnFile"  Foreground="Aqua" FontWeight="Bold" FontSize="22" Content="共享檔案" Margin="12,0,0,0" Checked="OnChecked" GroupName="g" Tag="file"/>
                    </StackPanel>

                    <StackPanel Name="stackPText" Visibility="Collapsed" Margin="8">
                        <TextBlock Text="共享文字" FontSize="25"/>
                        <TextBlock Foreground="Gold" FontSize="25" Text="輸入要共享的內容" />
                        <TextBox x:Name="tBlockText" Foreground="Gold" />
                    </StackPanel>

                    <StackPanel Name="stackPImg" Visibility="Collapsed" Margin="8">
                        <TextBlock Text="共享影象" FontSize="25"/>
                        <TextBlock Foreground="Gold" FontSize="25" Text="共享以下圖片"/>
                        <Image Width="600" Height="400" Stretch="UniformToFill" HorizontalAlignment="Left"
                               Margin="1,5,0,5" Source="Assets/SpaceNeedle1.jpg"/>
                    </StackPanel>

                    <StackPanel Name="stackPFile" Visibility="Collapsed" Margin="8">
                        <TextBlock Text="共享檔案" FontSize="28"/>
                        <TextBlock Foreground="Gold" FontSize="25" Text="選擇要共享的檔案"/>
                        <StackPanel>
                            <Button Content="選擇檔案" Click="OnPickFile"/>
                            <TextBlock x:Name="tBlockFile" Foreground="Gold" FontSize="24"/>
                        </StackPanel>
                    </StackPanel>
                </StackPanel>
            </ScrollViewer>
            <Button Grid.Row="2" Name="btnShare" Margin="12" Content="確定共享" FontSize="35" FontFamily="隸書" Foreground="Azure" Background="Black" Click="btnShare_Click"/>
        </Grid>
這裡通過3個StackPanel的“顯示“與”隱藏“來達到在一個位置顯示3個介面的功能,然後在後臺通過以下方法更改Visibility屬性。
        private void OnChecked(object sender, RoutedEventArgs e)
        {
            RadioButton rbtn = sender as RadioButton;
            if (rbtn != null)
            {
                string tag = rbtn.Tag.ToString();
                switch (tag)
                {
                    case "text":
                        this.stackPText.Visibility = Windows.UI.Xaml.Visibility.Visible;
                        this.stackPImg.Visibility = Windows.UI.Xaml.Visibility.Collapsed;
                        this.stackPFile.Visibility = Windows.UI.Xaml.Visibility.Collapsed;
                        break;
                    case "image":
                        this.stackPText.Visibility = Windows.UI.Xaml.Visibility.Collapsed;
                        this.stackPImg.Visibility = Windows.UI.Xaml.Visibility.Visible;
                        this.stackPFile.Visibility = Windows.UI.Xaml.Visibility.Collapsed;
                        break;
                    case "file":
                        this.stackPText.Visibility = Windows.UI.Xaml.Visibility.Collapsed;
                        this.stackPImg.Visibility = Windows.UI.Xaml.Visibility.Collapsed;
                        this.stackPFile.Visibility = Windows.UI.Xaml.Visibility.Visible;
                        break;
                    default:
                        this.stackPText.Visibility = Windows.UI.Xaml.Visibility.Visible;
                        this.stackPImg.Visibility = Windows.UI.Xaml.Visibility.Collapsed;
                        this.stackPFile.Visibility = Windows.UI.Xaml.Visibility.Collapsed;
                        break;
                }
            }
        }
以下是核心程式碼,通過RadioButton的選擇來共享不同的內容。這裡沒有進行try、catch異常檢測,但在實際工程中則是必要的,因為如果你不共享任何內容而點選共享按鈕你就知道了……
         void MainPage_DataRequested(DataTransferManager sender, DataRequestedEventArgs args)
        {
            var deferral = args.Request.GetDeferral();
            if (radioBtnText.IsChecked == true)
            {
                args.Request.Data.Properties.Title = "共享文字";
                args.Request.Data.Properties.Description = "共享你輸入的文字資料。";
                args.Request.Data.SetText(this.tBlockText.Text);
            }
            else if (radioBtnImg.IsChecked == true)
            {
                args.Request.Data.Properties.Title = "共享影象";
                args.Request.Data.Properties.Description = "共享以下圖片。";
                args.Request.Data.SetBitmap(Windows.Storage.Streams.RandomAccessStreamReference.CreateFromUri(new Uri("ms-appx:///Assets/SpaceNeedle1.jpg")));
            }
            else if (radioBtnFile.IsChecked == true)
            {
                args.Request.Data.Properties.Title = "共享檔案";
                args.Request.Data.Properties.Description = "共享你選擇的檔案。";
                var file = this.tBlockFile.Tag as Windows.Storage.StorageFile;
                List<IStorageItem> files = new List<IStorageItem>();
                files.Add(file);
                args.Request.Data.SetStorageItems(files);
            }
            deferral.Complete();
        }
選擇檔案的方法我們在前面也都介紹過了,直接貼程式碼……
         private async void OnPickFile(object sender, RoutedEventArgs e)
        {
            Windows.Storage.Pickers.FileOpenPicker picker = new Windows.Storage.Pickers.FileOpenPicker();
            picker.FileTypeFilter.Add(".mp3");
            picker.FileTypeFilter.Add(".jpg");
            picker.FileTypeFilter.Add(".png");
            picker.FileTypeFilter.Add(".docx");
            picker.FileTypeFilter.Add(".pptx");
            picker.FileTypeFilter.Add(".txt");
            Windows.Storage.StorageFile file = await picker.PickSingleFileAsync();
            if (file != null)
            {
                this.tBlockFile.Text = file.Path;
                this.tBlockFile.Tag = file;
            }
        }
當然了,記得下面這些操作……
       protected override void OnNavigatedTo(NavigationEventArgs e)
        {
            DataTransferManager.GetForCurrentView().DataRequested += MainPage_DataRequested;
        }

        protected override void OnNavigatedFrom(NavigationEventArgs e)
        {
            DataTransferManager.GetForCurrentView().DataRequested -= MainPage_DataRequested;
        }
最後就是共享確認按鈕了,一行程式碼搞定。
        private void btnShare_Click(object sender, RoutedEventArgs e)
        {
            DataTransferManager.ShowShareUI();
        }
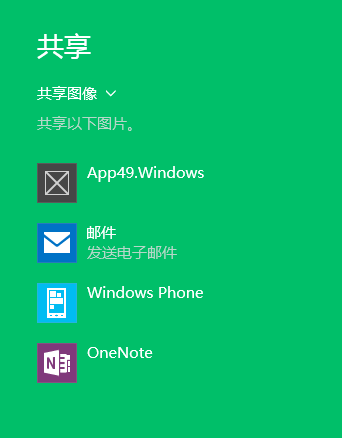
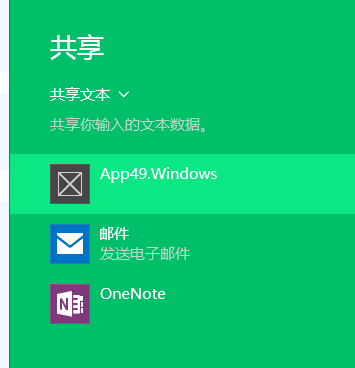
以上這個App,你將需要共享的資料從這裡發出,也叫共享源,但共享到哪裡了呢?
看到”共享影象“和”共享以下圖片“想起來剛才的兩行程式碼了麼?這兩個屬性就用在了這裡。
args.Request.Data.Properties.Title = "共享文字";
args.Request.Data.Properties.Description = "共享你輸入的文字資料。";
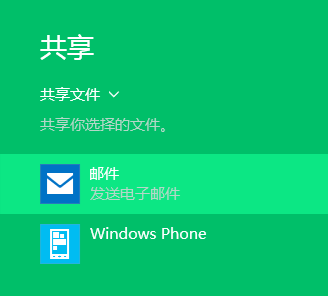
我們當然可以將資料共享到郵件、OneNote裡,但如果你是要寫一個自己的接收共享資料的應用呢,如何來寫?
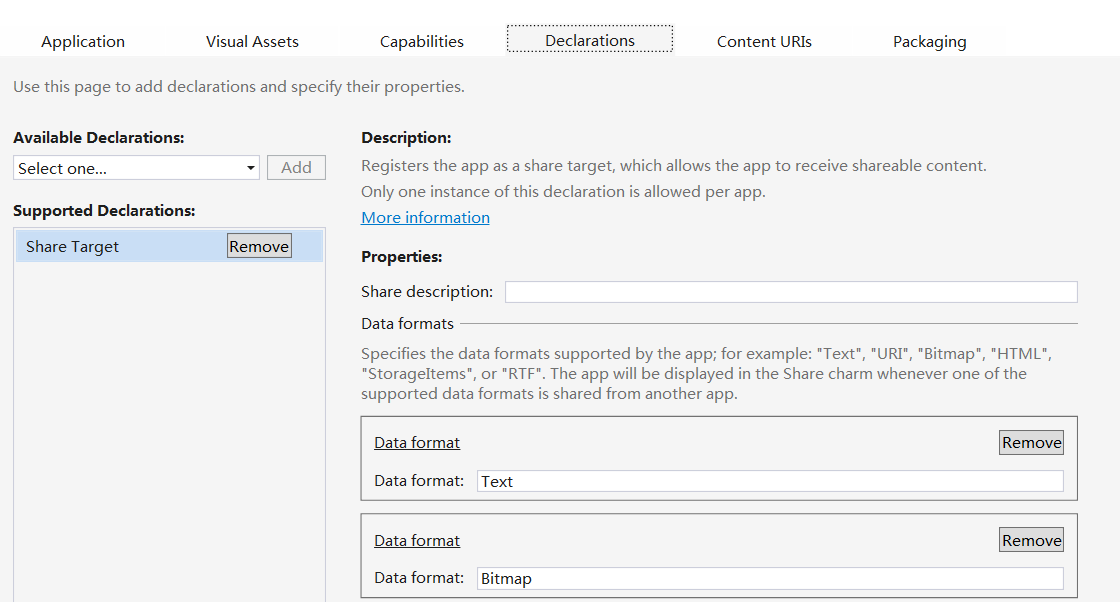
接下來就來寫另一個App咯,也就是上圖中的App49了。首先在清單檔案中做如下操作,當然了,具體要新增哪些東西大家自己看著辦就好了。
然後新增一個XAML頁面來接收資料,因為你不可能只讓你的APP專門用來接收資料咯,所以就不建議在MainPage中寫了。
在新頁面中大概做一下頁面佈局,我的佈局通常來說都不是很美觀的……
    <Grid Background="{StaticResource ApplicationPageBackgroundThemeBrush}">
        <Grid.RowDefinitions>
            <RowDefinition Height="*"/>
            <RowDefinition Height="100"/>
        </Grid.RowDefinitions>

        <Grid x:Name="gridText" Margin="24" Visibility="Collapsed" Grid.Row="0">
            <StackPanel>
                <TextBlock FontSize="25" Foreground="Red" Text="接收到的文字:"/>
                <TextBlock FontSize="30" Foreground="Pink" FontWeight="Bold" x:Name="tbText" Margin="8"/>
            </StackPanel>
        </Grid>

        <Grid x:Name="gridImg" Margin="25" Visibility="Collapsed" Grid.Row="0">
            <StackPanel>
                <TextBlock FontSize="25" Foreground="Red" Text="接收到的影象:"/>
                <Image x:Name="img" Margin="12" Width="500" Height="400" HorizontalAlignment="Left" Stretch="Uniform"/>
            </StackPanel>
        </Grid>

        <Grid x:Name="gridStorageItems" Margin="25" Visibility="Collapsed" Grid.Row="0">
            <StackPanel>
                <TextBlock FontSize="25"  Foreground="Red" Text="接收到的檔案:"/>
                <TextBlock FontSize="30" Margin="12" x:Name="tbStorageItem"/>
            </StackPanel>
        </Grid>

        <Button Grid.Row="1" HorizontalAlignment="Center" Margin="0,15,0,20"
                Content="完成共享" FontSize="28" Width="200" Click="btnCompleteShare_Click"/>
    </Grid>
後臺程式碼中寫以下程式碼,核心在於if中的3個判斷,就是3中共享的檔案了咯。
  public sealed partial class ShareTargetPage : Page
    {
        ShareOperation shareOperation = null;
        public ShareTargetPage()
        {
            this.InitializeComponent();
        }

        protected async override void OnNavigatedTo(NavigationEventArgs e)
        {
            ShareOperation sp = e.Parameter as ShareOperation;
            if (sp != null)
            {
                this.shareOperation = sp;
                DataPackageView pack = sp.Data;
                if (pack.Contains(StandardDataFormats.Text))
                {
                    string s = await pack.GetTextAsync();
                    this.tbText.Text = s;
                    this.gridText.Visibility = Windows.UI.Xaml.Visibility.Visible;
                }
                else if (pack.Contains(StandardDataFormats.Bitmap))
                {
                    var stream = await pack.GetBitmapAsync();

                    BitmapImage bmp = new BitmapImage();
                    bmp.SetSource(await stream.OpenReadAsync());
                    this.img.Source = bmp;
                    this.gridImg.Visibility = Windows.UI.Xaml.Visibility.Visible;
                }
                else if (pack.Contains(StandardDataFormats.StorageItems))
                {
                    var storageItems = await pack.GetStorageItemsAsync();
                    StorageFile file = storageItems[0] as StorageFile;

                    this.tbStorageItem.Text = file.Name;
                    this.gridStorageItems.Visibility = Windows.UI.Xaml.Visibility.Visible;
                }
            }
        }

        private void btnCompleteShare_Click(object sender, RoutedEventArgs e)
        {
            this.shareOperation.ReportCompleted();
        }
    }
接著我們就要來除錯這兩個程式啦。只需要將接受共享資料的App按F5執行後關掉就好了,因為它會部署到本地的,或者也可以在Build選項卡中直接部署也是一樣的。然後按F5執行共享資料的資料來源App就好啦。
截圖如下:
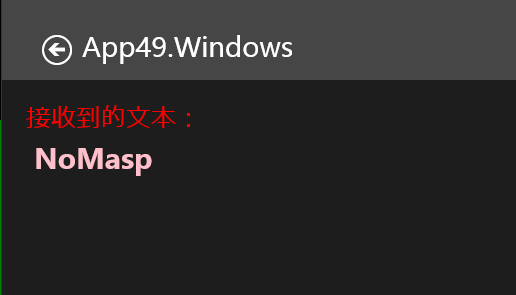
這張圖片我壓縮過了,不如太大上傳不了,所以可能看不清楚吧。下面是共享文字資料的過程截圖啦。
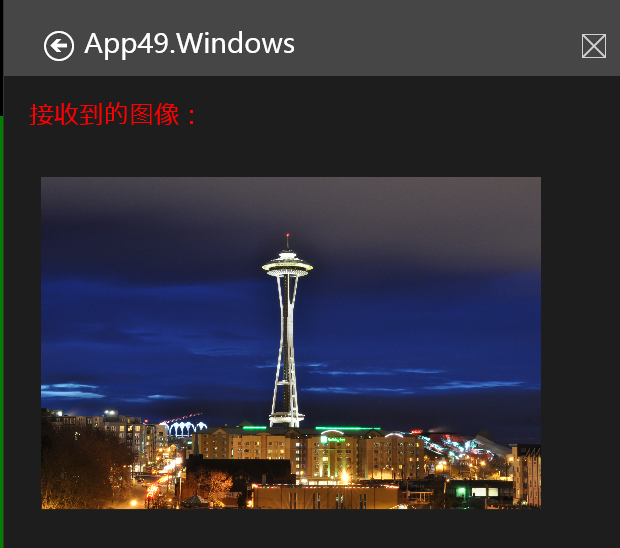
這個是共享影象的截圖,忘了說了,在前面的SpaceNeedle1.jpg就是下面這張圖片我已經事先新增到工程裡了的。
緊接著我們共享這個docx檔案,卻發現在共享欄裡沒有了App49,發生了什麼?
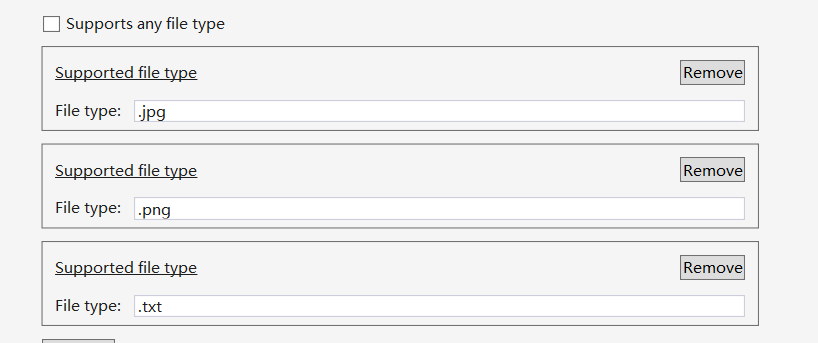
下面這首剛才新增的受支援的檔案型別,明顯沒有新增.docx,所以這也是一個需要注意的地方。
話說大家如果想知道10000的階層是多少可以下載這個資源。傳送門:10000的階層
而想知道如何算出10000的階層可以看這裡。傳送門:100的階層真的算不出來嗎?
我已經將【萬里征程——Windows App開發】如何使用貼上板 和【萬里征程——Windows App開發】在應用中整合搜尋的程式碼全部都整合到當前工程中了,歡迎大家下載。
傳送門:搜尋整合、貼上板、共享源原始碼
傳送門:共享目標原始碼
PS:我的所有下載均不需要下載積分(因為博主我之前為了下載一些破資源耗費太多時間做任務、創小號了……)
感謝大家的支援…… 這幾篇寫的比較倉促,因為這陣子都好忙的…… 大家有問題直接郵件我……
感謝您的訪問,希望對您有所幫助。 歡迎大家關注、收藏以及評論。
為使本文得到斧正和提問,轉載請註明出處:
http://blog.csdn.net/nomasp
相關文章
- 【萬里征程——Windows App開發】應用設定和應用幫助WindowsAPP
- 【萬里征程——Windows App開發】畫筆和影象WindowsAPP
- windows bat系列10:批量設定&取消共享目錄WindowsBAT
- 【萬里征程——Windows App開發】動畫1WindowsAPP動畫
- 【萬里征程——Windows App開發】開發準備WindowsAPP
- 【萬里征程——Windows App開發】應用欄WindowsAPP
- 【萬里征程——Windows App開發】使用Toast通知WindowsAPPAST
- 【萬里征程——Windows App開發】繪製圖形WindowsAPP
- 【萬里征程——Windows App開發】補充:JSONWindowsAPPJSON
- 【萬里征程——Windows App開發】動態磁貼WindowsAPP
- Oracle遊標共享(Cursor Sharing)--常規遊標共享和自適應遊標共享(ACS)Oracle
- 去掉Windows預設共享Windows
- 【萬里征程——Windows App開發】使用華麗麗的字型WindowsAPP
- 【萬里征程——Windows App開發】如何使用貼上板WindowsAPP
- 【萬里征程——Windows App開發】頁面佈局和基本導航WindowsAPP
- linux掛載windows共享目錄LinuxWindows
- 【萬里征程——Windows App開發】DatePicker&TimepickerWindowsAPP
- 【萬里征程——Windows App開發】ListView&GridView之分組WindowsAPPView
- 【萬里征程——Windows App開發】SemanticZoom檢視切換WindowsAPPOOM
- vmware安裝VMware Tools,並設定共享目錄
- Win7共享印表機怎麼設定?Windows7共享印表機的設定方法步驟Win7Windows
- 電腦共享檔案怎麼設定,Win10共享設定方法Win10
- AIX下NFS共享設定AINFS
- 如何設定印表機共享
- 共享辦公室租賃,實現資源共享
- [共享WIFI]將筆記本網路設定為共享WIFIWiFi筆記
- 【萬里征程——Windows App開發】控制元件大集合1WindowsAPP控制元件
- 【萬里征程——Windows App開發】控制元件大集合2WindowsAPP控制元件
- 【萬里征程——Windows App開發】在應用中整合搜尋WindowsAPP
- 【萬里征程——Windows App開發】DatePickerFlyout、TimePickerFlyout的使用WindowsAPP
- Windows8系統下設定印表機共享Windows
- linux與linux之間共享目錄設定Linux
- win10怎麼設定nfs共享目錄_win10啟動nfs共享目錄的操作步驟Win10NFS
- 配置 NFS 共享目錄NFS
- vue資源共享Vue
- win10印表機共享設定方法 win10如何設定印表機共享Win10
- 共享汽車APP開發的功能與優勢APP
- vmware設定共享儲存(RAC)
