GMS認證之verifier--LOCATION原始碼賞析

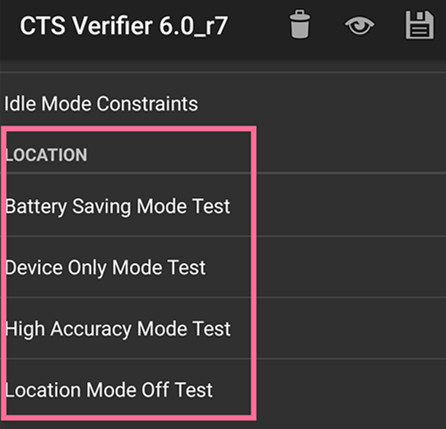
LOCATION 測試簡單介紹
verifier 測試的LOCATION,主要是測試位置模式是否生效,分別測試位置模式為省電模式,僅僅是裝置模式,高精度模式和位置關閉模式。
關鍵測試內容
其實verifier此測試項,主要是測試LOCATION功能是否正常,也就是檢查一下是否當前的位置模式與設定後的位置模式是否匹配,校驗核心程式碼非常簡單:
以Batteru Saving Mode Test為例,只是比較一下db資料庫的資料:
testIsExpectedMode(1, Secure.LOCATION_MODE_BATTERY_SAVING);protected void testIsExpectedMode(int i, int expectedMode) {
int mode = getLocationMode();
boolean passed = mode == expectedMode;
……………
}
private int getLocationMode() {
        ContentResolver cr = getContentResolver();
        return Secure.getInt(cr, Secure.LOCATION_MODE, Secure.LOCATION_MODE_OFF);
}
同樣的,其它三種測試:
Device Only Mode Test:
testIsExpectedMode(1, Secure.LOCATION_MODE_SENSORS_ONLY);Hight Accuracy Mode Test:
testIsExpectedMode(1, Secure.LOCATION_MODE_HIGH_ACCURACY);Location Mode Off Test:
testIsExpectedMode(0, Secure.LOCATION_MODE_OFF);原始碼結構賞析
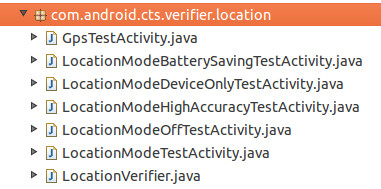
location目錄程式碼:
我看完這一塊程式碼,對google公司寫此段程式碼的哥哥非常敬佩,覺得這才是一個合格的軟體工程師寫出來的作品。
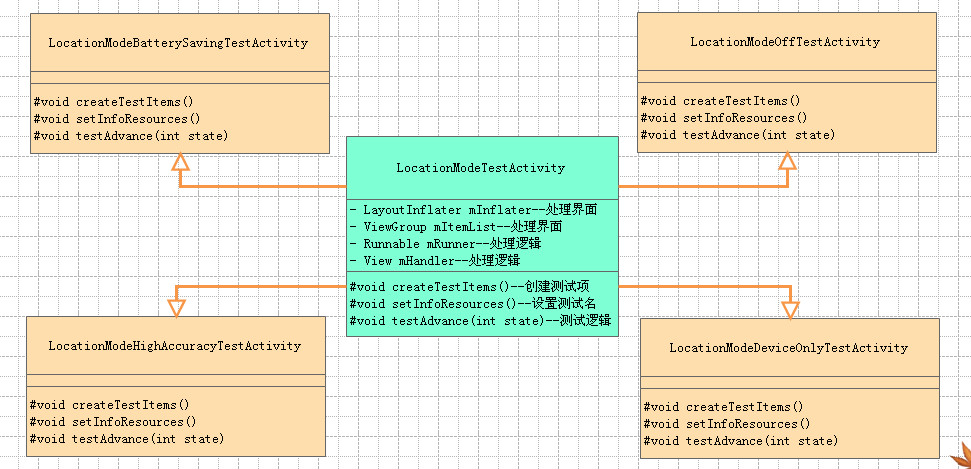
先來張UML類圖:
怎麼樣,不是我寫的太簡單,而是原始碼就是如此簡潔。
簡單的介紹一下此uml類圖吧:
LocationModeTestActivity:
此類是一個父類,定義了三個抽象方法:
createTestItems ():—-建立測試項
setInfoResources():—-設定測試項的名稱
testAdvance(int state):—-測試邏輯
關鍵的幾個屬性:
LayoutInflater mInflater—-處理UI介面
ViewGroup mItemList—-處理UI介面,主要是新增測試項
Runnable mRunner—-處理邏輯的執行緒
View mHandler—-處理邏輯執行緒的發動者
在LocationModeTestActivity類中,我們已經定義好了上面三個抽象方法的執行方法,然後我們在後面的具體測試實現類中,也就是:
LocationModeBatterySavingTestActivity(測試省電模式)
LocationModeHighAccuracyTestActivity(測試高精度模式)
LocationModeDeviceOnlyTestActivity(僅僅裝置模式)
LocationModeOffTestActivity(位置關閉模式)
實現上面定義的三個抽象方法,並且實現是非常的簡潔,就ok了。
是不是覺得非常神奇,是不是覺得非常好擴充套件,是不是覺得結構非常的眼孰啊,記不記得有一種設計模式就是此特點。
哈哈,對,這就是常見的模板模式(如果你不知道模板模式,如果是新手快點學,如果是工作幾年的老手,那隻能證明你還是個新手,並且不合格,啊噢)。
如果是一般的程式設計師來實現此功能,他可能會覺得這個實現不難,針對各個位置模式,分別寫一個檢測演算法,實現完事。後面的同事如果再要擴充套件此實現,不好意思,請客官自己從零開始實現吧。
這就是一般程式設計師和android公司的程式設計師的區別:
一位針對具體實現程式設計,一位針對介面和抽象來程式設計!
一位完成自己工作程式設計,一位針對程式框架程式設計,選擇適合成熟的設計模式,方便程式擴充套件,方便多人協作。
這就是當我看到此模組的程式碼時的想法!
小弟經常感覺自己每天都在和一幫忙烏合之眾在上班,真的,android的軟體工程師,好想和你們做朋友啊。
原始碼關鍵實現賞析
那我們再來看看幾個關鍵的怎麼實現的吧:
介面是如何實現的
在LocationModeTestActivity類中的onCreate方法中,我們就定義了介面的相關邏輯:
    @Override
    protected void onCreate(Bundle savedInstanceState) {
        super.onCreate(savedInstanceState);
        ........
        mRunner = this;
        mInflater = getLayoutInflater();
        View view = mInflater.inflate(R.layout.location_mode_main, null);
        mItemList = (ViewGroup) view.findViewById(R.id.test_items);
        mHandler = mItemList;
        createTestItems();
        ..........
        setContentView(view);
        ............
        setInfoResources();
        ...............
    }
我們可以明顯的知道,抽象方法createTestItems()和setInfoResources在onCreate方法中,用以來實現子類的介面的自定義。
那子類的介面是如何自定義的呢:
我們以LocationModeBatterySavingTestActivity為例,檢視具體實現方法:
    @Override
    protected void createTestItems() {
        createUserItem(R.string.location_mode_turn_on);
        createUserItem(R.string.location_mode_select_battery_saving);
        createAutoItem(R.string.location_mode_secure_gps_off);
        createAutoItem(R.string.location_mode_secure_nlp_on);
        createAutoItem(R.string.location_mode_manager_gps_off);
        createAutoItem(R.string.location_mode_manager_nlp_on);
    }
    @Override
    protected void setInfoResources() {
        setInfoResources(R.string.location_mode_battery_saving_test,
                R.string.location_mode_battery_saving_info, -1);
    }
在createTestItems方法中,主要呼叫createUserItem方法,我們再檢視LocationModeTestActivity類中的createUserItem方法:
protected View createUserItem(int stringId) {
        View item = mInflater.inflate(R.layout.location_mode_item, mItemList, false);
        TextView instructions = (TextView) item.findViewById(R.id.instructions);
        instructions.setText(stringId);
        mItemList.addView(item);
        return item;
}
看到沒,就是直接把一個view新增到mItemList中,簡單明瞭吧。
setInfoResources也是同樣的原理。
測試邏輯是如何實現的
我們檢視LocationModeTestActivity類:
public abstract class LocationModeTestActivity
        extends PassFailButtons.Activity implements Runnable {
也就說,LocationModeTestActivity類實現了介面Runnable,我們來看run方法:
public void run() {
    ........
    testAdvance(mState);
    ........
}
從中我們可以看出實現測試邏輯的方法testAdvance是在run()方法中來呼叫的,那麼我們是在那裡呼叫run方法呢?
我們定義:
private Runnable mRunner;
private View mHandler;
然後在next()和delay()方法中呼叫介面run()方法:
    protected void next() {
        mHandler.post(mRunner);
    }
    protected void delay() {
        mHandler.postDelayed(mRunner, 2000);
    }
那麼next()和delay()方法是什麼時候呼叫呢?
    protected void testIsOn(int i) {
        ......
        next();
    }
protected void testIsExpectedMode(int i, int expectedMode) {
...
next();
....
delay();
} protected void testSecureProviderIsEnabled(int i, String provider) {
....
next();
} protected void testSecureProviderIsDisabled(int i, String provider) {
....
next();
} protected void testManagerProviderIsEnabled(int i, String gpsProvider) {
....
next();
}protected void testManagerProviderIsDisabled(int i, String gpsProvider) {
.....
next();
}看明白沒,對,這就是每個測試項後,都直接執行next(),來呼叫對應的方法來測試對應的邏輯。
最讓我感覺意外的是:
private ViewGroup mItemList;
private View mHandler;
mItemList = (ViewGroup) view.findViewById(R.id.test_items);
mHandler = mItemList;mHandler.post(mRunner);
mHandler.postDelayed(mRunner, 2000);難道View有handler的作用嗎?可以呼叫post和postDelayed方法?
好吧,我開啟國內打不開的android官網,檢視了一個view類的說明:
java.lang.Object

   ↳    android.view.View
boolean post(Runnable action)
Causes the Runnable to be added to the message queue.boolean postDelayed(Runnable action, long delayMillis)
Causes the Runnable to be added to the message queue, to be run after the specified amount of time elapses.好吧,懂你。
我真是沒有見識。
至此,文章已經寫完了。可能有的人會問,此原始碼在那裡,好吧,如果你有興趣,可以去原始碼的cts/apps/CtsVerifier目錄下去檢視了。
相關文章
- Java 原始碼賞析 - java.lang - VoidJava原始碼
- Flutter之旅:從原始碼賞析Dart物件導向Flutter原始碼Dart物件
- Flutter異常監控 - 肆 | Rollbar原始碼賞析Flutter原始碼
- 超酷實用的jQuery焦點圖賞析及原始碼jQuery原始碼
- 二、django rest_framework原始碼之認證流程剖析DjangoRESTFramework原始碼
- # 【nodejs原理&原始碼賞析(3)】欣賞手術級的原型鏈加工藝術NodeJS原始碼原型
- ZStack原始碼剖析之核心庫鑑賞——Defer原始碼
- Flutter 之 InheritWidget 原始碼淺析Flutter原始碼
- 【nodejs原理&原始碼賞析(4)】深度剖析cluster模組原始碼與node.js多程式(上)NodeJS原始碼Node.js
- 【nodejs原理&原始碼賞析(6)】深度剖析cluster模組原始碼與node.js多程式(下)NodeJS原始碼Node.js
- SpringSecurity認證流程原始碼詳解SpringGse原始碼
- drf 認證校驗及原始碼分析原始碼
- spring security 認證原始碼跟蹤Spring原始碼
- 【nodejs原理&原始碼賞析(5)】net模組與通訊的實現NodeJS原始碼
- Django(64)頻率認證原始碼分析與自定義頻率認證Django原始碼
- django-rest-framework原始碼分析2—認證(Authentication)原始碼解析DjangoRESTFramework原始碼
- Java集合之ConcurrentHashMap原始碼淺析JavaHashMap原始碼
- ASP.NET Core[原始碼分析篇] - 認證ASP.NET原始碼
- JWT身份認證(附帶原始碼講解)JWT原始碼
- HTTP認證之基本認證——Basic(一)HTTP
- HTTP認證之基本認證——Basic(二)HTTP
- Nginx架構賞析Nginx架構
- 認證授權方案之JwtBearer認證JWT
- HTTP認證之摘要認證——Digest(一)HTTP
- Vue原始碼簡析之檢視生成(上)Vue原始碼
- shiro認證流程原始碼分析--練氣初期原始碼
- MySQL • 原始碼分析 • mysql認證階段漫遊MySql原始碼
- SpringSecurity之認證SpringGse
- DRF之JWT認證JWT
- .39-淺析webpack原始碼之parser.parseWeb原始碼
- PHP驗證碼淺析PHP
- Flutter 原始碼系列:DropdownButton 原始碼淺析Flutter原始碼
- vuex 原始碼簡析Vue原始碼
- Redux原始碼淺析Redux原始碼
- redux 原始碼淺析Redux原始碼
- Koa 原始碼淺析原始碼
- webmagic原始碼淺析Web原始碼
- 淺析Redux原始碼Redux原始碼