thinkphp中create()方法實現簡單的使用者登錄檔單驗證功能
一些說明
使用的tp框架是3.2.2
IDE 為phpstorm
整合環境是 xammp
資料庫mysql 管理工具是NAVCAT for mysql
使用了smarty模板引擎
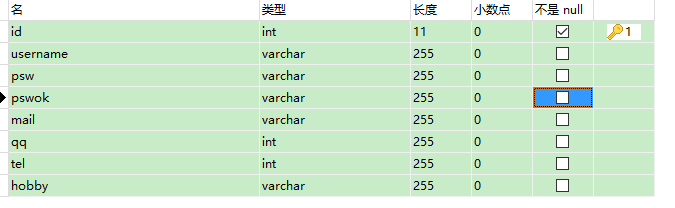
tp_user資料表的結構
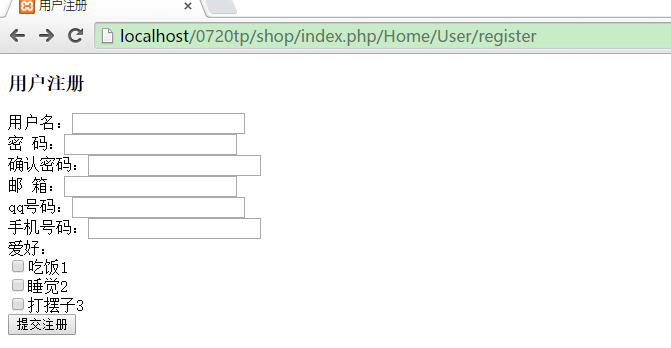
使用者登錄檔單的html程式碼和頁面
程式碼(包括使用了smarty模板引擎輸出錯誤資訊$那一塊)
<!DOCTYPE html>
<html lang="en">
<head>
    <meta charset="UTF-8">
    <title>使用者註冊</title>
</head>
<body>
<form action="{$smarty.const.__SELF__}" method="post">
    <table>
        <h3>使用者註冊</h3>
            <tr><span>使用者名稱:</span><input type="text" name="username" value=""></tr><span style="color: red">{$errorinfo.username|default:""}</span><br>
            <tr><span>密  碼:</span><input type="text" name="psw" value=""></tr><span style="color: red">{$errorinfo.psw|default:""}</span><br>
            <tr><span>確認密碼:</span><input type="text" name="pswok" value=""></tr><span style="color: red">{$errorinfo.pswok|default:""}</span><br>
            <tr><span>郵  箱:</span><input type="text" name="mail" value=""></tr><span style="color: red">{$errorinfo.mail|default:""}</span><br>
            <tr><span>qq號碼:</span><input type="text" name="qq" value=""></tr><span style="color: red">{$errorinfo.qq|default:""}</span><br>
            <tr><span>手機號碼:</span><input type="text" name="tel" value=""></tr><span style="color: red">{$errorinfo.tel|default:""}</span><br>
            <span>愛好:</span><span style="color: red">{$errorinfo.hobby|default:""}</span><br>
            <tr><input type="checkbox" name="hobby[]" value="1">吃飯1</tr><br>
            <tr><input type="checkbox" name="hobby[]" value="2">睡覺2</tr><br>
            <tr><input type="checkbox" name="hobby[]" value="3">打擺子3</tr><br>

            <tr><input type="submit" value="提交註冊"></tr>
    </table>
</form>

</body>
</html>
頁面截圖
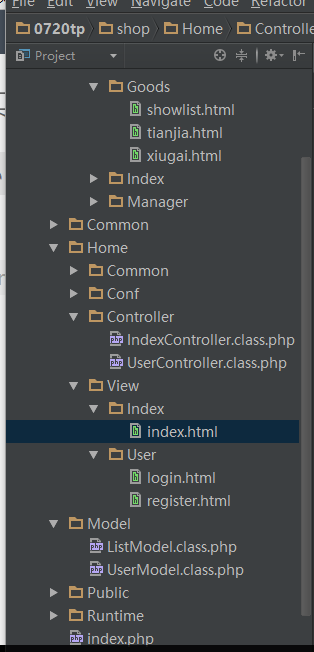
目錄結構
處理過程
- 首先建立一個資料庫表的物件
$m = new \Model\UserModel();
靜態定義方式因為必須定義模型類,所以只能用D函式例項化模型或者上面的形式。 - 使用create方法建立資料物件,此時物件是儲存在記憶體中的,並沒有實際的寫入到資料庫中。並且以陣列的形式儲存。create方法執行的同時會自動觸發表單驗證和其他一些驗證方法。
$info = $m->create(); - 使用靜態方式驗證:在模型類裡面通過$_validate屬性定義驗證規則
程式碼如下:(具體的驗證說明可以參考開發手冊“模型”目錄下的“自動驗證”那一部分)
namespace Model;
use Think\Model;
class UserModel extends Model
{
    // 自動驗證定義
    //array(欄位,驗證規則,錯誤提示,驗證條件,附加規則,驗證時間)
    protected $patchValidate = true;//開啟批處理驗證
    protected $_validate = array(
        //對使用者名稱驗證,不能為空
        array('username','require',"username is null!"),
        array('username','',"username is exist!",0,'unique',1),
        array('psw','require','psw is null!'),
        array('pswok','require','pswok is null!'),
        array('pswok','psw','psw and pswok  is error!',0,'confirm'),
        array('mail','email','EMAIL is error'),
        //array('qq','require',"qq number  is null!"),
        array('qq','number','qq number  is error',2),
        array('qq','5,12','qq length is error',2,'length'),

        array('hobby','check_hobby',"hobby num must over 2",0,'callback')
    );
    function  check_hobby($arg){
        $len = count($arg);
        if($len<2){
            return false;//會自動輸出驗證的錯誤資訊
        }
        return true;
    }
}
4 將錯誤資訊顯示到前臺頁面上去
我們通過getError()方法獲取到錯誤資訊,再通過assign()方法將錯誤資訊儲存起來$this->assign("errorinfo",$m->getError());。在前端通過{$errorinfo.username}來將錯誤資訊輸出。<span style="color: red">{$errorinfo.username|default:""}</span>這裡使用了default設定預設值,防止無值情況顯示錯誤。
下面是UserController下的register方法的完整程式碼:
function register(){
        $m = new \Model\UserModel();
        if(!empty($_POST)){
            //dump($_POST);
            $info = $m->create();  //收集$_POST的資料並返回,同時觸發表單自動驗證etc.
            if($info){
                //dump($info);
                $info['hobby'] = implode(',',$info['hobby']);//將陣列資訊轉換成字串,這樣才可以用來插入到資料庫中
                //dump($info);
                if($m->add($info)){
                    $this->redirect("Index/index");
                    //dump($info);
                }
            }else{
                //dump($m->getDbError());
                //dump($m->getError());
                $this->assign("errorinfo",$m->getError());
            }
        }
        $this->display();
    }
最後
自動驗證包括靜態方式和動態方式。
1. 靜態方式:在模型類裡面通過$_validate屬性定義驗證規則。
2. 動態方式:使用模型類的validate方法動態建立自動驗證規則
這裡只對靜態方式簡單的使用。更多的可以參考使用手冊
相關文章
- js使用者登錄檔單驗證簡單程式碼例項JS
- jQuery使用者登入和登錄檔單驗證程式碼例項jQuery
- jQuery登錄檔單驗證程式碼例項jQuery
- Java Web簡單登陸功能的實現JavaWeb
- 利用jQuery實現表單驗證功能jQuery
- jquery登陸表單簡單驗證程式碼jQuery
- jquery 實現滑動條的簡單驗證jQuery
- JSP(ajax)+Servlet實現簡單的登入功能JSServlet
- java實現簡單的單點登入Java
- 單例模式 – 單例登錄檔與 Spring 實現單例剖析單例模式Spring
- 單例模式 - 單例登錄檔與 Spring 實現單例剖析單例模式Spring
- Python實現簡單驗證碼的轉文字Python
- 在 SpringBoot 專案中簡單實現 JWT 驗證Spring BootJWT
- Laravel 使用者認證最簡單的實現 比 Jetstream 要簡單很多Laravel
- 一起來實現單使用者登入 —— 功能實現
- 簡單幾步實現滑動驗證碼(後端驗證)後端
- html+JS+php實現簡單的註冊使用者名稱驗證HTMLJSPHP
- JQuery登錄檔單jQuery
- 單點登入原理與簡單實現
- 7,javase程式碼實戰-條件語句——簡單的驗證使用者登陸(二)Java
- 登錄檔檔案修改開啟程式的簡單示例
- 簡單通訊錄的實現
- Flask-Login 讓實現登入功能變簡單Flask
- 實現基於JWT的Token登入驗證功能JWT
- javascript實現的簡單驗證碼效果程式碼例項JavaScript
- ajax方法簡單實現
- vue實現簡訊驗證碼登入Vue
- laravel_admin 單一登入的簡單實現Laravel
- 純CSS實現表單驗證CSS
- 訂單交易平臺三(登入介面整個實現過程)階段一(只實現簡單的登入功能)
- django與小程式實現登入驗證功能Django
- 使用 ActionScript 實現簡單滑動驗證碼識別
- jquery驗證簡單示例jQuery
- Promise 基本方法的簡單實現Promise
- 實現elementUI表單的全域性驗證UI
- php實現簡單路由router功能PHP路由
- 一種簡單好用的Vue表單驗證Vue
- 登錄檔單中密碼遮蔽的再設計密碼