:由於在大多數情況下GPIO的狀態變化都會觸發應用程式執行一些動作。為了方便nRF51官方把該流程封裝成了GPIOTE,全稱:The GPIO Tasks and Events (GPIOTE) 。
從GPIO電平變化到產生中斷事件的流程詳解
1、GPIOTE概覽
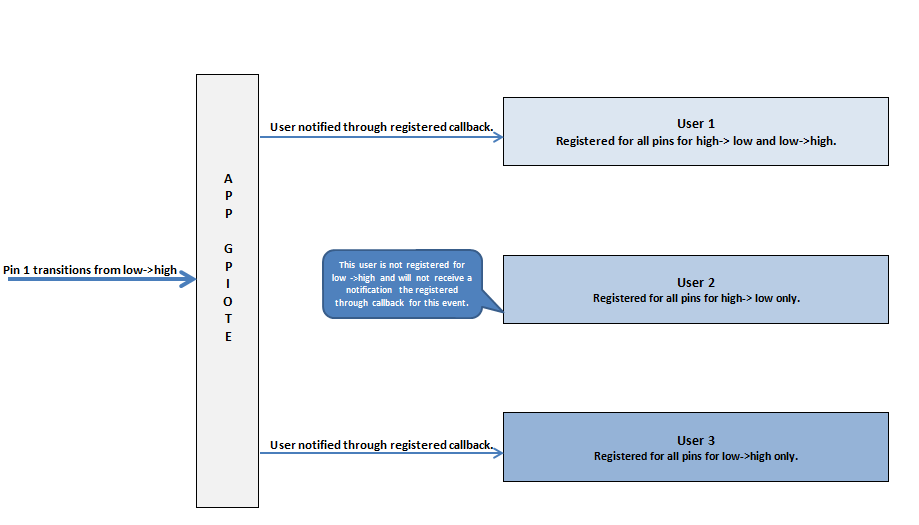
nRF51上面有32個GPIO,由於在大多數情況下GPIO的狀態變化都會觸發應用程式執行一些動作。為了方便nRF51官方把該流程封裝成了GPIOTE,全稱:The GPIO Tasks and Events (GPIOTE) 。GPIOTE提供使用任務和事件訪問GPIO引腳功能。此外,用這個lib你可以把讓多個模組共用一個相同的GPIOTE中斷,當GPIOTE發生中斷,其中斷處理程式會確定是那個引腳,並將該事件通知對應的模組。

圖:Users are being notified of a pin transition event(user表示各個模組)
GPIOTE的users必須配置相應的引腳,除非用在SENSE用途(在該用途下引腳應該被配置為GPIO_PIN_CNF_SENSE_Disabled)
模組需要指定那個引腳在何種電平變換下產生中斷事件(電平變換型別——由低到高,由高變低,both)
Note
儘管應用使用了Scheduler,但是GPTOTE的事件控制程式碼還是直接來自GPTOTE中斷控制程式碼。
2、初始化GPIOTE模組
初始化之前不能使用該模組的API,再次建議使用APP_GPIOTE_INIT代替app_gpiote_initIt來進行初始化,因為前者負責為每個user保留所需的記憶體(MAX_USERS指明最多需要多少分users,即多少個模組將註冊並使用GPIOTE模組)
1 // Macro to initialize GPIOTE module and reserving necessary memory for each of user.
2 APP_GPIOTE_INIT(MAX_USERS);
note
初始化只能一次!!!
3、GPIOTE的暫存器
每個user必須註冊自己以使自己在GPIO狀態變化時被通知到。在註冊時,user必須提供回撥處理程式,以通知一個轉換事件,以及自己感興趣的引腳的轉換方式。下圖32位的bitmask是用來代表32GPIO引腳的。user能夠將感興趣事件註冊為引腳由低到高或由高到低變化。

圖:GPIO Pin representation using 32-bit bitmask
在註冊成功時user被指派一個user id,user需要記下該id為後續向GPIOTE模組發請求提供唯一識別。該唯一識別是函式的一個輸出引數p_user_id,如下:
 1 // GPIOTE user identifier for the example module.
 2 static app_gpiote_user_id_t   m_example_user_id;// GPIOTE event handler.
 3 static void example_gpiote_event_handler(uint32_t event_pins_low_to_high, uint32_t event_pins_high_to_low);
 4 .
 5 .
 6 .
 7 uint32_t  low_to_high_bitmask = 0x0000000F; // Bitmask to be notified of transition from low to high for GPIO 0-3
 8 uint32_t  high_to_low_bitmask = 0x0000000E; // Bitmask to be notified of transition from high to low for GPIO 0-2
 9 uint32_t retval;retval = app_gpiote_user_register(&m_example_user_id,
10                                                   low_to_high_bitmask,
11                                                   high_to_low_bitmask,
12                                                   example_gpiote_event_handler);
13
14 if (retval != NRF_SUCCESS){
15     // Failed to register with user with GPIO module!
16 }
17
18 .
19 .
20 .
ps:預設情況下,初始化之後GPIOTE是失能的。因此,必須有一個user呼叫app_gpiote_user_enable來使能GPIOTE。
下面是一個使用者註冊的引腳狀態變化事件的回撥函式:
 1 // GPIOTE event handler.
 2 void example_gpiote_event_handler (uint32_t event_pins_low_to_high, uint32_t event_pins_high_to_low)
 3 {
 4     .
 5     .
 6     .
 7     if (event_pins_low_to_high & 0x00000001)
 8     {
 9         // GPIO pin 0 transitioned from low to high.
10         // Take necessary action.
11     }
12     if (event_pins_high_to_low & 0x00000004)
13     {
14         // GPIO pin 2 transitioned from high to low.
15         // Take necessary action.
16     }
17
18     .
19     .
20     .
21 }
4、Enable/Disable GPIOTE
一個註冊過的user能夠在任何時間失能或使能GPIOTE模組。當GPIOTE失能時事件將不能被接收,初始化之後GPIOTE預設是失能的。下面例子展示失能或使能GPIOTE模組:
 1 uint32_t retval;
 2
 3 // Enable notifications for example user module which is already registered.
 4 retval = app_gpiote_user_disable(m_example_user_id);
 5 if (retval != NRF_SUCCESS)
 6 {
 7     // Enabling notifications failed. Take corrective/needed action.
 8     .
 9     .
10 }
11
12  .
13  .
14  .
15 // Enable notifications for example user module which is already registered.
16 retval = app_gpiote_user_enable(m_example_user_id);
17 if (retval != NRF_SUCCESS)
18 {
19     // Enabling notifications failed. Take corrective/needed action.
20     .
21     .
22 }
5、Reading GPIOTE State
一個註冊過的user能夠通過讀取狀態資訊獲取GPIOs的當前狀態。
 1 uint32_t retval;
 2 uint32_t gpio_pin_state;
 3
 4 retval = app_gpiote_pins_state_get(m_example_user_id,&gpio_pin_state);
 5 if (retval != NRF_SUCCESS)
 6 {
 7     // Failed to read state information. Take corrective action.
 8 }else{
 9     .
10     .
11     if (gpio_pins_state & 0x00000006) // Checks if pin one and two are set
12     {
13         // Take necessary action
14     }
15     .
16     .
17 }
歷史關聯文章
[nRF51822] 3、 新年也來個總結——圖解nRF51 SDK中的Button handling library和FIFO library
[nRF51822] 4、 圖解nRF51 SDK中的Schedule handling library 和Timer library
@beautifulzzzz 2016-01-01 continue~