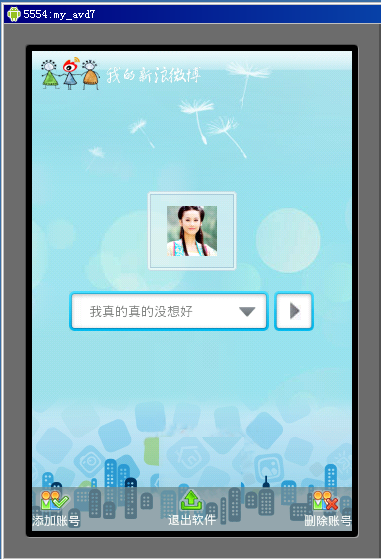
首先回顧一下功能流程當使用者開啟軟體顯示載入頁面時程式首先去sqlite庫查詢是否已經儲存有使用者的新浪微博的UserID號、Access Token、Access Secret的記錄如果沒有一條記錄那麼跳轉到使用者授權功能頁面,這個已經由上面兩篇文章實現了,如果有記錄那麼頁面跳轉到使用者登入頁面,也就是本篇以及下篇要實現的功能,本篇講UI的實現,本專案支援多微博賬號了,也就是使用者可以設定多個微博賬號,登入的時候選擇其中的一個登入,具體效果如上圖,新建名LoginActivity.java的Activity並且在AndroidManifest.xml中進行相應配置,這個頁面就是我們要實現的使用者登入頁面。
看上面的效果,首先頁面分3部分實現,背景部分、底部選單部分、使用者選擇以及頭像顯示部分,首先在res/layout的目錄下新建名為login.xml的layout,然後根據頁面顯示要求編寫如下的佈局控制:

 程式碼
程式碼
<LinearLayout
xmlns:android="http://schemas.android.com/apk/res/android"
android:id="@+id/layout"
android:orientation="vertical"
android:layout_width="fill_parent"
android:layout_height="fill_parent">
<ImageView
android:layout_width="wrap_content"
android:layout_height="wrap_content"
android:src="@drawable/logo_s"
android:layout_marginTop="5dip"
android:layout_marginLeft="5dip">
</ImageView>
<RelativeLayout
android:layout_width="fill_parent"
android:layout_height="fill_parent">
<RelativeLayout
android:id="@+id/iconBtn"
android:layout_width="90px"
android:layout_height="80px"
android:background="@drawable/icon_selector"
android:layout_above="@+id/selectLayout"
android:layout_centerHorizontal="true"
android:layout_marginBottom="20dip">
<ImageView
android:id="@+id/icon"
android:layout_width="wrap_content"
android:layout_height="wrap_content"
android:layout_centerInParent="true">
</ImageView>
</RelativeLayout>
<RelativeLayout
android:id="@+id/selectLayout"
android:layout_width="wrap_content"
android:layout_height="wrap_content"
android:layout_centerInParent="true">
<EditText
android:id="@+id/iconSelect"
android:layout_width="200px"
android:layout_height="wrap_content"
android:maxLength="10"
android:paddingLeft="20px"
android:editable="false"
android:enabled="false"
android:textSize="13px"
android:background="@drawable/input_over" >
</EditText>
<ImageButton
android:id="@+id/iconSelectBtn"
android:layout_width="wrap_content"
android:layout_height="wrap_content"
android:layout_marginRight="1.0dip"
android:layout_alignTop="@+id/iconSelect"
android:layout_alignRight="@+id/iconSelect"
android:layout_alignBottom="@+id/iconSelect"
android:background="@drawable/more_selector" >
</ImageButton>
<ImageButton
android:id="@+id/login"
android:layout_width="40px"
android:layout_height="40px"
android:layout_marginLeft="5dip"
android:layout_alignTop="@+id/iconSelectBtn"
android:layout_toRightOf="@+id/iconSelectBtn"
android:layout_alignBottom="@+id/iconSelectBtn"
android:background="@drawable/btn_in_selector" >
</ImageButton>
</RelativeLayout>
<RelativeLayout
android:layout_width="fill_parent"
android:layout_height="44dip"
android:layout_alignParentBottom="true"
android:background="#BB768e95">
<LinearLayout
android:id="@+id/addLayout"
android:layout_width="wrap_content"
android:layout_height="wrap_content"
android:orientation="vertical"
android:layout_alignParentLeft="true"
android:gravity="center"
android:layout_marginTop="3px">
<ImageButton
android:id="@+id/addIcon"
android:layout_width="wrap_content"
android:layout_height="wrap_content"
android:background="@drawable/add_selector">
</ImageButton>
<TextView
android:layout_width="wrap_content"
android:layout_height="wrap_content"
android:textColor="#ffffff"
android:textSize="12px"
android:text="新增賬號">
</TextView>
</LinearLayout>
<LinearLayout
android:id="@+id/exitLayout"
android:layout_width="wrap_content"
android:layout_height="wrap_content"
android:orientation="vertical"
android:layout_centerInParent="true"
android:gravity="center"
android:layout_marginTop="3px">
<ImageButton
android:id="@+id/exitIcon"
android:layout_width="wrap_content"
android:layout_height="wrap_content"
android:background="@drawable/exit_selector">
</ImageButton>
<TextView
android:layout_width="wrap_content"
android:layout_height="wrap_content"
android:textColor="#ffffff"
android:textSize="12px"
android:text="退出軟體">
</TextView>
</LinearLayout>
<LinearLayout
android:id="@+id/delLayout"
android:layout_width="wrap_content"
android:layout_height="wrap_content"
android:orientation="vertical"
android:layout_alignParentRight="true"
android:gravity="center"
android:layout_marginTop="3px">
<ImageButton
android:id="@+id/delIcon"
android:layout_width="wrap_content"
android:layout_height="wrap_content"
android:background="@drawable/del_selector">
</ImageButton>
<TextView
android:layout_width="wrap_content"
android:layout_height="wrap_content"
android:textColor="#ffffff"
android:textSize="12px"
android:text="刪除賬號">
</TextView>
</LinearLayout>
</RelativeLayout>
</RelativeLayout>
</LinearLayout>
正對上面的login.xml的layout進行一下說明,背景部分前面已經講過了這裡也就不重複。
底部選單實現,原本我是採用GridView實現的非常的方便但是後來由於顯示位置不好控制改成了用RelativeLayout和LinearLayout巢狀的方式,實現的比較土但是達到了顯示需求,首先是一個最外面的RelativeLayout目的是用來實現底部對齊顯示,並且把這個RelativeLayout的背景設定為淺藍色半透明的效果,關鍵這2行:android:layout_alignParentBottom="true"和android:background="#BB768e95"。然後是在RelativeLayout內部新增3個LinearLayout分別是用來顯示新增賬號、退出軟體、刪除賬號3個功能按鈕選單,並且分別設定為左對齊、居中對齊、右對齊,3個LinearLayout都設定為垂直佈局android:orientation="vertical",然後每LinearLayout新增相應的圖片和文字。
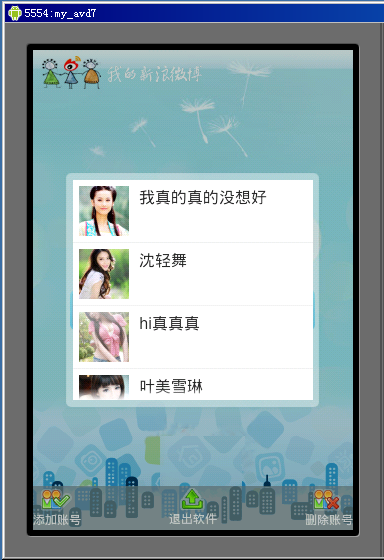
使用者選擇以及頭像顯示部分,這塊分成3小塊,用來顯示使用者頭像的ImageView、用來顯示使用者名稱字並且點選可以出現選擇列表的EditText、用來點選進入當前選擇使用者首頁的功能按鈕ImageButton,這3小塊的佈局實現也是採用elativeLayout和LinearLayout相互巢狀配合的方式實現的具體參考login.xml。這裡重點說說這個賬號選擇列表彈出視窗的實現,當點選下拉箭頭按鈕的時候彈出並顯示,這個是用Dialog控制元件實現,首先準備好圓角的半透明背景圖mask_bg.png然後新增到res/drawable-mdpi資料夾下,接著自定義一個Dialog樣式檔案,在res/values目錄下新建名為dialogStyles2.xml的resources檔案,在使用者授權驗證頁面的時候我們也自定義過類似的Dialog的樣式,具體解釋可以參考前面的戶授權驗證頁面功能,內容如下:
程式碼
<resources>
<style name="dialog2" parent="@android:style/Theme.Dialog">
<item name="android:windowFrame">@null</item>
<item name="android:windowIsFloating">true</item>
<item name="android:windowIsTranslucent">false</item>
<item name="android:windowNoTitle">true</item>
<item name="android:windowBackground">@drawable/mask_bg</item>
<item name="android:backgroundDimEnabled">true</item>
</style>
</resources>
接下來還需要定義選擇列表的layout,新建名為dialog2.xml的layout檔案,內容如下:
程式碼
<LinearLayout
xmlns:android="http://schemas.android.com/apk/res/android"
android:layout_width="wrap_content"
android:layout_height="wrap_content"
android:orientation="vertical"
android:padding="4dip">
<ListView
android:id="@+id/list"
android:layout_width="240px"
android:layout_height="220px"
android:divider="#f1f2f2"
android:dividerHeight="1px"
android:layout_margin="5px"
android:background="#ffffff"
android:cacheColorHint="#00000000">
</ListView>
</LinearLayout>
完成了layout和樣式檔案的編寫,接下來就是把dialogStyles2.xml樣式檔案和dialog2.xml的列表layout用起來,當點選id為iconSelectBtn的ImageButton時顯示使用者選擇視窗,在LoginActivity的onCreate方法中新增如下程式碼:
程式碼super.onCreate(savedInstanceState);
setContentView(R.layout.login);
LinearLayout layout=(LinearLayout)findViewById(R.id.layout);
//背景自動適應
AndroidHelper.AutoBackground(this, layout, R.drawable.bg_v, R.drawable.bg_h);
ImageButton iconSelectBtn=(ImageButton)findViewById(R.id.iconSelectBtn);
iconSelectBtn.setOnClickListener(new OnClickListener(){
@Override
public void onClick(View v) {
View diaView=View.inflate(LoginActivity.this, R.layout.dialog2, null);
dialog=new Dialog(LoginActivity.this,R.style.dialog2);
dialog.setContentView(diaView);
dialog.show();
......
}
});
到這裡登入的UI部分就實現的差不多了,剩下的都是一些功能部分程式碼用來實現從sqlite中賬號列表的獲取,以及點選選擇等互動操作等,這些在下一篇中來繼續的講。