定義樣式並獲取上傳檔案路徑及指定檔案型別
<input type="file">定義樣式並獲取上傳檔案路徑及指定檔案型別
標籤:
<inputtypefileinputit |
分類: 工作中常用 |
<input type="file" />瀏覽時只顯示指定檔案型別
<input type="file" accept="application/msword" ><br><br>accept屬性列表<br>
1.accept="application/msexcel"
2.accept="application/msword"
3.accept="application/pdf"
4.accept="application/poscript"
5.accept="application/rtf"
6.accept="application/x-zip-compressed"
7.accept="audio/basic"
8.accept="audio/x-aiff"
9.accept="audio/x-mpeg"
10.accept="audio/x-pn/realaudio"
11.accept="audio/x-waw"
12.accept="image/gif"
13.accept="image/jpeg"
14.accept="image/tiff"
15.accept="image/x-ms-bmp"
16.accept="image/x-photo-cd"
17.accept="image/x-png"
18.accept="image/x-portablebitmap"
19.accept="image/x-portable-greymap"
20.accept="image/x-portable-pixmap"
21.accept="image/x-rgb"
22.accept="text/html"
23.accept="text/plain"
24.accept="video/quicktime"
25.accept="video/x-mpeg2"
26.accept="video/x-msvideo"
這個就可以實現選擇具體的資料型別,但是有相容問題,我在測試的時候只有Opera,Chrome能用,火狐和IE都不相容
好吧,就在這裡測試一下吧:
我只想要word
在這裡如果想支援多種型別的話,比如金山的office和microsoft的office的不同副檔名,這樣的話可以在accept裡面放置多個屬性就可以了:
<form> <input type="file" name="pic" id="pic" accept="image/gif, image/jpeg" /></form>
如果不限制影象的格式,可以寫為:accept="image/*"。同樣是可以的
好的,測試一下:
我只想要gif、bmp
好吧,只要是圖片我就要了
嗯,測試成功,用Opera,Chrome能用,因為accept也是html5的新特性,所以火狐和IE的支援就顯得單薄了,這樣還是讓我們等待他們的接受把
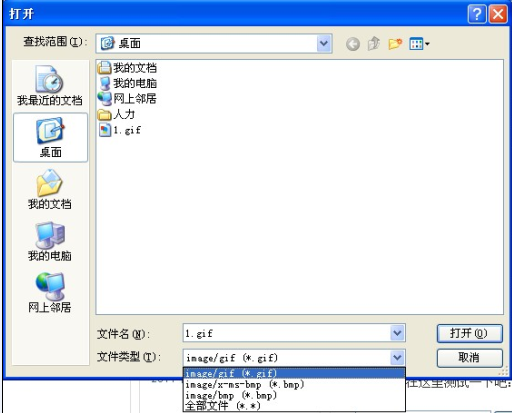
測試了好久,發現gif和bmp一起的時候並不是能取得他們的並集,仔細觀察以後是按寫入順序排列了一下他們的“檔案選擇型別”:
就像是下面的圖片一樣:

我們如果不定義input file的格式的時候,那麼檔案型別的地方就是全部檔案*.*,如果我們定義了自己的,那麼檔案型別就會和我們選中的一樣,但是這時候我們如果想看別的文 件的時候還是可以通過檔案型別的下拉框,去選擇自己額外喜歡的型別的,簡單的說,它就是起到了一個簡單的按照我們的主觀意願篩選的作用,同時我們如果不是 選擇的image/*而是好幾個並列的話就會按照上面的情況分別得排列出來,比如圖上的我input就是這個樣子的:
<form> <input type="file" name="pic" id="pic" accept="image/gif, image/x-ms-bmp, image/bmp" /></form>
相關文章
- struts檔案上傳,獲取檔名和檔案型別型別
- PHP獲取指定函式定義在哪個檔案中及行號PHP函式
- FileUpload 上傳的檔案獲取相對路徑
- python獲取指定目錄所有檔案絕對路徑Python
- 獲取上傳檔案的大小
- c#檔案路徑的獲取C#
- 獲取檔案路徑(Delphi )----轉貼
- vue中檔案上傳阿里雲並獲取上傳進度Vue阿里
- 檔案上傳按鈕樣式
- HTML上傳檔案瀏覽時只顯示指定檔案型別(可以相容IE)HTML型別
- 怎樣獲取Torque.properties檔案的絕對路徑?
- php如何上傳txt檔案,並且讀取txt檔案PHP
- help:如何獲取類檔案的路徑
- 獲取絕對路徑 【檔案找不到】
- Laravel file 上傳檔案資訊獲取Laravel
- laravel file上傳檔案資訊獲取Laravel
- 檔案上傳漏洞防範-檔案型別檢測型別
- .net core 獲取檔案MIME型別型別
- JavaScript input type=file 獲取檔案大小及型別限制JavaScript型別
- Java中的獲取檔案的物理絕對路徑,和讀取檔案Java
- Node.js:上傳檔案,服務端如何獲取檔案上傳進度Node.js服務端
- struts2檔案上傳型別限制 之 zip和rar檔案型別型別
- 5招輕鬆獲取Mac檔案路徑Mac
- C# Winform中如何獲取檔名與檔案路徑C#ORM
- java操作Properties屬性檔案及獲取專案部署伺服器路徑Java伺服器
- PHP檔案上傳字尾名與檔案型別對照表PHP型別
- bootstrap中好看的檔案上傳樣式boot
- 【SQL】Oracle建立CLOB型別上傳下載讀取檔案SQLOracle型別
- 檔案路徑及副檔名校驗正規表示式
- Python獲取當前目錄下所有檔案的絕對路徑並儲存在檔案中Python
- Python判斷上傳檔案型別Python型別
- 獲取當前js檔案被引用的路徑JS
- 如何獲取 vue 單檔案自身原始碼路徑Vue原始碼
- Xamarin Essentials教程獲取路徑檔案系統FileSystem
- 獲取沙盒檔案路徑的兩種方法
- .NET Core 如何上傳檔案及處理大檔案上傳
- Python最常用的讀取指定路徑檔案的方法!Python
- SpringBoot 中獲取專案的路徑和檔案流Spring Boot