嵌入式Linux驅動筆記(十六)------裝置驅動模型(kobject、kset、ktype)
###你好!這裡是風箏的部落格,
###歡迎和我一起交流。
前幾天去面試,被問到Linux裝置驅動模型這個問題,沒答好,回來後惡補知識,找了些資料,希望下次能答出個滿意答案。
Linux早期時候,一個驅動對應一個裝置,也就對應一個硬體地址,那當有兩個一樣的裝置的時候,就要寫兩個驅動,顯然是不合理的。應該是從Linux2.5開始,就引入了device-bus-driver模型。
其中裝置驅動模型主要結構分為kset、kobject、ktype。
kset是同型別kobject物件的集合,可以說是一個容器。
kobject是匯流排、驅動、裝置的三種物件的一個基類,實現公共介面。
ktype,記錄了kobject物件的一些屬性。
裝置驅動模型的核心即是kobject,是為了管理日益增多的裝置,使得裝置在底層都具體統一的介面。他與sysfs檔案系統緊密相連,每個註冊的kobject都對應sysfs檔案系統中的一個目錄。為了直觀管理,統一存放的路徑,使用了kset。但是僅僅有這些目錄沒有意義,這兩個結構體只能表示出裝置的層次關係,所以基本不單獨使用,會嵌入到更大的結構體中,(如希望在驅動目錄下能看到掛在該匯流排上的各種驅動,而在裝置目錄下能看到掛在該匯流排的各種裝置,就將kobject嵌入到描述裝置以及驅動的結構體中,這樣每次註冊裝置或驅動,都會在sys目錄下有描述)
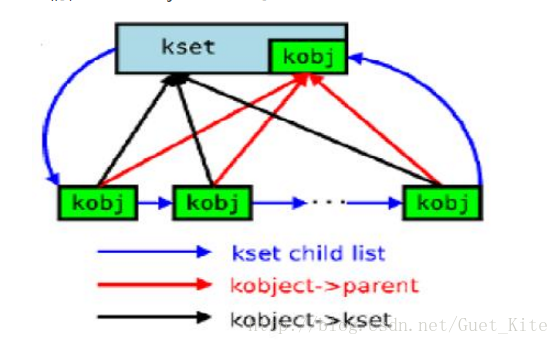
放上一個經典的圖:
這個圖其實還漏了一個ktype,kobject都應該包含一個ktype。
Linux裝置模型的目的是:為核心建立起一個統一的裝置模型,從而有一個對系統結構的一般性抽象描述。
我們可以先看下一個小的測試程式:
#include <linux/device.h>
#include <linux/module.h>
#include <linux/init.h>
#include <linux/sysfs.h>
#include <linux/kernel.h>
#include <linux/stat.h>
#include <linux/slab.h>
#include <linux/string.h>

static struct kset * my_kset;
struct test_kobj {
	int number;
	struct kobject kobj;/*嵌入更大的結構體*/
};
static struct test_kobj * test1;
static struct attribute my_attr = {
	.name = "name",
	.mode = S_IRWXUGO,
};
/*attribute陣列*/
static struct attribute *my_attrs[] = {
	&my_attr,
	NULL,  /*最後必須為NULL*/
};

static ssize_t kobject_attr_show(struct kobject *kobj, struct attribute *attr,
                char *buf)
{
	struct test_kobj *obj = container_of(kobj, struct test_kobj, kobj);
	ssize_t count = 0;
  	printk("kobject 's number is %d\n", obj->number);
	printk("kobject 's name is ");
	count = sprintf(buf, "%s\n", kobject_name(kobj) );
	return count;
}

static ssize_t kobject_attr_store(struct kobject *kobj, struct attribute *attr,
                   const char *buf, size_t count)
{
	struct test_kobj *obj = container_of(kobj, struct test_kobj, kobj);
	sscanf(buf, "%d", &obj->number);
	printk("%s\n", __FUNCTION__);
	return count;
}

static struct sysfs_ops my_sys_ops = {
	.show	= kobject_attr_show,
	.store	= kobject_attr_store,
};

void kobject_release(struct kobject *kobj)
{
	struct test_kobj *obj = container_of(kobj, struct test_kobj, kobj);
	kfree(obj);
	printk("%s\n", __FUNCTION__);
}

static struct kobj_type my_ktype = {
	.release		= kobject_release,
	.sysfs_ops	= &my_sys_ops,
	.default_attrs	= my_attrs,
};

static int __init kobject_init_test(void)
{
	int error;
	my_kset = kset_create_and_add("kobject_test", NULL, NULL);
	if (!my_kset) {
		goto out;
	}

	test1 = kzalloc(sizeof(struct test_kobj), GFP_KERNEL);
	if (!test1) {
		kset_unregister(my_kset);
		return -ENOMEM;
	}
	test1->number= 1;

	error = kobject_init_and_add(&test1->kobj, &my_ktype, &my_kset->kobj, "test1");
	if(error){
		kobject_put(&test1->kobj);
		goto out;
	}

	printk("%s success.\n", __FUNCTION__);
	return 0;

out:
	printk("%s failed!\n", __FUNCTION__);
	return -1;
}

static void __exit kobject_exit_test(void)
{
	kobject_del(&test1->kobj);
	kobject_put(&test1->kobj);
	kset_unregister(my_kset);
	printk("%s\n", __FUNCTION__);
}

module_init(kobject_init_test);
module_exit(kobject_exit_test);

MODULE_DESCRIPTION("kobject test");
MODULE_LICENSE("GPL");
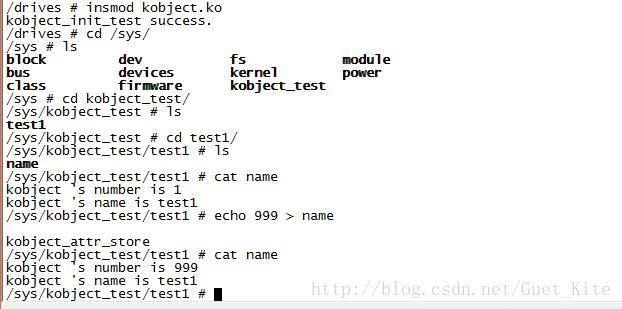
可以看到,我們在使用kobject、kset、ktype結構,就在sysfs虛擬檔案系統下建立(通過kset_create_and_add和kobject_init_and_add函式)了一些子目錄(kobject_test)和屬性檔案。kset和kobject都可以建立出目錄,但是kset的目錄下存放kobject目錄,kobject下存放屬性檔案(可以對屬性檔案進行讀寫操作,如上圖name屬性檔案,而且kobject目錄下也可以存放kobject目錄,只需parent指向它即可)。
這個小程式沒看懂?沒關係,先看下面的分析:
我們對著Linux kernel原始碼分析下,可以下看看三個結構體的成員:
struct kset {
	struct list_head list;//包含kobject的連結串列
	spinlock_t list_lock;//在訪問連結串列時加鎖
	struct kobject kobj;//嵌入的kobject
	const struct kset_uevent_ops *uevent_ops;//對發往使用者空間的uevent的處理,如熱拔插
};
struct kobject {
	const char		*name;//名字
	struct list_head	entry;//連線到kset建立層次結構
	struct kobject		*parent;//指向父節點,物件導向的層次架構
	struct kset		*kset;//指向所屬的kset
	struct kobj_type	*ktype;//屬性檔案
	struct kernfs_node	*sd; /* sysfs directory entry */
	struct kref		kref;//引用計數
#ifdef CONFIG_DEBUG_KOBJECT_RELEASE
	struct delayed_work	release;
#endif
	unsigned int state_initialized:1;//初始化狀態
	unsigned int state_in_sysfs:1;//是否處在sysfs下了
	unsigned int state_add_uevent_sent:1;
	unsigned int state_remove_uevent_sent:1;
	unsigned int uevent_suppress:1;
};
struct kobj_type {
	void (*release)(struct kobject *kobj);/*用於釋放kobject佔用的資源*/
	const struct sysfs_ops *sysfs_ops;/*提供實現以下屬性的方法*/
	struct attribute **default_attrs;/*用於儲存型別屬性列表(指標的指標)*/
	const struct kobj_ns_type_operations *(*child_ns_type)(struct kobject *kobj);
	const void *(*namespace)(struct kobject *kobj);
};
其實說到裝置驅動模型,很容易想到platform,之前我們也說過:嵌入式Linux驅動學習筆記(五)------學習platform裝置驅動
那我們現在就來具體分析這個吧:
init/main.c裡:
kernel_init
	->kernel_init_freeable
		->do_basic_setup
			->driver_init
這是driver_init函式:
void __init driver_init(void)
{
	/* These are the core pieces */
	devtmpfs_init();
	devices_init();/*device、dev目錄*/
	buses_init();/*bus目錄*/
	classes_init();/*class目錄*/
	firmware_init();/*firmware目錄*/
	hypervisor_init();/*hypervisor目錄*/
	/* These are also core pieces, but must come after the
	 * core core pieces.
	 */
	platform_bus_init();
	cpu_dev_init();
	memory_dev_init();
	container_dev_init();
	of_core_init();
}
我們看下devices_init函式:
int __init devices_init(void)
{
	devices_kset = kset_create_and_add("devices", &device_uevent_ops, NULL);
	if (!devices_kset)
		return -ENOMEM;
	dev_kobj = kobject_create_and_add("dev", NULL);
	if (!dev_kobj)
		goto dev_kobj_err;
	sysfs_dev_block_kobj = kobject_create_and_add("block", dev_kobj);
	if (!sysfs_dev_block_kobj)
		goto block_kobj_err;
	sysfs_dev_char_kobj = kobject_create_and_add("char", dev_kobj);
	if (!sysfs_dev_char_kobj)
		goto char_kobj_err;

	return 0;
 char_kobj_err:
	kobject_put(sysfs_dev_block_kobj);//刪除
 block_kobj_err:
	kobject_put(dev_kobj);
 dev_kobj_err:
	kset_unregister(devices_kset);
	return -ENOMEM;
}
這裡面呼叫kset_create_and_add建立kset並返回給devices_kset,注意這裡的devices_kset,可以說是/sys下最大的boss之一了,所有的物理裝置都會在device目錄下管理,/sys/device/目錄是核心對系統中所有裝置的分層次表達模型,儲存了系統所有的裝置。
然後呼叫kobject_create_and_add函式在/sys/目錄下建立dev目錄,/sys/dev目錄下維護一個按照字元裝置和塊裝置的主次號碼(major:minor)連結到真實裝置(/sys/devices)的符號連結檔案,應用程式通過對這些檔案的讀寫和控制,可以訪問實際的裝置。
最後再以dev_kobj為父節點,在/sys/dev/目錄下建立block和char目錄。
這裡我們先看kobject_create_and_add函式,再分析kset_create_and_add函式:
struct kobject *kobject_create_and_add(const char *name, struct kobject *parent)
{
	struct kobject *kobj;
	int retval;

	kobj = kobject_create();
	if (!kobj)
		return NULL;

	retval = kobject_add(kobj, parent, "%s", name);
	/*忽略部分無關程式碼*/
	return kobj;
}
其實裡面函式也沒啥,先建立kobject,初始化它,再新增,沒啥好說的。
倒是除了kobject_create_and_add函式,還有一個類似的函式:kobject_init_and_add。
kobject_init_and_add傳入一個kobject指標和kobj_type指標,然後進行初始化
kobject_create_and_add建立一個kobject變數,並返回其指標,它不用傳入kobj_type指標
在kset_create_and_add函式裡也會用到kobject,所以我們現在來分析下kset_create_and_add函式:
struct kset *kset_create_and_add(const char *name,
				 const struct kset_uevent_ops *uevent_ops,
				 struct kobject *parent_kobj)
{
	struct kset *kset;
	int error;

	kset = kset_create(name, uevent_ops, parent_kobj);
	if (!kset)
		return NULL;
	error = kset_register(kset);
	if (error) {
		kfree(kset);
		return NULL;
	}
	return kset;
}
裡面就是具體的建立和註冊kset了。
先說建立函式:
static struct kset *kset_create(const char *name,
				const struct kset_uevent_ops *uevent_ops,
				struct kobject *parent_kobj)
{
	struct kset *kset;
	int retval;

	kset = kzalloc(sizeof(*kset), GFP_KERNEL);//分配kset空間
	if (!kset)
		return NULL;//失敗就返回
	retval = kobject_set_name(&kset->kobj, "%s", name);//設定kset的名字,也即內嵌kobject的名字
	if (retval) {
		kfree(kset);
		return NULL;
	}
	kset->uevent_ops = uevent_ops;//kset屬性操作
	kset->kobj.parent = parent_kobj;//設定其parent
	kset->kobj.ktype = &kset_ktype;//ktype指定為kset_ktype
	kset->kobj.kset = NULL;

	return kset;
}
可以看出kset_create函式內容為:
1)呼叫kobject_set_name函式設定kobject的名稱
2)設定kobject的uevent_ops、parent為傳入的形參uevent_ops、parent_kobj
3)設定kobject的ktype為系統定義好的ktype變數
4)設定kobject的所屬kset為NULL,意思是kobject所屬的kset就是kset本身,因為kset結構體包含了一個kobject成員。
這裡需要一個注意的,就是ktype 這個結構,即kset_ktype:
static struct kobj_type kset_ktype = {
	.sysfs_ops	= &kobj_sysfs_ops,
	.release = kset_release,
};
這裡填充了一個釋放函式,每個kobject必須有一個釋放函式,並且這個kobject必須保持直到這個釋放函式被呼叫到。如果這個條件不能被滿足,則這個程式碼是有缺陷的。注意,假如你忘了提供釋放函式,核心會提出警告的;不要嘗試提供一個空的釋放函式來消除這個警告,你會受到kobject維護者的無情嘲笑。
至於kobj_sysfs_ops,則是關於讀寫操作相關的操作集:
static const struct sysfs_ops sysfs_ops = {
	.show	= show,
	.store	= store,
};
讀檔案時,會呼叫到.show的回撥函式。
寫檔案時,會呼叫到.store的回撥函式。
看完了建立函式,接下來是註冊函式:
int kset_register(struct kset *k)
{
	int err;
	if (!k)
		return -EINVAL;

	kset_init(k);//初始化kset
	err = kobject_add_internal(&k->kobj);/*初始化kobject,建立對應的sys目錄*/
	if (err)
		return err;
	kobject_uevent(&k->kobj, KOBJ_ADD);
	return 0;
}
kset_init函式主要是對kset初始化,會將初始化引用計數器(即kobj->kref)為1(當計數器引用計數沒到0之前不可以被釋放)。接著初始化entry連結串列結點,用於與所屬的kset的list成員組成連結串列(INIT_LIST_HEAD(&kobj->entry)),以及一些引數的賦值。最後,還初始化以list成員為頭結點的連結串列,它和子kobject的entry成員組成連結串列(INIT_LIST_HEAD(&k->list))。
kobject_add_internal函式就是關鍵的kobject函式了:
static int kobject_add_internal(struct kobject *kobj)
{
	int error = 0;
	struct kobject *parent;

	if (!kobj)
		return -ENOENT;

	if (!kobj->name || !kobj->name[0]) {//如果kobject的名字為空.退出
		WARN(1, "kobject: (%p): attempted to be registered with empty "
			 "name!\n", kobj);
		return -EINVAL;
	}

	parent = kobject_get(kobj->parent);//如果kobj-parent為真,則增加kobj->kref計數,即父節點的引用計數
	/* join kset if set, use it as parent if we do not already have one */
	if (kobj->kset) {
		if (!parent)
			parent = kobject_get(&kobj->kset->kobj);//如果parent父節點為NULL那麼就用kobj->kset->kobj作其父節點,並增加其引用計數
		kobj_kset_join(kobj);//把kobj的entry成員新增到kobj->kset>list的尾部,現在的層次就是kobj->kset->list指向kobj->entry
		kobj->parent = parent;
	}
	/*刪除了部分除錯內容*/
	error = create_dir(kobj);//利用kobj建立目錄和屬性檔案,其中會判斷,如果parent為NULL那麼就在sysfs_root_kn下建立
	if (error) {
		/*刪除了部分內容*/
	} else
		kobj->state_in_sysfs = 1;//如果建立成功。將state_in_sysfs建為1。表示該object已經在sysfs中了

	return error;
}
kobject_add_internal函式內容在註釋裡都寫好了,可以概括為:
1)如果kobject的parent成員為NULL,則把它指向kset的kobject成員。
2)如果kobject的kset成員不為NULL,它會呼叫kobj_kset_join函式把kobject的entry成員新增到kset的list連結串列中
3)最後呼叫create_dir函式建立sys目錄
註冊函式裡最後一個呼叫就是kobject_uevent函式了,應該是關於熱拔插機制的,這不是我們現在關心的內容。
好了,經過上面的折騰,就會在/sys/目錄下建立一個devices目錄。
接下來繼續回到文章開頭進入到的devices_init函式:
void __init driver_init(void)
{
	/* These are the core pieces */
	devtmpfs_init();
	devices_init();/*device、dev目錄*/
	buses_init();/*bus目錄*/
	classes_init();/*class目錄*/
	firmware_init();/*firmware目錄*/
	hypervisor_init();/*hypervisor目錄*/
	/* These are also core pieces, but must come after the
	 * core core pieces.
	 */
	platform_bus_init();
	cpu_dev_init();
	memory_dev_init();
	container_dev_init();
	of_core_init();
}
我們之前分析的是devices_init函式,其實接下來幾個函式都是一樣的,在/sys/目錄下建立各個目錄。
只需要記住
devices_kset對應/sys/devices目錄
bus_kset對應/sys/bus目錄
devices_kset對應/sys/devices目錄
system_kset對應/sys/devices/system目錄
class_kset對應/sys/class目錄
firmware_kobj對應/sys/firmware目錄
hypervisor_kobj對應/sys/hypervisor目錄
接下來看下platform_bus_init函式
也就是我們之前用的platform匯流排了!!
在driver/base/platform.c檔案:
struct bus_type platform_bus_type = {
	.name		= "platform",
	.dev_groups	= platform_dev_groups,
	.match		= platform_match,//各種關鍵字匹配
	.uevent		= platform_uevent,
	.pm		= &platform_dev_pm_ops,
};
struct device platform_bus = {
	.init_name	= "platform",
};

int __init platform_bus_init(void)
{
	int error;

	early_platform_cleanup();

	error = device_register(&platform_bus);
	if (error)
		return error;
	error =  bus_register(&platform_bus_type);
	if (error)
		device_unregister(&platform_bus);
	of_platform_register_reconfig_notifier();
	return error;
}
這裡,device_register就是在/sys/device/目錄下建立platform
int device_register(struct device *dev)
{
	device_initialize(dev);
	return device_add(dev);
}
其實也就包含兩個函式,一個初始化,一個新增:
void device_initialize(struct device *dev)
{
	dev->kobj.kset = devices_kset;//設定裝置的kobject所屬集合,devices_kset即對應/sys/devices/
	kobject_init(&dev->kobj, &device_ktype);//初始化裝置的kobject
	INIT_LIST_HEAD(&dev->dma_pools);//初始化裝置的DMA池,用於傳遞大資料
	mutex_init(&dev->mutex);
	lockdep_set_novalidate_class(&dev->mutex);
	spin_lock_init(&dev->devres_lock);//初始化自旋鎖,用於同步子裝置連結串列
	INIT_LIST_HEAD(&dev->devres_head);//初始化子裝置連結串列頭
	device_pm_init(dev);
	set_dev_node(dev, -1);
#ifdef CONFIG_GENERIC_MSI_IRQ
	INIT_LIST_HEAD(&dev->msi_list);
#endif
}
註釋都寫好了,看下device_add函式:
int device_add(struct device *dev)
{
	struct device *parent = NULL;
	struct kobject *kobj;
	struct class_interface *class_intf;
	int error = -EINVAL;
	struct kobject *glue_dir = NULL;

	dev = get_device(dev);//增加裝置的kobject的引用計數
	if (!dev)
		goto done;

	if (!dev->p) {
		error = device_private_init(dev);//初始化dev的私有成員,及其連結串列操作函式
		if (error)
			goto done;
	}

	if (dev->init_name) {//儲存裝置名,以後需要獲取時使用dev_name函式獲取
		dev_set_name(dev, "%s", dev->init_name);
		dev->init_name = NULL;
	}

	/* subsystems can specify simple device enumeration */
	if (!dev_name(dev) && dev->bus && dev->bus->dev_name)
		dev_set_name(dev, "%s%u", dev->bus->dev_name, dev->id);

	if (!dev_name(dev)) {
		error = -EINVAL;
		goto name_error;
	}

	pr_debug("device: '%s': %s\n", dev_name(dev), __func__);

	parent = get_device(dev->parent);//返回父節點,增加父節點引用計數,如果沒有返回NULL
	kobj = get_device_parent(dev, parent);//以上層devices為準重設dev->kobj.parent
	if (kobj)
		dev->kobj.parent = kobj;

	/* use parent numa_node */
	if (parent && (dev_to_node(dev) == NUMA_NO_NODE))
		set_dev_node(dev, dev_to_node(parent));

	/* first, register with generic layer. */
	/* we require the name to be set before, and pass NULL */
	error = kobject_add(&dev->kobj, dev->kobj.parent, NULL);//設定dev->kobj的名字和父物件,並建立相應目錄
	if (error) {
		glue_dir = get_glue_dir(dev);
		goto Error;
	}

	/* notify platform of device entry */
	if (platform_notify)
		platform_notify(dev);

	error = device_create_file(dev, &dev_attr_uevent);//建立uevent屬性檔案
	if (error)
		goto attrError;

	error = device_add_class_symlinks(dev);
	if (error)
		goto SymlinkError;
	error = device_add_attrs(dev);
	if (error)
		goto AttrsError;
	error = bus_add_device(dev);
	if (error)
		goto BusError;
	error = dpm_sysfs_add(dev);
	if (error)
		goto DPMError;
	device_pm_add(dev);

	if (MAJOR(dev->devt)) {
		error = device_create_file(dev, &dev_attr_dev);//在sys下產生dev屬性檔案
		if (error)
			goto DevAttrError;

		error = device_create_sys_dev_entry(dev);//在/sys/dev目錄建立對裝置的軟連結
		if (error)
			goto SysEntryError;

		devtmpfs_create_node(dev);
	}

	/* Notify clients of device addition.  This call must come
	 * after dpm_sysfs_add() and before kobject_uevent().
	 */
	if (dev->bus)
		blocking_notifier_call_chain(&dev->bus->p->bus_notifier,
					     BUS_NOTIFY_ADD_DEVICE, dev);

	kobject_uevent(&dev->kobj, KOBJ_ADD);//向使用者空間發出KOBJ_ADD 事件
	bus_probe_device(dev);//檢測驅動中有無適合的裝置進行匹配,現在只新增了裝置,還沒有載入驅動,所以不會進行匹配
	if (parent)
		klist_add_tail(&dev->p->knode_parent,
			       &parent->p->klist_children);//把該裝置的節點掛到其父節點的連結串列

	if (dev->class) {
		mutex_lock(&dev->class->p->mutex);
		/* tie the class to the device */
		klist_add_tail(&dev->knode_class,
			       &dev->class->p->klist_devices);

		/* notify any interfaces that the device is here */
		list_for_each_entry(class_intf,
				    &dev->class->p->interfaces, node)
			if (class_intf->add_dev)
				class_intf->add_dev(dev, class_intf);
		mutex_unlock(&dev->class->p->mutex);
	}
	/*省略部分error內容*/
}
device_add函式是比較重要的,註釋基本都寫好了,可以概括為:
1)增加kobj->kref計數
2)初始化dev的私有成員
3)設定裝置名稱
4)增加父節點引用計數
5)將dev->kobj新增到dev->kobj.parent對應目錄下
6)dev->kobj下建立屬性檔案
7)在/sys/dev目錄建立對裝置的軟連結
8)驅動檢測
其中,驅動檢測函式:bus_probe_device
我在嵌入式Linux驅動筆記(五)------學習platform裝置驅動分析有,可以看看。
最後,我們接著看 bus_register(&platform_bus_type);
篇幅有點長了,函式我就寫點重要的即可
int bus_register(struct bus_type *bus)
{
	int retval;
	struct subsys_private *priv;
	struct lock_class_key *key = &bus->lock_key;

	priv = kzalloc(sizeof(struct subsys_private), GFP_KERNEL);
	if (!priv)
		return -ENOMEM;

	priv->bus = bus;
	bus->p = priv;

	BLOCKING_INIT_NOTIFIER_HEAD(&priv->bus_notifier);

	retval = kobject_set_name(&priv->subsys.kobj, "%s", bus->name);
	if (retval)
		goto out;

	priv->subsys.kobj.kset = bus_kset;
	priv->subsys.kobj.ktype = &bus_ktype;
	priv->drivers_autoprobe = 1;

	retval = kset_register(&priv->subsys);
	if (retval)
		goto out;

	retval = bus_create_file(bus, &bus_attr_uevent);
	if (retval)
		goto bus_uevent_fail;

	priv->devices_kset = kset_create_and_add("devices", NULL,
						 &priv->subsys.kobj);
	if (!priv->devices_kset) {
		retval = -ENOMEM;
		goto bus_devices_fail;
	}

	priv->drivers_kset = kset_create_and_add("drivers", NULL,
						 &priv->subsys.kobj);
	if (!priv->drivers_kset) {
		retval = -ENOMEM;
		goto bus_drivers_fail;
	}
	/*後面的省略*/
}
再次強調:
priv->subsys.kobj.kset = bus_kset;
priv->subsys.kobj.ktype = &bus_ktype;
這裡設定了所屬的kset和ktype。
ktype結構體裡包含了sysfs_ops結構體,裡面就是對檔案的讀寫操作:
static const struct sysfs_ops bus_sysfs_ops = {
	.show	= bus_attr_show,//讀檔案
	.store	= bus_attr_store,//寫檔案
};
最後,bus_register函式裡還呼叫了kset_create_and_add函式在/sys/platform/目錄下建立devices和drivers目錄,裡面存放我們platform平臺下注冊的裝置和驅動。
好了,到此,我們就來再次小小歸納下
*在kset下還可能會有更深的kset
*kset包含一個或多個kobject,方便管理
*kobject並不一定需要kset
*kobject下有屬性檔案,·向使用者層提供了表示和操作這個 kobject 的屬性特徵的介面
*kobject 下還有一些符號連結檔案,指向其它的 kobject
現在,是不是對裝置驅動模型有了更為直觀的認識?現在回頭看看文章開頭的小程式,是不是輕而易舉的理解了呢?
udev就會讀取/sys目錄下的資訊,在/dev目錄下建立裝置了。
最後,強烈建議觀看《Linux裝置模型淺析之裝置篇》和《Linux那些事兒之我是Sysfs》這兩篇文章
這裡有篇文章,是翻譯了核心文件(Documentation\kobject.txt),可以看看:
http://www.cnblogs.com/helloahui/p/3674933.html
後記:關於uevent,在這裡有描述:http://blog.csdn.net/fanqipin/article/details/8287343
相關文章
- 嵌入式Linux驅動學習筆記(十六)------裝置驅動模型(kobject、kset、ktype)Linux筆記模型Object
- Linux裝置驅動之字元裝置驅動Linux字元
- 嵌入式Linux驅動筆記(九)------dts裝置樹在2440使用Linux筆記
- Linux驅動開發筆記(四):裝置驅動介紹、熟悉雜項裝置驅動和ubuntu開發雜項裝置DemoLinux筆記Ubuntu
- 深入淺出:Linux裝置驅動之字元裝置驅動Linux字元
- 乾坤合一:Linux裝置驅動之塊裝置驅動Linux
- 字元裝置驅動 —— 字元裝置驅動框架字元框架
- 嵌入式Linux驅動筆記(十一)------i2c裝置之mpu6050驅動Linux筆記
- 嵌入式Linux驅動筆記(十三)------spi裝置之RFID-rc522驅動Linux筆記
- 【linux】驅動-7-平臺裝置驅動Linux
- 蛻變成蝶:Linux裝置驅動之字元裝置驅動Linux字元
- 蛻變成蝶~Linux裝置驅動之字元裝置驅動Linux字元
- Linux塊裝置驅動Linux
- 【linux】驅動-6-匯流排-裝置-驅動Linux
- ArmSoM系列板卡 嵌入式Linux驅動開發實戰指南 之 字元裝置驅動Linux字元
- Linux裝置驅動程式學習----1.裝置驅動程式簡介Linux
- 乾坤合一:Linux裝置驅動之USB主機和裝置驅動Linux
- Linux裝置驅動探究第1天----spi驅動(1)Linux
- Linux裝置驅動程式 (轉)Linux
- 嵌入式Linux中platform平臺裝置模型的框架(實現LED驅動)LinuxPlatform模型框架
- 向嵌入式Linux移植實時裝置驅動程式(轉)Linux
- 嵌入式Linux中的LED驅動控制(裝置樹方式)Linux
- 嵌入式Linux驅動筆記(十七)------詳解V4L2框架(UVC驅動)Linux筆記框架
- 驅動Driver-MISC雜項驅動裝置
- linux 裝置驅動基本概念Linux
- Linux驅動實踐:如何編寫【 GPIO 】裝置的驅動程式?Linux
- 嵌入式Linux中的LED驅動控制(裝置樹方式)(續)Linux
- LED字元裝置驅動字元
- 基於匯流排裝置驅動模型的按鍵讀取驅動程式模型
- 學Linux驅動: 應該先了解驅動模型Linux模型
- linux核心匯流排驅動模型-驅動篇Linux模型
- Linux驅動之I2C匯流排裝置以及驅動Linux
- Linux下的硬體驅動——USB裝置(上)(驅動配置部分)(轉)Linux
- 在Linux中,什麼是裝置驅動程式?如何安裝和解除安裝裝置驅動程式?Linux
- linux裝置驅動編寫入門Linux
- linux裝置驅動編寫基礎Linux
- LINUX下的裝置驅動程式 (轉)Linux
- 《Linux裝置驅動開發詳解(第2版)》——第1章Linux裝置驅動概述及開發環境構建1.1裝置驅動的作用Linux開發環境