嵌入式Linux驅動筆記(十二)------通俗易懂式分析瞭解spi框架
你好!這裡是風箏的部落格,
歡迎和我一起交流。
之前講過i2c框架:通俗易懂式分析瞭解i2c框架
如果之前你看懂了,那其實spi框架也差不多。
同樣的,先上張圖:
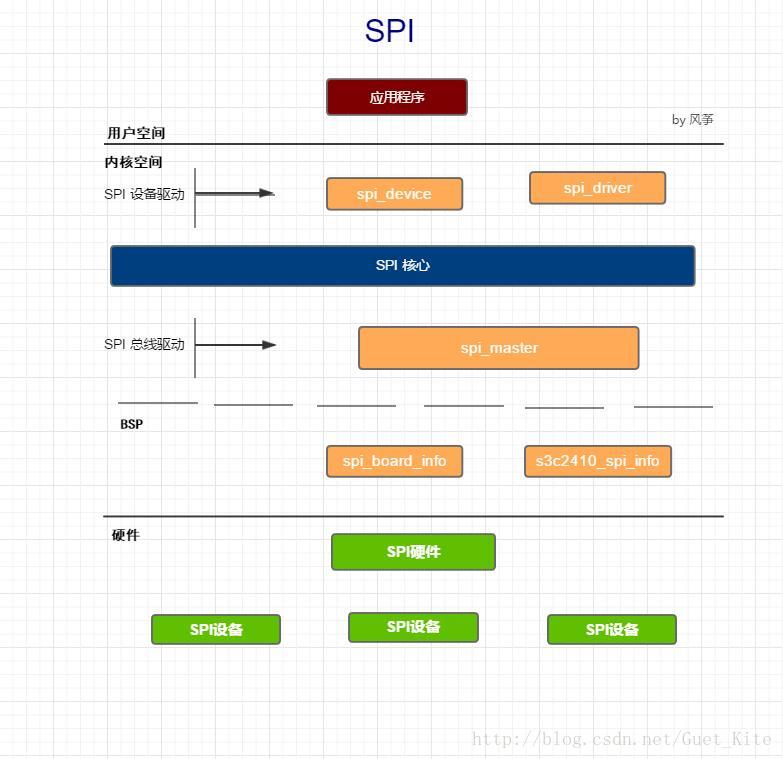
老規則,從上往下看起,以kernel4.8.17為例:
在mach-smdk2440.c檔案裡:
static struct platform_device *smdk2440_devices[] __initdata = {
    &s3c_device_ohci,
    &s3c_device_lcd,
    &s3c_device_wdt,
    &s3c_device_i2c0,
    &s3c_device_iis,
    &smdk2440_device_eth,
};
沒有spi的device,我們需要自己手動新增進去:
&s3c_device_spi0,
可以看到,他和s3c_device_i2c0是類似的:
static struct resource s3c_spi0_resource[] = {
    [0] = DEFINE_RES_MEM(S3C24XX_PA_SPI, SZ_32),
    [1] = DEFINE_RES_IRQ(IRQ_SPI0),
};

struct platform_device s3c_device_spi0 = {
    .name       = "s3c2410-spi",
    .id     = 0,
    .num_resources  = ARRAY_SIZE(s3c_spi0_resource),
    .resource   = s3c_spi0_resource,
    .dev        = {
        .dma_mask       = &samsung_device_dma_mask,
        .coherent_dma_mask  = DMA_BIT_MASK(32),
    }
};
name為”s3c2410-spi”。
接著看spi-s3c24xx.c檔案:
static struct platform_driver s3c24xx_spi_driver = {
    .probe      = s3c24xx_spi_probe,
    .remove     = s3c24xx_spi_remove,
    .driver     = {
        .name   = "s3c2410-spi",
        .pm = S3C24XX_SPI_PMOPS,
    },
};
module_platform_driver(s3c24xx_spi_driver);
這裡名字匹配,會呼叫probe函式:
static int s3c24xx_spi_probe(struct platform_device *pdev)
{
    /*省略......*/
    master = spi_alloc_master(&pdev->dev, sizeof(struct s3c24xx_spi));
    if (master == NULL) {
        dev_err(&pdev->dev, "No memory for spi_master\n");
        return -ENOMEM;
    }

    hw = spi_master_get_devdata(master);

    hw->master = master;
    hw->pdata = pdata = dev_get_platdata(&pdev->dev);
    hw->dev = &pdev->dev;
    /*省略......*/
    /* the spi->mode bits understood by this driver: */
    master->mode_bits = SPI_CPOL | SPI_CPHA | SPI_CS_HIGH;

    master->num_chipselect = hw->pdata->num_cs;
    master->bus_num = pdata->bus_num;
    master->bits_per_word_mask = SPI_BPW_MASK(8);

    /* setup the state for the bitbang driver */

    hw->bitbang.master         = hw->master;
    hw->bitbang.setup_transfer = s3c24xx_spi_setupxfer;
    hw->bitbang.chipselect     = s3c24xx_spi_chipsel;
    hw->bitbang.txrx_bufs      = s3c24xx_spi_txrx;

    hw->master->setup  = s3c24xx_spi_setup;

    /*省略......*/
    err = devm_request_irq(&pdev->dev, hw->irq, s3c24xx_spi_irq, 0,
                pdev->name, hw);
    /*省略......*/

    s3c24xx_spi_initialsetup(hw);

    /* register our spi controller */

    err = spi_bitbang_start(&hw->bitbang);
    if (err) {
        dev_err(&pdev->dev, "Failed to register SPI master\n");
        goto err_register;
    }

    return 0;
}這裡就涉及到spi_master了,SPI控制器負責按照設定的物理訊號格式在主控和spi裝置之間交換資料,SPI控制器資料是如何被傳輸的,而不關心資料的內容。SPI通用介面層用spi_master結構來表示一個spi控制器。
probe裡會對master裡的各種資料和回撥函式進行填充,如:
hw->bitbang.setup_transfer:計算預分頻係數並寫入暫存器
master->num_chipselect:控制器支援的片選數量,即能支援多少個spi裝置
hw->bitbang.chipselect:對硬體的設定,禁止或使能CS訊號
hw->master->setup:設定SPI模式
以及設定中斷:s3c24xx_spi_irq
注意這一句:hw->bitbang.txrx_bufs = s3c24xx_spi_txrx;
也就是s3c24xx_spi_txrx函式,注意一下,這個我們待會講。
之後主要就是呼叫spi_bitbang_start進行register SPI master了:
int spi_bitbang_start(struct spi_bitbang *bitbang)
{
    struct spi_master *master = bitbang->master;
    int ret;

    if (!master || !bitbang->chipselect)
        return -EINVAL;

    mutex_init(&bitbang->lock);

    if (!master->mode_bits)
        master->mode_bits = SPI_CPOL | SPI_CPHA | bitbang->flags;

    if (master->transfer || master->transfer_one_message)
        return -EINVAL;

    master->prepare_transfer_hardware = spi_bitbang_prepare_hardware;
    master->unprepare_transfer_hardware = spi_bitbang_unprepare_hardware;
    master->transfer_one = spi_bitbang_transfer_one;
    master->set_cs = spi_bitbang_set_cs;

    if (!bitbang->txrx_bufs) {
        bitbang->use_dma = 0;
        bitbang->txrx_bufs = spi_bitbang_bufs;
        if (!master->setup) {
            if (!bitbang->setup_transfer)
                bitbang->setup_transfer =
                     spi_bitbang_setup_transfer;
            master->setup = spi_bitbang_setup;
            master->cleanup = spi_bitbang_cleanup;
        }
    }

    /* driver may get busy before register() returns, especially
     * if someone registered boardinfo for devices
     */
    ret = spi_register_master(spi_master_get(master));
    if (ret)
        spi_master_put(master);

    return 0;
}
這裡就是開始對master進行設定了:
master->prepare_transfer_hardware:在發起一個資料傳送過程前,給控制器驅動一個機會,申請或釋放某些必要的硬體資源。
master->unprepare_transfer_hardware:在發起一個資料傳送過程後,清理回撥函式。
master->setup:修改控制器的工作模式或引數
bitbang->setup_transfer:設定資料傳輸速率。
master->cleanup:SPI從裝置被釋放時,該回撥函式會被呼叫,以便釋放該從裝置所佔用的硬體資源。
等等……
這裡也要注意一個:master->transfer_one = spi_bitbang_transfer_one;
這個master->transfer_one和master->transfer_one_message很像,不要搞混了。先留意一下spi_bitbang_transfer_one這個函式。
這裡注意了,不要對master->transfer || master->transfer_one_message進行回撥函式填充!
接著呼叫spi_register_master函式:
int spi_register_master(struct spi_master *master)
{
    /*省略......*/
    /* convention:  dynamically assigned bus IDs count down from the max */
    if (master->bus_num < 0) {
        /* FIXME switch to an IDR based scheme, something like
         * I2C now uses, so we can't run out of "dynamic" IDs
         */
        master->bus_num = atomic_dec_return(&dyn_bus_id);
        dynamic = 1;
    }

    INIT_LIST_HEAD(&master->queue);
    spin_lock_init(&master->queue_lock);
    spin_lock_init(&master->bus_lock_spinlock);
    mutex_init(&master->bus_lock_mutex);
    mutex_init(&master->io_mutex);
    master->bus_lock_flag = 0;
    init_completion(&master->xfer_completion);
    if (!master->max_dma_len)
        master->max_dma_len = INT_MAX;

    /* register the device, then userspace will see it.
     * registration fails if the bus ID is in use.
     */
    dev_set_name(&master->dev, "spi%u", master->bus_num);
    status = device_add(&master->dev);
    if (status < 0)
        goto done;
    dev_dbg(dev, "registered master %s%s\n", dev_name(&master->dev),
            dynamic ? " (dynamic)" : "");

    /* If we're using a queued driver, start the queue */
    if (master->transfer)
        dev_info(dev, "master is unqueued, this is deprecated\n");
    else {
        status = spi_master_initialize_queue(master);
        if (status) {
            device_del(&master->dev);
            goto done;
        }
    }
    /* add statistics */
    spin_lock_init(&master->statistics.lock);

    mutex_lock(&board_lock);
    list_add_tail(&master->list, &spi_master_list);
    list_for_each_entry(bi, &board_list, list)
        spi_match_master_to_boardinfo(master, &bi->board_info);
    mutex_unlock(&board_lock);

    /* Register devices from the device tree and ACPI */
    of_register_spi_devices(master);
    acpi_register_spi_devices(master);
done:
    return status;
}
這算是一個比較關鍵的函式,裡面:
master->bus_num,代表的是掛在哪條匯流排上,spi0或者spi1之類的。
接著初始化master->queue,這裡,queue,佇列!為什麼會有佇列呢?
為了解決多個不同的SPI裝置共享SPI控制器而帶來的訪問衝突,spi_bitbang使用核心提供的工作佇列(workqueue)。workqueue是Linux核心中定義的一種回撥處理方式。採用這種方式需要傳輸資料時,不直接完成資料的傳輸,而是將要傳輸的工作分裝成相應的訊息(spi_message),傳送給對應的workqueue,由與workqueue關聯的核心守護執行緒(daemon)負責具體的執行。由於workqueue會將收到的訊息按時間先後順序排列,這樣就是對裝置的訪問嚴格序列化,解決了衝突。
所以SPI的通訊是通過訊息佇列機制。
接著設定名字:dev_set_name(&master->dev, “spi%u”, master->bus_num);
就是剛剛說的spi0、spi1……
然後,
if (master->transfer)
dev_info(dev, “master is unqueued, this is deprecated\n”);
else {
status = spi_master_initialize_queue(master);
if (status) {
device_del(&master->dev);
goto done;
}
}
之前說過,我們沒有對master->transfer進行填充,所以會進入spi_master_initialize_queue函式,
最後,
list_add_tail(&master->list, &spi_master_list);
list_for_each_entry(bi, &board_list, list)
spi_match_master_to_boardinfo(master, &bi->board_info);
將master->list新增到spi_master_list列表,迴圈遍歷spi裝置配置結構體,然後與spi控制的匯流排號匹配,成功則生成新spi裝置。
我們來看下spi_master_initialize_queue函式:
static int spi_master_initialize_queue(struct spi_master *master)
{
    int ret;

    master->transfer = spi_queued_transfer;
    if (!master->transfer_one_message)
        master->transfer_one_message = spi_transfer_one_message;

    /* Initialize and start queue */
    ret = spi_init_queue(master);
    if (ret) {
        dev_err(&master->dev, "problem initializing queue\n");
        goto err_init_queue;
    }
    master->queued = true;
    ret = spi_start_queue(master);
    if (ret) {
        dev_err(&master->dev, "problem starting queue\n");
        goto err_start_queue;
    }

    return 0;

err_start_queue:
    spi_destroy_queue(master);
err_init_queue:
    return ret;
}
這裡,系統就會自動幫我們填充master->transfer以及master->transfer_one_message了。
就是spi的通訊函式。從名字看,這兩個都是通訊函式,那他們兩個是什麼關係呢?別急,待會講。
然後呼叫spi_init_queue和spi_start_queue函式初始化佇列並啟動工作執行緒(spi_pump_messages函式):init_kthread_work(&master->pump_messages, spi_pump_messages)
queue_kthread_work(&master->kworker, &master->pump_messages)
.
最後,我們來看spi是怎麼讀寫的,在spi裝置驅動層提供了兩種資料傳輸方式。一種是半雙工方式,另一種就是全雙工方式。write方法提供了半雙工讀訪問,read方法提供了半雙工寫訪問。
在spi.h檔案裡,以寫函式為例:
static inline int
spi_write(struct spi_device *spi, const void *buf, size_t len)
{
    struct spi_transfer t = {
            .tx_buf     = buf,
            .len        = len,
        };
    struct spi_message  m;

    spi_message_init(&m);
    spi_message_add_tail(&t, &m);
    return spi_sync(spi, &m);
}
初始化spi_message,然後把spi_transfer連結到spi_message尾部。最後呼叫spi_sync函式,呼叫過程:
spi_sync
        __spi_sync(spi, message);
            __spi_queued_transfer(spi, message, false);//這個就是master->transfer
            __spi_pump_messages(master, false);
            wait_for_completion(&done);
記得之前說的master->transfer和master->transfer_one_message的關係嗎?
先進入__spi_queued_transfer函式:
static int __spi_queued_transfer(struct spi_device *spi,
                 struct spi_message *msg,
                 bool need_pump)
{
    struct spi_master *master = spi->master;
    unsigned long flags;

    spin_lock_irqsave(&master->queue_lock, flags);

    if (!master->running) {
        spin_unlock_irqrestore(&master->queue_lock, flags);
        return -ESHUTDOWN;
    }
    msg->actual_length = 0;
    msg->status = -EINPROGRESS;
    list_add_tail(&msg->queue, &master->queue);
    if (!master->busy && need_pump)
        queue_kthread_work(&master->kworker, &master->pump_messages);

    spin_unlock_irqrestore(&master->queue_lock, flags);
    return 0;
}
這裡,master->transfer裡,先將攜帶資料的結構體spi_message掛到master->queue上。每一次資料傳輸都將要傳輸的資料包裝成結構體spi_message傳遞。
接著將該傳輸任務新增到工作佇列頭master->kworker,在某個合適的時間, master->pump_messages將被排程執行,也就是spi_pump_messages函式將被呼叫:
所以他並不涉及到真正的資料傳輸。
看下spi_pump_messages函式:
static void spi_pump_messages(struct kthread_work *work)
{
    struct spi_master *master =
        container_of(work, struct spi_master, pump_messages);

    __spi_pump_messages(master, true);
}
再看__spi_pump_messages函式,裡面有一句:
ret = master->transfer_one_message(master, master->cur_msg);
    if (ret) {
        dev_err(&master->dev,
            "failed to transfer one message from queue\n");
        goto out;
    }
這裡就會呼叫到master->transfer_one_message了,進行資料傳輸。
最後就會wait_for_completion阻塞等待傳輸完成了。
那他到底是怎麼傳輸的呢?看下master->transfer_one_message函式:
static int spi_transfer_one_message(struct spi_master *master,
                    struct spi_message *msg)
{
    struct spi_transfer *xfer;
    bool keep_cs = false;
    int ret = 0;
    unsigned long long ms = 1;
    struct spi_statistics *statm = &master->statistics;
    struct spi_statistics *stats = &msg->spi->statistics;

    spi_set_cs(msg->spi, true);//spi片選啟用

    SPI_STATISTICS_INCREMENT_FIELD(statm, messages);
    SPI_STATISTICS_INCREMENT_FIELD(stats, messages);

    list_for_each_entry(xfer, &msg->transfers, transfer_list) {//從spi_message結構的transfers連結串列中獲取spi_transfer結構
        trace_spi_transfer_start(msg, xfer);

        spi_statistics_add_transfer_stats(statm, xfer, master);
        spi_statistics_add_transfer_stats(stats, xfer, master);

        if (xfer->tx_buf || xfer->rx_buf) {
            reinit_completion(&master->xfer_completion);

            ret = master->transfer_one(master, msg->spi, xfer);
            /*部分省略......*/

            if (ret > 0) {
                ret = 0;
                ms = 8LL * 1000LL * xfer->len;
                do_div(ms, xfer->speed_hz);
                ms += ms + 100; /* some tolerance */

                if (ms > UINT_MAX)
                    ms = UINT_MAX;

                ms = wait_for_completion_timeout(&master->xfer_completion,
                                 msecs_to_jiffies(ms));
            }

            /*部分省略......*/
        } else {
            if (xfer->len)
                dev_err(&msg->spi->dev,
                    "Bufferless transfer has length %u\n",
                    xfer->len);
        }

        trace_spi_transfer_stop(msg, xfer);

        if (msg->status != -EINPROGRESS)
            goto out;

        if (xfer->delay_usecs)
            udelay(xfer->delay_usecs);

        if (xfer->cs_change) {
            if (list_is_last(&xfer->transfer_list,
                     &msg->transfers)) {
                keep_cs = true;//不用重新片選,繼續下一個message的傳輸
            } else {
                spi_set_cs(msg->spi, false);
                udelay(10);
                spi_set_cs(msg->spi, true);
            }
        }

        msg->actual_length += xfer->len;
    }

out:
    if (ret != 0 || !keep_cs)
        spi_set_cs(msg->spi, false);

    if (msg->status == -EINPROGRESS)
        msg->status = ret;//所用spi_message傳輸完畢

    if (msg->status && master->handle_err)
        master->handle_err(master, msg);

    spi_res_release(master, msg);

    spi_finalize_current_message(master);

    return ret;
}
這裡可以看出呼叫了master->transfer_one(master, msg->spi, xfer)以及spi_finalize_current_message(master);
master->transfer_one就是我們之前說的,spi_finalize_current_message函式裡會呼叫mesg->complete,使得wait_for_completion不需要再阻塞等待了。
我們繼續看下master->transfer_one函式:
static int spi_bitbang_transfer_one(struct spi_master *master,
                    struct spi_device *spi,
                    struct spi_transfer *transfer)
{
    struct spi_bitbang *bitbang = spi_master_get_devdata(master);
    int status = 0;

    if (bitbang->setup_transfer) {
        status = bitbang->setup_transfer(spi, transfer);
        if (status < 0)
            goto out;
    }

    if (transfer->len)
        status = bitbang->txrx_bufs(spi, transfer);

    if (status == transfer->len)
        status = 0;
    else if (status >= 0)
        status = -EREMOTEIO;

out:
    spi_finalize_current_transfer(master);

    return status;
}
函式裡面,一開始就呼叫bitbang->setup_transfer對SPI進行設定,然後就會呼叫bitbang->txrx_bufs了,記得之前說過的嗎?
static int s3c24xx_spi_txrx(struct spi_device *spi, struct spi_transfer *t)
{
    struct s3c24xx_spi *hw = to_hw(spi);

    hw->tx = t->tx_buf;
    hw->rx = t->rx_buf;
    hw->len = t->len;
    hw->count = 0;

    init_completion(&hw->done);

    hw->fiq_inuse = 0;
    if (s3c24xx_spi_usefiq(hw) && t->len >= 3)
        s3c24xx_spi_tryfiq(hw);

    /* send the first byte */
    writeb(hw_txbyte(hw, 0), hw->regs + S3C2410_SPTDAT);

    wait_for_completion(&hw->done);
    return hw->count;
}
這裡就是SPI的傳輸了,看註釋,這裡雖然只傳送第一位元組,但是中斷裡會傳送完其它的位元組(並接收資料), 直到所有的資料傳送完畢且所要接收的資料接收完畢(首要)才返回。
static irqreturn_t s3c24xx_spi_irq(int irq, void *dev)
{
    struct s3c24xx_spi *hw = dev;
    unsigned int spsta = readb(hw->regs + S3C2410_SPSTA);
    unsigned int count = hw->count;

    if (spsta & S3C2410_SPSTA_DCOL) {
        dev_dbg(hw->dev, "data-collision\n");//檢測衝突
        complete(&hw->done);
        goto irq_done;
    }

    if (!(spsta & S3C2410_SPSTA_READY)) {
        dev_dbg(hw->dev, "spi not ready for tx?\n");//裝置忙
        complete(&hw->done);
        goto irq_done;
    }

    if (!s3c24xx_spi_usingfiq(hw)) {
        hw->count++;

        if (hw->rx)
            hw->rx[count] = readb(hw->regs + S3C2410_SPRDAT);//接收資料

        count++;

        if (count < hw->len)
            writeb(hw_txbyte(hw, count), hw->regs + S3C2410_SPTDAT);//傳送需要的資料或者傳送0
        else
            complete(&hw->done);//傳送接收完畢
    } else {
        hw->count = hw->len;
        hw->fiq_inuse = 0;

        if (hw->rx)
            hw->rx[hw->len-1] = readb(hw->regs + S3C2410_SPRDAT);

        complete(&hw->done);
    }

 irq_done:
    return IRQ_HANDLED;
}
所以說,spi_sync函式是發起一個同步傳輸的阻塞API,它會通過master->transfer把spi_message結構掛在spi_master的queue欄位下,然後啟動專門為spi傳輸準備的核心工作執行緒spi_pump_messages,把該spi_message從佇列中移除,然後呼叫master->prepare_transfer_hardware回撥來讓控制器驅動準備必要的硬體資源,最後 master->transfer_one_message來實際處理message的傳輸工作,然後等待傳輸的完成後呼叫mesg->complete,表明傳輸完成,以通知協議驅動程式準備下一幀資料,wait_for_completion不需要再等待了。
最後,還有其他的API傳輸函式供我們使用:
int spi_write_then_read(struct spi_device *spi, const void *txbuf, unsigned n_tx, void *rxbuf, unsigned n_rx); —- 先寫後讀。
static inline ssize_t spi_w8r8(struct spi_device *spi, u8 cmd) —- 寫8位,然後讀8位。
static inline ssize_t spi_w8r16(struct spi_device *spi, u8 cmd) —- 寫8位,然後讀16位。
參考:https://blog.csdn.net/droidphone/article/details/24663659
下一章講2440怎麼移植使用SPI驅動:spi裝置之RFID-rc522驅動
相關文章
- 嵌入式Linux驅動筆記(十)------通俗易懂式分析瞭解i2c框架Linux筆記框架
- 嵌入式Linux驅動筆記(十三)------spi裝置之RFID-rc522驅動Linux筆記
- 嵌入式Linux驅動筆記(十七)------詳解V4L2框架(UVC驅動)Linux筆記框架
- 嵌入式Linux驅動筆記(十四)------詳解clock時鐘(CCF)框架及clk_get函式Linux筆記框架函式
- SPI驅動框架一框架
- 嵌入式Linux驅動筆記(十六)------裝置驅動模型(kobject、kset、ktype)Linux筆記模型Object
- 嵌入式Linux驅動筆記(十八)------淺析V4L2框架之ioctlLinux筆記框架
- 嵌入式Linux驅動學習筆記(十六)------裝置驅動模型(kobject、kset、ktype)Linux筆記模型Object
- 嵌入式Linux驅動筆記(十一)------i2c裝置之mpu6050驅動Linux筆記
- 嵌入式Linux驅動筆記(九)------dts裝置樹在2440使用Linux筆記
- SPI轉can晶片CSM300詳解以及Linux驅動移植除錯筆記晶片Linux除錯筆記
- 嵌入式Linux驅動筆記(十五)------編譯使用tslib支援LCD觸控式螢幕Linux筆記編譯
- SPI驅動示例
- 嵌入式Linux驅動學習筆記(十五)------編譯使用tslib支援LCD觸控式螢幕Linux筆記編譯
- 嵌入式Linux中的LED驅動控制(續)Linux
- Linux裝置驅動探究第1天----spi驅動(1)Linux
- 嵌入式Linux中platform平臺裝置模型的框架(實現LED驅動)LinuxPlatform模型框架
- Linux晶片驅動之SPI ControllerLinux晶片Controller
- 【原創】Linux PCI驅動框架分析(一)Linux框架
- 【原創】Linux PCI驅動框架分析(二)Linux框架
- 框架-SPI四種模式+通用裝置驅動實現框架模式
- 嵌入式Linux中的LED驅動控制(基於misc)Linux
- 嵌入式筆記5.1 定時器詳解筆記定時器
- ArmSoM系列板卡 嵌入式Linux驅動開發實戰指南 之 字元裝置驅動Linux字元
- 向嵌入式Linux移植實時裝置驅動程式(轉)Linux
- 嵌入式Linux中的LED驅動控制(裝置樹方式)Linux
- 嵌入式系統基礎知識:瞭解嵌入式系統
- 十二、Spring Boot 嵌入式 Servlet 容器啟動原理Spring BootServlet
- 嵌入式Linux下3G無線上網路卡的驅動Linux
- 嵌入式Linux中的LED驅動控制(裝置樹方式)(續)Linux
- 筆記:瞭解Elasticsearch筆記Elasticsearch
- 【Linux SPI】RFID RC522 裝置驅動Linux
- 痞子衡嵌入式:瑞薩RA系列FSP韌體庫分析之外設驅動
- 一個嵌入式Linux系統的鍵盤驅動實現(轉)Linux
- 嵌入式之Makefile學習筆記筆記
- 嵌入式之uboot原始碼分析-啟動第二階段學習筆記(上篇)boot原始碼筆記
- 嵌入式Linux中的LED驅動控制(使用多個次裝置號)Linux
- ES 筆記三十二:文件分散式儲存筆記分散式