原文連結:
http://blog.csdn.net/u013718120/article/details/55096393
本篇部落格由江清清技術專欄獨家釋出,轉載請註明出處。專案已開源到github,連結為:ReactNativeApp,歡迎大家fork,star
上一篇和大家分享瞭如何在Android 現有App中整合React Native。本篇部落格同樣是react Native中比較經典的內容:熱更新部署。
android原生App中我們實現熱修復有很多種選擇:Tinker、hotFix、Qzone的熱更新等等。基本的思路都是大同小異的。React
Native中的熱更新有點像App的版本更新,也就是根據查詢server端的版本和手機端目前App的版本進行對比,然後來執行是否更新的操作。根本原因在於react
native的載入啟動機制:React Native會將一系列資源打包成js bundle檔案,系統載入js bundle檔案,解析並渲染。所以,React Native熱更新的根本原理就是更換js
bundle檔案,並重新載入,新的內容就完美的展示出來了。微軟為我們提供了CodePush來簡化熱更新的操作,但是由於速度等原因在國內並沒有備受青睞。本篇內容就以自己伺服器來更新的方式實現。
一、原理分析
前面簡單的說了些基本原理,接下來先上一張具體的更新流程圖:

上面流程圖中展示瞭如何實現更新的步驟,可以總結為進入App根據版本檢查是否需要更新:
(1)更新:
下載最新JsBundle檔案以及所需要的圖片資源等,下載完成後解析最新JsBundle檔案。
(2)不更新:
判斷本地是否還有快取的JsBundle檔案:
1>存在:
本地存在JsBundle,即有過熱更新操作。那麼App直接載入在快取目錄下的JsBundle檔案。
2>不存在:
本地不存在JsBundle,即之前從未有過熱更新操作。那麼App只能使用初始化時打包在assets目錄下的index.android.bundle檔案。
Ok,根據上面的流程,我們來看下程式碼實現過程。
二、功能實現
(1)檢查是否需要更新
-
<span style="color:#333333;">
-
-
-
private void checkVersion() {
-
-
if(true) {
-
-
Toast.makeText(this, "開始下載", Toast.LENGTH_SHORT).show();
-
downLoadBundle();
-
}
-
}</span>
實現步驟即請求伺服器中的版本號,然後與本地版本號進行對比,此處我為了程式碼清晰易懂,直接執行下載更新的流程。
(2)Android為我們提供了下載工具類:DownLoadManager,我們使用它來執行下載
-
<span style="color:#333333;">
-
-
-
private void downLoadBundle() {
-
-
-
zipfile = new File(FileConstant.JS_PATCH_LOCAL_PATH);
-
if(zipfile != null && zipfile.exists()) {
-
zipfile.delete();
-
}
-
-
DownloadManager downloadManager = (DownloadManager) getSystemService(Context.DOWNLOAD_SERVICE);
-
DownloadManager.Request request = new DownloadManager
-
.Request(Uri.parse(FileConstant.JS_BUNDLE_REMOTE_URL));
-
request.setNotificationVisibility(DownloadManager.Request.VISIBILITY_HIDDEN);
-
request.setAllowedNetworkTypes(DownloadManager.Request.NETWORK_MOBILE| DownloadManager.Request.NETWORK_WIFI);
-
request.setDestinationUri(Uri.parse("file://"+ FileConstant.JS_PATCH_LOCAL_PATH));
-
mDownLoadId = downloadManager.enqueue(request);
-
}</span>
首先去判斷是否存在有下載的更新壓縮包,如果有,則先刪除舊的,然後下載最新壓縮包。
(3)下載完成後,DownLoadManager會發出一個DownloadManager.ACTION_DOWNLOAD_COMPLETE的廣播,在收到廣播後,對比下載任務ID
-
<span style="color:#333333;">
-
-
-
public class CompleteReceiver extends BroadcastReceiver {
-
-
@Override
-
public void onReceive(Context context, Intent intent) {
-
long completeId = intent.getLongExtra(DownloadManager.EXTRA_DOWNLOAD_ID,-1);
-
if(completeId == mDownLoadId) {
-
-
RefreshUpdateUtils.decompression();
-
zipfile.delete();
-
-
-
-
startActivity(new Intent(MainActivity.this,MyReactActivity.class));
-
}
-
}
-
}</span>
因為我們下載的是Zip壓縮檔案(Zip壓縮檔案體積下,有效控制了由於更新檔案大以及圖片資源佔用給使用者帶來消耗流量的問題),所以我們需要先解壓
(4)解壓Zip
-
<span style="color:#333333;">
-
-
-
public static void decompression() {
-
-
try {
-
-
ZipInputStream inZip = new ZipInputStream(new FileInputStream(FileConstant.JS_PATCH_LOCAL_PATH));
-
ZipEntry zipEntry;
-
String szName;
-
try {
-
while((zipEntry = inZip.getNextEntry()) != null) {
-
-
szName = zipEntry.getName();
-
if(zipEntry.isDirectory()) {
-
-
szName = szName.substring(0,szName.length()-1);
-
File folder = new File(FileConstant.JS_PATCH_LOCAL_FOLDER + File.separator + szName);
-
folder.mkdirs();
-
-
}else{
-
-
File file1 = new File(FileConstant.JS_PATCH_LOCAL_FOLDER + File.separator + szName);
-
boolean s = file1.createNewFile();
-
FileOutputStream fos = new FileOutputStream(file1);
-
int len;
-
byte[] buffer = new byte[1024];
-
-
while((len = inZip.read(buffer)) != -1) {
-
fos.write(buffer, 0 , len);
-
fos.flush();
-
}
-
-
fos.close();
-
}
-
}
-
} catch (IOException e) {
-
e.printStackTrace();
-
}
-
inZip.close();
-
} catch (FileNotFoundException e) {
-
e.printStackTrace();
-
} catch (IOException e) {
-
e.printStackTrace();
-
}
-
}</span>
(5)解壓完成後,載入最新Bundle和圖片資源
如何控制RN載入Bundle的方式呢?沒錯,0.26版本之後的RN系統在ReactApplication下的ReactNativeHost為我們提供了getJsBundleFile方法,在該方法中預設返回null,即載入assets下的bundle檔案。我們可以根據條件來載入不同目錄下的bundle檔案即可
-
<span style="color:#333333;">
-
-
-
public class MainApplication extends Application implements ReactApplication {
-
-
private static MainApplication instance;
-
private static final CommPackage mCommPackage = new CommPackage();
-
-
@Override
-
public void onCreate() {
-
super.onCreate();
-
instance = this;
-
SoLoader.init(this,false);
-
}
-
-
private final ReactNativeHost mReactNativeHost = new ReactNativeHost(this) {
-
-
@Nullable
-
@Override
-
protected String getJSBundleFile() {
-
File file = new File (FileConstant.JS_BUNDLE_LOCAL_PATH);
-
if(file != null && file.exists()) {
-
return FileConstant.JS_BUNDLE_LOCAL_PATH;
-
} else {
-
return super.getJSBundleFile();
-
}
-
}
-
-
@Override
-
public boolean getUseDeveloperSupport() {
-
return BuildConfig.DEBUG;
-
}
-
-
@Override
-
protected List<ReactPackage> getPackages() {
-
return Arrays.<ReactPackage>asList(
-
new MainReactPackage(),
-
mCommPackage
-
);
-
}
-
};
-
-
@Override
-
public ReactNativeHost getReactNativeHost() {
-
return mReactNativeHost;
-
}
-
}</span>
在當我們下載好最新更新檔案後,跳轉到RN介面,即會執行getJSBundleFile方法來執行載入Bundle檔案的方式。在實際應用當中,我們可以在Splash頁面去執行檢查更新下載,然後在跳轉到RN介面時,最新檔案就會呈現出來。
如何獲取最新的bundle檔案和圖片資源呢?我們在RN專案根目執行以下命令來得到bundle檔案和圖片資源:
-
react-native bundle --entry-file index.android.js --bundle-output ./bundle/index.android.bundle --platform android --assets-dest ./bundle --dev false
(1)--entry 入口js檔案,android系統就是index.android.js,iOS系統就是index.ios.js
(2)--bundle-output 生成的bundle檔案路徑
(3)--platform 平臺
(4)--assets-dest 圖片資源的輸出目錄
(5)--dev 是否為開發版本,打正式版的安裝包時我們將其賦值為false
執行命令之前,首先要在根目錄下建立好bundle資料夾,bundle檔案和圖片資源將會輸出到已建立好的bundle資料夾下。
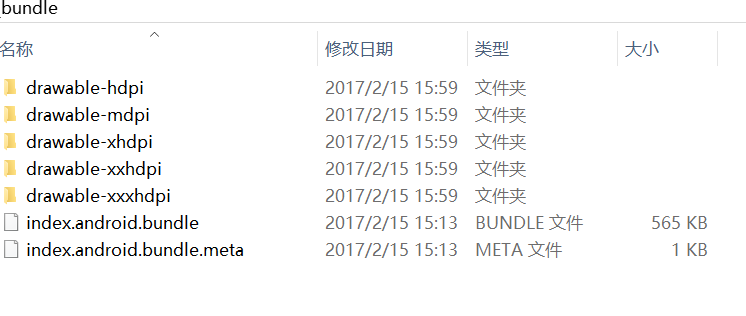
解壓後的最新更新檔案:

三、差異化更新
到此,我們便完成了程式碼的熱更新工作。大家可能會說,如果bundle太大的情況下怎麼辦呢?沒錯,這個問題同樣在部落格開始也提到了。打包成zip也是為了減小更新檔案體積,減少使用者流量消耗,同樣,我們也可以生成用生成補丁包的方式來進一步減小更新包zip的體積。
初始專案釋出時,生成並保留一份index.android.bundle檔案。
有版本更新時,生成新的index.android.bundle檔案,使用google-diff-match-patch對比兩個檔案,並生成差異補丁檔案。app下載補丁檔案,再使用google-diff-match-patch和assets目錄下的初始版本合併,生成新的index.android.bundle檔案。
1.新增google-diff-match-patch庫
google-diff-match-patch庫包含了多種程式語言的庫檔案,我們使用其中的Java版本,所以我將其提取出來,方便大家下載使用:
google-diff-match-patch-java
下載後將其新增到專案目錄即可。
2.生成補丁包
-
<span style="color:#333333;">
-
String o = RefreshUpdateUtils.getStringFromPat("C:/Users/lenovo/Desktop/old.bundle");
-
String n = RefreshUpdateUtils.getStringFromPat("C:/Users/lenovo/Desktop/new.bundle");
-
-
-
diff_match_patch dmp = new diff_match_patch();
-
LinkedList<Diff> diffs = dmp.diff_main(o, n);
-
-
-
LinkedList<Patch> patches = dmp.patch_make(diffs);
-
-
-
String patchesStr = dmp.patch_toText(patches);
-
-
try {
-
-
Files.write(Paths.get("C:/Users/lenovo/Desktop/patches.pat"), patchesStr.getBytes());
-
} catch (IOException e) {
-
-
e.printStackTrace();
-
}</span>
-
<span style="color:#333333;"> public static String getStringFromPat(String patPath) {
-
-
FileReader reader = null;
-
String result = "";
-
-
try {
-
reader = new FileReader(patPath);
-
int ch = reader.read();
-
StringBuilder sb = new StringBuilder();
-
while (ch != -1) {
-
sb.append((char)ch);
-
ch = reader.read();
-
reader.close();
-
result = sb.toString();
-
} catch (FileNotFoundException e) {
-
e.printStackTrace();
-
} catch (IOException e) {
-
e.printStackTrace();
-
}
-
return result;
-
}</span>
3.下載完成,解壓後執行mergePatAndAsset方法將Assets目錄下的index.android.bundle和pat檔案合併
-
<span style="color:#333333;">
-
-
-
public class CompleteReceiver extends BroadcastReceiver {
-
-
@Override
-
public void onReceive(Context context, Intent intent) {
-
long completeId = intent.getLongExtra(DownloadManager.EXTRA_DOWNLOAD_ID,-1);
-
if(completeId == mDownLoadId) {
-
-
RefreshUpdateUtils.decompression();
-
zipfile.delete();
-
-
-
mergePatAndAsset();
-
startActivity(new Intent(MainActivity.this,MyReactActivity.class));
-
}
-
}
-
}</span>
4.合併
-
<span style="color:#333333;">
-
-
-
private void mergePatAndAsset() {
-
-
-
String assetsBundle = RefreshUpdateUtils.getJsBundleFromAssets(getApplicationContext());
-
-
String patcheStr = RefreshUpdateUtils.getStringFromPat(FileConstant.JS_PATCH_LOCAL_FILE);
-
-
diff_match_patch dmp = new diff_match_patch();
-
-
LinkedList<diff_match_patch.Patch> pathes = (LinkedList<diff_match_patch.Patch>) dmp.patch_fromText(patcheStr);
-
-
Object[] bundleArray = dmp.patch_apply(pathes,assetsBundle);
-
-
try {
-
Writer writer = new FileWriter(FileConstant.JS_BUNDLE_LOCAL_PATH);
-
String newBundle = (String) bundleArray[0];
-
writer.write(newBundle);
-
writer.close();
-
-
File patFile = new File(FileConstant.JS_PATCH_LOCAL_FILE);
-
patFile.delete();
-
} catch (IOException e) {
-
e.printStackTrace();
-
}
-
}</span>
從上述程式碼中我們看到,合併分為如下過程:
(1)獲取Assets目錄下的bundle檔案,轉換為字串
(2)解析.pat檔案將其轉換為字串
(3)呼叫patch_fromText獲取patches補丁包
(4)呼叫patch_apply方法將第四步中生成patches補丁包與第一步中獲取的bundle合併生成新的bundle
(5)儲存bundle
5.讀取pat檔案的方法:
-
<span style="color:#333333;">
-
-
-
-
-
public static String getStringFromPat(String patPath) {
-
-
FileReader reader = null;
-
String result = "";
-
try {
-
reader = new FileReader(patPath);
-
int ch = reader.read();
-
StringBuilder sb = new StringBuilder();
-
while (ch != -1) {
-
sb.append((char)ch);
-
ch = reader.read();
-
}
-
reader.close();
-
result = sb.toString();
-
} catch (FileNotFoundException e) {
-
e.printStackTrace();
-
} catch (IOException e) {
-
e.printStackTrace();
-
}
-
return result;
-
}</span>
6.讀取Assets目錄下的bundle檔案:
-
<span style="color:#333333;">
-
-
-
-
public static String getJsBundleFromAssets(Context context) {
-
-
String result = "";
-
try {
-
-
InputStream is = context.getAssets().open(FileConstant.JS_BUNDLE_LOCAL_FILE);
-
int size = is.available();
-
byte[] buffer = new byte[size];
-
is.read(buffer);
-
is.close();
-
result = new String(buffer,"UTF-8");
-
-
} catch (IOException e) {
-
e.printStackTrace();
-
}
-
return result;
-
}</span>
以上步驟執行完成後,我們就獲取到了新的bundle檔案,繼而載入新的bundle檔案,實現React Native熱更新。上述差異包更新方式只能更新不含圖片引用的bundle程式碼檔案,如果需要增量更新圖片,需要修改React Native原始碼
四、修改React Native圖片載入原始碼
渲染圖片的方法在:node_modules / react-native / Libraries / Image /AssetSourceResolver.js 下:
-
defaultAsset(): ResolvedAssetSource {
-
if (this.isLoadedFromServer()) {
-
return this.assetServerURL();
-
}
-
-
if (Platform.OS === 'android') {
-
return this.isLoadedFromFileSystem() ?
-
this.drawableFolderInBundle() :
-
this.resourceIdentifierWithoutScale();
-
} else {
-
return this.scaledAssetPathInBundle();
-
}
-
}
defaultAsset方法中根據平臺的不同分別執行不同的圖片載入邏輯。重點我們來看android platform:
drawableFolderInBundle方法為在存在離線Bundle檔案時,從Bundle檔案所在目錄載入圖片。resourceIdentifierWithoutScale方法從Asset資源目錄下載入。由此,我們需要修改isLoadedFromFileSystem方法中的邏輯。
(1)在AssetSourceResolver.js中增加增量圖片全域性名稱變數
-
-
-
-
-
-
-
-
-
-
-
-
'use strict';
-
-
export type ResolvedAssetSource = {
-
__packager_asset: boolean,
-
width: number,
-
height: number,
-
uri: string,
-
scale: number,
-
};
-
-
import type { PackagerAsset } from 'AssetRegistry';
-
-
var patchImgNames = '';
-
const PixelRatio = require('PixelRatio');const Platform = require('Platform');const assetPathUtils = require('../../local-cli/bundle/assetPathUtils');const invariant = require('fbjs/lib/invariant');function getScaledAssetPath(asset): string { var scale = AssetSourceResolver.pickScale(asset.scales, PixelRatio.get()); var scaleSuffix = scale === 1 ? '' : '@' + scale + 'x'; var assetDir = assetPathUtils.getBasePath(asset); return assetDir + '/' + asset.name + scaleSuffix + '.' + asset.type;}
-
剩餘程式碼略....
(2)修改isLoadedFromFileSystem方法
-
isLoadedFromFileSystem(): boolean {
-
var imgFolder = getAssetPathInDrawableFolder(this.asset);
-
var imgName = imgFolder.substr(imgFolder.indexOf("/") + 1);
-
var isPatchImg = patchImgNames.indexOf("|"+imgName+"|") > -1;
-
return !!this.bundlePath && isPatchImg;
-
}
patchImgNames是增量更新的圖片名稱字串全域性快取,其中包含所有更新和修改的圖片名稱,並且以 “|”隔開。當系統載入圖片時,如果在快取中存在該圖片名,證明是我們增量更新或修改的圖片,所以需要系統從Bundle檔案所在目錄下載入。否則直接從原有Asset資源載入。
(3)每當有圖片增量更新,修改patchImgName,例如images_ic_1.png和images_ic_2.png為增量更新或修改的圖片
-
var patchImgNames = ' |images_ic_1.png|images_ic_2.png |';
注:生成bundle目錄時,圖片資源都會放在統一目錄下(drawable-mdpi),如果引用圖片包含其它路徑,例如require(“./img/test1.png”),圖片在img目錄下,則圖片載入時會自動將img目錄轉換為圖片名稱:”img_test1.png”,即圖片所在資料夾名稱會作為圖片名的字首。此時圖片名配置檔案中的名稱也需要宣告為”img_test1.png”,例如:"
| img_test1.png | img_test2.png | "
(4)重新打包
-
react-native bundle --entry-file index.android.js --bundle-output ./bundle/index.android.bundle--platform android --assets-dest ./bundle --dev false
(5)生成.pat差異補丁包,並壓縮為zip更新包

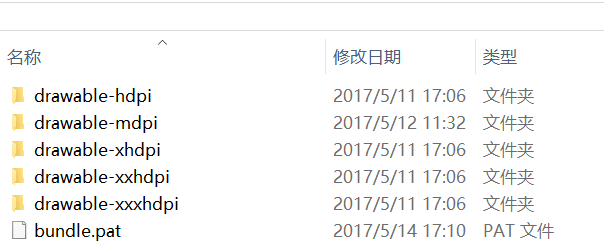
更新包沒有太大區別,依然是增量更新的圖片和pat。
小提示:因為RN會從drawable-mdpi下載入圖片,所以我們只需要將drawable-mdpi打包即可,其餘的 drawable-xx資料夾可以不放進到zip。
(6)既然是增量更新,就會分為第一次更新前與後的情況。所以需要宣告一個標識來表示當前是否為第一次下發更新包
【第一次更新前】:
1> SD卡下不存在更新包,pat補丁包需要與Asset下的index.android.bundle進行合併,生成新的bundle檔案。
2> 增量圖片直接下發到SD卡
【第一次更新後,即第一次更新後的更新操作】:
1> SD卡下存在更新包,需要將新的pat補丁包與SD卡下的上次生成的index.android.bundle進行合併,生成新的bundle檔案。
2> 增量圖片需要新增到SD卡bundle所在資料夾下的drawable-mdpi目錄。
3> 本次下發的更新包在與之前的bundle進行合併以及將圖片新增到之前drawable-mdpi後,需要刪除。
核心程式碼如下:
-
-
bundleFile = new File(FileConstant.LOCAL_FOLDER);
-
if(bundleFile != null && bundleFile.exists()) {
-
ACache.get(getApplicationContext()).put(AppConstant.FIRST_UPDATE,false);
-
} else {
-
-
ACache.get(getApplicationContext()).put(AppConstant.FIRST_UPDATE,true);
-
}
-
-
-
-
private void handleZIP() {
-
-
-
new Thread(new Runnable() {
-
@Override
-
public void run() {
-
-
boolean result = (Boolean) ACache.get(getApplicationContext()).getAsObject(AppConstant.FIRST_UPDATE);
-
if (result) {
-
-
FileUtils.decompression(FileConstant.JS_PATCH_LOCAL_FOLDER);
-
-
mergePatAndAsset();
-
} else {
-
-
FileUtils.decompression(FileConstant.FUTURE_JS_PATCH_LOCAL_FOLDER);
-
-
mergePatAndBundle();
-
}
-
-
FileUtils.deleteFile(FileConstant.JS_PATCH_LOCAL_PATH);
-
}
-
}).start();
-
}
-
-
-
-
private void mergePatAndAsset() {
-
-
-
String assetsBundle = FileUtils.getJsBundleFromAssets(getApplicationContext());
-
-
String patcheStr = FileUtils.getStringFromPat(FileConstant.JS_PATCH_LOCAL_FILE);
-
-
merge(patcheStr,assetsBundle);
-
-
FileUtils.deleteFile(FileConstant.JS_PATCH_LOCAL_FILE);
-
}
-
-
-
-
private void mergePatAndBundle() {
-
-
-
String assetsBundle = FileUtils.getJsBundleFromSDCard(FileConstant.JS_BUNDLE_LOCAL_PATH);
-
-
String patcheStr = FileUtils.getStringFromPat(FileConstant.FUTURE_PAT_PATH);
-
-
merge(patcheStr,assetsBundle);
-
-
FileUtils.copyPatchImgs(FileConstant.FUTURE_DRAWABLE_PATH,FileConstant.DRAWABLE_PATH);
-
-
FileUtils.traversalFile(FileConstant.FUTURE_JS_PATCH_LOCAL_FOLDER);
-
}
-
-
-
-
private void merge(String patcheStr, String bundle) {
-
-
-
diff_match_patch dmp = new diff_match_patch();
-
-
LinkedList<diff_match_patch.Patch> pathes = (LinkedList<diff_match_patch.Patch>) dmp.patch_fromText(patcheStr);
-
-
Object[] bundleArray = dmp.patch_apply(pathes,bundle);
-
-
try {
-
Writer writer = new FileWriter(FileConstant.JS_BUNDLE_LOCAL_PATH);
-
String newBundle = (String) bundleArray[0];
-
writer.write(newBundle);
-
writer.close();
-
} catch (IOException e) {
-
e.printStackTrace();
-
}
-
}
FileUtils工具類函式:
-
-
-
-
-
-
public static void copyPatchImgs(String srcFilePath,String destFilePath) {
-
-
File root = new File(srcFilePath);
-
File[] files;
-
if(root.exists() && root.listFiles() != null) {
-
files = root.listFiles();
-
for (File file : files) {
-
File oldFile=new File(srcFilePath+file.getName());
-
File newFile=new File(destFilePath+file.getName());
-
DataInputStream dis= null;
-
DataOutputStream dos=null;
-
try {
-
dos=new DataOutputStream(new FileOutputStream(newFile));
-
dis = new DataInputStream(new FileInputStream(oldFile));
-
} catch (FileNotFoundException e) {
-
e.printStackTrace();
-
}
-
-
int temp;
-
try {
-
while((temp=dis.read())!=-1){
-
dos.write(temp);
-
}
-
dis.close();
-
dos.close();
-
} catch (IOException e) {
-
e.printStackTrace();
-
}
-
}
-
}
-
}
-
-
-
-
-
public static void traversalFile(String filePath) {
-
File file = new File(filePath);
-
if (file.exists()) {
-
File[] files = file.listFiles();
-
for (File f : files) {
-
if(f.isDirectory()) {
-
traversalFile(f.getAbsolutePath());
-
} else {
-
f.delete();
-
}
-
}
-
file.delete();
-
}
-
}
-
-
-
-
-
public static void deleteFile(String filePath) {
-
File patFile = new File(filePath);
-
if(patFile.exists()) {
-
patFile.delete();
-
}
-
}
當客戶端下載解析後,圖片的增量更新就搞定了,這樣我們的更新包就小了很多。 缺點也很明顯,每次更新RN版本的時候,都需要修改RN的原始碼,不過這點小麻煩還是可以避免的。
其實還有另一種辦法解決增量熱更新。思路很簡單,即不載入asset目錄下的bundle檔案,最開始就把bundle放到SD卡下。讓RN載入Bundle的路徑固定為SD卡路徑。這樣每次都可以直接更新SD卡的更新包即可。不過缺點也是很明顯的,如果RN作為App的首顯示介面,這就很尷尬了。這裡只是提及,具體流程不再贅述。
六、iOS熱更新
@清風颺 私信說實現了在iOS下的熱更新,並且也是以壓縮包形式下發。唯一區別是沒有實現增量更新,大家有需要的,可以去了解一下:React-Native開發iOS篇-熱更新的程式碼實現
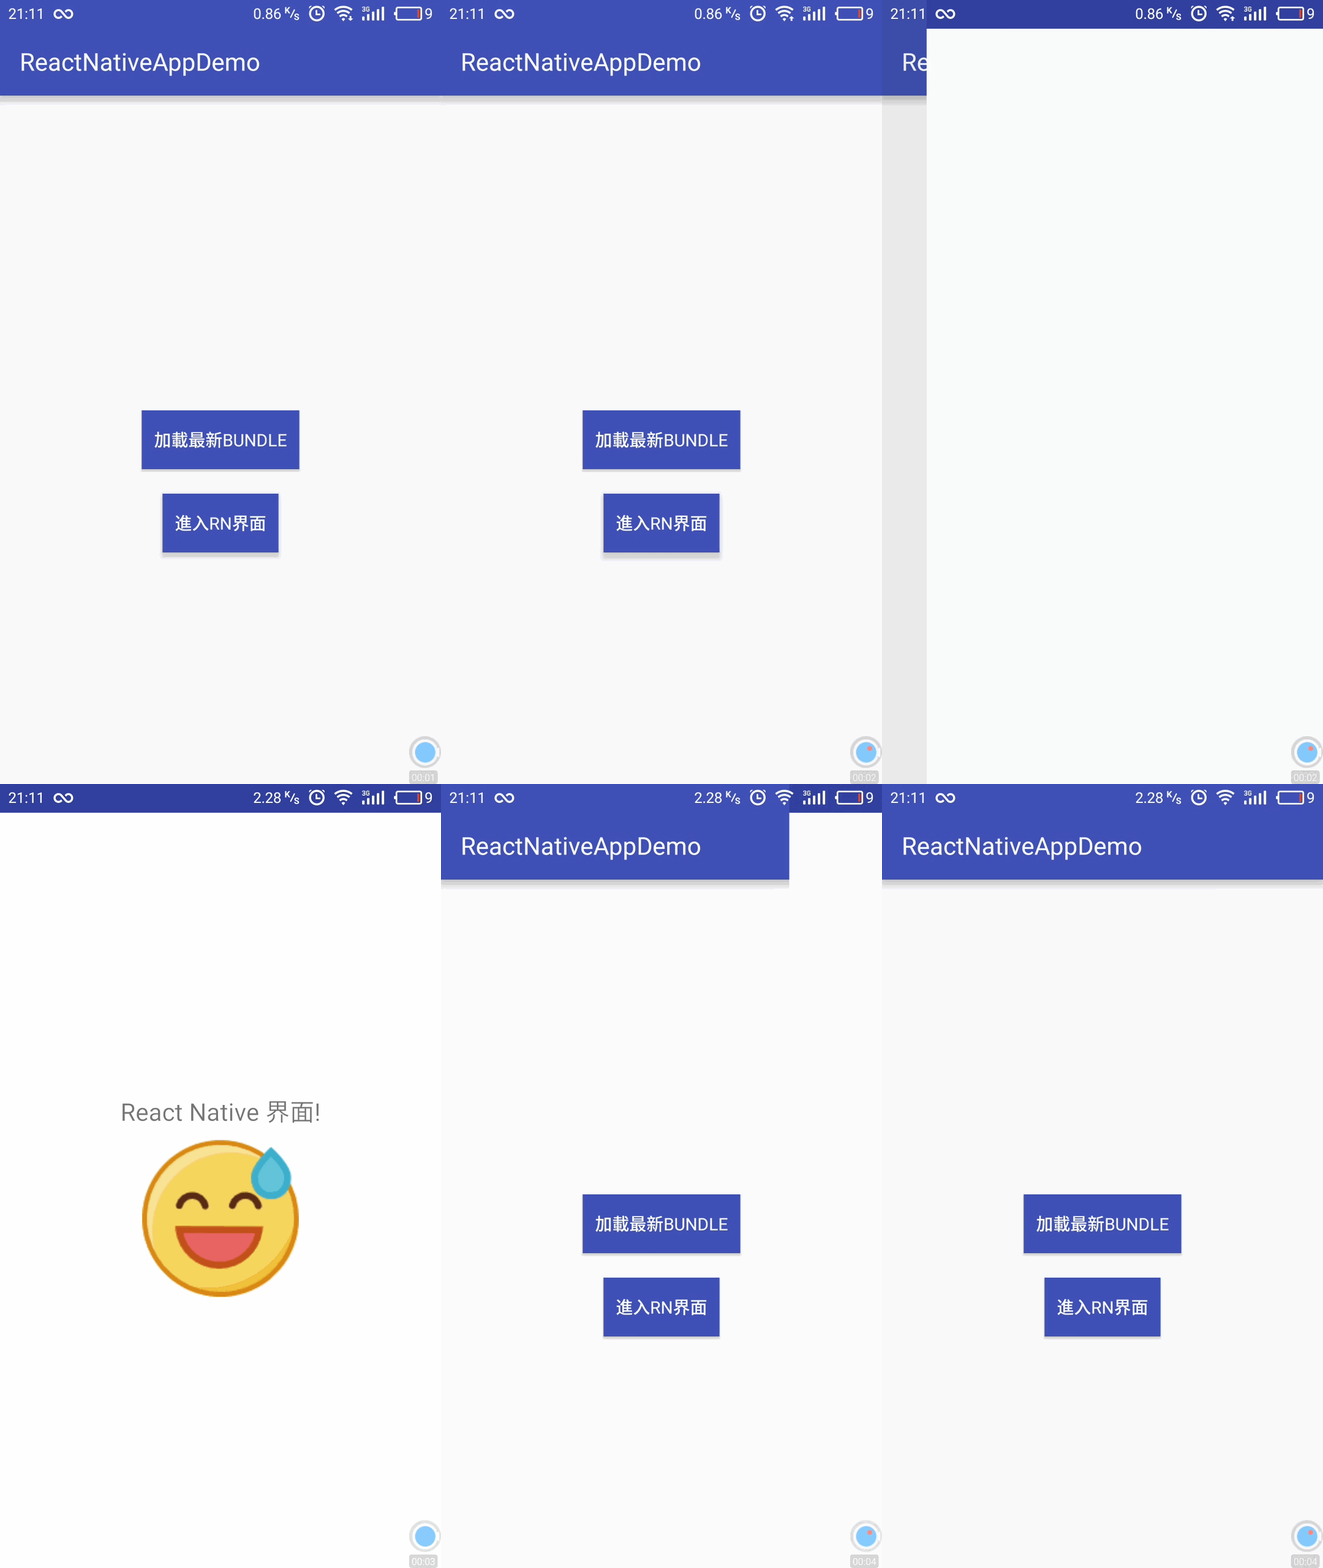
七、效果圖

以上就是使用React Native關於熱更新的內容,其實還有很多不足地方,例如對更新檔案進行加密,防止被惡意修改等等一些內容還需要不斷完善。下一篇文章繼續和大家分享關於React Native的內容,如何與原生進行互動,敬請期待~


