一、簡介
在上一篇文章 go-kratos實戰02 中,詳細介紹了用 kratos 編寫專案程式碼的步驟。這篇就在上篇基礎上,再結合 Go 資料庫操作庫 gorm 一步一步來實現一個簡單的增刪改查操作。
首先假定你已經會使用 gorm 的基本操作。
安裝 gorm:
$ go get -u gorm.io/gorm
go: downloading gorm.io/gorm v1.23.5

... ...
GORM 文件:https://gorm.io/zh_CN/docs/
Go,gorm 和 go-kratos 版本:
go v1.17.10 windows/amd64
go-kratos v2.2.1
gorm v1.23.5
二、新建 student 專案
在前面文章中,我們知道可以使用 kratos new 命令,用 kratos-layout 這個模板快速新建出一個專案。
$ kratos new student
? Creating service student, layout repo is https://github.com/go-kratos/kratos-layout.git, please wait a moment.

From https://github.com/go-kratos/kratos-layout
   cc5192f..6715fbc  main       -> origin/main
 * [new tag]         v2.3.0     -> v2.3.0
 * [new tag]         v2.2.2     -> v2.2.2

... ...
發現
kratos new命令每次建立新專案都會使用最新版 go-kratos。看上面的資訊 kratos 版本到了 v2.3.0。前面專案用的還是 v2.2.1,為了和前面專案版本保持一致,把 go.mod 裡的 kratos 改成 v2.2.1 ,然後
執行
go mod tidy命令,重新下載依賴包。
因為使用 kratos-layout 模板新建的 student 專案,為了使專案看起來乾淨點,需要修改和刪除裡面的檔案。
比如 proto 檔案:
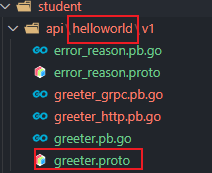
三、整理 student 專案
這時候專案裡的很多檔案,變數名等都是以 greeter 為名字的,因為這個是模板自帶的。先簡單整理下。
-
刪掉 helloworld/v1 資料夾,新建 student/v1 資料夾
-
在 internal 目錄下的 greeter.go 檔案都可以修改為 student.go ,裡面的內容後面在逐一修改,或者直接刪掉檔案後在新增 student.go 檔案。我這裡直接修改好了,它是一個參考模板。
四、編寫專案程式碼
4.1 用命令新建 student.proto
kratos proto add api/student/v1/student.proto
4.2 通過 student.proto 生成程式碼
第一步,給 student.proto 新增如下程式碼:
// 先引入 google/api/annotations.proto
import "google/api/annotations.proto";

// 在 service Student{} 增加如下程式碼:
rpc GetStudent (GetStudentRequest) returns (GetStudentReply) {
		option (google.api.http) = {
			get: "/student/{id}",
		};
}

message GetStudentRequest {
	int32 id = 1;
}

message GetStudentReply {
	string name   = 1;
	int32  status = 2;
	int32  id     = 3;
}
第二步,通過 kratos proto client 生成 pb 相關程式碼:
kratos proto client api/student/v1/student.proto
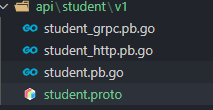
第三步,通過 student.proto 生成 Service(服務) 程式碼:
$ kratos proto server api/student/v1/student.proto -t internal/service
internal/service/student.go
修改 internal/service/service.go 裡依賴注入部分:
var ProviderSet = wire.NewSet(NewStudentService)
4.3 例項化 HTTP 和 gRPC
在 internal/server 目錄下,修改 http.go, grpc.go, server.go。
http.go:
// 上面 import 中引入的 greeter
import (
	v1 "student/api/student/v1"

    ... ...
)

// NewHTTPServer new a HTTP server.
func NewHTTPServer(c *conf.Server, student *service.StudentService, logger log.Logger) *http.Server {
    ... ...

	srv := http.NewServer(opts...)
	v1.RegisterStudentHTTPServer(srv, student)
	return srv
}
grpc.go:
import (
	v1 "student/api/student/v1"

    ... ...
)

// NewGRPCServer new a gRPC server.
func NewGRPCServer(c *conf.Server, student *service.StudentService, logger log.Logger) *grpc.Server {
	... ...

	srv := grpc.NewServer(opts...)
	v1.RegisterStudentServer(srv, student)
	return srv
}
4.4 編寫獲取學生資訊程式碼
下面編寫用學生 id 來獲取學生資訊。
第一步:在 internal/biz/student.go 裡編寫程式碼
前面第一篇文章講過 biz 目錄作用,起到業務組裝作用,定義了 biz 的 repo 介面。
如果沒有這個檔案就新建一個,student.go 中程式碼如下:
package biz

import (
	"context"
	"time"

	"github.com/go-kratos/kratos/v2/log"
)

// Student is a Student model.
type Student struct {
	ID        int32
	Name      string
	Info      string
	Status    int32
	UpdatedAt time.Time
	CreatedAt time.Time
}

// 定義 Student 的操作介面
type StudentRepo interface {
	GetStudent(context.Context, int32) (*Student, error) // 根據 id 獲取學生資訊
}

type StudentUsecase struct {
	repo StudentRepo
	log  *log.Helper
}

// 初始化 StudentUsecase
func NewStudentUsecase(repo StudentRepo, logger log.Logger) *StudentUsecase {
	return &StudentUsecase{repo: repo, log: log.NewHelper(logger)}
}

// 通過 id 獲取 student 資訊
func (uc *StudentUsecase) Get(ctx context.Context, id int32) (*Student, error) {
	uc.log.WithContext(ctx).Infof("biz.Get: %d", id)
	return uc.repo.GetStudent(ctx, id)
}
用 wire 注入程式碼,修改 internal/biz/biz.go :
var ProviderSet = wire.NewSet(NewStudentUsecase)
第二步:在 internal/data/student.go 裡編寫程式碼
前面第一篇文章已經講過 data 目錄作用,對資料持久化的操作,業務資料訪問,包含 DB、redis 等封裝,實現了 biz 的 repo interface。biz 裡定義了 repo interface。
如果沒有這個檔案就新建一個,student.go 程式碼如下:
package data

import (
	"context"

	"student/internal/biz"

	"github.com/go-kratos/kratos/v2/log"
)

type studentRepo struct {
	data *Data
	log  *log.Helper
}

// 初始化 studentRepo
func NewStudentRepo(data *Data, logger log.Logger) biz.StudentRepo {
	return &studentRepo{
		data: data,
		log:  log.NewHelper(logger),
	}
}

func (r *studentRepo) GetStudent(ctx context.Context, id int32) (*biz.Student, error) {
	var stu biz.Student
	r.data.gormDB.Where("id = ?", id).First(&stu) // 這裡使用了 gorm
        r.log.WithContext(ctx).Info("gormDB: GetStudent, id: ", id)
	return &biz.Student{
		ID:        stu.ID,
		Name:      stu.Name,
		Status:    stu.Status,
		Info:      stu.Info,
		UpdatedAt: stu.UpdatedAt,
		CreatedAt: stu.CreatedAt,
	}, nil
}
上面程式碼裡有個 r.data.gormDB, gormDB 這個東東從哪裡來?就是下面要編寫的 data/data.go,連線資料庫。
第三步:編寫 internal/data/data.go:
資料庫的封裝操作程式碼。
// 第 1 步引入 *gorm.DB
type Data struct {
	// TODO wrapped database client
	gormDB *gorm.DB
}

// 第 2 步初始化 gorm
func NewGormDB(c *conf.Data) (*gorm.DB, error) {
	dsn := c.Database.Source
	db, err := gorm.Open(mysql.Open(dsn), &gorm.Config{})
	if err != nil {
		return nil, err
	}

	sqlDB, err := db.DB()
	if err != nil {
		return nil, err
	}
	sqlDB.SetMaxIdleConns(50)
	sqlDB.SetMaxOpenConns(150)
	sqlDB.SetConnMaxLifetime(time.Second * 25)
	return db, err
}

// 第 3 步,初始化 Data
func NewData(logger log.Logger, db *gorm.DB) (*Data, func(), error) {
	cleanup := func() {
		log.NewHelper(logger).Info("closing the data resources")
	}

	return &Data{gormDB: db}, cleanup, nil
}

// 第 4 步,用 wire 注入程式碼,修改 原來的 NewSet
var ProviderSet = wire.NewSet(NewData, NewGormDB, NewStudentRepo)
生成的模板程式碼是在 NewData 裡初始化 db,這裡把 gormDB 獨立封裝,然後用 wire 注入。
第四步,編寫 internal/service/student.go 程式碼
上面通過 student.proto 檔案生成了一份 service/student.go 程式碼模板,具體程式碼還沒有編寫,下面就來編寫 service 程式碼。
// 引入 biz.StudentUsecase
type StudentService struct {
	pb.UnimplementedStudentServer

	student *biz.StudentUsecase
	log     *log.Helper
}
// 初始化
func NewStudentService(stu *biz.StudentUsecase, logger log.Logger) *StudentService {
	return &StudentService{
		student: stu,
		log:     log.NewHelper(logger),
	}
}
// 獲取學生資訊
func (s *StudentService) GetStudent(ctx context.Context, req *pb.GetStudentRequest) (*pb.GetStudentReply, error) {
	stu, err := s.student.Get(ctx, req.Id)

	if err != nil {
		return nil, err
	}
	return &pb.GetStudentReply{
		Id:     stu.ID,
		Status: stu.Status,
		Name:   stu.Name,
	}, nil
}
4.5 修改配置檔案
配置檔案 student/configs/config.yaml。
修改 mysql 配置項 source,這裡 source 要修改成 gorm 的 dsn 資料格式,driver 不變,
// https://gorm.io/zh_CN/docs/connecting_to_the_database.html#MySQL
dsn := "user:pass@tcp(127.0.0.1:3306)/dbname?charset=utf8mb4&parseTime=True&loc=Local
data:
  database:
    driver: mysql
    source: root:root@tcp(127.0.0.1:3306)/test?charset=utf8mb4&parseTime=True&loc=Local
我使用的資料庫名就是 test,所以就不用修改資料庫名。
把 server.http.addr 埠修改為 8000 -> 8080。
如果修改了 conf.proto,請使用
make config命令重新生成 conf.pb.go 檔案。我這裡沒有修改,就不需要重新生成。
4.6 重新生成 wire_gen.go 檔案
進入到 cmd/student 目錄,然後用 wire 命令重新生成 wire_gen.go,
$ cd ./cmd/student
$ wire
wire: student/cmd/student: wrote D:\mygo\go-kratos-demos\student\cmd\student\wire_gen.go
五、資料庫
在 mysql 裡建立一個名為 test 的資料庫,然後執行下面的 sql,建立資料表 students :
DROP TABLE IF EXISTS `students`;
CREATE TABLE `students` (
  `id` int(11) NOT NULL AUTO_INCREMENT,
  `name` varchar(255) CHARACTER SET latin1 DEFAULT NULL,
  `info` varchar(255) CHARACTER SET latin1 DEFAULT NULL,
  `updated_at` datetime DEFAULT NULL,
  `created_at` datetime DEFAULT NULL,
  `status` varchar(255) CHARACTER SET latin1 DEFAULT NULL,
  PRIMARY KEY (`id`)
) ENGINE=InnoDB AUTO_INCREMENT=7 DEFAULT CHARSET=utf8mb4;

-- ----------------------------
-- Records of students
-- ----------------------------
INSERT INTO `students` VALUES ('1', 'tom', 'a top student', '2022-06-02 15:28:55', '2022-06-02 15:27:01', '1');
INSERT INTO `students` VALUES ('3', 'jimmy', 'a good student', null, null, '0');
INSERT INTO `students` VALUES ('4', 'you', 'fea tea', null, null, '1');
INSERT INTO `students` VALUES ('6', 'ju', '', null, null, '1');
六、執行專案
在 cmd/student 目錄, 執行命令 kratos run
$ kratos run
INFO msg=config loaded: config.yaml format: yaml
INFO msg=[gRPC] server listening on: [::]:9000
INFO msg=[HTTP] server listening on: 127.0.0.1:8080
使用 curlie - https://github.com/rs/curlie 測試:
$ curlie  http://127.0.0.1:8080/student/1
HTTP/1.1 200 OK
{
    "name": "tom",
    "status": 1,
    "id": 1
}
Content-Type: application/json
Date: Thu, 02 Jun 2022 08:04:49 GMT
Content-Length: 32
測試返回成功。
好了,獲取學生資訊的程式碼就編寫完了。
其餘部分,比如增加、修改等,自己可以試著寫一寫,熟能生巧嘛。
七、專案程式碼地址
go-kratos student 專案原始碼地址:
上面所有程式碼以 github 上的程式碼為準。
八、參考
- https://go-kratos.dev/docs/getting-started/start kratos 新建模板專案
- https://go-kratos.dev/docs/getting-started/usage kratos cli 工具
- https://gorm.io/zh_CN/docs/connecting_to_the_database.html#MySQL gorm mysql資料庫連線
- https://gorm.io/zh_CN/docs/query.html gorm 查詢
- https://www.cnblogs.com/jiujuan/p/12676195.html gorm 基本操作
- https://github.com/rs/curlie curlie http 請求